OpenPLEXOS - Customize your PLEXOS
Contents
1. Introduction
1.1. What is OpenPLEXOS
OpenPLEXOS refers to a scheme where you can add custom .NET assemblies (libraries) into an input database, and have the PLEXOS engine execute functions inside those assemblies at runtime. By this means you can customize many of the algorithms in PLEXOS, as well as add new algorithms and custom reporting systems.
1.2. How OpenPLEXOS interacts with your custom assemblies
There are essentially three ways that OpenPLEXOS can interact with custom assemblies, and therefore into the core of PLEXOS:
- Some configuration properties have 'custom' option, which causes the engine to look for a custom function to execute, e.g. 'Region [Price]' or 'Region [Uplift]'.
- The PLEXOS engine regularly calls all registered assemblies during each step of the simulation. By writing custom code for these defined calling points, you can implement customizations to both the simulation and reporting.
- The PLEXOS installation includes complete source for the default EEOpenPLEXOS.dll assembly. You can, if desired, modify this code directly to alter the behaviour of default algorithms.
1.2.1. Setting with a 'Custom' option
The 'Load Settlement Model' property, which sets the 'Region Price', has a special option that when activated, causes PLEXOS to call the function 'MyRegion.Price()' in the registered OpenPLEXOS assemblies. This allows to intercept the price calculation and customize the pricing.
In brief, after the appropriate function is implemented (e.g. MyRegion.Price()), in the custom assembly, the OpenPLEXOS will call the function and run the code (this is further explained in section 4.2).
1.2.2. Calls made during each simulation step
The following calls are made during the course of each simulation phase and step of that phase:
- MyModel.BeginInitialize(): Called before 'in-built objects' have been initialized. Note that this call is only made once per simulation phase.
- MyModel.AfterInitialize(): Called after all 'in-built objects' have been initialized. The mathematical program exists, but is not fully populated with data. At this instance a customized variable and/or constraint object/s can be added to the mathematical program. Note that this call is only made once per simulation phase.
- MyModel.AfterProperties(): Called after the mathematical program is fully populated with data. This call is made at least once per simulation step. At this instance the mathematical program's coefficients can be modified and/or the custom variable/constraint data can be populated.
- MyModel.BeforeOptimize(): Called just before the solver is called. This is called at least once per step. At this instance the solver settings will be overridden.
- MyModel.AfterOptimize(): Called just after the solver has finished. This is called at least once per step.
- MyModel.BeforeRecordSolution(): Called just before PLEXOS writes solution data. This is the time to implement your own algorithms, which may involve calls to rerun the optimization, e.g. this where generator bidding and uplift are done.
- MyModel.AfterRecordSolution(): Called once per simulation step, just after the solution has been written. At this instance algorithms like the Region Supply Report can be performed, that involve customizations which will not affect reported data, but perhaps write their own reports.
- MyModel.TerminatePhase(): Called at the end of each phase. This has been included to allow a user to clean up/reset any shared variables at the end of each phase.
- MyModel.OnWarning(): Called when any model error or warning is raised, passing the error string to the function body. This function can be disabled due to the overhead involved in invoking functions, by returning "False". Once disabled, the function is not invoked throughout the model run for this specific custom assembly.
- MyModel.EnforceMyConstraints(): Called during the transmission convergence, where additional constraints could possibly be added. If a non-zero value is returned, PLEXOS resolves and continues its convergence.
Using the above functions in custom assembly, the call to functions can be intercepted and the customized algorithms can be implemented.
1.2.3. Built-in algorithms
Complete source is provided for the following algorithms:
- Cost Recovery
- Region Marginal Unit Report
- Bertrand Bidding
- LRMC Bidding
- Region Supply Report
The source code for the following fully customizable algorithms is also provided (Built-in algorithms that can be customized):
- Uplift
- Price
An example of customizing the uplift algorithm will be presented later on in this document.
1.2.4. Solution Data API
The solution API allows users to modify the solution database at runtime, allowing the changes to be reflected in all aspects of solution reporting (e.g. Solution file, text file outputs, etc.). This is a powerful feature that exposes the following functions:
- AddObject(nClassId As ClassEnum, strObjectName As String, Optional strCategory As String = ""): Adds an object of a specific class to the solution database and returns the System membership ID.
- AddMembership(nCollection As CollectionEnum, strParent As String, strChild As String): Adds a membership between objects and returns the membership ID. For example the user may want to create a solution membership between a new constraint that was added and an existing line. This of course is used purely for reporting purposes, e.g. you can the directly query the line data from the constraint.
- AddReportingProperty(nCollectionId As CollectionEnum, strPropertyName As String, strUnit As String, Optional strCategory As String = "-", Optional strSummaryName As String = Nothing, Optional strSummaryUnit As String = Nothing, Optional bClearFunctions As Boolean = False): Adds a custom reporting property to the solution database and returns the new reporting property's enum ID.
- AddReportingUnit(strUnit As String): Defines a new unit type for reporting.
- GetMembership(nCollection As CollectionEnum, strParentName As String, strChildName As String): Returns the membership ID of the objects stored in the solution database.
- Register_CalculateIntervalData(nCollectionId As CollectionEnum, nMembershipId As Integer, nReportPropertyEnum As Integer, oFunction As CustomIntervalFunction, Optional bReportSamples As Boolean = False, Optional bReportStatistics As Boolean = False, Optional bWriteFlatFiles As Boolean = False, Optional nReportPhase As Integer() = Nothing): For any added objects/memberships you can register a custom interval calculation function. For example you may wish to register a new dummy node object, with the purpose of outputting a custom price. Therefore a Price interval calculation can be registered and any objects, accessible through OpenPLEXOS, can be used to calculate this custom price. Of course the custom code could query external data if required.
- Register_CalculateSummaryData(nCollectionId As CollectionEnum, nMembershipId As Integer, nReportPropertyEnum As Integer, oFunction As CustomIntervalFunction, nSummaryType As SummaryTypeEnum, Optional bReportSamples As Boolean = False, Optional bReportStatistics As Boolean = False, Optional bWriteFlatFiles As Boolean = False, Optional nReportPhase As Integer() = Nothing): For any added objects/memberships you can register a custom summary calculation function. Please see the "Register_CalculateIntervalData" function for more details.
These methods can all be accessed through the "solution file wrapper" class: G_oMODEL.SolutionFile
A basic and simple example can be seen here:
Imports EEPHASE
Imports EEUTILITY
Imports EEUTILITY.Enums
Imports EESolutionWrapper

Public Class MyModel
  Implements EEPHASE.IOpenModel

  Private Shared m_bObjectsCreated As Boolean = False
  Private Shared nMembership As Integer
  Private Shared nMyReportingPropertyEnum As Integer
  Private Shared strMyObjectName = "MyCustomGenerator"
  Private Shared strMyReportProperty = "MyReportingProperty"
  Private Shared strMySummaryReportProperty = "MySummaryReportingProperty"
  Private Shared strNewUnit = "MyUnits"
  Private Shared strNewSummaryUnit = "MySummaryUnits"
  Private Shared nReportPhases As Integer() = New Integer(3) {SimulationPhaseEnum.LTPlan, SimulationPhaseEnum.PASA,
                                                              SimulationPhaseEnum.MTSchedule, SimulationPhaseEnum.STSchedule}

  Public Sub BeginInitialize() Implements IOpenModel.BeginInitialize
  End Sub

  Public Sub AfterInitialize() Implements IOpenModel.AfterInitialize

      If (m_bObjectsCreated = False) Then
          m_bObjectsCreated = True

          G_oMODEL.SolutionFile.AddReportingUnit(strNewUnit)
          G_oMODEL.SolutionFile.AddReportingUnit(strNewSummaryUnit)

          ' Add a Generator object to the solution dataset
          nMembership = G_oMODEL.SolutionFile.AddObject(ClassEnum.Generator, strMyObjectName)

          ' Add a Reporting Property to the solution dataset
          nMyReportingPropertyEnum = G_oMODEL.SolutionFile.AddReportingProperty(CollectionEnum.SystemGenerators, strMyReportProperty,
                                        strNewUnit, strSummaryName:=strMySummaryReportProperty, strSummaryUnit:=strNewSummaryUnit)

      End If

      ' Register a calculation function for MyReportProperty
      G_oMODEL.SolutionFile.Register_CalculateIntervalData(CollectionEnum.SystemGenerators,
                                   nMembership,
                                   nMyReportingPropertyEnum,
                                   AddressOf MyCustomCalculation,
                                   bWriteFlatFiles:=True,
                                   nReportPhase:=nReportPhases,
                                   bReportSamples:=True,
                                   bReportStatistics:=True)

      G_oMODEL.SolutionFile.Register_CalculateSummaryData(CollectionEnum.SystemGenerators,
                                  nMembership,
                                  nMyReportingPropertyEnum,
                                  AddressOf MyCustomCalculation,
                                  SummaryTypeEnum.Sum,
                                  bWriteFlatFiles:=True,
                                  nReportPhase:=nReportPhases)
  End Sub

  Public Sub AfterOptimize() Implements IOpenModel.AfterOptimize
  End Sub

  Public Sub AfterProperties() Implements IOpenModel.AfterProperties
  End Sub

  Public Sub AfterRecordSolution() Implements IOpenModel.AfterRecordSolution
  End Sub

  Public Sub BeforeOptimize() Implements IOpenModel.BeforeOptimize
  End Sub

  Public Sub BeforeProperties() Implements IOpenModel.BeforeProperties
  End Sub

  Public Sub BeforeRecordSolution() Implements IOpenModel.BeforeRecordSolution
  End Sub

  Public Sub TerminatePhase() Implements IOpenModel.TerminatePhase
  End Sub

  Public Function EnforceMyConstraints() As Integer Implements IOpenModel.EnforceMyConstraints
  End Function

  Public Function OnWarning(Message As String) As Boolean Implements IOpenModel.OnWarning
  End Function

  Public Function MyCustomCalculation() As Double()
      Dim oRand As New Random
      Return (Enumerable.Repeat(0, Archive.StepPeriodCount)).Select(Function(o) oRand.NextDouble).ToArray
  End Function

End Class
2. Customizing PLEXOS
2.1. Creating a .NET assembly
Steps in brief:
- Open Visual Studio
- Create a new Project (File->New Project)
- Select "Class Library" and name the project (this will become the default namespace). In the example used here, the project is named "HelloOpenPLEXOS"). See Figure 1.
- Click "OK".
- Finally add the required PLEXOS references to the project (right click on the project name -> Add -> Reference... (See Figure 2)):
- AMMO.dll,
- EECOMPILER.dll,
- EEPHASE.dll,
- EESolutionWrapper.dll,
- EESolver.dll,
- EEUTILITY.dll,
Note: The above .dll files are located in the PLEXOS installation directory. After adding the .dll to the references, those will be displayed under project "Reference" list (See Figure 3: References list).
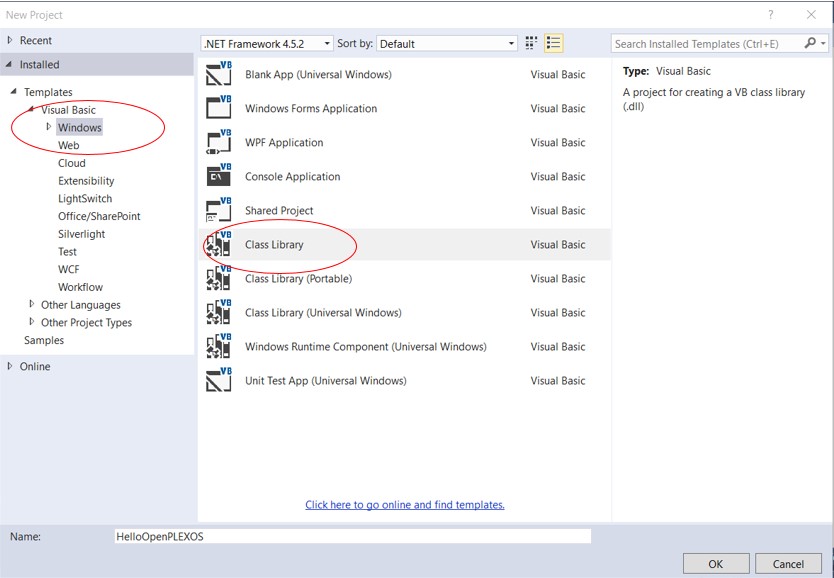 Figure 1: Creating a new project
 Figure 2: Adding references
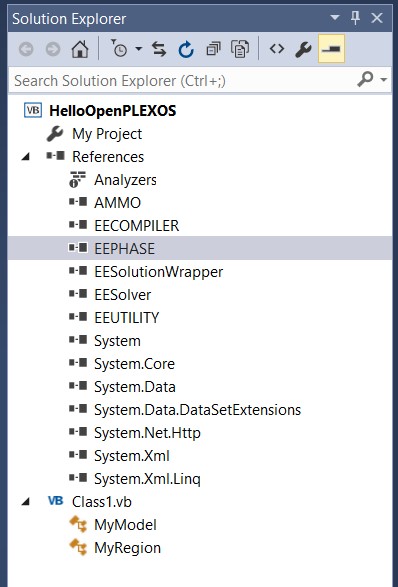 Figure 3: References list
2.2. Create your own OpenPLEXOS Assemblies
- Create a new .NET Class Library project, as described in 2.1
- Delete the default class, if one has been created (usually called Class1)
- Create the required classes MyModel and MyRegion
- Write "Implements EEPHASE.IOpenModel" in the MyModel class, and all available functions in that interface are automatically created. Note:
Class MyModel must implement the interface EEPHASE.IOpenModel;
Class MyRegion must implement the interface EEPHASE.IOpenRegion;
This will create the "template" of the classes with appropriate function stubs. (See Figure 4) - Compile the project to produce a DLL file e.g. HelloOpenPLEXOS.dll (explain in 2.3).
- Finally, register the assembly (DLL file) with PLEXOS (explain in 2.4).
Customizations of these built-in functions can be created by copying the supplied source code into the personalized project, making the required custom changes and overwriting the default OpenPLEXOS assembly.
MyRegion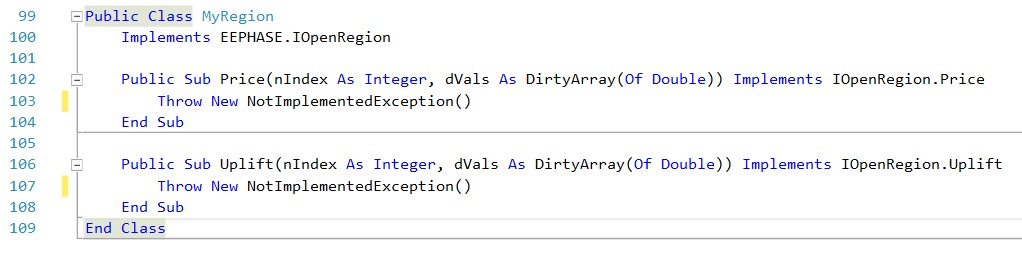 Figure 4: An empty implementation of MyRegion
2.3. Compile your project to produce a DLL file
In the properties window, the "Assembly name" field, shows the name of assembly that will be build later. The default name is the same as the project name created (In this example, it isHelloOpenPLEXOS) (See Figure 5: Properties window). Note, that the project name can be personalized. Click Build ->Build HelloOpenPLEXOS (See Figure 6: Build window).
Build a HelloOpenPLEXOS.dll file and it will be stored in Visual Basic project folder:
...\HelloOpenPLEXOS\HelloOpenPLEXOS\bin\Debug\HelloOpenPLEXOS.dll
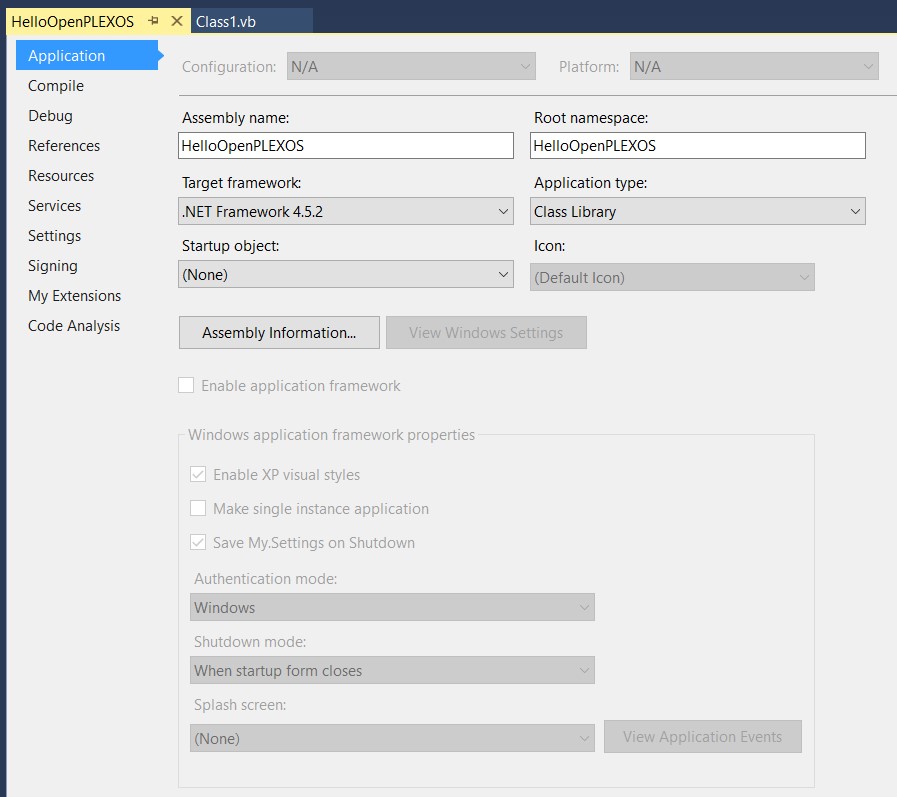 Figure 5: Properties window
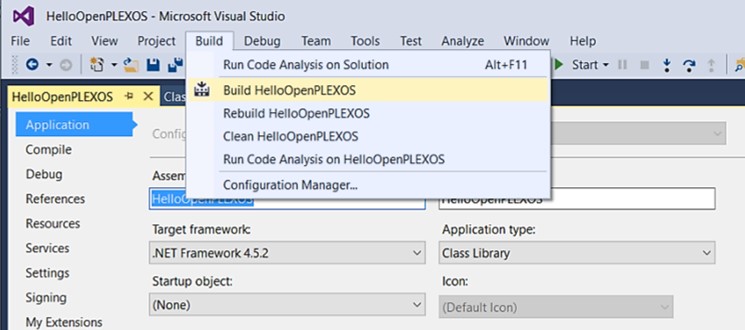 Figure 6: Build window
NOTE: When the assembly file has been coded, it can be stored in any directory.
2.4. Registering your assemblies with PLEXOS
After the assembly is created, it needs to be registered with PLEXOS. Assembly registration is done per database, i.e. the assemblies need to be registered for every database, in which the OpenPLEXOS runs the custom functions. In this case, we use a simple model named Ex1_Base as an example. Launch the PLEXOS 7 interface and use the "File" -> "Open" to open the model Ex1_Base
- Select the "Settings" menu option (See Figure 7);
- Click the "Assemblies Tab" (See Figure 8);
- The order of which assemblies are run depends on their orders in the table;
- Fill in the filename and path to the assembly (See Figure 9), then click "OK" to close the Settings window.
- Execute Ex1_Base, if the custom DLL file appears (See Figure 10), that means that the custom DLL file got registered successfully. In Figure 10, the first DLL file EEOpenPLEXOS.dll is the built-in DLL file. The second DLL file highlighted with red line is the custom DLL file.
Figure 10, shows that the Ex1_Base model cannot find the custom DLL file. In such instance the DLL file path which was entered in Settings -> Assemblies, has to be checked (as shown in Figure 9).
Figure 12 depicts that the custom DLL file was registered successfully but the DLL file has exceptions. Check if the Throw New NotImplementedException() in each Sub and Function has been commanded.
The namespace inside the assembly is in which OpenPLEXOS will find the required classes (e.g. MyModel, MyRegion). Note that, by default the namespace of a .NET project is same as the DLL name, but this can be changed via Project settings, or by explicitly defining a namespace in the source file.
 Figure 7: Settings
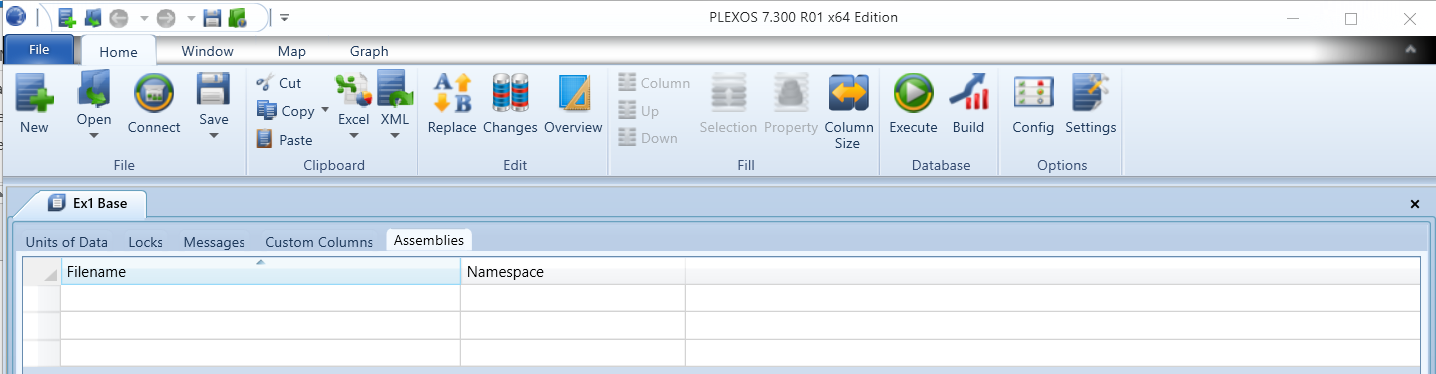 Figure 8: Empty assemblies
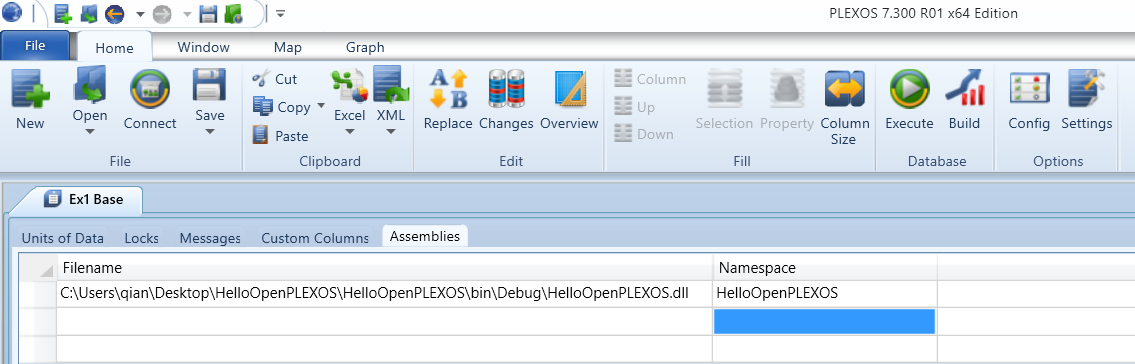 Figure 9: Register assembly with full path
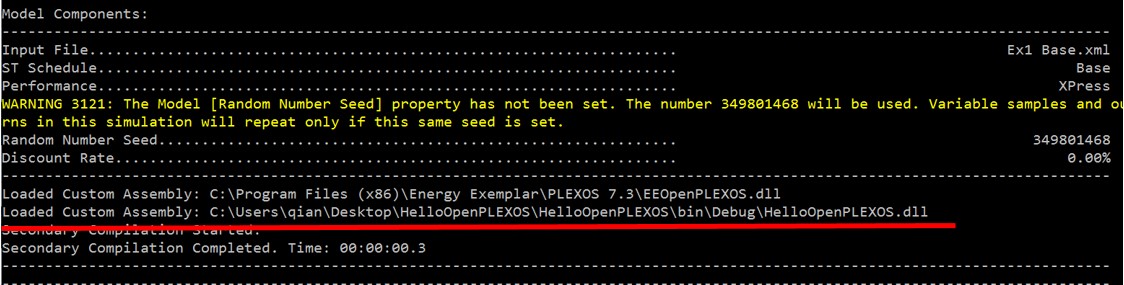 Figure 10: Registering custom DLL file successfully
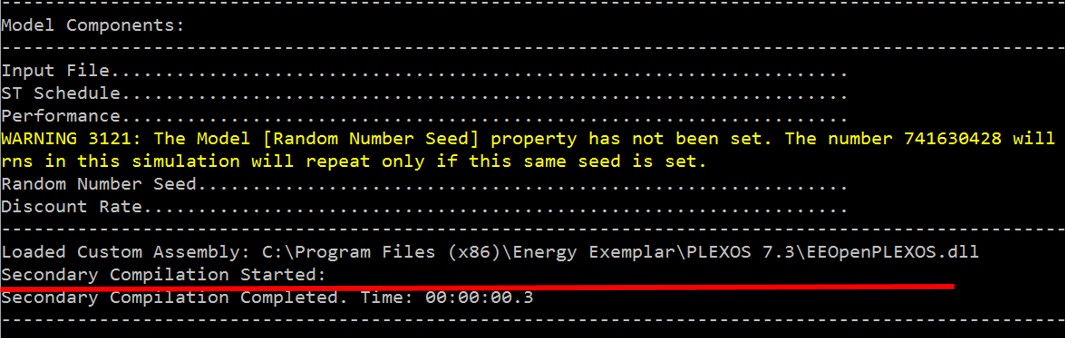 Figure 11: Cannot find custom DLL file
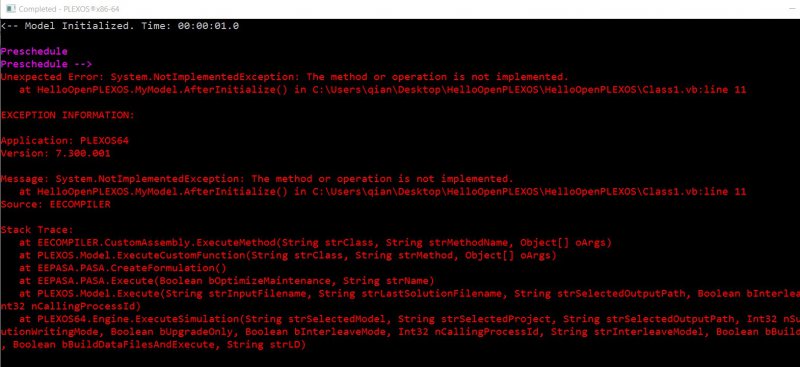 Figure 12: DLL file with Exceptions
During the execution of PLEXOS you will notice that the shipped OpenPLEXOS assembly is loaded at run-time and is reported at the beginning of the onscreen log. PLEXOS will also list any user defined assemblies that the model uses as shown in Figure 10.
Note: Multiple assemblies can be referenced. PLEXOS will call the function from each assembly in the order that they have been added to the Assemblies settings dialog.
Those are the steps required to hook the custom model functions into PLEXOS, however if the intention id to write a custom code for the uplift or pricing algorithms, then it has to be setup explicitly in the model. The "Uplift compatibility" and the "Load Settlement Model" of the "Region" object, need to be set to "Custom". As screenshot was given below.
- -> Config (See Figure 13);
- In Config window, -> Transmission -> Region -> Settings -> Load Settlement Model & Uplift Compatibility & Uplift Enable (See Figure 14, 15) -> click 'OK';
- After enabling those properties in 'config' window, they will show up in the property tree of the application (See Figure 16, 17).
- From the property grid, select the option to be 'Yes' for 'Uplift Enabled' (See Figure 17)
- From the property grid, select the value to be Custom for Uplift Compatibility (See Figure 18)
- From the property grid, select the value to be Custom for Load Settlement Model
- Click the Save icon on the ribbon menu to save the changes.
Load Settlement Modelin property grid shows 8 options, such as Nodal, Uniform, None etc. PLEXOS will not execute MyRegion.Price() Sub in the custom DLL file until the property of Load Settlement Model is set as Custom. When theUplift Enabled is set to Yes and Uplift compatibility to Custom, PLEXOS will execute MyRegion.Uplift() in the custom DLL file. If the Uplift Enabled is set to Yes, Uplift compatibility to CBP or SEM, PLEXOS still will execute MyRegion.Uplift() the custom DLL file and use the result to overwrite the previous uplift. However, if Uplift Enabled is set to No, regardless of the property Uplift Compatibility has, PLEXOS will not execute the custom DLL file.
 Figure 13: Config_1
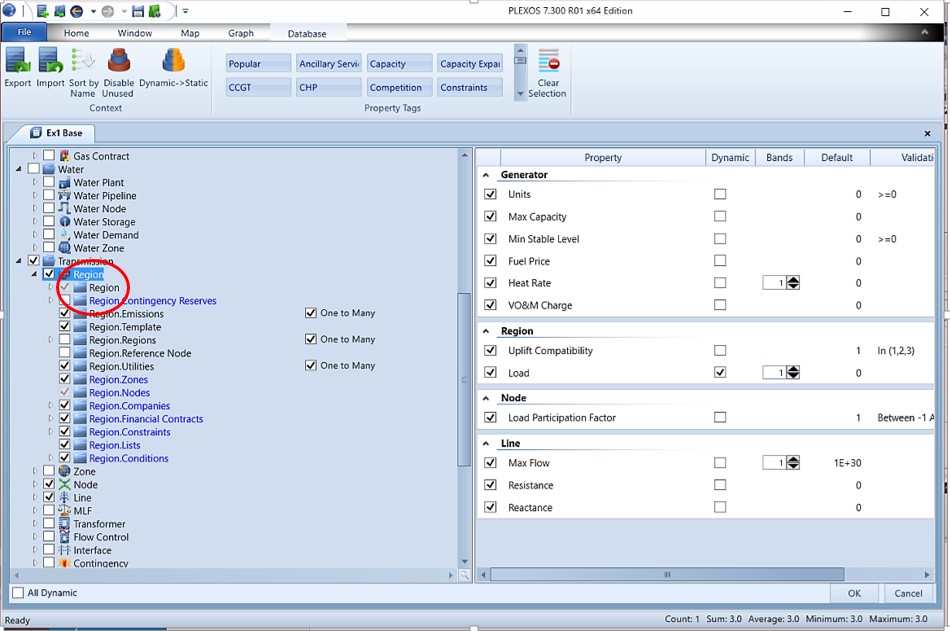 Figure 14: Config_2
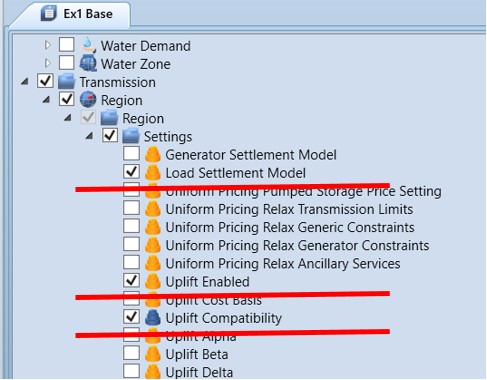 Figure 15: Config_3
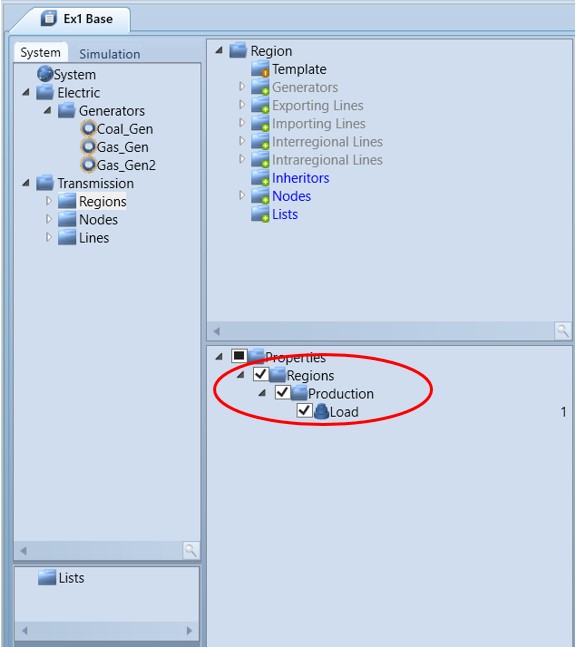 Figure 16: Properties tree
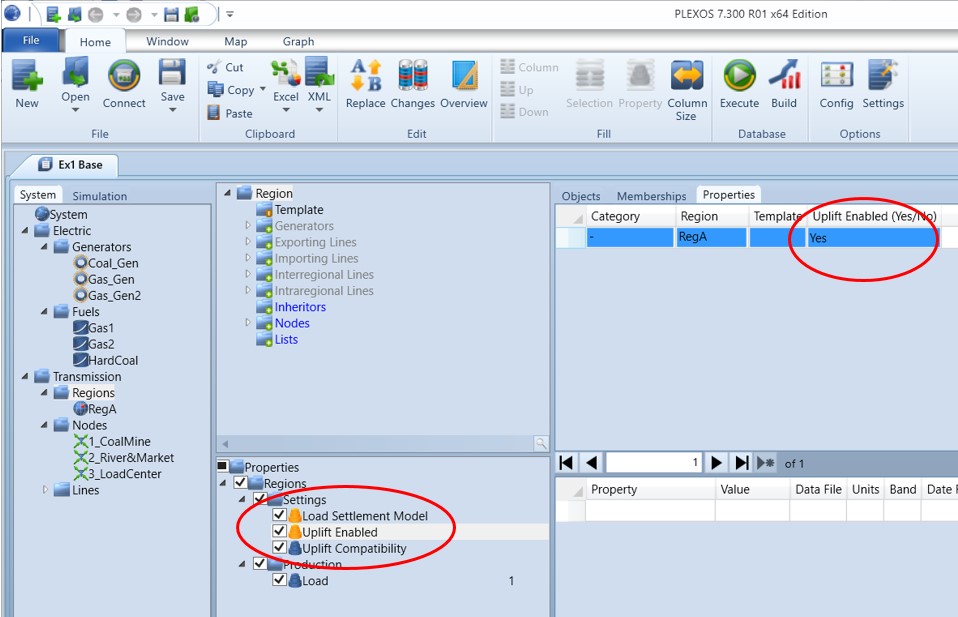 Figure 17: Property_Uplift Enabled
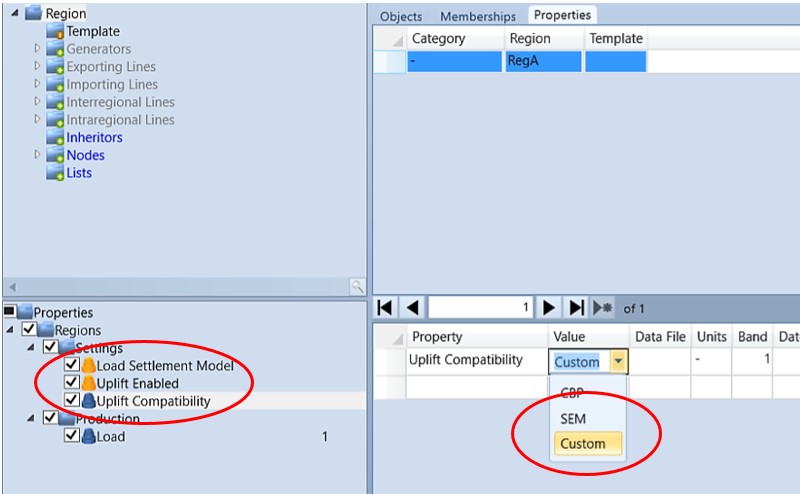 Figure 18: Property_Uplift Compatibility
3. Debugging your OpenPLEXOS Assemblies
Like writing all applications/programs, it will inevitably require debugging during the development process. There are two ways to debug. The first method is to register the custom assembly to PLEXOS and execute the model in PLEXOS by clicking the "Execute" button from PLEXOS interface; the second method is to register the assembly to PLEXOS model and execute by running the assembly in VB IDE. The second method of debugging is described in this section.
- If Visual Studio IDE has more than one projects, make sure, the project (the custom assembly project) that is to be executed is set as the "start up project". To make a project to be a startup project, right click the project and choose "Set as Startup Project" menu item (See Figure 19).
- Right click the project again and select -> Properties -> Debug
- Select the "Start external program" and select the location of the PLEXOS32.exe (or PLEXOS64.exe) file, which is located in PLEXOS install directory (See Figure 20).
- Run the project, also make sure to choose the model that needs to be run (See Figure 21).
- Finally, the "Start Debugging" option can be selected from the main menu of Visual Studio. Any normal debugging operation can now take place, for example set break points add variables to your watch windows (See 3.1.1) etc.
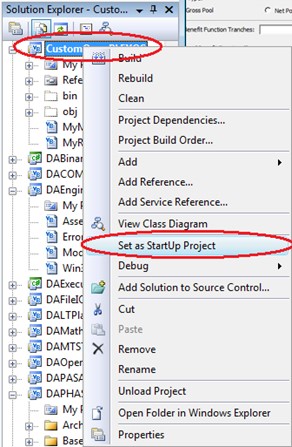 Figure 19: Set StartUp Project
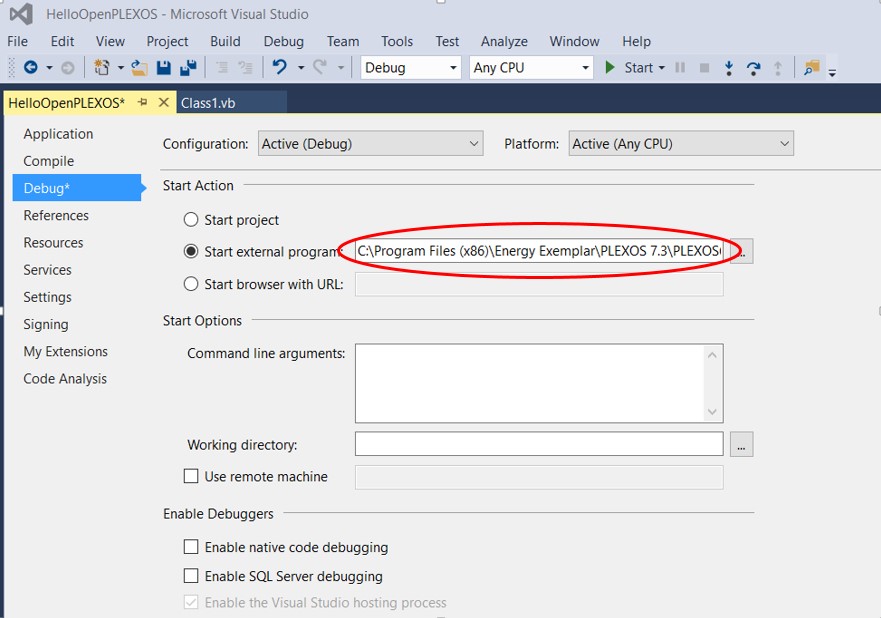 Figure 20: Debug options for the Custom Assembly
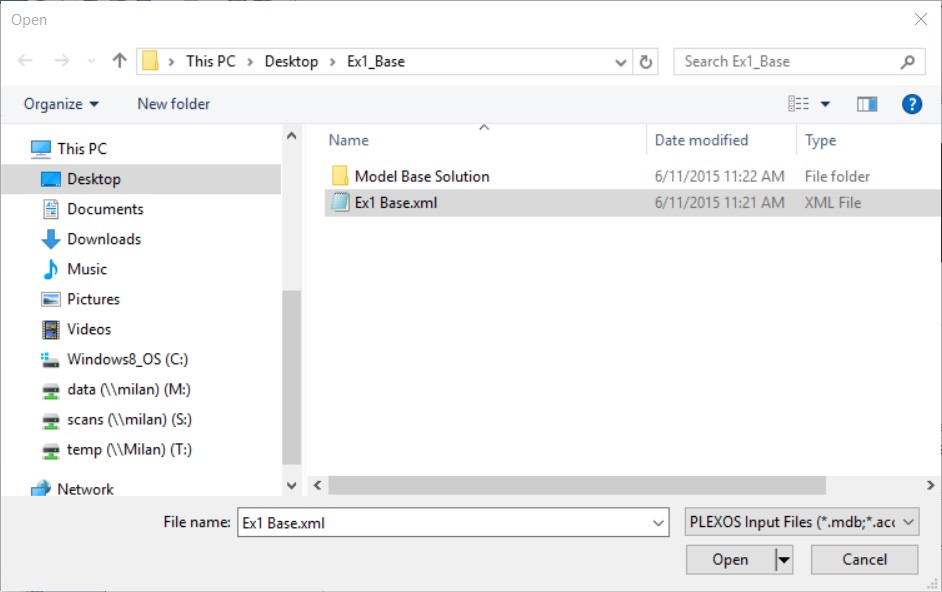 Figure 21: Ex1_Base model
3.1. PLEXOS Object Model
The PLEXOS object model consists of collection of objects that are of a certain class, for example all generators will be grouped into the generator collection, and each generator is of the Generator class.
3.1.1. System Memberships and Collections
These next few sections of this document will briefly describe how to access various properties of system memberships, such as SystemGenerators, and non-system collections, such as GeneratorFuels, within the model.
A PLEXOS model internally creates a collection for most of the classes mentioned in (not all are directly required in the model itself, for example the Power station is only required in the compilation of the data) and these are accessible in all functions available in OpenPLEXOS.
A few examples of some of the collections available are:
- GeneratorsIN: The collection of regions defined in the system. It was G_generatorsIN in 7.2 version.
- NodesIN: The collection of nodes defined in the system.
- LinesIN: The collection of lines defined in the system.
These collections are essentially arrays of PLEXOS objects, so accessing the properties, for example, of the first generator in the system is as easy as doing: open the watch window (See Figure 22 to know how to get it) while the project is executed and still in run, if you type Generatorsln(1) in the watch window (Figure 23) and then extend it, you can see all its properties (Figure 24).
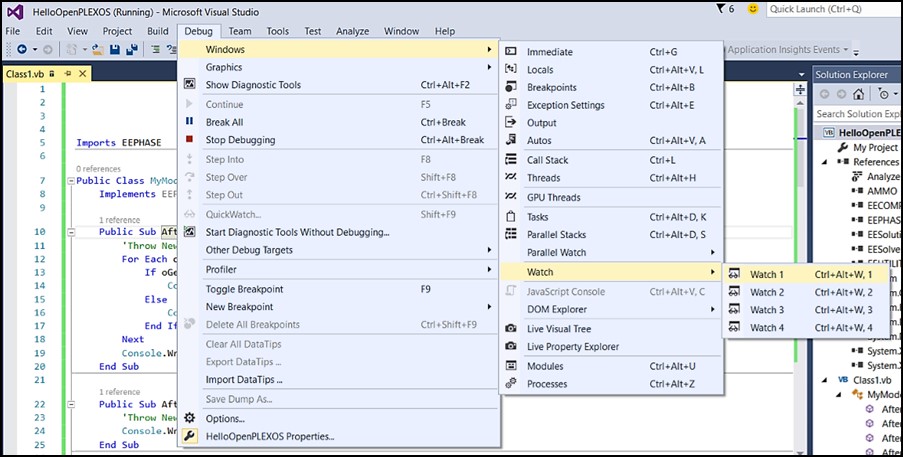 Figure 22: Open watch window
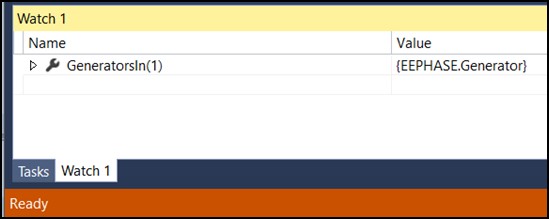 Figure 23: GeneratorsIn(1) in watch window
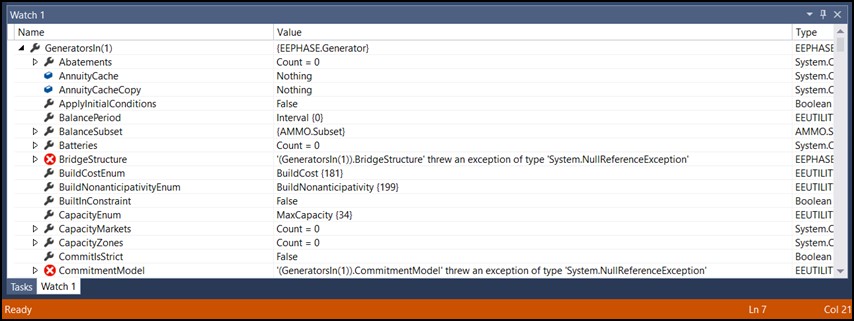 Figure 24: GeneratorsIn(1)'s properties
The information given is a list of methods, properties or functions, which are available for the generator objects. However the name of the generator accessed would not be known. When using a specific generator, it needs to be located, therefore the very simple example below shows how to iterate through all generators, printing out the name and SRMC of each, and finally when it finds the generator called "Coal_Gen" it writes out the SRMC and Generation of it (for the first period only).
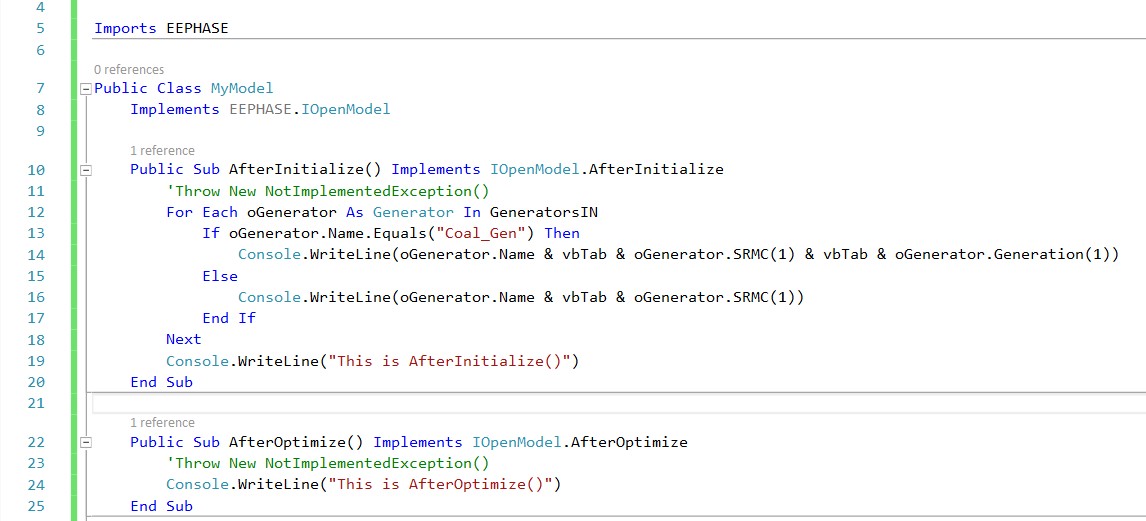 Figure 25: Iterating through all generators
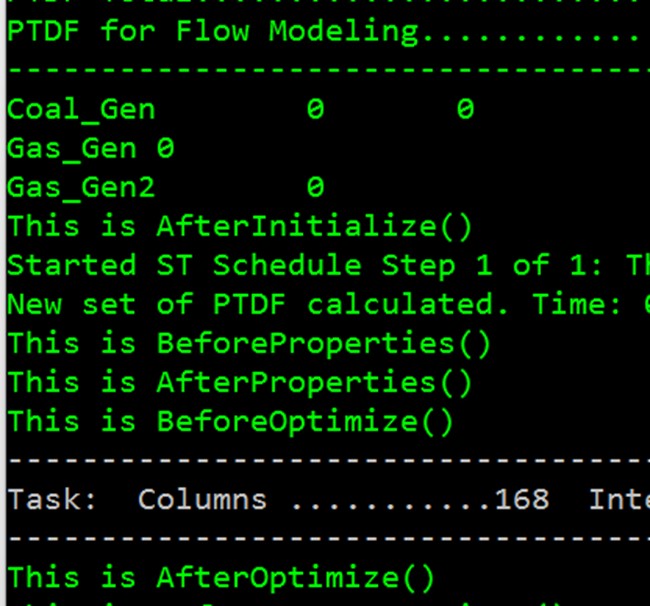 Figure 26: Results of generators
Figure 26 shows the results of all generators in the model Ex1_Base. The block of code is not necessarily in the AfterInitialize() sub, it can be used at any point. For the built-in subroutines both in MyModel and MyRegion classes, the code can be written to display such as "This is AfterInitialize()" to see the order of execution of each sub as shown in Figure 27.
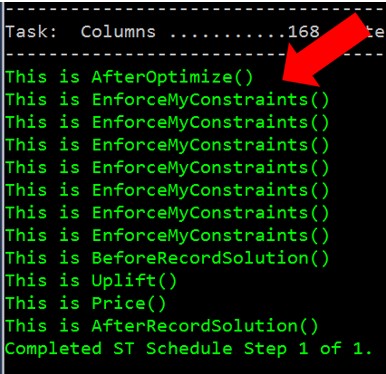 Figure 27: Simple test
Essentially all collections can be iterated in this manner. However this is an iteration through all of the objects in the system collection. The user may actually want to iterate through all fuels that have a membership with a particular generator. These memberships are known as non-system membership (i.e. the parent object is not "System") and is explained in the next section.
All objects can be referenced by their names, as shown below. However, this is not as efficient as using a numeric index.
GeneratorsIn("Coal_Gen")
3.1.2. Non-System Memberships and Collections
Non-system memberships are exactly what the name suggests. They are memberships where the parent object is not of a system type. Some of the Typical examples of non-system memberships are:
- GeneratorNodes
- GeneratorCompanies
- GeneratorFuels
The process of iterating through the objects involved in the membership is very similar to that of the system collection iteration example. For example the following block of codes lists all generator fuel memberships in the system.
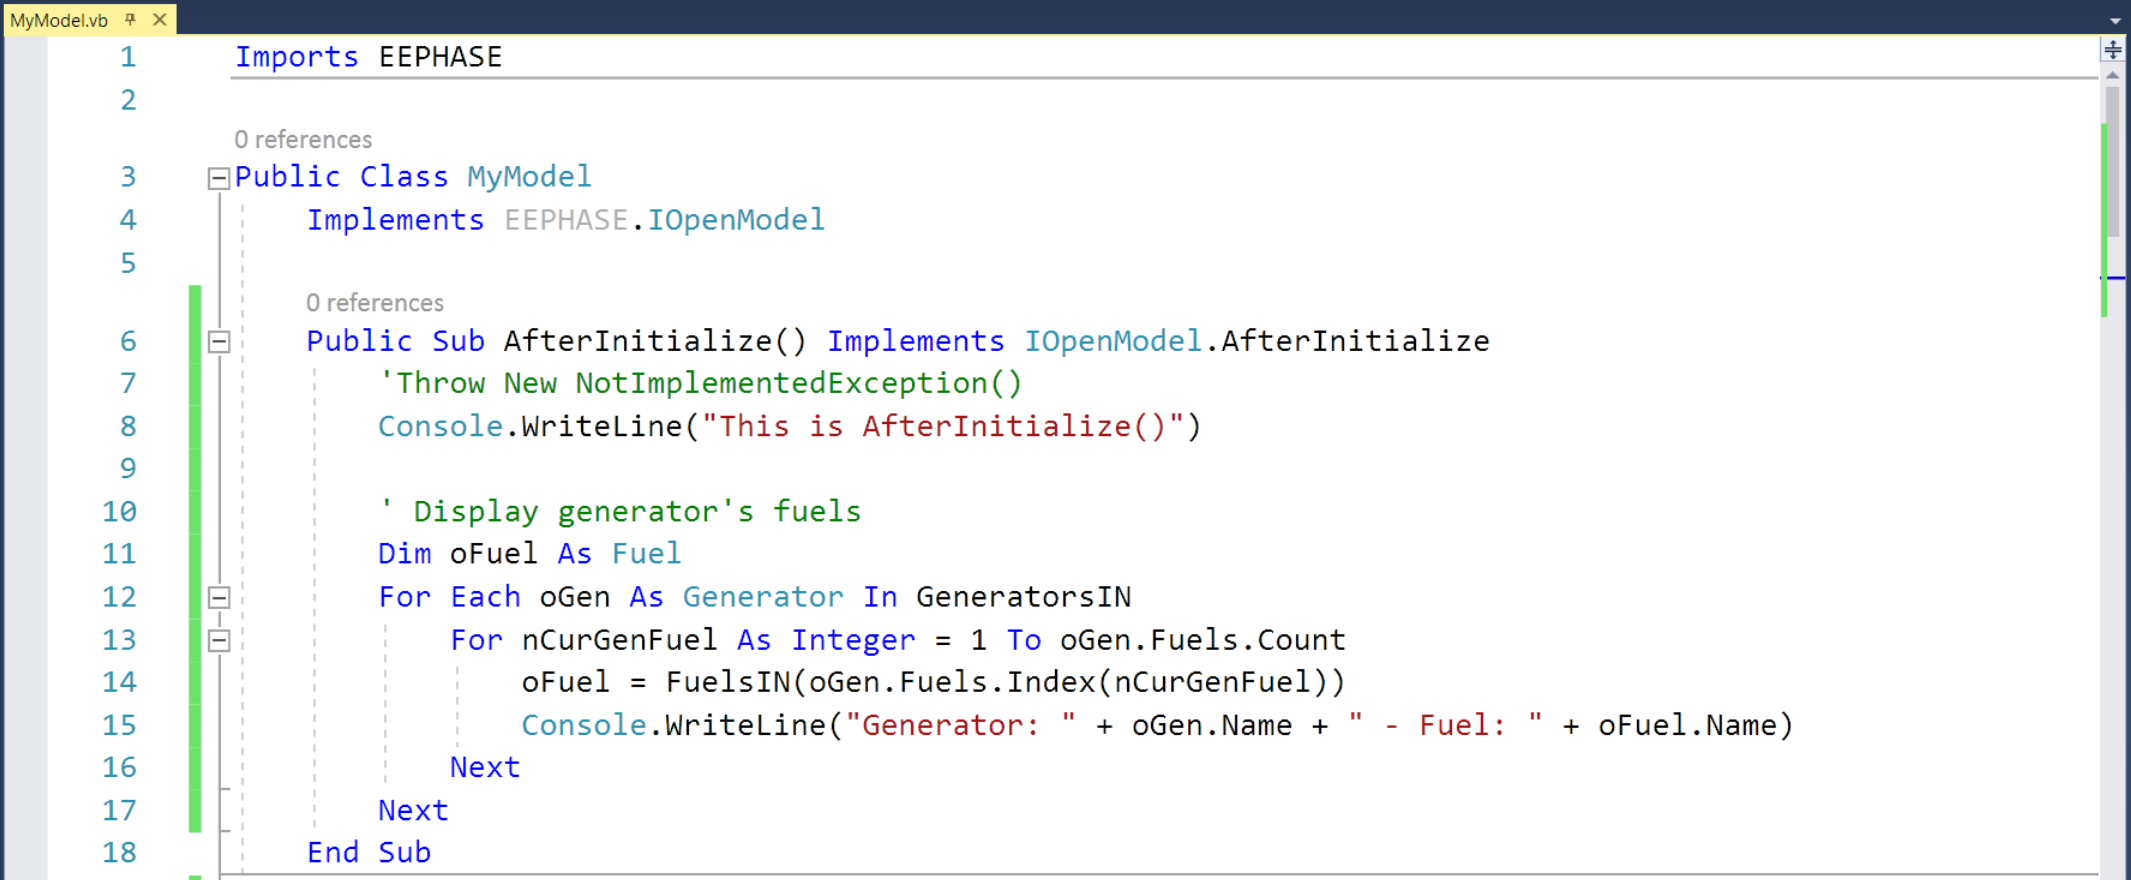 Figure 28: Generator fuel membership
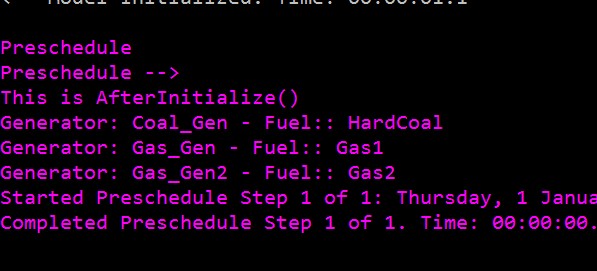 Figure 29: Result of generator fuel membership
Referring the code, it can be seen that the outer loop is iterating through each generator in the system, and the inner loop is iterating through each fuel that has a membership with the generator.
The membership objects are all in the form of ".m_oObject" where "Object" is replaced with a specific collection, such as fuels, i.e. m_oFuels.
Many objects in PLEXOS also contain objects know as subsets, which are closely related to non-system memberships. Instead of obtaining all fuels in a generator, as described in the previous example, the generator subset in a fuel object can be used to obtain all generators in that fuel. The coded example below (Figure 30) demonstrates how to list all fuel generator membership, which is complement collection of Generator Fuel and Figure 31 shows its results.
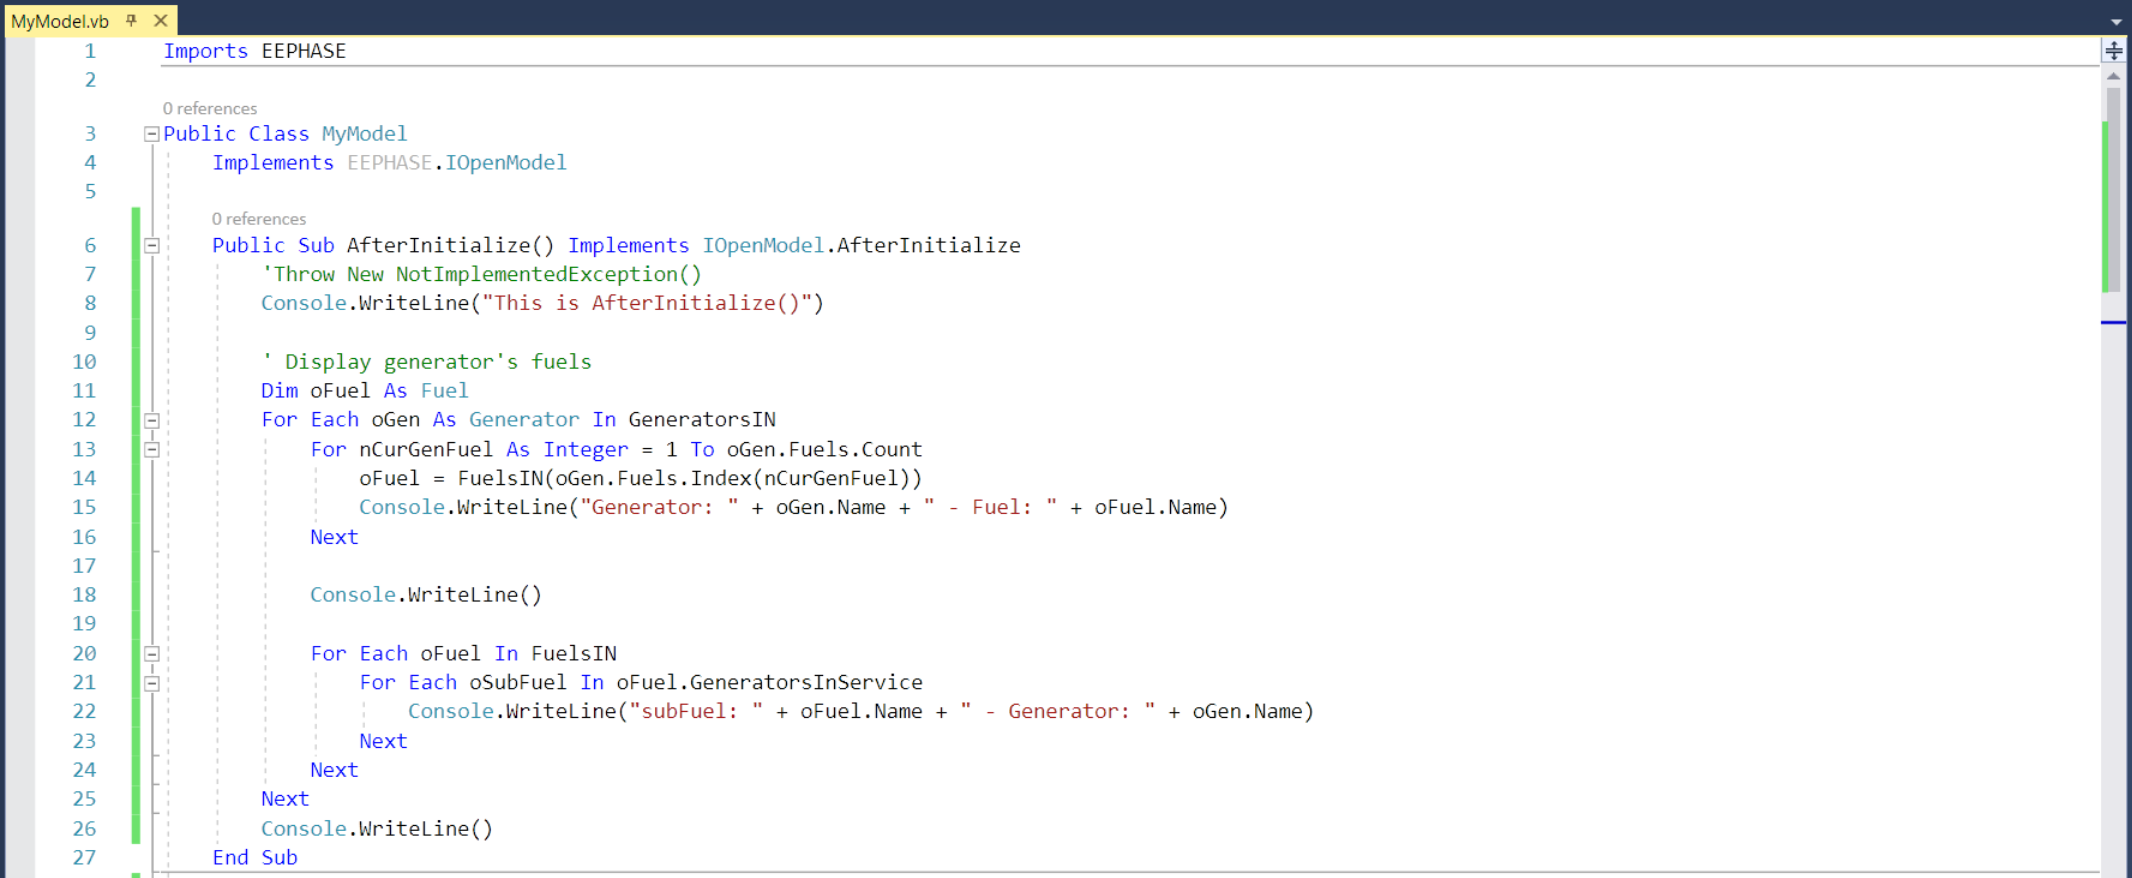 Figure 30: Complement collection of Generator Fuel
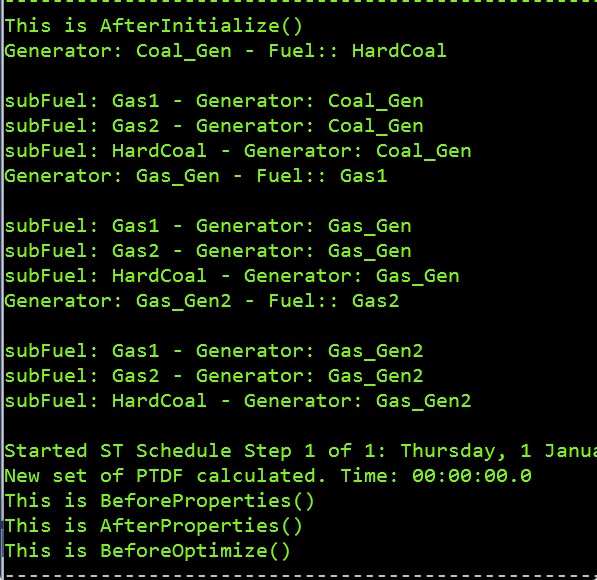 Figure 31: Results
These are the basics of the PLEXOS object model. The source code examples shipped with PLEXOS, provides more useful and in-depth examples.
4. Custom Uplift Code Example
The previous sections explain how to create assemblies, implement the PLEXOS interface and hook these assemblies up to PLEXOS. This section briefly describes some code snippets that demonstrate a simple custom uplift example (not a real example) with custom reporting.
4.1. Custom Uplift Requirement
The requirement for this simple example is to calculate the uplift as being the total generator fixed costs plus a custom physical contract (generation contracts) fixed cost. The custom fixed costs will essentially be a multi-tier physical contract fixed cost, which is not directly supported by PLEXOS. The data detailed in Table1: Physical Contract Fixed Cost Requirement, will be hard coded into the custom assembly however these could easily be read from an external file.
The step number, period, region name, price, SRMC and finally the uplift need to be output as a separate report.
Table 1
| Rage (MW) | Fixed Cost $/MW |
|---|---|
| 1 - 50 | 0.1 |
| 51 - 100 | 2 |
| 101+ | 3 |
4.2. Custom Uplift Procedure
After completing all the prerequisite steps mentioned above, 'creating the assembly', 'configuring the PLEXOS interface' and registering the custom assemblies in the model, the custom assembly coding can be initiated
Imports EEPHASE
Public Class MyModel
    Implements EEPHASE.IOpenModel

    Public Sub BeginInitialize() Implements IOpenModel.BeginInitialize
    End Sub

    Public Sub AfterInitialize() Implements IOpenModel.AfterInitialize
        'Throw New NotImplementedException()
        Console.WriteLine("This is AfterInitialize()")
        Dim oFuel As Fuel
        For Each oGenerator As Generator In GeneratorsIN
            For nCurGeneratorFuel As Integer = 1 To oGenerator.m_oFuels.Count
                oFuel = FuelsIN(oGenerator.m_oFuels.Index(nCurGeneratorFuel))

                Console.WriteLine("Generator: " & oGenerator.m_strName & " - Fuel:: " & oFuel.m_strName)
            Next
            Console.WriteLine()

        Next
        Console.WriteLine()
    End Sub

    Public Sub AfterOptimize() Implements IOpenModel.AfterOptimize
        'Throw New NotImplementedException()
        Console.WriteLine("This is AfterOptimize()")
    End Sub

    Public Sub AfterProperties() Implements IOpenModel.AfterProperties
        'Throw New NotImplementedException()
        Console.WriteLine("This is AfterProperties()")
    End Sub

    Public Sub AfterRecordSolution() Implements IOpenModel.AfterRecordSolution
        'Throw New NotImplementedException()
        Console.WriteLine("This is AfterRecordSolution()")
    End Sub

    Public Sub BeforeOptimize() Implements IOpenModel.BeforeOptimize
        'Throw New NotImplementedException()
        Console.WriteLine("This is BeforeOptimize()")
    End Sub

    Public Sub BeforeProperties() Implements IOpenModel.BeforeProperties
        'Throw New NotImplementedException()
        Console.WriteLine("This is BeforeProperties()")
    End Sub

    Public Sub BeforeRecordSolution() Implements IOpenModel.BeforeRecordSolution
        'Throw New NotImplementedException()
        Console.WriteLine("This is BeforeRecordSolution()")
    End Sub

    Public Sub TerminatePhase() Implements IOpenModel.TerminatePhase
        'Throw New NotImplementedException()
        Console.WriteLine("This is TerminatePhase()")
        MyRegion.ClearData()
    End Sub

    Public Function EnforceMyConstraints() As Integer Implements IOpenModel.EnforceMyConstraints
        'Throw New NotImplementedException()
        Console.WriteLine("This is EnforceMyConstraints()")
        Return 0
    End Function

    Public Function OnWarning(Message As String) As Boolean Implements IOpenModel.OnWarning
        'Throw New NotImplementedException()
        Console.WriteLine("This is OnWarning(Message As String)")
        Return 0
    End Function
End Class

Public Class MyRegion
    Implements EEPHASE.IOpenRegion

    Public Sub Price(nIndex As Integer, dVals As DirtyArray(Of Double)) Implements IOpenRegion.Price
        'Throw New NotImplementedException()
        Console.WriteLine("This is Price()")
    End Sub

    Public Sub Uplift(nIndex As Integer, dVals As DirtyArray(Of Double)) Implements IOpenRegion.Uplift
        'Throw New NotImplementedException()
        Console.WriteLine("This is Uplift()")
        InitializeReport()
        Dim oRegion As Region = RegionsIN(nIndex)
        Dim dGenerationFixedCosts As Double
        Dim dContractFixedCosts As Double

        With RegionsIN(nIndex)
            For nCurPeriod As Integer = 1 To Archive.StepPeriodCount
                ' stage 1) get the generation costs
                For Each oNode As Node In .Nodes
                    For Each oGenerator As Generator In oNode.Generators
                        dGenerationFixedCosts += oGenerator.FixedCosts(nCurPeriod)
                    Next
                Next

                ' stage 2) get the physical contract fixed costs
                For Each oPhysicalContract As PhysicalContract In .GenerationContracts
                    dContractFixedCosts += GetPhysicalContractFixedCosts(oPhysicalContract.Generation(nCurPeriod))
                Next

                ' stage 3) set the uplift value for that period as being
                '          generator fixed costs plus the physical contract fixed costs
                dVals(nCurPeriod) = dGenerationFixedCosts + dContractFixedCosts

                dGenerationFixedCosts = 0.0
                dContractFixedCosts = 0.0
            Next
        End With
    End Sub

    Private GenerationFixedCosts As Double(,) = New Double(,) {{50, 0.1}, {50, 2}, {50, 3}}
    Private Function GetPhysicalContractFixedCosts(ByVal dGeneration As Double) As Double
        Dim dFixedCost As Double = 0.0
        For nCurFixedCost As Integer = 0 To GenerationFixedCosts.GetUpperBound(0)
            If (dGeneration < GenerationFixedCosts(nCurFixedCost, 0)) OrElse
                nCurFixedCost = GenerationFixedCosts.GetUpperBound(0) Then
                dFixedCost += GenerationFixedCosts(nCurFixedCost, 1) * dGeneration
                Exit For
            Else
                dFixedCost += GenerationFixedCosts(nCurFixedCost, 0) * GenerationFixedCosts(nCurFixedCost, 1)
                dGeneration -= GenerationFixedCosts(nCurFixedCost, 0)
            End If
        Next
        Return dFixedCost
    End Function

    Private Shared m_swReport As IO.StreamWriter
    Private Sub InitializeReport()
        'Output Required:
        If m_swReport Is Nothing Then
            Dim strReportFile As String = G_oMODEL.OutputPath &
                String.Format("\Custom Uplift ( {0} ) Phase {1}.txt", G_oMODEL.Name, G_oMODEL.SimulationPhase.ToString)
            m_swReport = New IO.StreamWriter(strReportFile, False)
            With m_swReport
                .Write("Step" & vbTab)
                .Write("Period" & vbTab)
                .Write("Region" & vbTab)
                .Write("Uplift" & vbTab)
                .Write("SRMC" & vbTab)
                .Write("Price" & vbTab)
                .WriteLine()
            End With
        End If
    End Sub
    Private Sub WriteData(ByVal oRegion As Region, ByVal nPeriod As Integer, ByVal dUplift As Double)
        With m_swReport
            .Write(G_oSTEP.m_nCurStep & vbTab)
            .Write(nPeriod & vbTab)
            .Write(oRegion.m_strName & vbTab)
            .Write(dUplift & vbTab)
            .Write(oRegion.ShadowPrice(nPeriod) & vbTab)
            .Write((oRegion.ShadowPrice(nPeriod) + dUplift) & vbTab)
            .WriteLine()
        End With
    End Sub
    Public Shared Sub ClearData()
        If m_swReport IsNot Nothing Then
            m_swReport.Close()
            m_swReport = Nothing
        End If
    End Sub
End Class
Firstly, a custom function, GetPhysicalContractFixedCosts() is created to calculate the fixed cost of the physical contract generation.
The uplift calculation is split into three simple stages. The first stage is to calculate the total fixed costs for all generators in the current region, which is as simple as iterating through the generator subset of all nodes in this region. During this process the variable "dGenerationFixedCosts" is continuously updated with the fixed cost of each generator.
The second stage of the code example iterates through all physical contracts in the region, which increments the "dContractFiexedCosts" appropriately. Those are the variables needed for stage three, which is the final uplift calculation. The third stage is as easy as assigning the product of the generation and physical fixed costs to the uplift reference array itself.
Note, that the stages one to three are processed for every period in each step of the simulation.
The final/third stage of this customization is to add the custom reporting. Two functions are created and those will be called within the main Uplift function. The first function is, "InitializeReport()", and simply creates a new file, when the shared file write variable is null (The variable is set to 'null' at the end of every phase) and writes the custom diagnostic column names.
The second function created is called "WriteData()" which has a number of arguments, all of which are data required in the custom report. The uplift calculation plus the various outputs are written to the tab delimited file.
The code snippet that provides full custom uplift with the custom reporting function call added, end at this point. And the following functions are used at the end, terminating the snippet
ClearData() closes the file stream and clear any data that has been allocated.
TerminatePhase() function is a part of the model implementation.