MLF Class
| Description: | Marginal loss factor equation |
See also MLF Property Reference for a detailed list of properties for this class of object.
This class is specifically designed for the Australian NEM. NEM loss equations include terms for regional demand as well as flow. The simulator (like the NEM market-clearing engine) approximates the loss function with a multi-tranche linear approximation.
You enter the MLF equations directly into the model using special MLF objects, and the simulator will calculate the loss function accounting for all factors including region demand, and from those function generates a linear approximation. This approach has the advantage that loss functions on the interregional interconnectors are calculated every period, ensuring that the simulated losses and interregional prices are as close as possible to an emulation of the market. There is no significant additional overhead or iteration required, so this is a also very efficient approach.
Example:
| Class | Name | Category | Description |
|---|---|---|---|
| MLF | LF Murray 330 | MLF | Loss factor equation (Murray 330 referred to Thomastown 66) |
| MLF | LF South Pine 275 | MLF | Loss factor equation (South Pine 275 referred to Sydney West 330) |
| MLF | LF Sydney West 330 | MLF | Loss factor equation (Sydney West 330 referred to Murray 330) |
| MLF | LF Torrens Island 66 | MLF | Loss factor equation (Torrens Island 66 referred to Thomastown 66) |
| Parent Class | Child Class | Collection | Constraint | Child Name |
|---|---|---|---|---|
| MLF | Region | Regions | LF Murray 330 | NSW1 |
| MLF | Region | Regions | LF Murray 330 | SA1 |
| MLF | Region | Regions | LF Murray 330 | VIC1 |
| MLF | Region | Regions | LF South Pine 275 | NSW1 |
| MLF | Region | Regions | LF South Pine 275 | QLD1 |
| MLF | Region | Regions | LF Sydney West 330 | NSW1 |
| MLF | Region | Regions | LF Sydney West 330 | VIC1 |
| MLF | Region | Regions | LF Torrens Island 66 | SA1 |
| MLF | Region | Regions | LF Torrens Island 66 | VIC1 |
| MLF | Node | Reference Node | LF Murray 330 | Murray 330kV |
| MLF | Node | Reference Node | LF South Pine 275 | South Pine 275kV |
| MLF | Node | Reference Node | LF Sydney West 330 | Sydney West 330kV |
| MLF | Node | Reference Node | LF Torrens Island 66 | Torrens Island 66kV |
| MLF | Line | Line | LF Murray 330 | V-SN |
| MLF | Line | Line | LF South Pine 275 | NSW1-QLD1 |
| MLF | Line | Line | LF Sydney West 330 | SNOWY1 |
| MLF | Line | Line | LF Torrens Island 66 | V-SA |
| Parent Class | Child Class | Collection | Parent Name | Child Name | Property | Value |
|---|---|---|---|---|---|---|
| System | MLF | MLFs | NEM | LF Murray 330 | Intercept | 1.0163 |
| System | MLF | MLFs | NEM | LF South Pine 275 | Intercept | 1.0027 |
| System | MLF | MLFs | NEM | LF Sydney West 330 | Intercept | 1.0144 |
| System | MLF | MLFs | NEM | LF Torrens Island 66 | Intercept | 0.9849 |
| MLF | Line | Lines | LF Murray 330 | V-SN | Flow Coefficient | 0.000095342 |
| MLF | Line | Lines | LF South Pine 275 | NSW1-QLD1 | Flow Coefficient | 0.00023474 |
| MLF | Line | Lines | LF Sydney West 330 | SNOWY1 | Flow Coefficient | 0.000080175 |
| MLF | Line | Lines | LF Torrens Island 66 | V-SA | Flow Coefficient | 0.00038885 |
| MLF | Region | Regions | LF Murray 330 | NSW1 | Demand Coefficient | -0.0000028101 |
| MLF | Region | Regions | LF Murray 330 | SA1 | Demand Coefficient | -0.0000012838 |
| MLF | Region | Regions | LF Murray 330 | VIC1 | Demand Coefficient | 0.000001691 |
| MLF | Region | Regions | LF South Pine 275 | NSW1 | Demand Coefficient | 0.0000017283 |
| MLF | Region | Regions | LF South Pine 275 | QLD1 | Demand Coefficient | 0.0000010083 |
| MLF | Region | Regions | LF Sydney West 330 | NSW1 | Demand Coefficient | -0.0000059551 |
| MLF | Region | Regions | LF Sydney West 330 | VIC1 | Demand Coefficient | -0.0000011774 |
| MLF | Region | Regions | LF Torrens Island 66 | SA1 | Demand Coefficient | -0.0000099266 |
| MLF | Region | Regions | LF Torrens Island 66 | VIC1 | Demand Coefficient | 0.0000022497 |
Interconnector losses are attributed to the sending and receiving regions in certain proportions. In the Australian NEM, these proportions are fixed constants. Line objects include the property Loss Allocation. By default, this allocation is 0.5, which means losses are attributed evenly to the sending and receiving nodes. The value may be set to any value between zero and one with values above 0.5 meaning that more losses are assigned to the receiving node.
Example:
| Line | Property | Value |
|---|---|---|
| N-Q-MNSP1 | Loss Allocation | 0.23 |
| NSW1-QLD1 | Loss Allocation | 0.5 |
| SNI | Loss Allocation | 0.5 |
| SNOWY1 | Loss Allocation | .95 |
| V-SA | Loss Allocation | 0.6 |
| V-S-MNSP1 | Loss Allocation | 0.6 |
| V-SN | Loss Allocation | 1 |
Note that losses for the SNOWY1 interconnector are 'normally' allocated in part to Snowy (10%) and NSW (90%), and likewise for V-SN, but for medium term modelling purposes, where no load is attributed to the Snowy region, these allocation factors should be consistent in not allocating any load to Snowy. For short-term modelling, where load are input for Snowy the 'normal' factors should be used (Snowy1 0.95/0.05, V-SN 0.10/0.90).
The NEM uses 10-piece linear loss functions across the entire range of feasible flows, notionally treating maximum import as the 'zero-point' for the approximation. The Transmission setting Max Loss Tranches determines how many loss tranches are used in each direction of flow. Thus, setting this value to 5 will replicate the approach used in the NEM.
The following pictures capture the dynamic MLF and loss approximation over a one-year simulation. There are eight graphs, two for each interconnector. The first chart in the set plots line flow versus loss, treating flows in the 'back' direction as notionally negative. The second chart shows the marginal loss factor (as reported under Marginal Loss Factor). This graph shows clearly the steps in the linear approximation. The green points are the MLF calculated using the 'raw' MLF equations above. The spread of points on each chart shows the amount of variation in the MLF equations due to the dynamic demand elements.
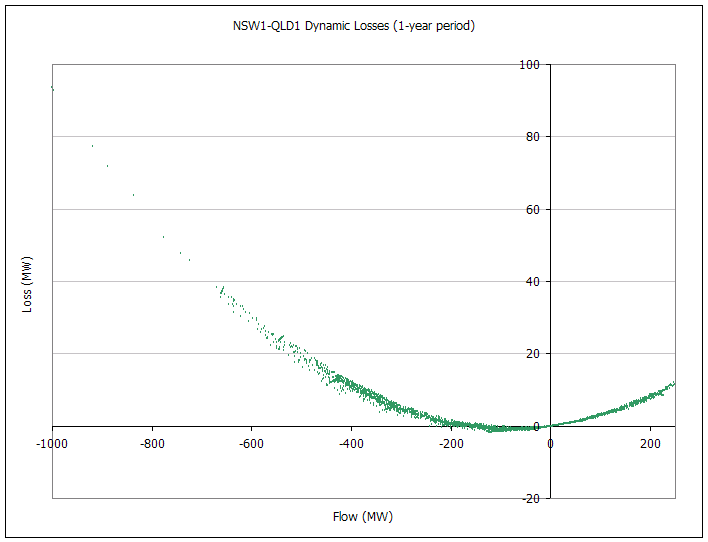 Figure 1: NSW-QLD Dynamic Losses (1-year period)
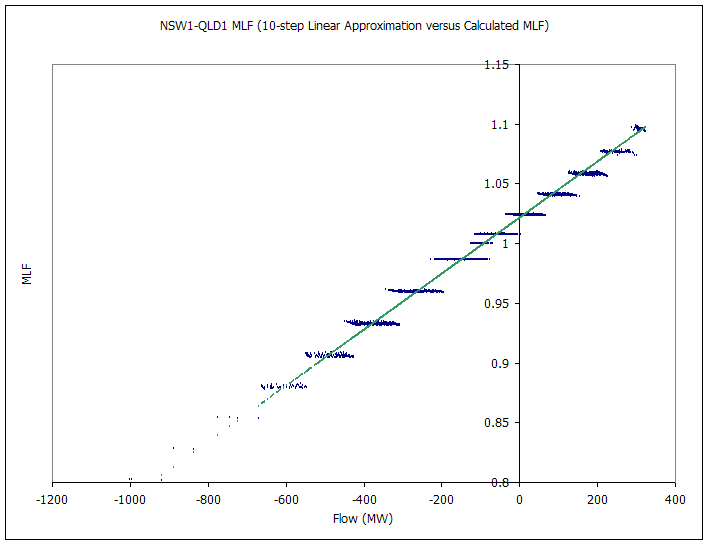 Figure 2: NSW-QLD MLF (10-step Linear Approximation versus Calculated MLF)
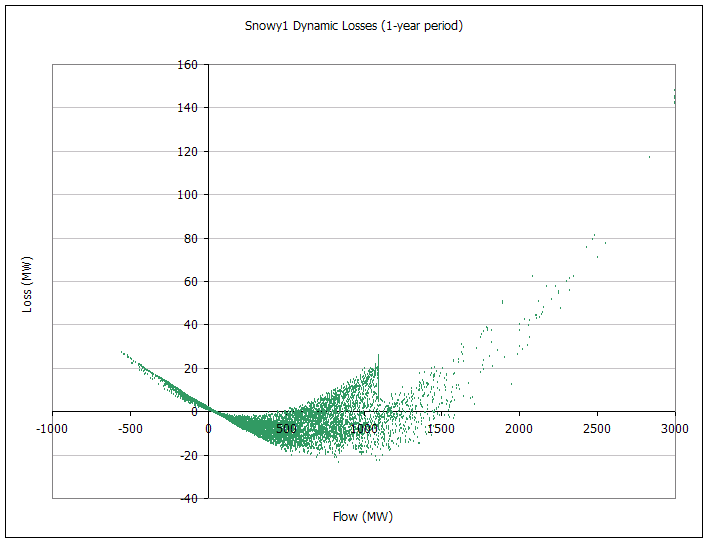 Figure 3: Snowy Dynamic Losses (1-year period)
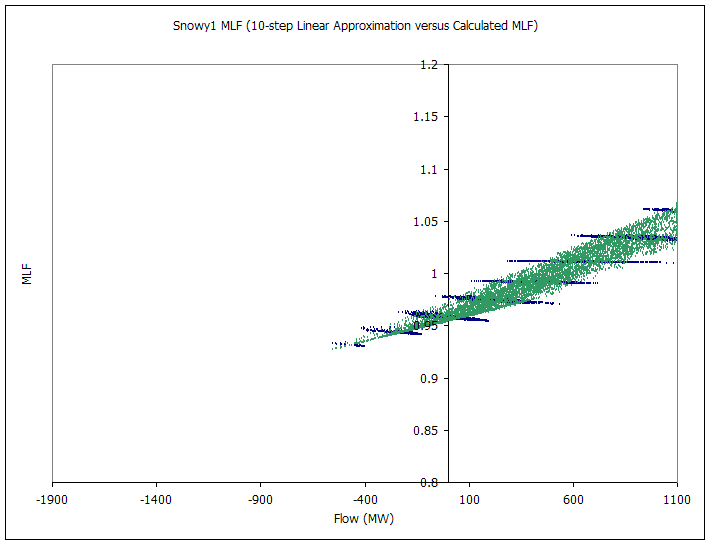 Figure 4: Snowy MLF (10-step Linear Approximation versus Calculated MLF)
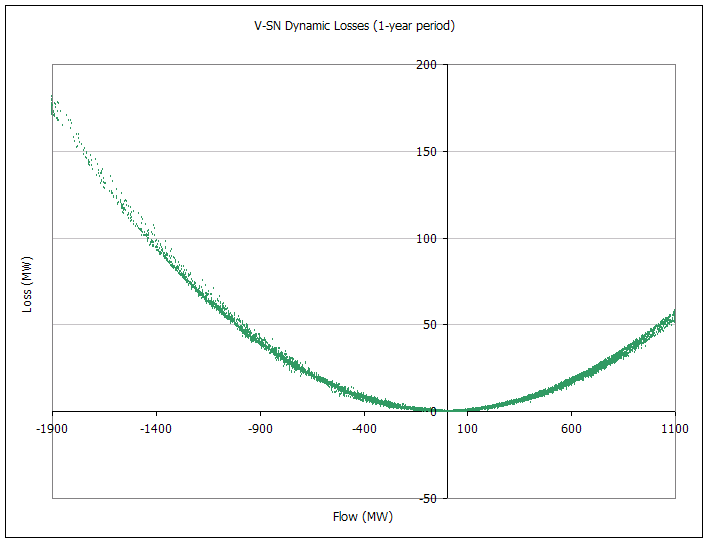 Figure 5: V-SN Dynamic Losses (1-year period)
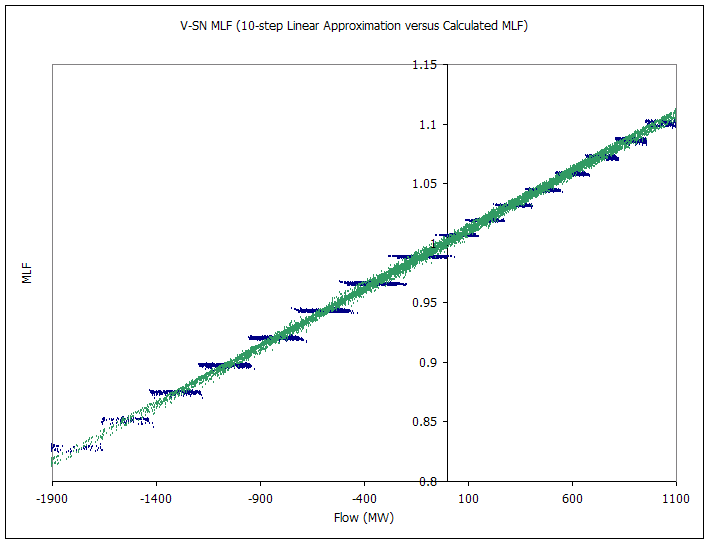 Figure 6: V-SN MLF (10-step Linear Approximation versus Calculated MLF)
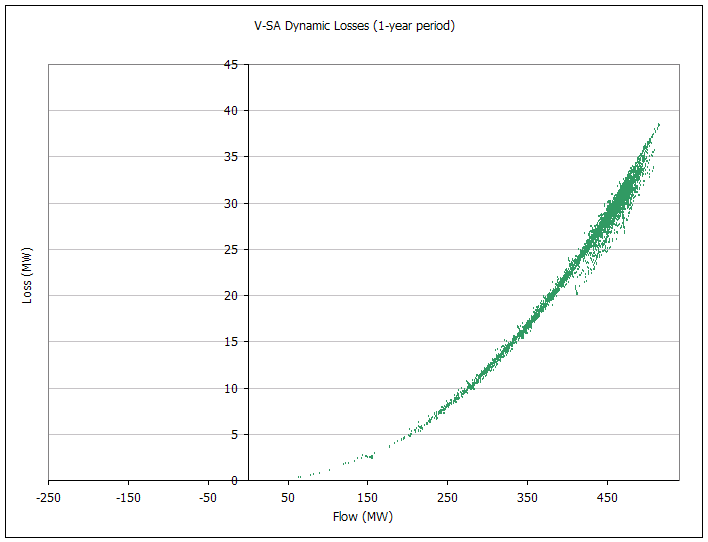 Figure 7: V-SA Dynamic Losses (1-year period)
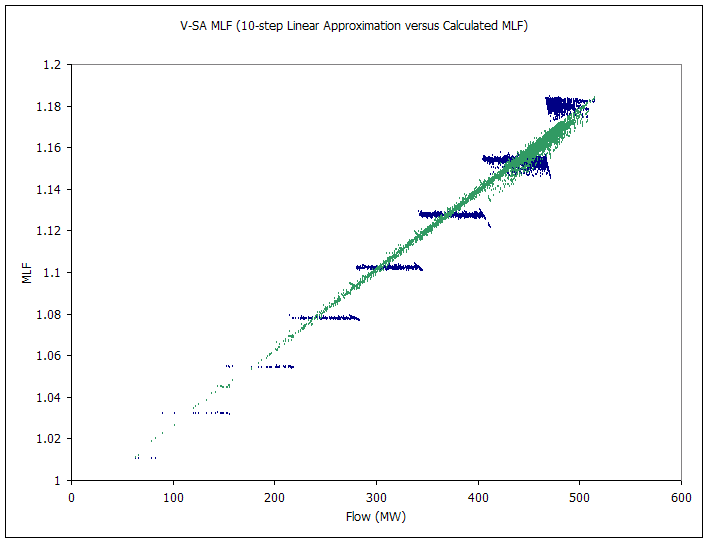 Figure 8: V-SA MLF (10-step Linear Approximation versus Calculated MLF)