Central License Manager
In this article
Overview
The Central License Manager (CLM) is an independent URL and provide Admins a brand-new way to efficiently control, manage, and optimize all your Energy Exemplar Software Licenses in a central system. It provides you:
- Centralized Management: Handle all Energy Exemplar licenses from one portal.
- Dynamic License Control: Assign, reclaim, and optimize license usage with ease.
- Hassle-Free Updates: No more annual license file updates for individual machines.
- Usage Monitoring: Access comprehensive usage reporting.
- Offline Use: Work without constant network connectivity.
NOTE: Only Admin users have access to the Central License Manager page.
The CLM is made up of four tabs as mentioned below:
- Subscription: Shows the subscription details including Tenant ID and Tenant License details.
- User Management: Shows the list of Active or Inactive users and allows Admin to Add or Remove a user, send a Welcome Email, assign different Licenses and Roles, set the user to Active or Inactive state, and Delete a user if it’s no more required.
- Single Sign On (SSO): Show the Single Sign-On Setting to configure the SSO.
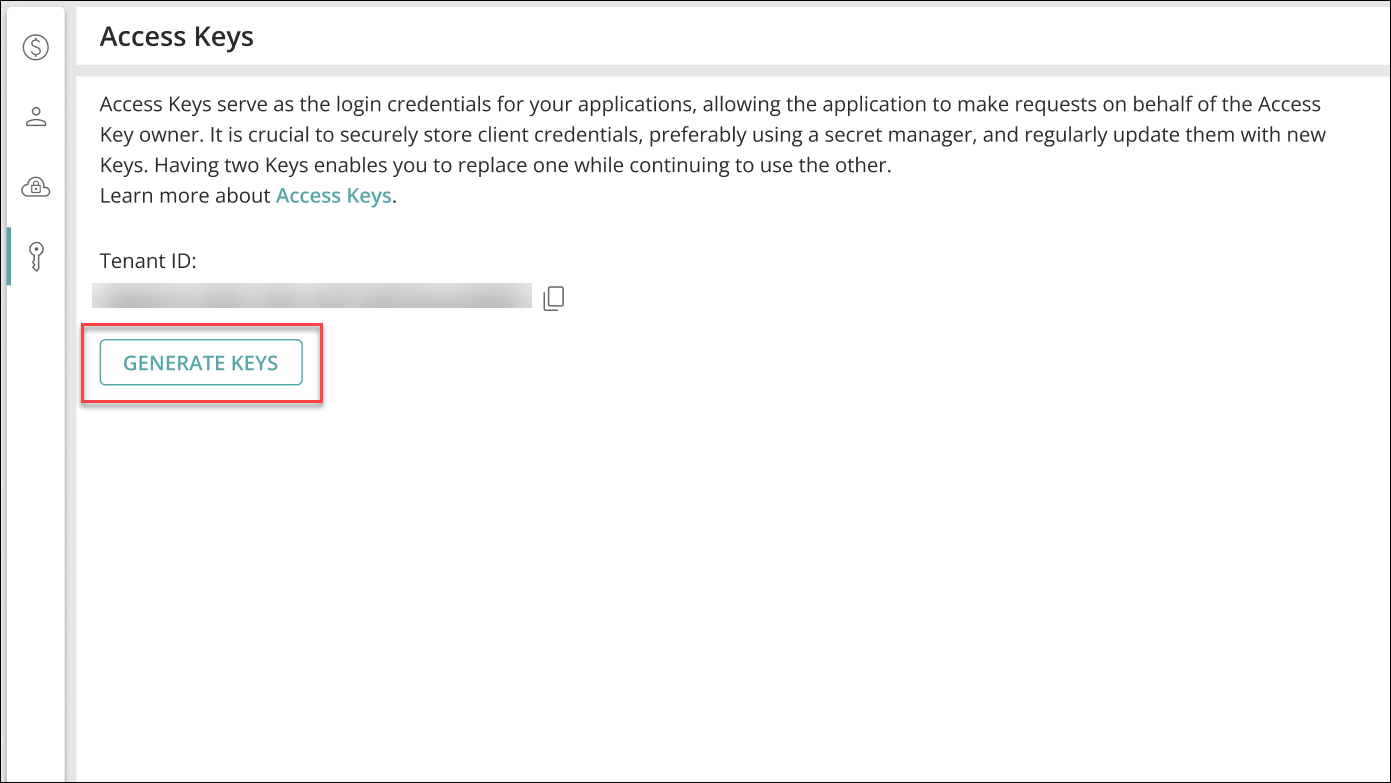
- Access Keys: Allows Admins to generate or regenerate essential login keys, such as Client ID, Primary Secret, and Secondary Secret. These keys enable seamless access to Energy Exemplar services without requiring users to log in to PLEXOS Cloud directly.
- Usage: Allows Tenant Admins with comprehensive visibility and control over license usage across their organization.
Verify and Activate your CLM Account
Upon receiving the Welcome email, you need to verify your email ID to access the Central License Manager page in PLEXOS Cloud. Please note the verification link will expire within a defined time for security purposes. In the case that the verification link expires before you can active your email, please contact your Customer Success Manager or Support team to resend the Welcome email.
Follow the steps below to verify your email ID:
1. After the Customer Success Manager (CSM) creates an account and the Tenant Creation is processed automatically in Salesforce, you will receive a verification email containing a verification link on your registered Email ID. Click on the VERIFY EMAIL button to continue.
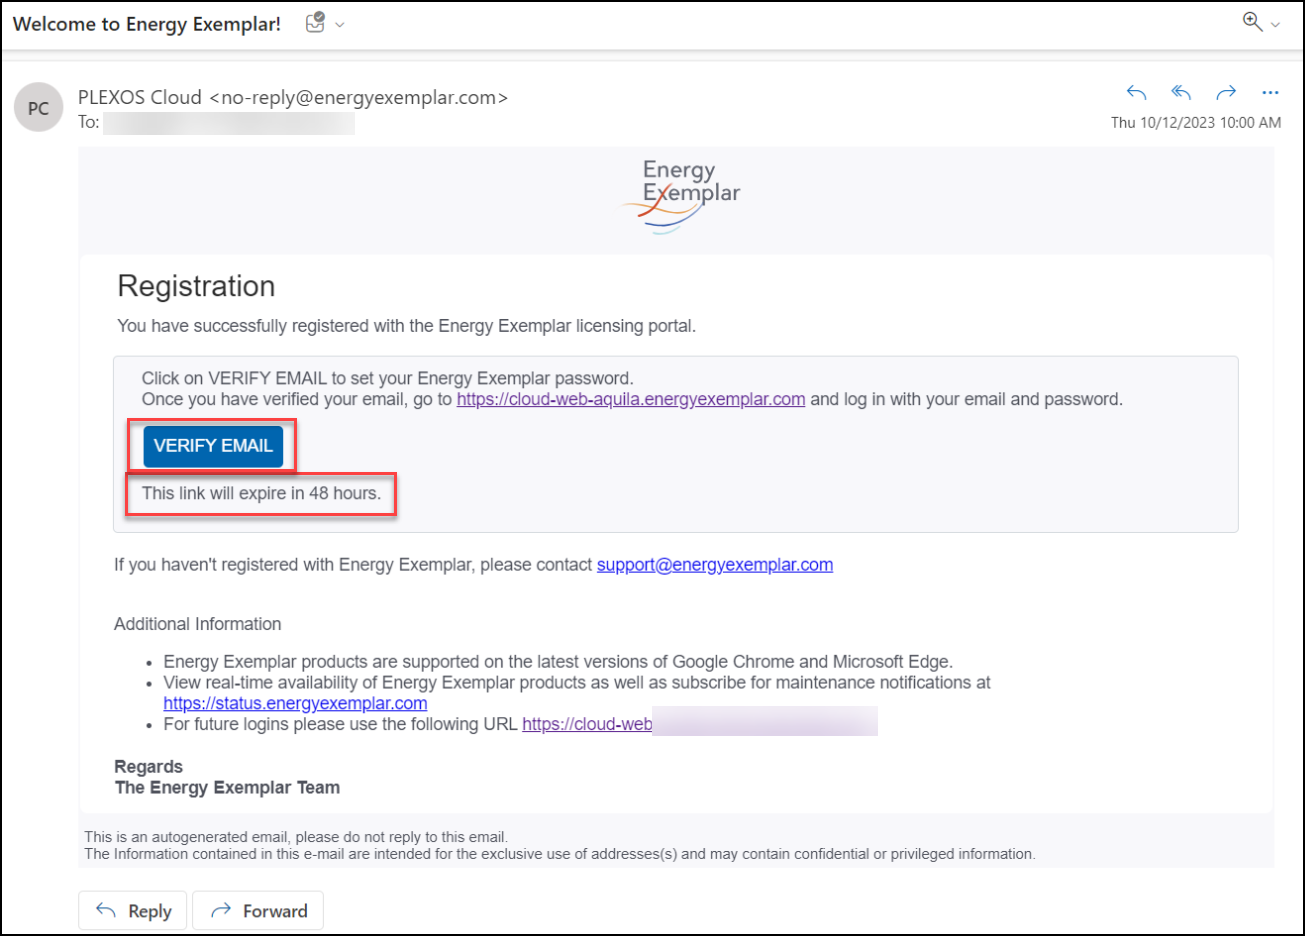
NOTE: The VERIFY EMAIL link provided in the Welcome email will expire in 48 hours. You need to reach out to the Support team for a new link if the previous link has expired.
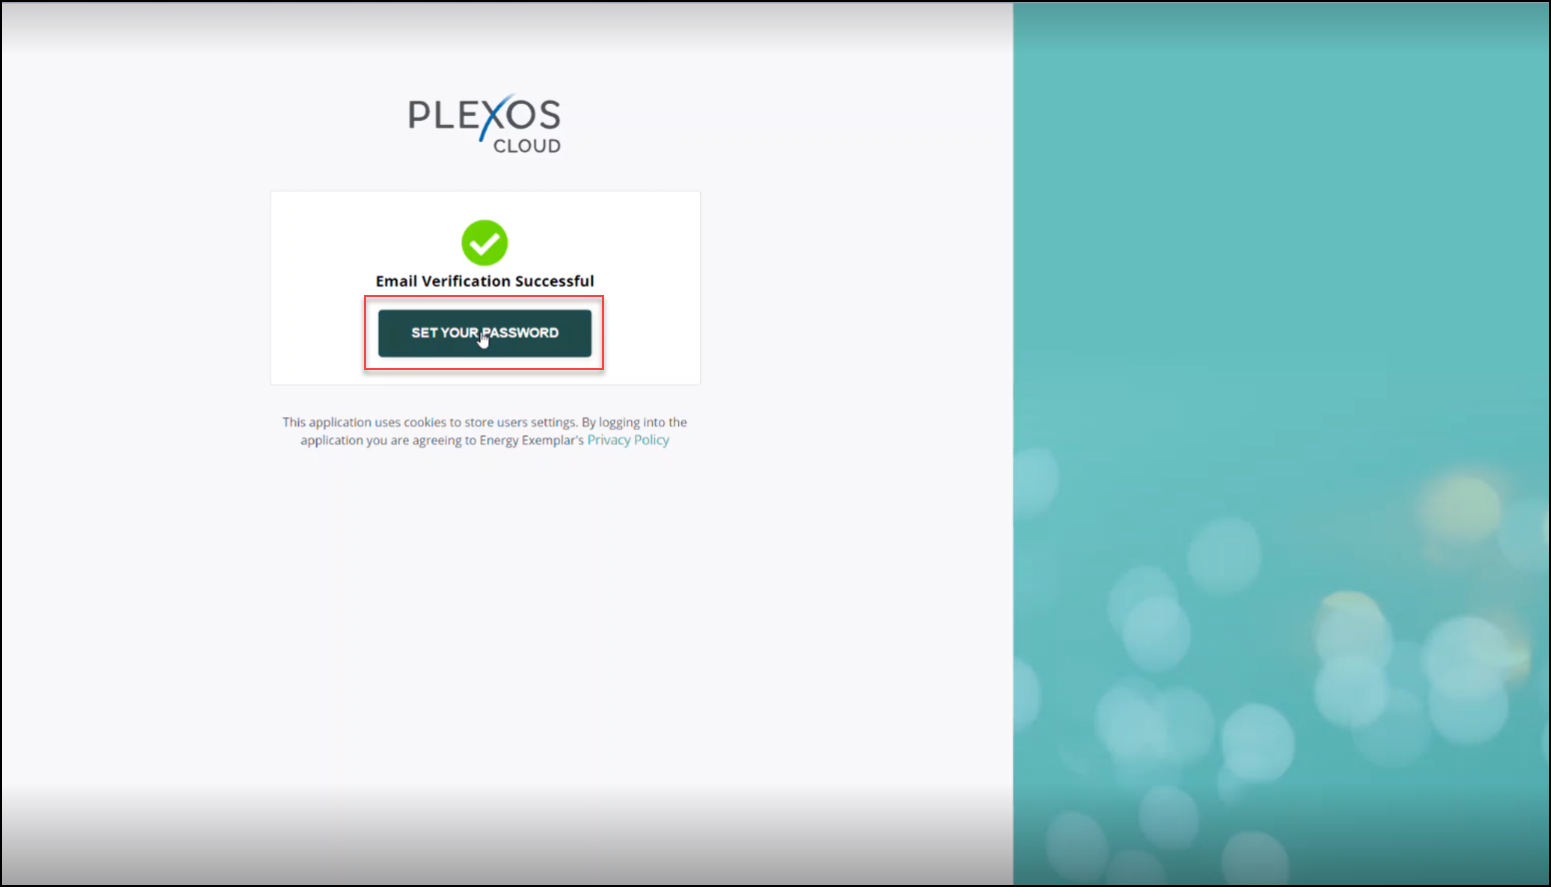
2. You will see a message, “Email Verification Successful” as shown below, and a button to set your password. Click on the SET YOUR PASSWORD button to redirect to the Reset Password screen.
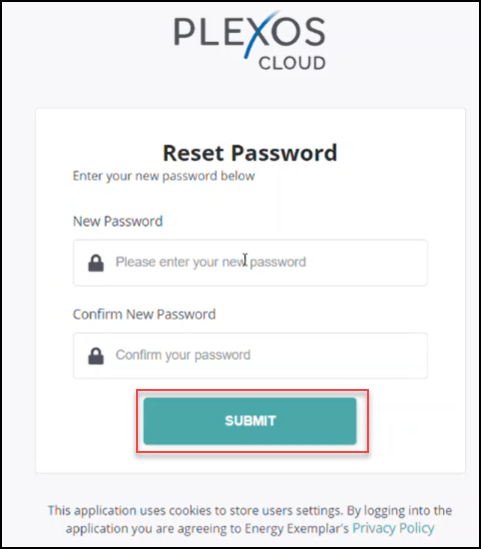
3. In the Reset Password screen, enter a unique and strong password for your account and click on the SUBMIT button to continue.
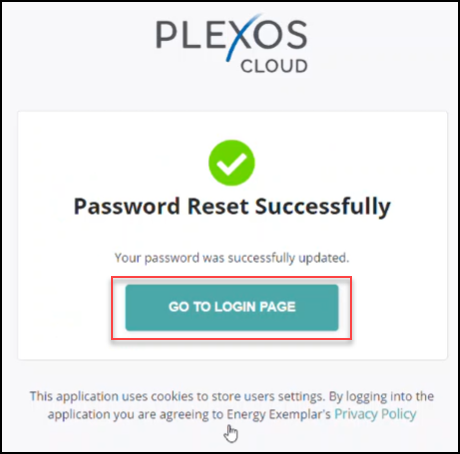
4. You will see a message, Password Reset Successfully, and a button to redirect you to the PLEXOS Cloud Sign-In page. Click on the GO TO LOGIN PAGE button to continue.
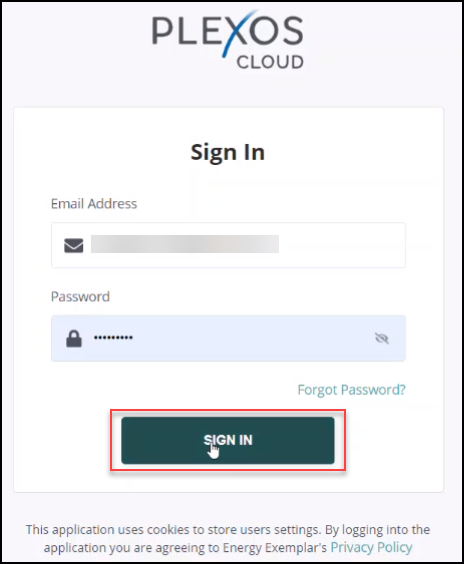
5. In the Sign In page, enter your account's Email Address and Password and click on the SIGN IN button to continue.
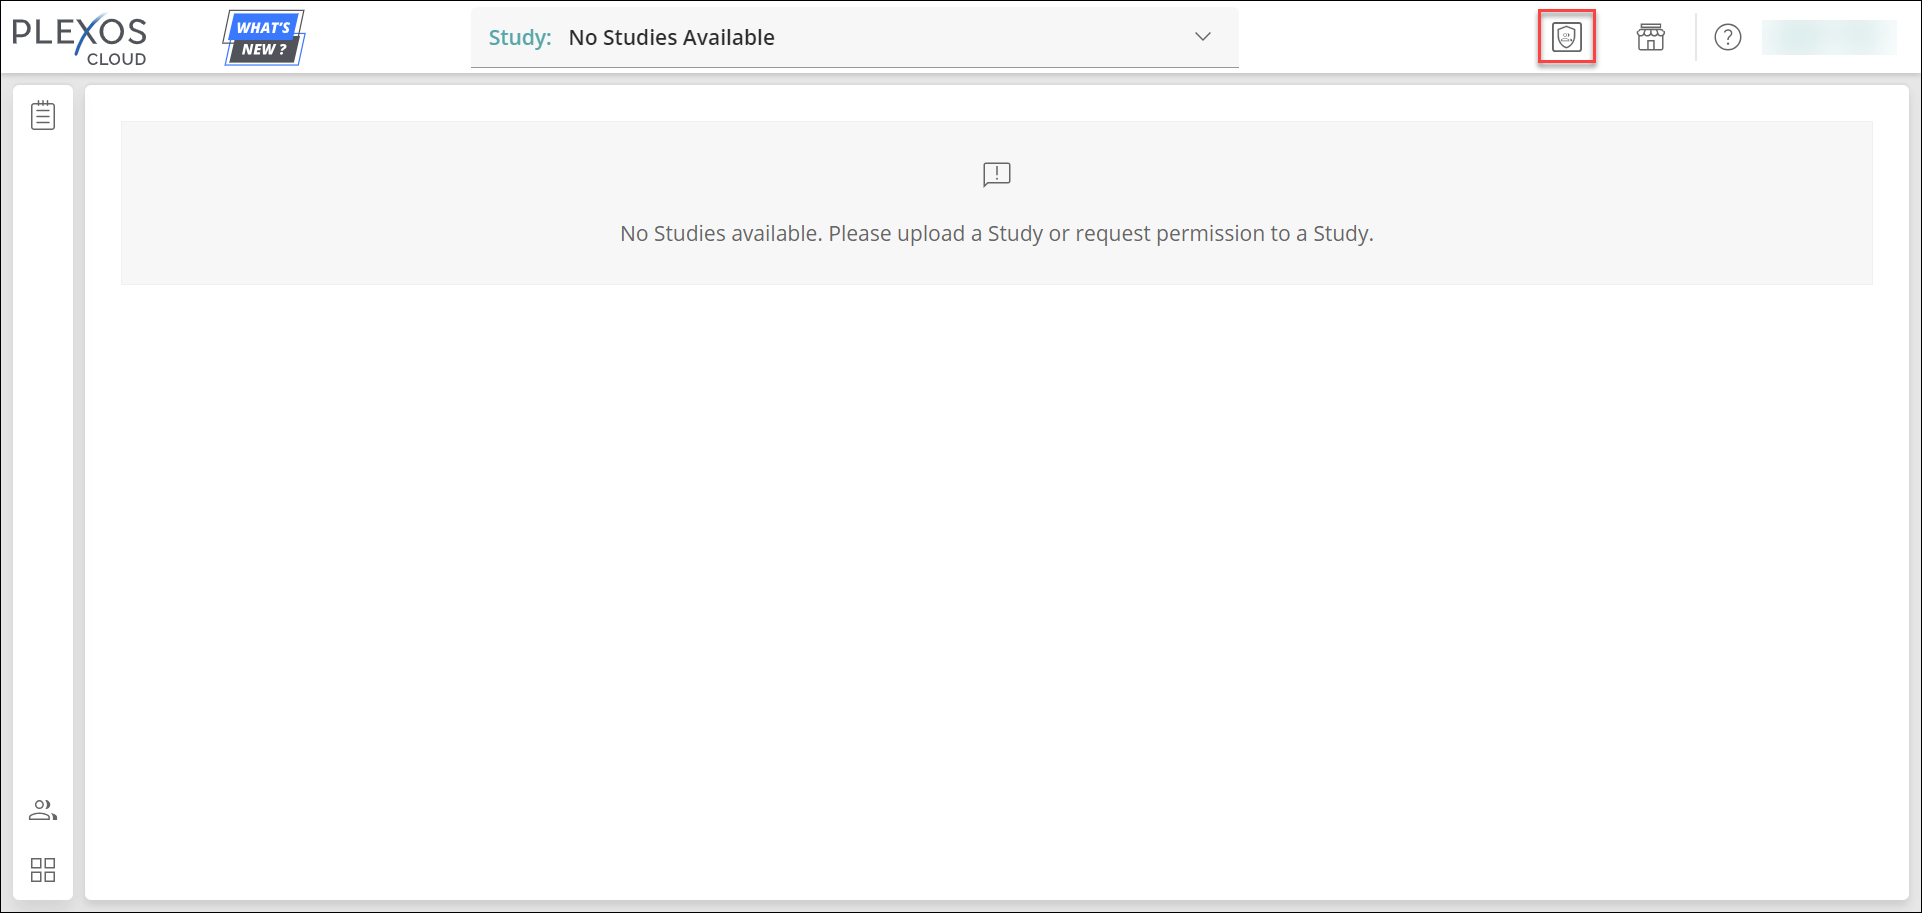
6. You will land on the PLEXOS Cloud homepage directly as shown below:
Access the Central License Manager page
The Central License Manager is currently accessible only to new customers logging into the AURORA 15.0 desktop application. Existing customers in previous versions are not supported with this sync. You can access the Central License Manager (CLM) page directly from PLEXOS Cloud with a single click using the button below:
Subscription page
The Subscription page within CLM offers comprehensive information about your tenant, providing information on tenant details, including Entitlements, Licenses, and associated products. Users with Admin Only and Analyst (with Admin role) Licenses can access this page.
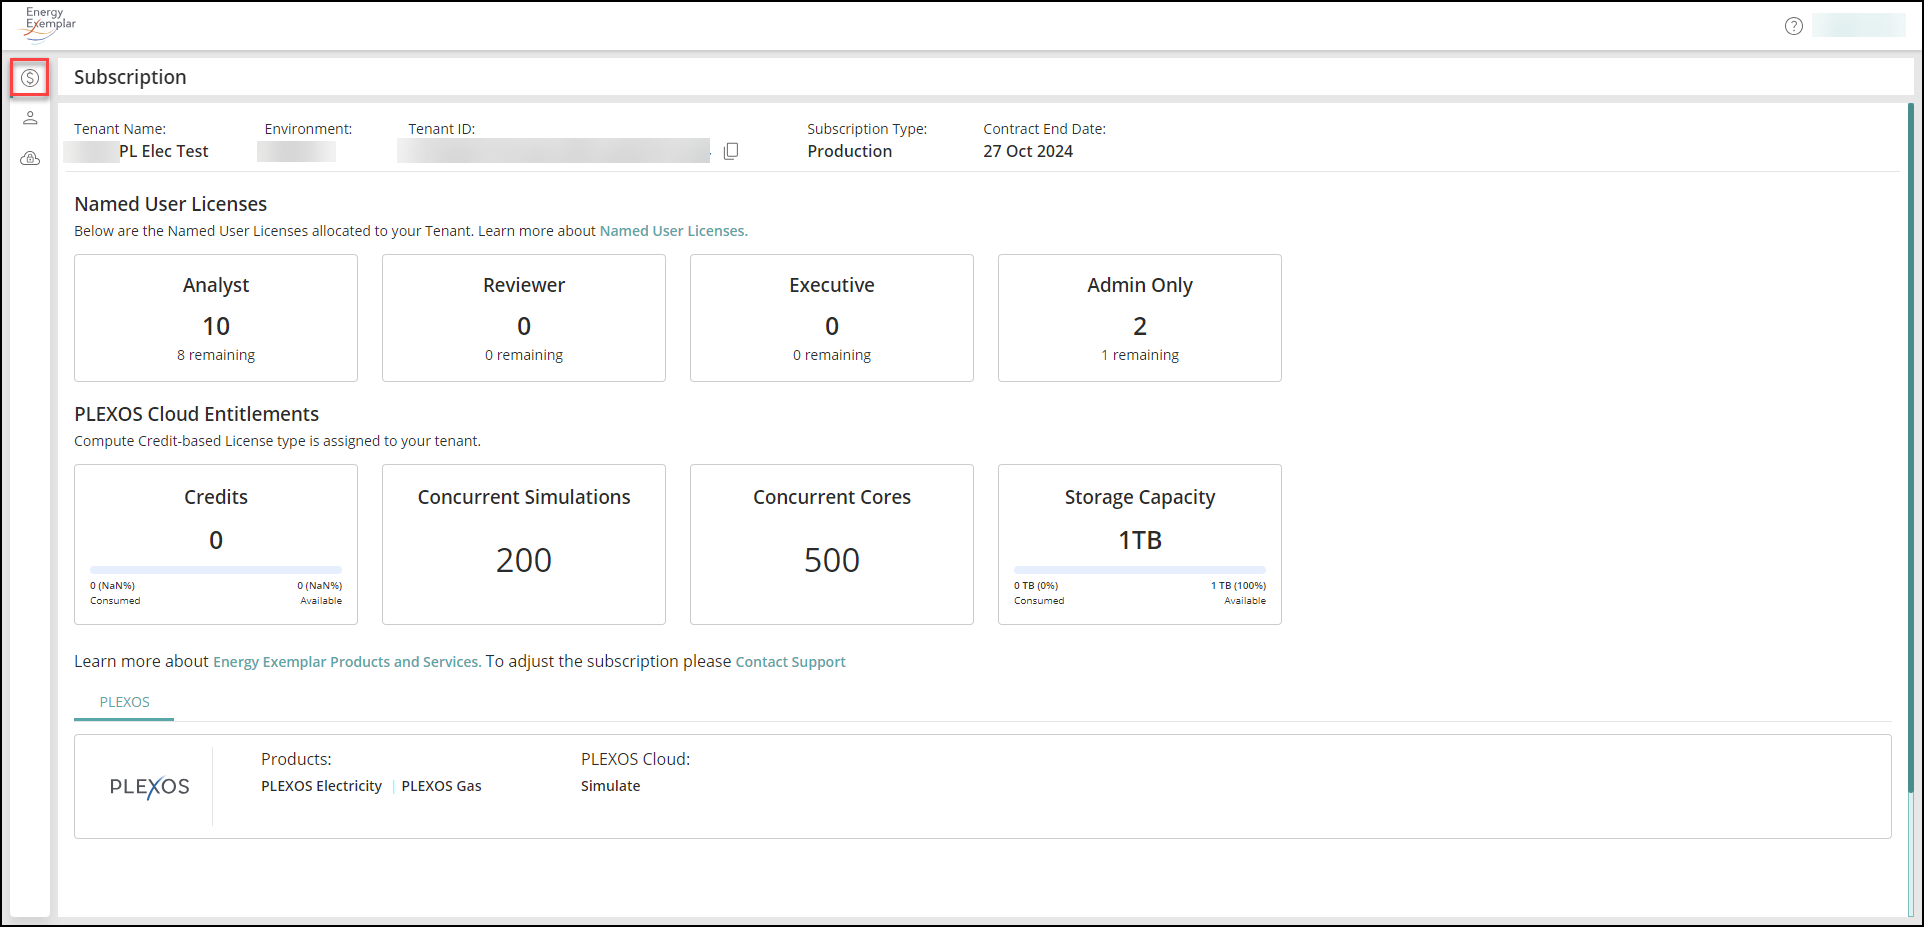
Find the details of each section on the Subscription page as mentioned below:
- Tenant Information: Provides detailed information on the Tenant Subscription including Tenant Name, Environment (currently logged in), Tenant ID, Subscription Type, and Contract End Date.
- Named User Licenses: Provides detailed information on license utilization, indicating both assigned licenses and the number remaining that can be allocated. Each tenant is assigned distinct license types, each with specific capacity limits that dictate the number of licensed users that can be created within that tenant.
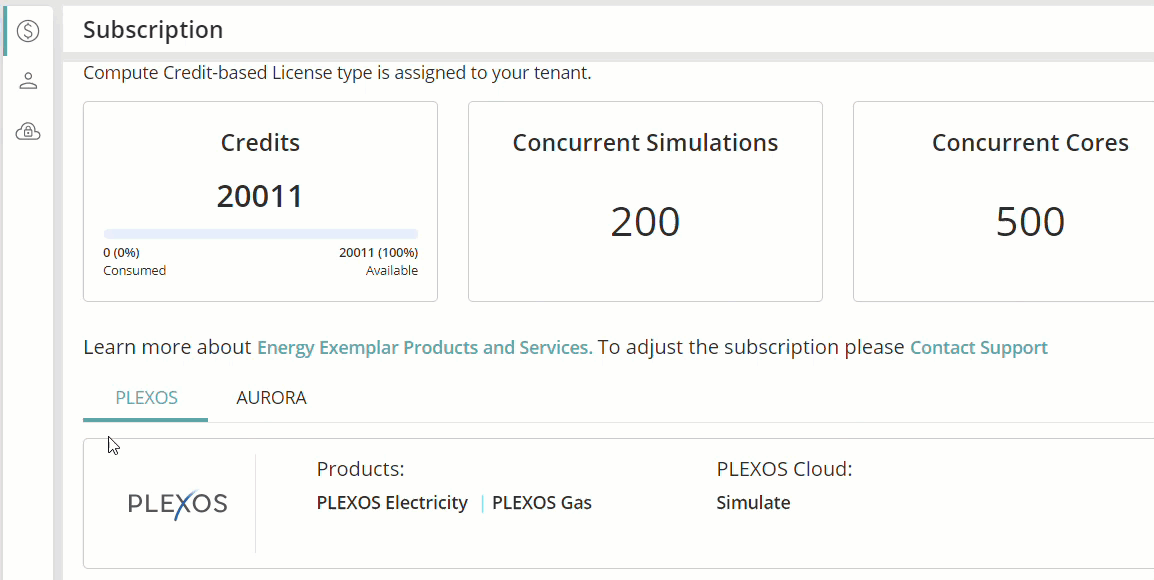
- PLEXOS Cloud Entitlements: Provides detailed information on the summary of configurations for use on the Cloud platform. This section is only available to tenants that own PLEXOS Cloud. See the details of each label as mentioned below:
- Credits: Credits are units designated to a tenant for running Simulations
- Concurrent Simulations: Concurrent Simulations refer to the number of Simulations that can be run simultaneously within the tenant.
- Concurrent Cores: Concurrent cores designate the maximum number of CPU cores that can be used simultaneously for running Simulations within the tenant.
- Storage Capacity: Storage capacity is the total amount of data, in terabytes (TB) that can be stored in PLEXOS Cloud.
- Access to PLEXOS Desktop / Aurora products: Provides information on different PLEXOS Desktop and Aurora products access you have including Product name and License Tier type. Users can view the sorted on-premises applications in distinct tabs, making it easy to access all relevant information about a specific application in one place. These tabs offer a complete overview of tenant Entitlements, and their Cloud Subscription details, improving user experience and making critical information more accessible.
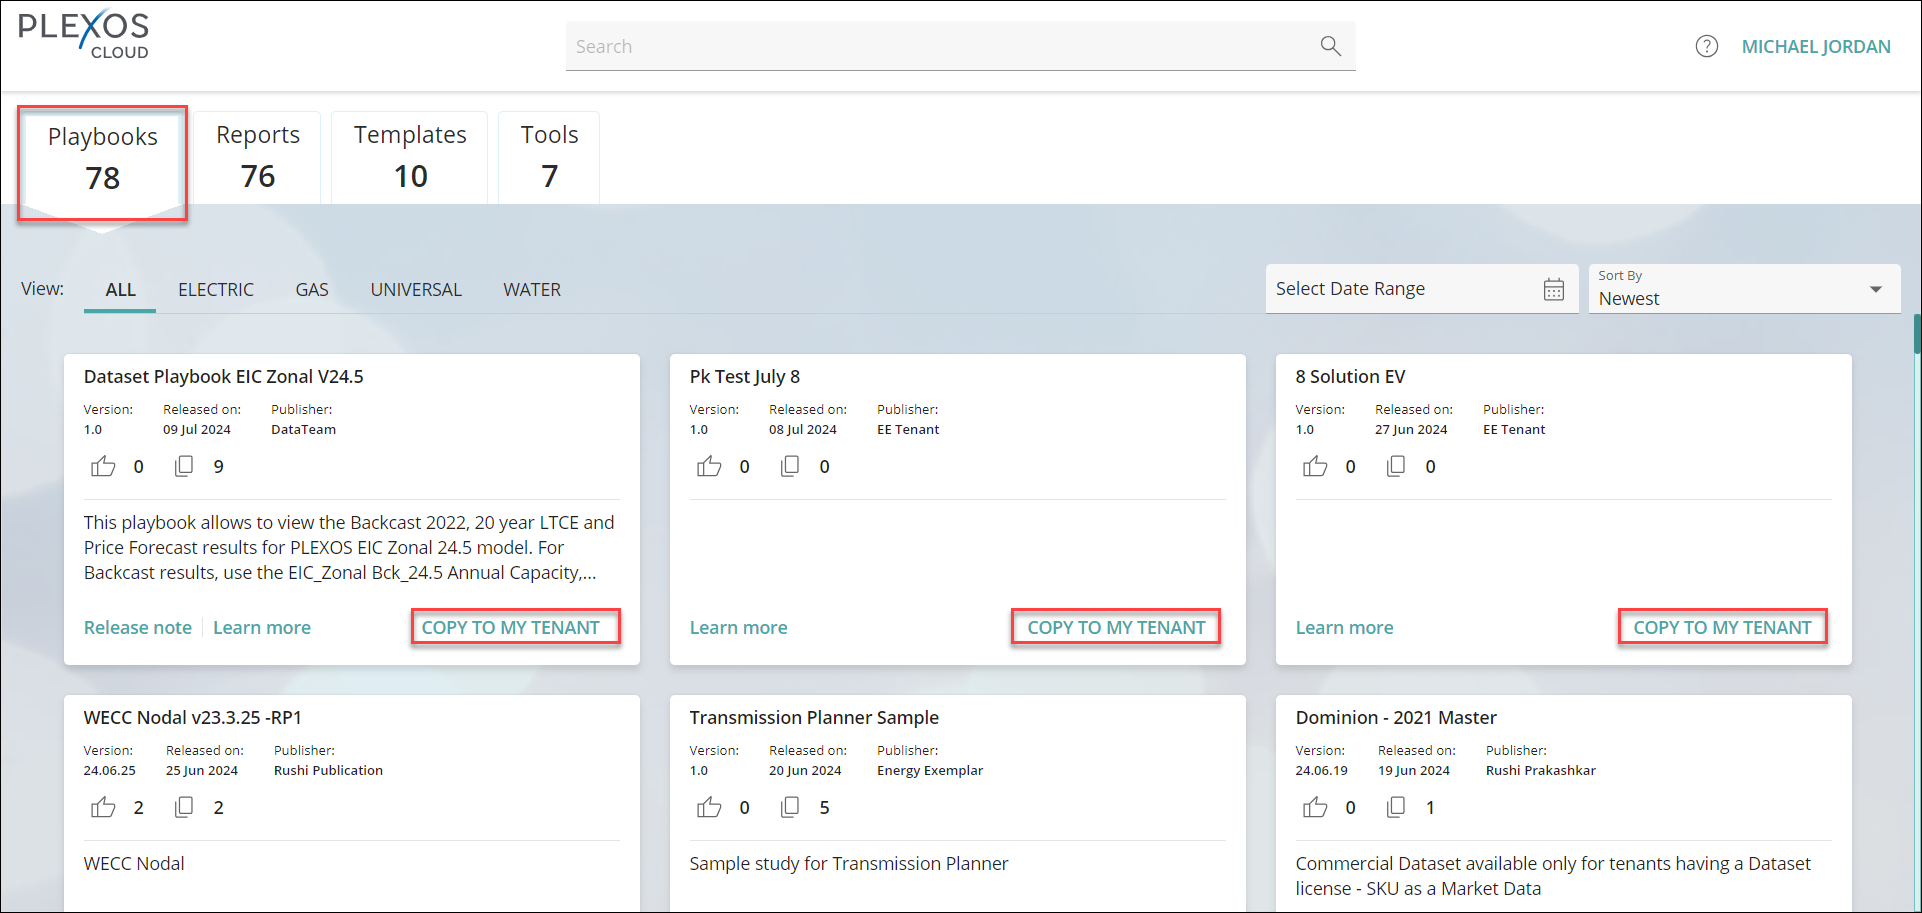
- Access to DATASETS: The DATASET tab provides tenant Admins with a list of datasets they purchased from Energy Exemplar. The DATASET tab includes vital information such as Product Name, Product Description, and the Assigned To column, to provide Admins with a comprehensive overview of each dataset under their tenant. Admins can utilize the Download button on the DATASET tab to retrieve dataset information in CSV or Excel formats, directly to their machines.

The CLM uses this list of licensed datasets to control what datasets the users can copy to their tenant in the Marketplace. The COPY TO MY TENANT button of the purchased datasets is enabled for all users in the company.
User Management page
Admin can manage User Licenses, Create or Delete a user, and assign different roles to a user on the Users page of the CLM URL or in PLEXOS Cloud.
1. Login to the Central License Manager (CLM) with your valid credentials. Refer to the table below to view the URLs of different regions or environments:
Environment/Region URL
North America https://license-manager-web-eeprod-na.energyexemplar.com
Europe https://license-manager-web-eu.energyexemplar.com
Australia https://license-manager-web-au.energyexemplar.com
India https://license-manager-web-ind.energyexemplar.com
2. Navigate to the Users page from the left navigation menu and click on the ADD NEW USER button available in the upper right corner of the screen.

3. The Add Users panel will open on the right. You need to fill out all the fields to add a new user. Find the details of each field as below:
A. First Name: Enter the first name of the user.
B. Last Name: Enter the last name of the user.
C. Email: Enter the email ID of the user.
NOTE: If you enter an existing or invalid email address, an error message “Not a Valid email address“ will pop up.
D. Add License: You can select applicable License types for a user from the dropdown as shown below:
NOTE: For each license type, you will see the number of Remaining licenses out of the purchased licenses.
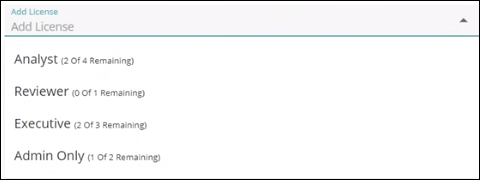
- Analysts: Analysts are the Modelers who have full access to the PLEXOS Cloud application. They can Edit, Model, Execute Simulations, and create and view Reports based on the platform tier licensed. Analysts could have an Admin role assigned which allows them with Admin access.
- Reviewers: Reviewers have non-execution licenses available in blocks of five, with tailored pricing. Although Simulations are not allowed with this license, Reviewers can log in to PLEXOS Cloud and access all data, including Input and Output. They can leverage Solution Output Analysis tools, view Map-based visualizations, access Solution Reports, and build Ad-hoc Charts on the Data Grid. They do not have editing capabilities or the ability to create BI Reports. Reviewers cannot access PLEXOS Desktop as this is just a Cloud-only license.
- Executives: Executives also have non-execution licenses, offered in blocks of five with corresponding pricing. Like Reviewers, they cannot perform Simulations but can view all Output Data and Reports shared with them. They can explore Map-Based Visualizations, and access published Solution Reports and BI Reports. However, Executives cannot Edit Input Data, Run Simulations, or generate Reports. Executives cannot access PLEXOS Desktop as this is just a Cloud-only license.
- Admin Only: Admins with this license can access the Central License Manager (CLM), which includes the Subscription, Users, Single Sign-On (SSO), and Access Keys pages. Each customer migrated to the CLM will receive two Admin Only licenses free of charge to perform administrative activities. This license allows Admins to manage tenant users and licenses in the CLM and Admin page in the PLEXOS Cloud but does not grant access to the Data, Models, Simulations, Solutions, and Comparison pages in the PLEXOS Cloud interface.
- Cloud Analyst: This license type applies exclusively to PLEXOS Cloud customers. Cloud Analysts can perform all activities available to a Modeler or Analyst but must Run Simulations on the PLEXOS Cloud only. Cloud Analysts could have an Admin role assigned, allowing them Admin access.
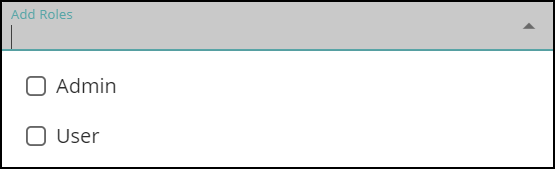
E. Add Roles: You can assign the desired Role(s) for a new user from the dropdown as shown below: (Based on the selection of the License type above, the Roles dropdown may vary between Admin or User option.)
4. Click on the SAVE button to add a new user with the above-entered details.
5. The newly added user will appear in the list under the Users page.
NOTE: Admins can utilize the Download button on the Users page to retrieve users information in CSV or Excel formats, directly to their machines.

NOTE: Upon new user creation, the new user will get a Welcome email from Energy Exemplar and has to go through the verification process to activate the email and start using Energy Exemplar licensed products. The email verification link expires within 48 hours, and Admin can re-send the link by clicking on the Email icon in the Actions column.
Update Existing User's Details
Admin can edit and save the License Types, Add or Remove Roles, and set existing users to Active or Inactive state as required.
Below are the actions an Admin can perform for an existing user in PLEXOS Cloud:
- Add License: Admin can select different license types from the dropdown.
- Add Roles: Admin can assign single or multiple roles from the dropdown as required.
- Status: Admin can change user status to an Active or Inactive state. When a user is set to Inactive, the confirmation pop-up will appear as below:
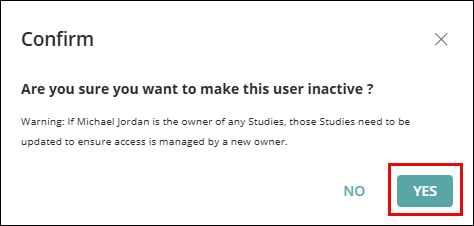
For Inactive users, the Admin can Delete a user if it’s no more required.
NOTE: For security purposes, you can only change the user’s status or delete a user after 3 days. except for the EMEA (Europe, Middle East, and Africa) region, where the stipulated waiting period is extended to 7 days. To immediately change the status of any user, please contact support and provide the User ID for quick processing.
Log In to PLEXOS Desktop
NOTE: This feature is available for both Simulate and Analytics tier customers.
Follow the steps below to access PLEXOS Desktop from the Central License Manager:
- Download and install PLEXOS Desktop 10 from the Energy Exemplar Customer Portal. (If not downloaded already)
NOTE: If the License Manager pop-up doesn't come automatically, go to the Windows Search bar > search for License Manager > open the latest version.
- After installation, you will see the below pop-up:
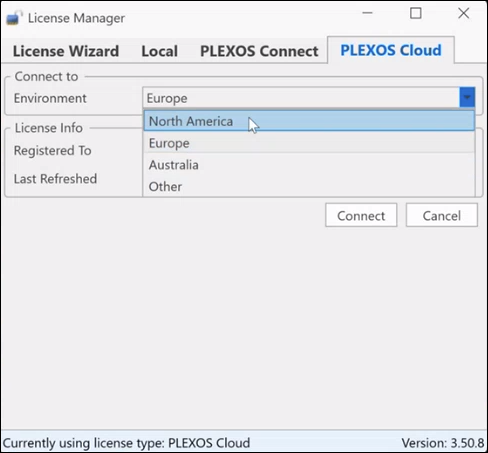
- Select the desired Environment from the dropdown list. If your environment is not present in the list, select Other and enter the name of the environment in the Other Environment field to Log In.
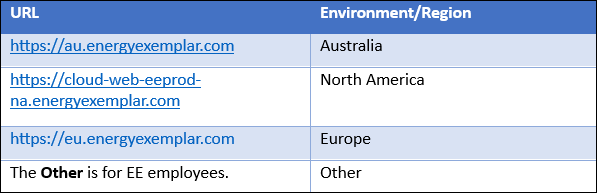
NOTE: The Environment is the region where your PLEXOS Cloud tenant is hosted. You can validate this from the URL provided in the Welcome email. See the different URLs and their regions for your reference:
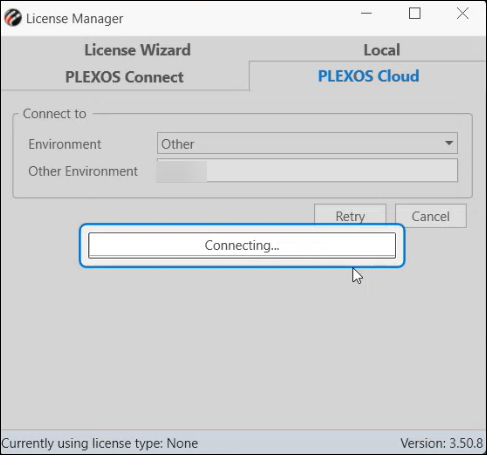
- Click on the Connect button to continue. (Clicking on the Connect button takes you to the Sign In page).

- From your browser, you will be redirected to the PLEXOS Cloud Sign In page for the selected environment. Enter your Login credentials and click on the Sign In button to continue.
NOTE: If you already have logged in to PLEXOS Cloud, you will be redirected to PLEXOS Desktop directly.
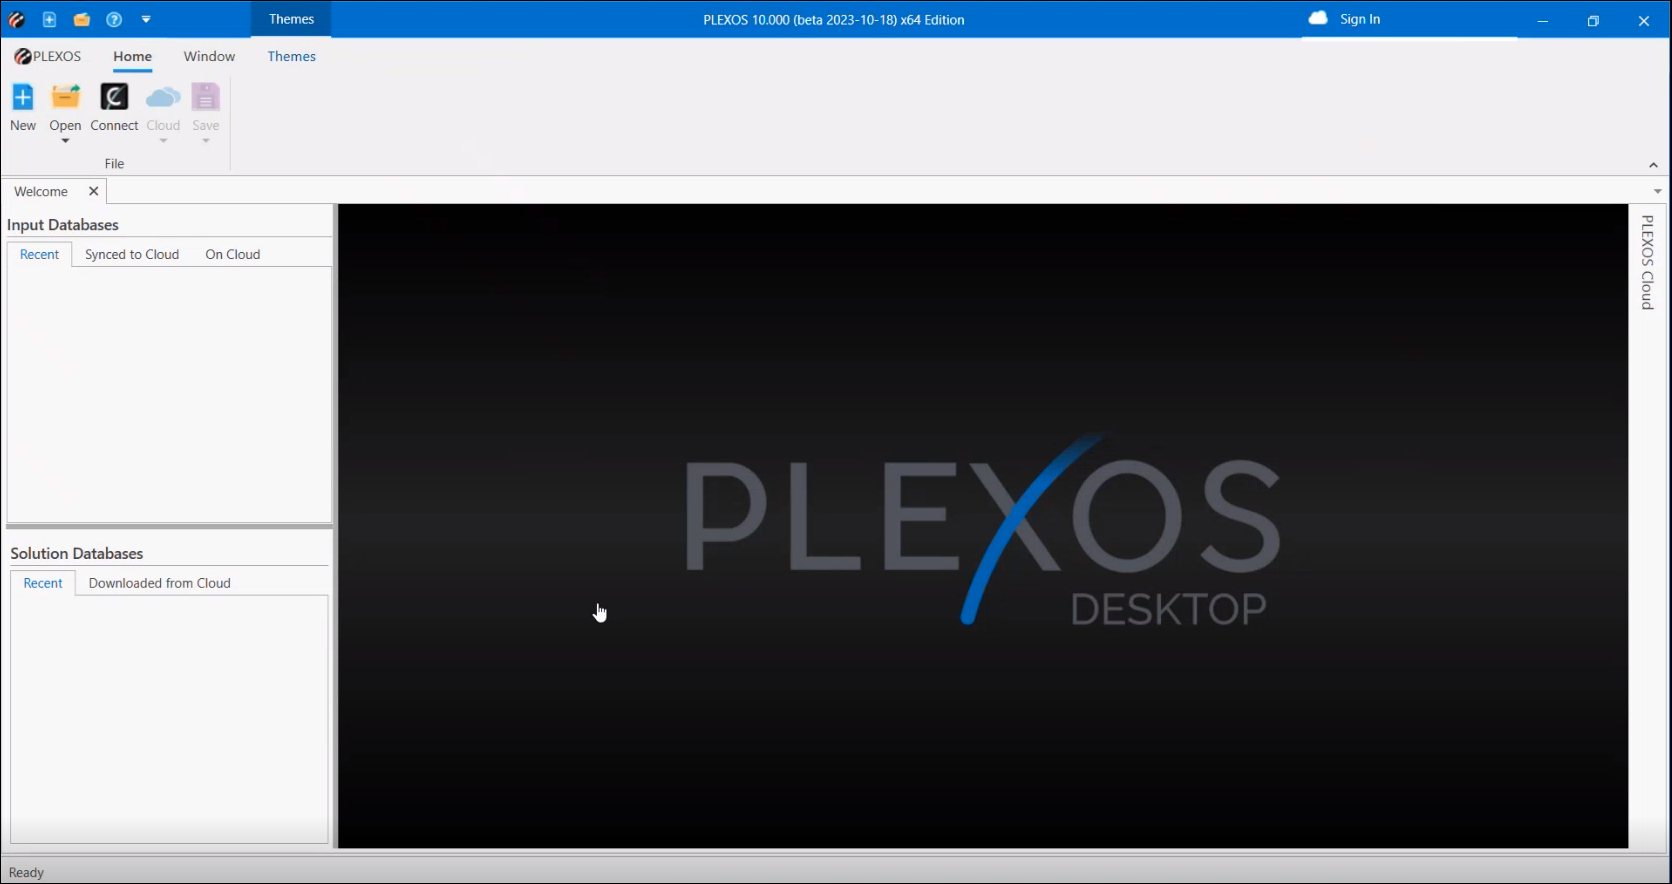
- After successful authentication, navigate to the PLEXOS Desktop and you will see the pop up showing the connection status as shown below:
- After the connection is successful, the PLEXOS Desktop homepage will open automatically as shown below:
NOTE: PLEXOS Desktop-only customers can ignore the steps below.
- At this step, you can use the PLEXOS Desktop features but to start using PLEXOS Cloud features, click on the Sign In button at the top-right of the screen.

- Select the required environment from the list. Refer the table mentioned in step 3 to identify your environment.
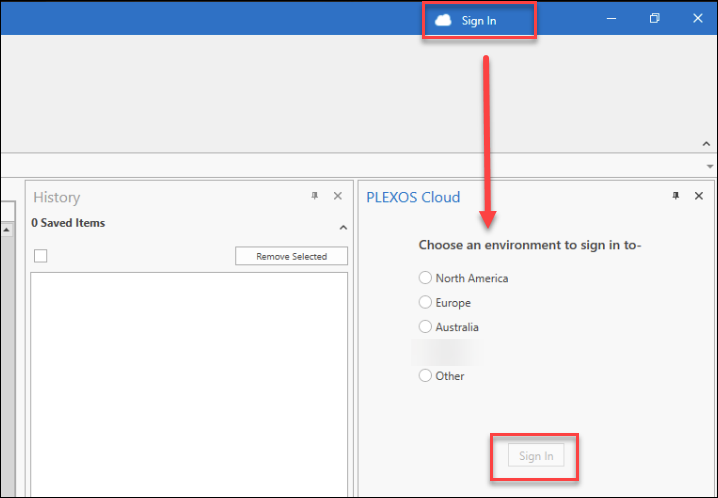
- The PLEXOS Cloud Sign-In panel may show up on the left side of the screen, just Pin the panel so it will stay on the right side of the screen.
- Click on the Sign In button. The authenticator will open a browser to log you in.
- Once successfully logged in, come back to PLEXOS desktop. You are now ready to use PLEXOS Desktop and PLEXOS Cloud together.
NOTE: After you Sign In successfully, your name will display in place of the Sign In button in the upper right section of the screen.
Verify the License File for PLEXOS
You can verify CLM generated license information in the License file available below on your PC:
C:\Users\Username\AppData\Roaming\PLEXOS
Log into Previous PLEXOS Versions
The license file generated by CLM through PLEXOS 10 Sign-In will allow you to log into previous PLEXOS versions. Users need to Sign In with the PLEXOS 10 Cloud option, and all previous versions will be able to open as usual.
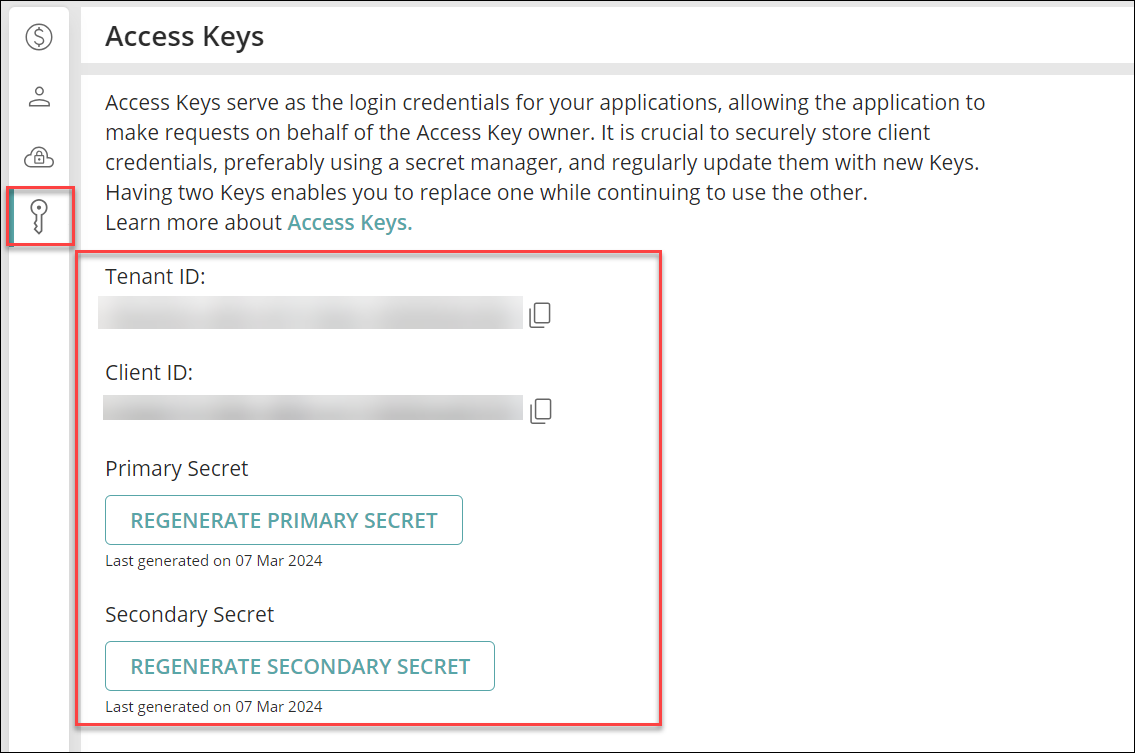
Access Keys to Set up Connect Server
NOTE: This section applies to any customer who uses PLEXOS Connect, CLI, and API. For Cloud customers, this applies to both Simulate and Analytics Tier customers.
The Access Keys page allows Admins to generate or regenerate essential login keys, such as Client ID, Primary Secret, and Secondary Secret. These keys enable seamless access to Energy Exemplar services without requiring users to log in to PLEXOS Cloud directly.
Located on the Access page, these keys are generic and can be utilized to access Energy Exemplar services like PLEXOS Connect, Command Line Interface (CLI), and Application Programming Interface (API), etc. Admins can regenerate and copy these login keys and secrets multiple times, ensuring smooth access to services.
Generate Initial Keys
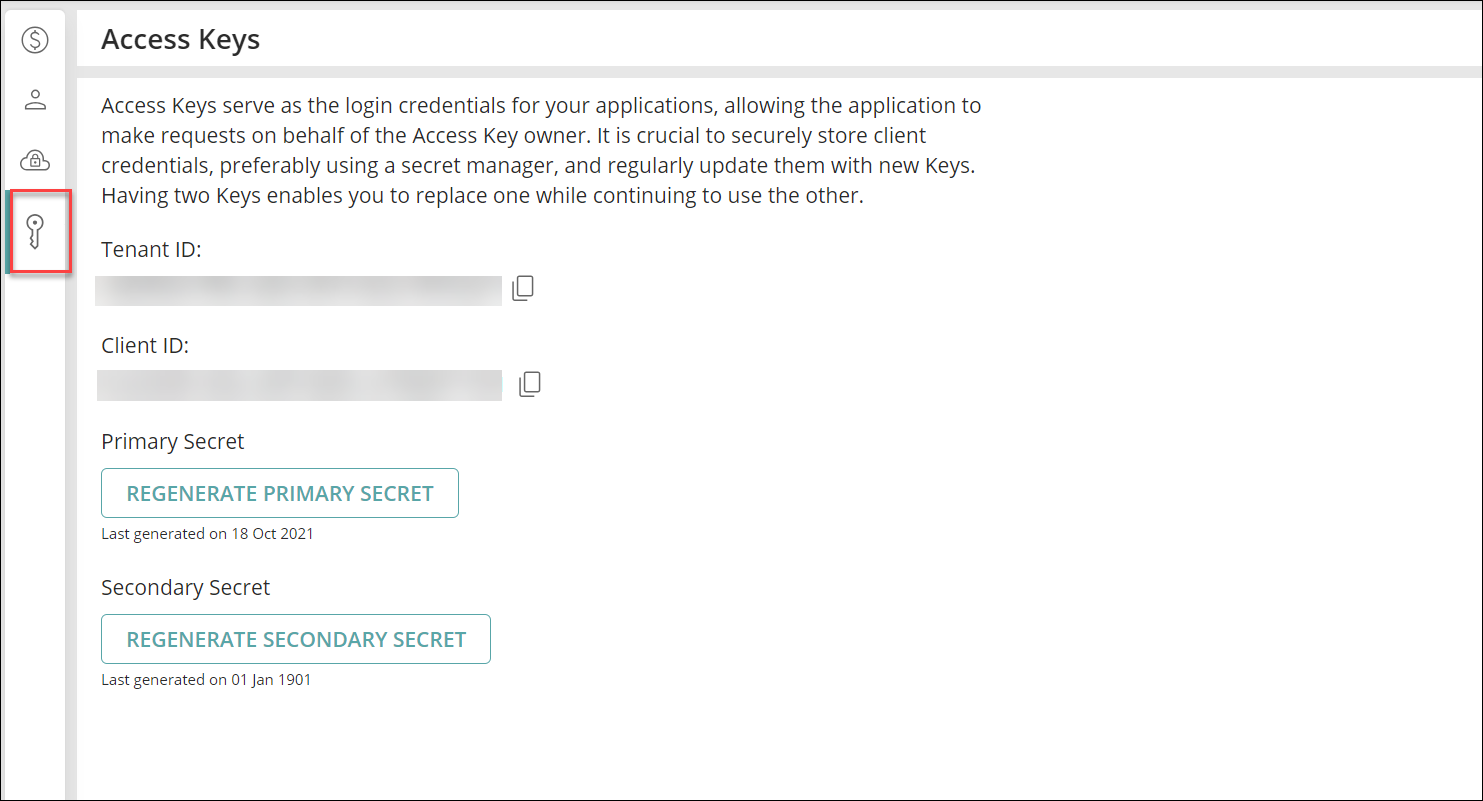
If the user has not generated the Secret Keys earlier, they will see the Tenant ID and GENERATE KEYS button on the Access Keys page as shown below. Follow the steps below to generate the Keys for the first time:
- Click on the GENERATE KEYS button to generate the Primary and Secondary Secret.
- An Access Key details dialog appears showing the Tenant ID, Client ID, Primary Secret, and Secondary Secret.
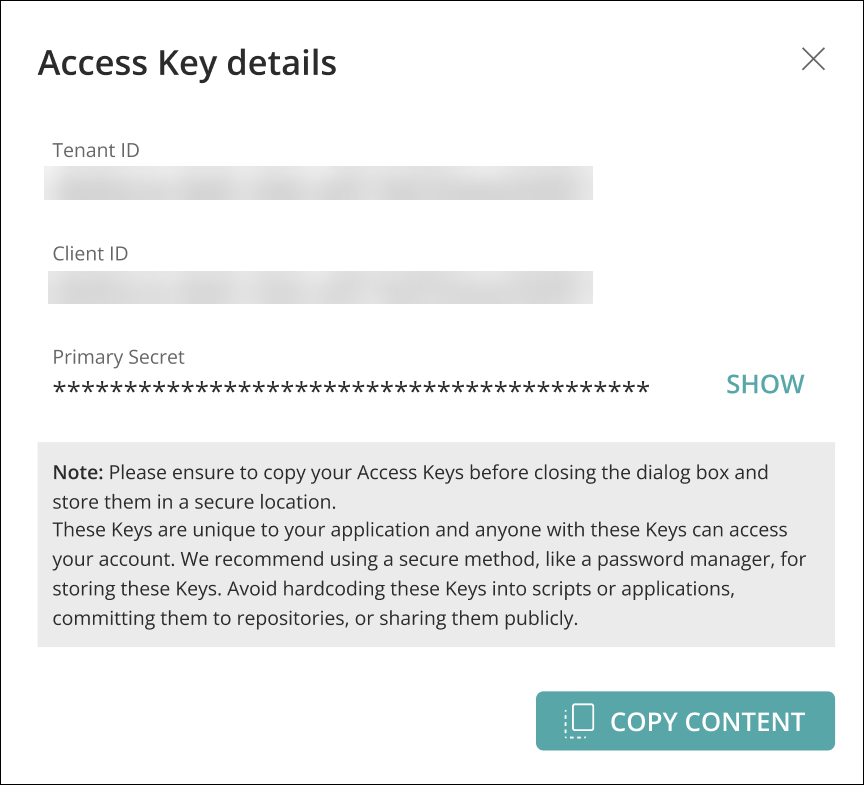
- IMPORTANT: Please ensure to copy your Access Keys before closing the dialog box and store them in a secure location. These Keys are unique to your application and anyone with these Keys can access your account. We recommend using a secure method, like a password manager, for storing these Keys. Avoid hardcoding these Keys into scripts or applications, committing them to repositories, or sharing them publicly.
- Click on the COPY CONTENT button to save these details on your clipboard. You can use these keys to share them with users in your organization to access Energy Exemplar services.
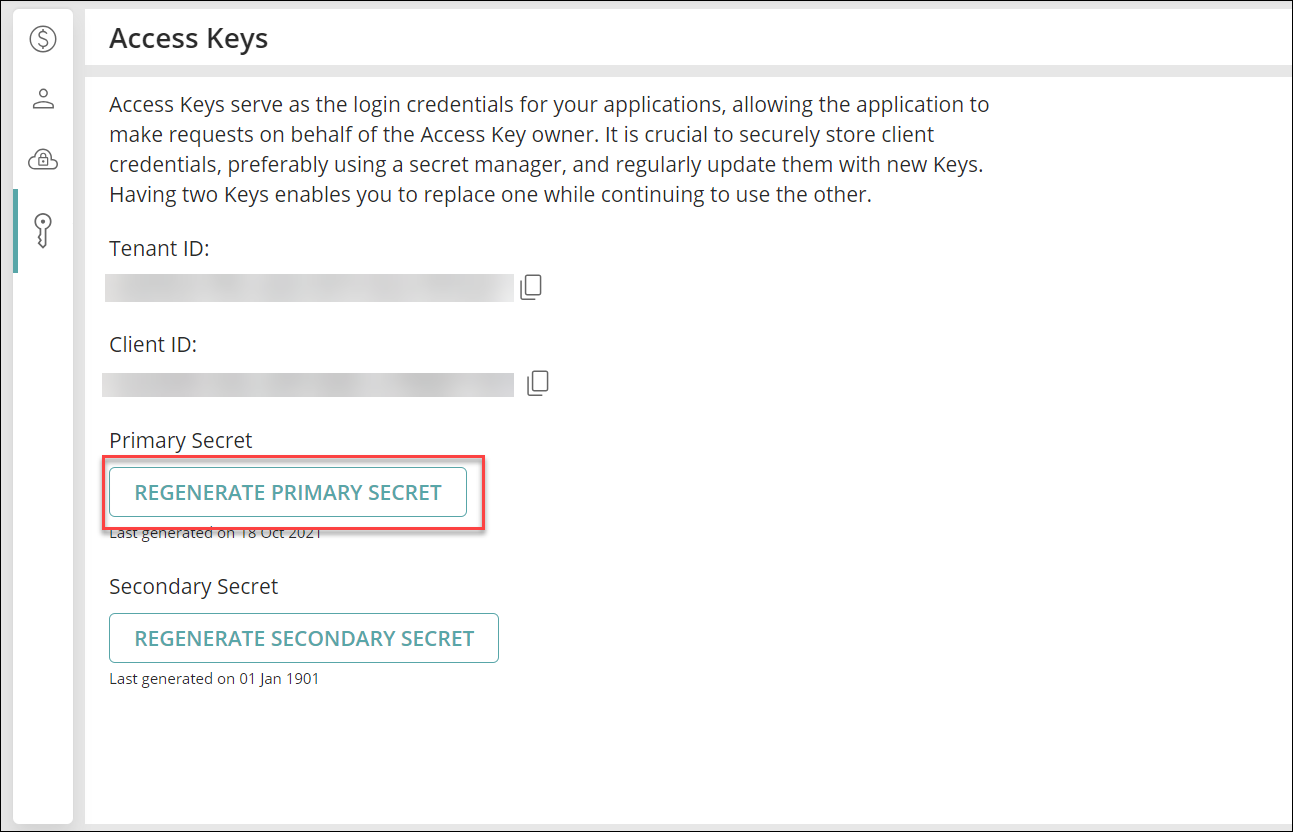
Regenerate Primary and Secondary Secrets
Users can regenerate the Primary and Secondary Secret multiple times. Using two secrets enables you to replace one while continuing to use the other. Follow the steps below to regenerate the Secret Keys:
- Click on the REGENERATE PRIMARY SECRET button.
- The Regenerate Primary Secret confirmation dialog appears, click on the CONFIRM button to continue.
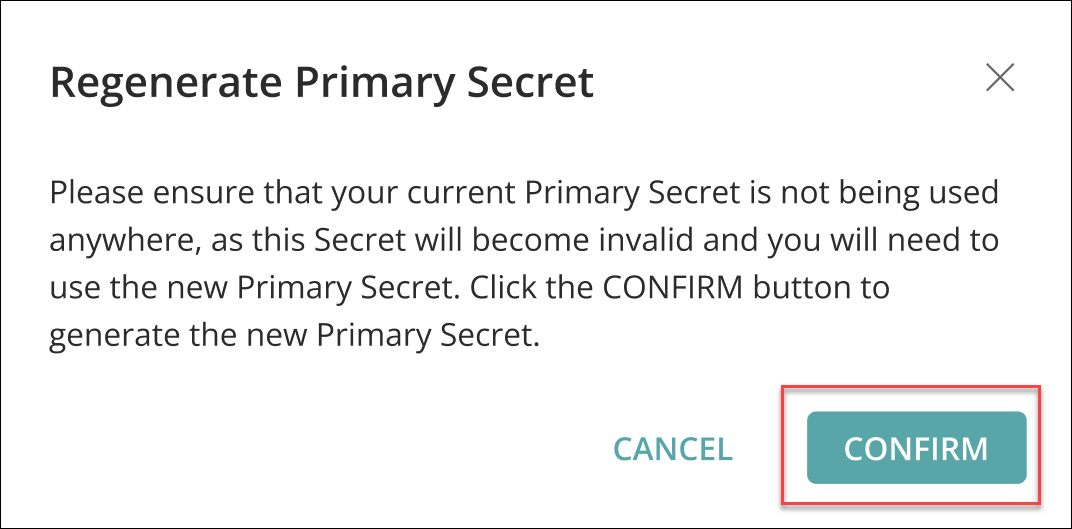
NOTE: Clicking on the CONFIRM button will make the current Primary Secret invalid. So, you will need to use the new Primary Secret wherever applicable.
- The Access Key details dialog appears showing the newly generated Primary Secret along with the Tenant ID and Client ID.
- Click on the COPY CONTENT button to save these credentials on your clipboard.
- Repeat the steps above by clicking on the REGENERATE SECONDARY SECRET button to regenerate the Secondary Secret.
Usage page
The Usage page empowers Tenant Admins with comprehensive visibility and control over license usage across their organization and offer the following benefits:
- Improved License Management: Gain precise control over license allocations, ensuring all users are properly licensed and renewals are managed proactively.
- Enhanced Compliance and Reporting: Comprehensive Data Export for License Analysis in CSV and Excel Formats. The Data Download feature in Central License Management (CLM) allows users to extract licensing data into CSV or Excel format for further analysis. It enhances the ability to efficiently analyze, track, and report on license management.
- Time-Saving and Efficient Monitoring: With advanced filtering and export options, tracking license usage has never been simpler. This helps you focus on what matters most and optimize your operations.
Key Features
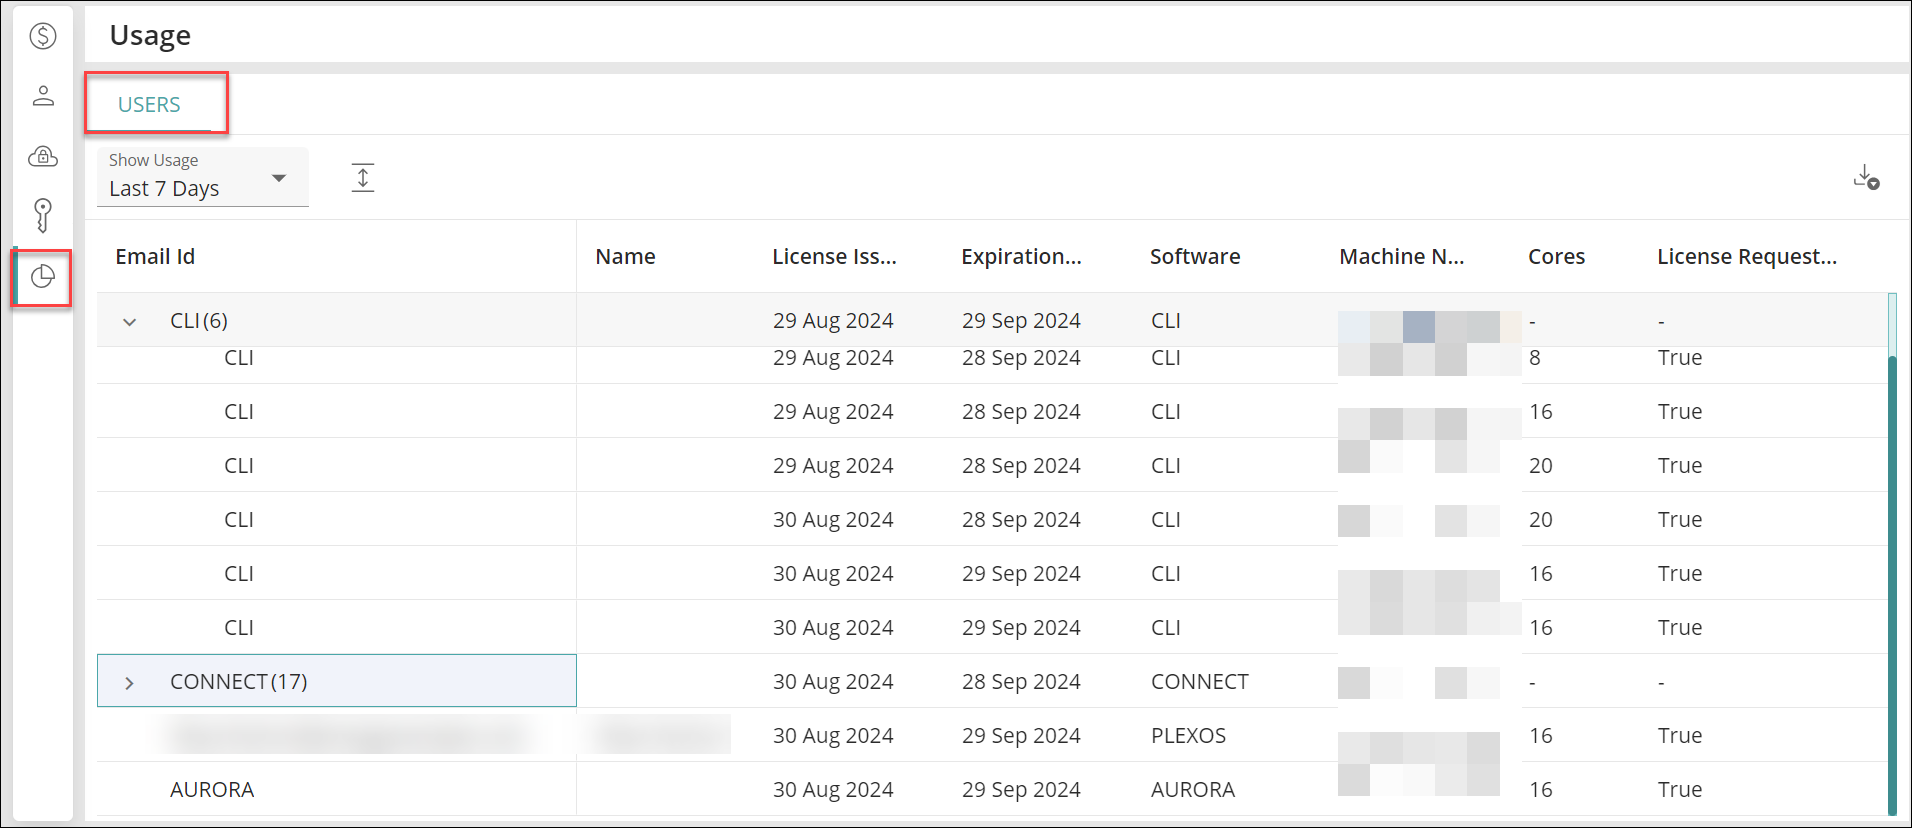
- Comprehensive License Tracking: The new Usage page allows Tenant Admins to efficiently track and report license usage for all users within their Tenant. You can easily monitor when licenses are issued and when they expire and gather detailed information for each user, ensuring better compliance and license management.
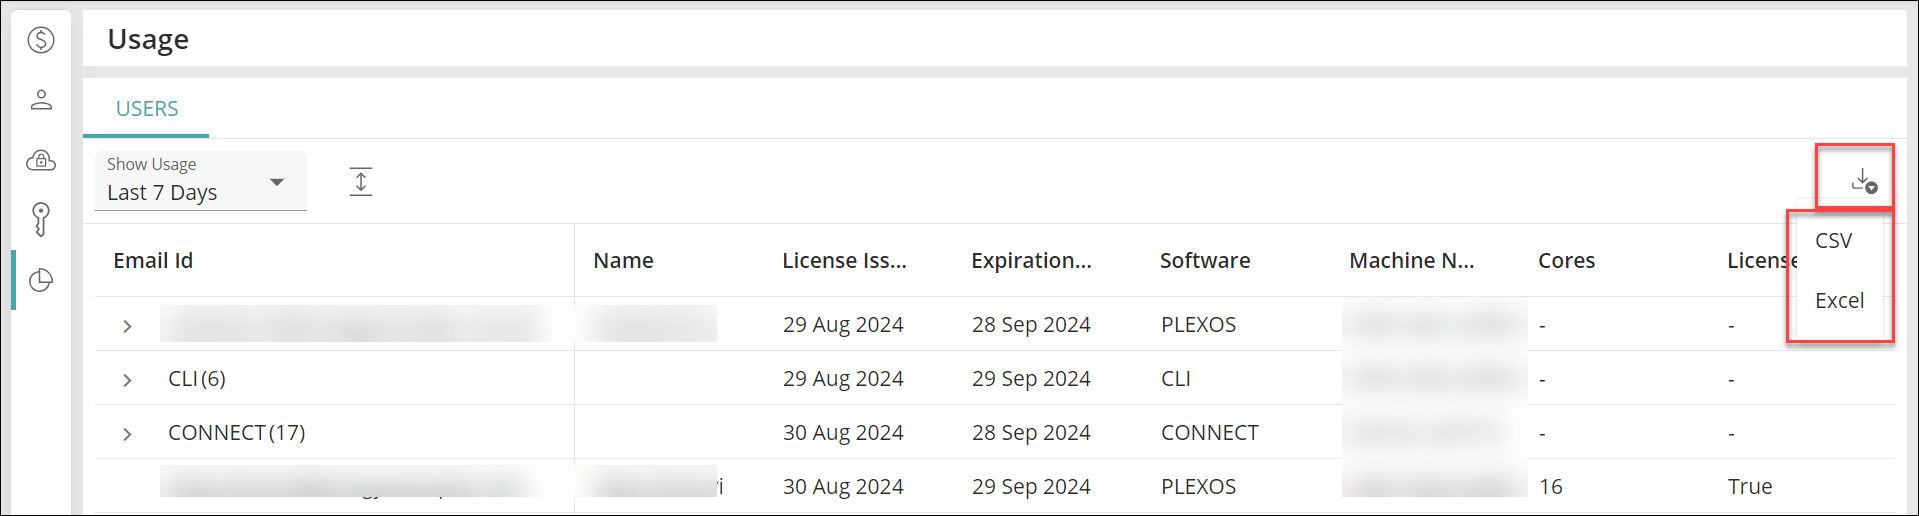
- Detailed User-Level Insights: The Usage page provides aggregated data for each user, including:
- Email: Displays the user's email address linked to one or more software applications. If a user's email is associated with multiple software products, you can click on the email to expand and view details, including the associated Software, Machines, Cores, and License Status for each.
- Name: Displays the unique name of each user associated with the email address.
- License Issued Date: Keep track of when each license was issued.
- License Expiration Date: Stay informed about upcoming license expirations to avoid service disruptions.
- Software: Indicates whether each user license is associated with Aurora, PLEXOS , Connect, or CLI.
- Machine Name: Identify the specific machine associated with the license.
- Cores: Monitor the number of Cores allocated for each license.
- License Request Status: Clearly identify the status of each license request, including detailed information for any failed requests, enabling quick troubleshooting and resolution.
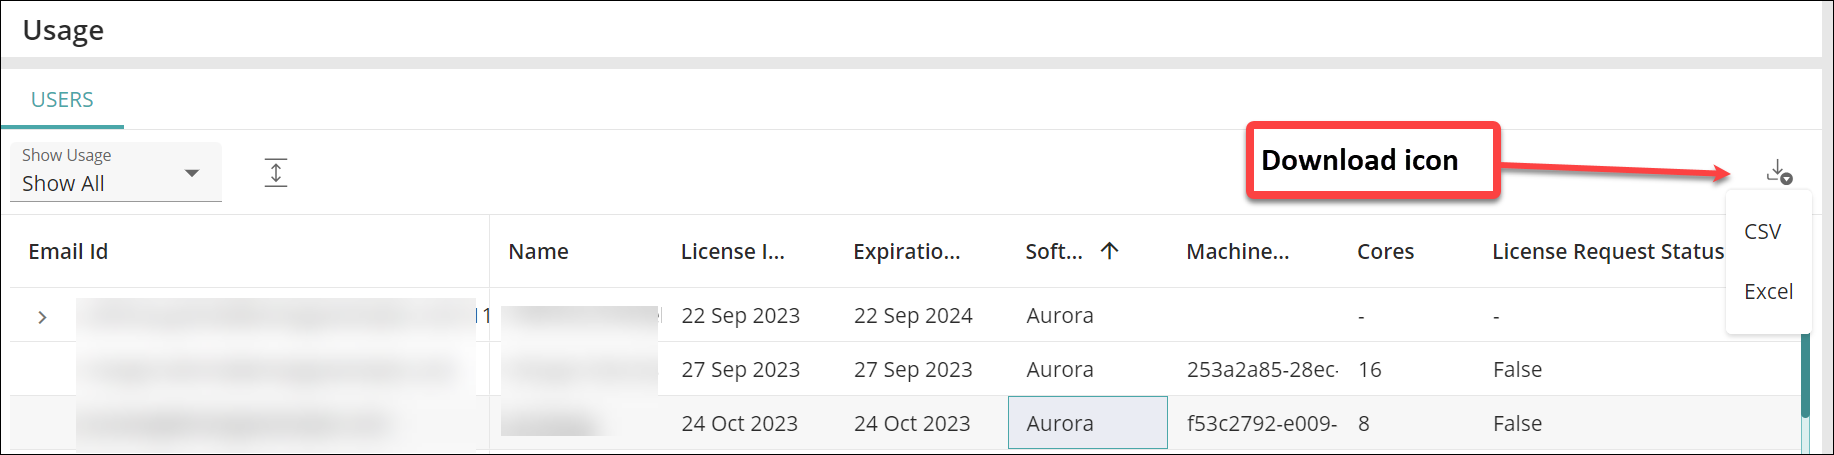
- Advanced Filtering Options: The Usage page includes robust date filtering capabilities to enhance usability. You can easily filter license data for the last 7 days, 30 days, 90 days, or specify a customizable date range to meet your specific reporting needs.
- Exportable Licensing History: The Usage page allows you to download the full history of license issuances for better record-keeping and external reporting. Click on the Download icon at the top right corner of the screen in either CSV or Excel format. This feature simplifies generating audit trails and ensures you always have access to critical data.
Configure PLEXOS Desktop/Connect with the PLEXOS Cloud License
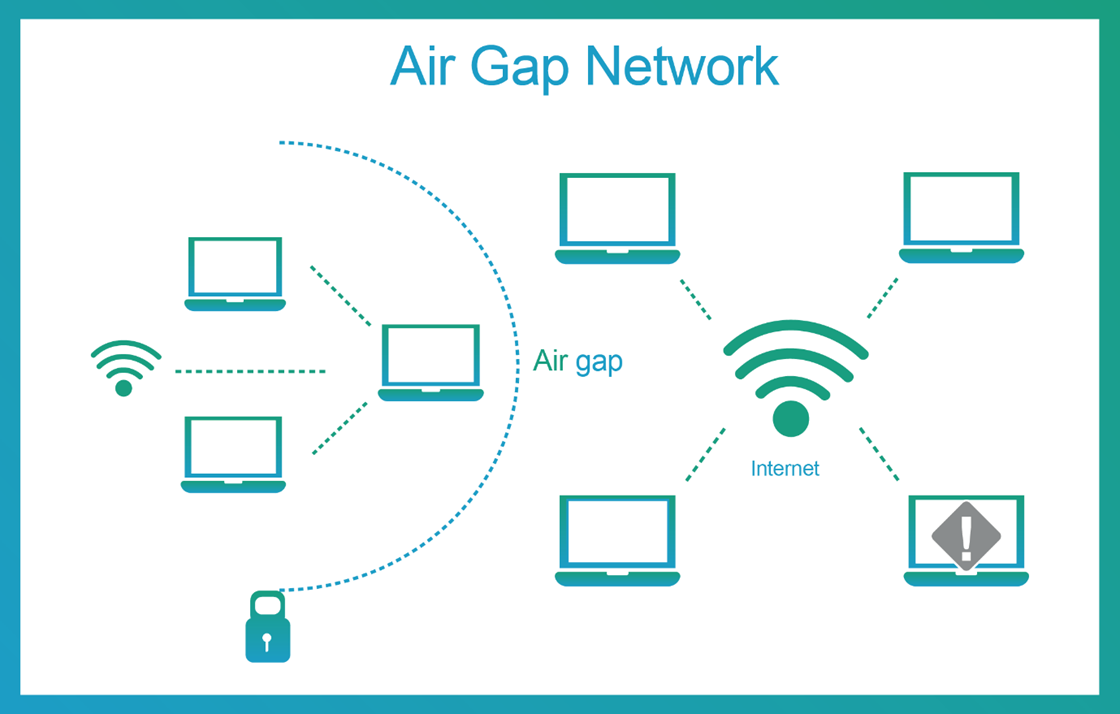
Create a Local License for Air Gap Machines
In scenarios where PLEXOS is installed on machines that are completely isolated from external networks, obtaining a license via CLM is not feasible. These AirGap machines, which are entirely disconnected from the internet, cannot meet the basic requirement of internet connectivity necessary for fetching the license through CLM.
Pre-requisites
The machine connected to the internet must have a Command Line Interface (CLI) installed. Follow the below-mentioned steps to obtain the license for Air Gap machines:
For PLEXOS Desktop Users
- Download and install PLEXOS Desktop 10 and above from the Energy Exemplar Customer Portal. (If not downloaded already)
NOTE: If the License Manager pop-up doesn't appear automatically, go to the Windows Search bar > search for License Manager > open the latest version. After installation, the License Manager pop-up appears as shown below:
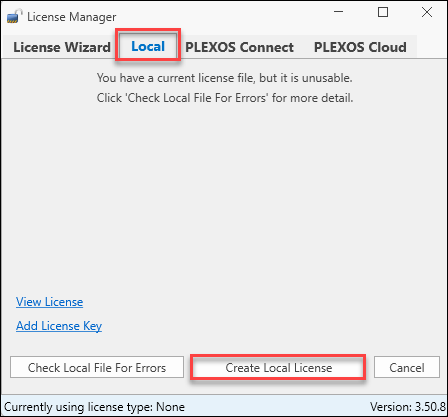
- Switch to the Local tab and click Create Local License button to generate a EE_lcl.lic license on the machine where you want to use PLEXOS Desktop.
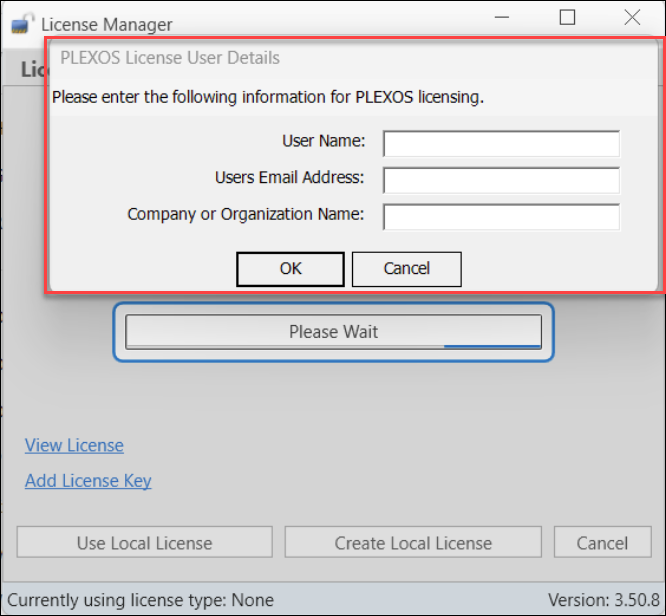
- Enter the User Name, Email Address, and Company Name, and click OK button to initiate the license generation process.
NOTE: If you have the Local License file already generated on your system, the following message appears confirming whether you want to recreate it.
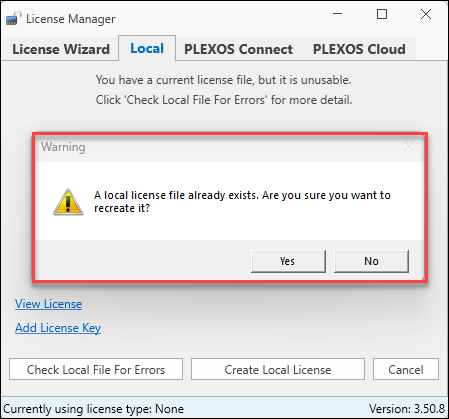
- Click the Yes button to recreate the new Local License File. OR Click the No button to use the existing Local License File.
- After successfully completing the process, you will notice the following pop-up, showing the path of the EE_lcl.lic license stored on your local machine.
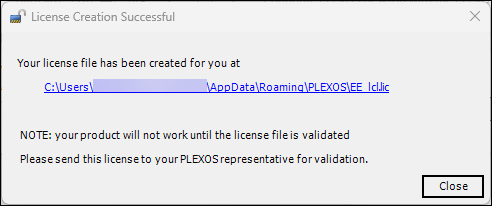
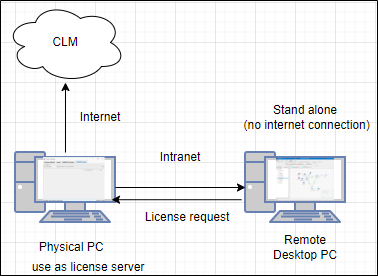
- To validate and activate this license file for your product, transfer the generated file in step 5 above via an intranet, flash drive, or CD to a machine with internet access. Ensure that the receiving machine has PLEXOS Command Line Interface (CLI) installed.
NOTE: Please note down the file path where the License File is stored on your internet-connected machine.
- Open the Command Prompt on the system that is connected to the internet.
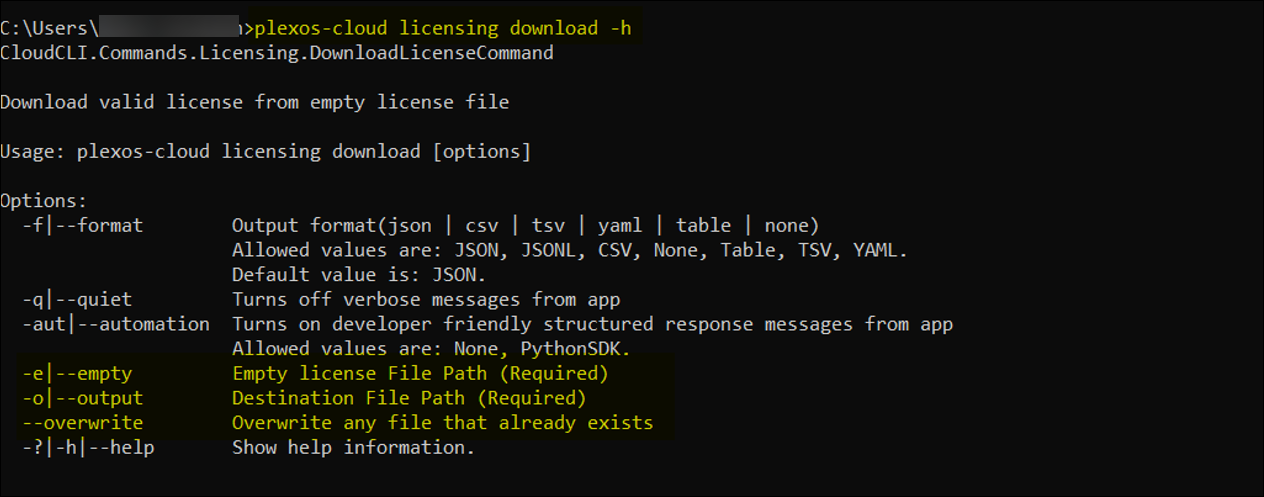
- Enter the following command to find the necessary options required to generate a PLEXOS Desktop License file.
NOTE: The user must set the environment and authenticate itself before proceeding to generate the PLEXOS Desktop License file. Refer to the CLI Toolkit article to learn more about authentication and Environment Setup commands.
plexos-cloud licensing download -h
- Enter the following command to download the license file to your machine, connected to the internet:
plexos-cloud licensing download -e “Enter the file path as mentioned in the NOTE of step 6” -o "Destination File Path as mentioned in NOTE of step 6”

- Copy the newly generated EE_lcl.xml file to the Air Gap machine and paste this xml file at this location:
C:\Users\<UserName>\AppData\Roaming\PLEXOS
- Start using the PLEXOS Desktop on the Air Gapped machines.
NOTE: The downloaded license file is valid for 30 days only. To refresh the license file after 30 days, follow the steps from step 7 and onwards as mentioned above.
For PLEXOS Connect Users
- Download and install the PLEXOS Connect 3.5R09 and above from the Energy Exemplar Customer Portal. (If not downloaded already)
- In the PLEXOS Connect application, click on the Licensing > View Server License option to get redirected to the Setup License dialog:
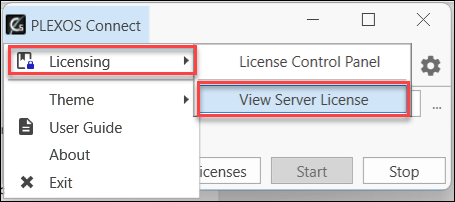
- Switch to the Legacy tab and click Create Empty License button to generate an EE.lic license on the machine where you want to use PLEXOS Desktop.
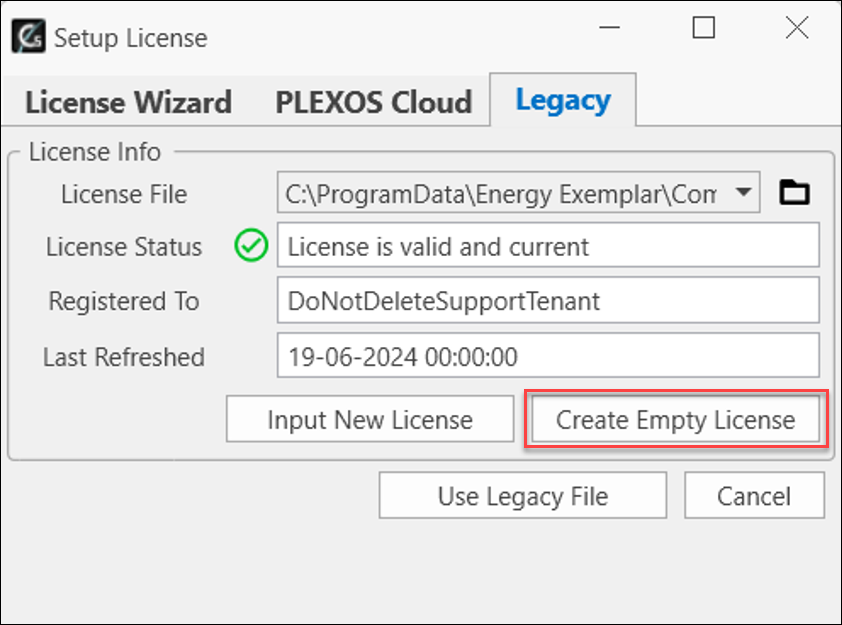
NOTE: If the Setup License dialog doesn't come automatically, navigate to the Windows Search bar > search PLEXOS Connect Application > open the latest version.
- After successful completion of the process, you will notice the following pop-up, showing the path of the EE.lic license stored on your local machine.
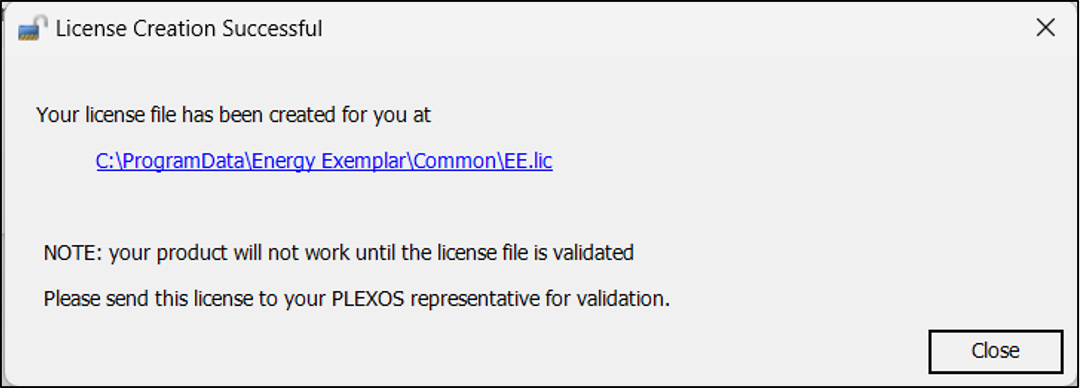
- To validate this license file and activate it for your product, transfer the generated file in step 3 above either via an intranet, flash drive, or CD to a machine having internet access. Ensure that the receiving machine has PLEXOS Command Line Interface (CLI) installed.
NOTE: Please note down the file path where the License File is stored on your internet-connected machine.
- Open the Command Prompt on the system that is connected to the internet.
- The user must set the Environment and Authenticate before proceeding to generate the PLEXOS Desktop License file. Refer to the CLI Toolkit article to learn more about authentication and Environment Setup commands.
- To authenticate the user for the Connect license, the user must have their Tenant ID, Client ID, and Secrets handy. Users can get these details from the CLM > Access Keys page.
- The command line to authenticate the user for connect is as follows:
plexos-cloud auth login --service-principal --tenant-id {} --client-id {} --client-secret {}

- Enter the following command to find the necessary options required to generate a PEXOS Desktop License file.
plexos-cloud licensing download -h
- Enter the following command to download the license file to your machine, connected to the internet:
plexos-cloud licensing download -e <Enter the file path as mentioned in the NOTE of step 5> -o <Destination File Path as mentioned in NOTE of step 5>
- Copy the newly generated EE.xml file to the Air gap machine and paste this xml file at this location:
C:\ProgramData\Energy Exemplar\Common
- You can now start using the PLEXOS Desktop on the Air Gapped machines.
NOTE: The downloaded license file is valid for 30 days only. To refresh the license file after 30 days, follow the steps from step 5 and onwards as mentioned above.
For Aurora Machine Users
To generate a license for an Air-Gapped machine, ensure you have the necessary tools and information as follow:
- Required Software
- Download and Install Aurora version 15 or the Command Line Interface (CLI), tool required to manage licenses and interact with the PLEXOS Cloud environment. This is essential for generating and applying licenses to air-gapped machine.
- Machine Name
- Locate the machine name, which is the unique identifier assigned to your device by the operating system. It ensures the license is linked to the correct air-gapped machine. You can find it under System > About on the device.
- Machine Identifier
- Retrieve the machine identifier, a unique hardware-based GUID (Globally Unique Identifier) used to tie the license to the target machine.
- Use one of these methods:
- Registry Editor: Navigate to the appropriate registry hive entry to find the identifier.

- PowerShell: Run the following command in PowerShell on the target machine.
Get-ItemProperty -Path HKLM:\SOFTWARE\Microsoft\Cryptography -Name "MachineGuid"

To generate a license for an air-gapped Aurora machine, you’ll need access to a machine with internet connectivity to execute the necessary commands. Follow the steps below to complete the process:
- Set the Environment and Log In
-
Open the Command Prompt on a machine with internet access and execute the following commands:
-
pxc environment set <Environment Name>: Sets the environment to the appropriate PLEXOS Cloud instance.

-
pxc auth login: Logs you into the PLEXOS Cloud for the above-configured environment using your login credentials.

NOTE: Ensure that the PLEXOS Cloud environment is correctly set and that you are logged into that environment using the Command Line Interface (CLI) before proceeding.
-
Generate the License File
-
Run the following command to generate the license file:
pxc licensing download-aurora --identifier [MACHINE_IDENTIFIER] --name [MACHINE_NAME] --output [OUTPUT_PATH]

-
Replace the placeholders [MACHINE_IDENTIFIER], [MACHINE_NAME], and [OUTPUT_PATH] with the corresponding values. For example:
pxc licensing download-aurora --identifier e55ce628-1234-4e20-a150-9v54503c3b48 --name NA-SBC-LAP123 --output C:\Users\ConnectedMachine\Documents\aurora.licence
The license file is generated in the specified output path on the connected machine.
-
Copy the license file to the air-gapped machine.
-
Depending on the Aurora version installed on the air-gapped machine, move the license file to the below-mentioned location:
- Aurora Version 15:
C:\Users\<Username>\AppData\Local\Energy Exemplar\Aurora\Aurora.License

- Aurora Version 14.2 and Earlier:
C:\ProgramData\Energy Exemplar\Aurora\Aurora.License

- Restart the Aurora application on the air-gapped machine to enable the license and start using it.

Log In to AURORA
Follow the steps below to access the AURORA Desktop application using CLM:
1. Download and Install AURORA 15.0 from the Energy Exemplar Customer Portal.
2. After installation, you will see the Sign In dialog as below:

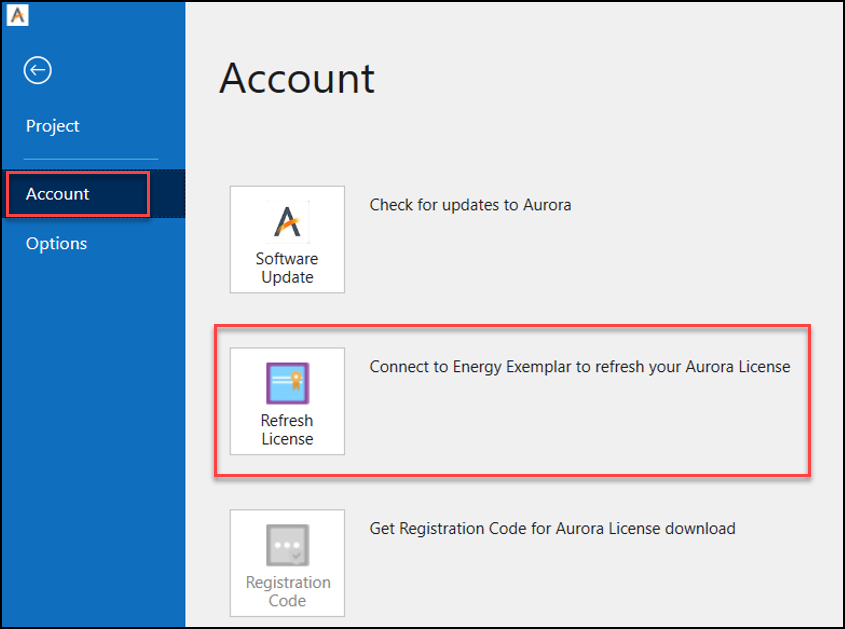
NOTE: If you have already logged into Aurora 15.0 with a legacy Aurora License, you will not see this login popup since Aurora 15.0 uses the old license file to log in directly. To view this pop-up, you need to either:
- Rename the old license (Aurora.license) in C:\ProgramData\Energy Exemplar\Aurora. You can rename it to anything and Aurora 15.0 will not be able to find a license and this Popup will show up.
-OR-
- Refresh the license from File->Account->Refresh License. Click on the Refresh License button to delete all the license files. You will need to log into Aurora 14.2 and prior versions using the legacy credentials. You can use the Rename license option above if you don’t remember your legacy username and password (you typically need it to sign once a year).
NOTE: The Legacy Aurora License button allows you to get license files from a legacy license server. Once your company switches to User Licensing provided by CLM, the legacy license file will expire within 30 days for Aurora 15.0 and all users from your company must use User Licensing to log into Aurora 15.0. For 14.2 and prior versions, the Legacy Licensing works as usual.
3. Select the desired environment from the Environment Dropdown.
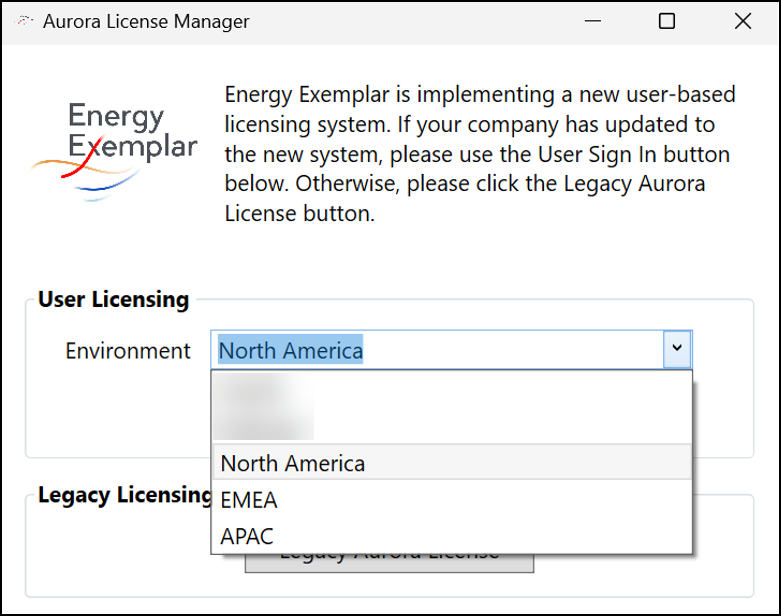
4. Click on the User Sign In button to redirect to the Login page for the selected environment.
5. Enter the valid credentials (Email Address and Password) for your account and click on the SIGN IN
NOTE: Click on the Forgot Password? link to reset your password anytime.
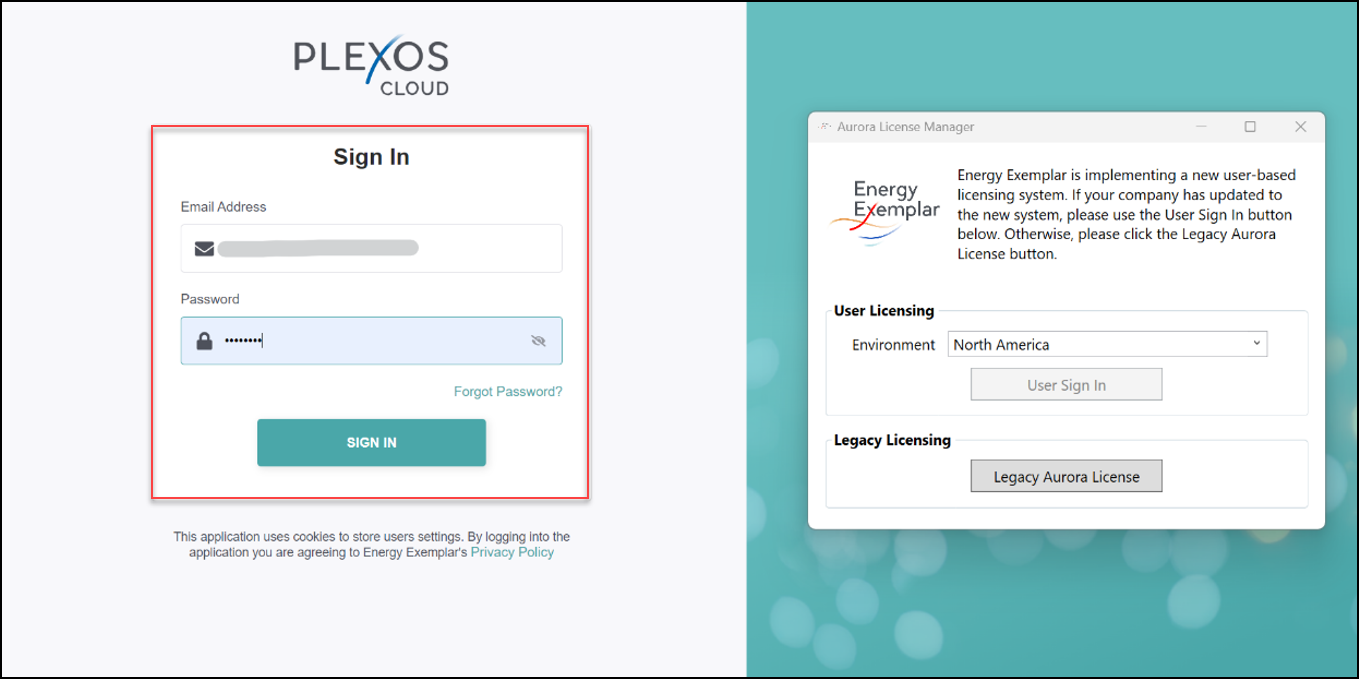
6. A pop-up will appear on the top of your screen to prompt you to open the AURORA desktop application. Click on the Open Aurora Desktop Application button.

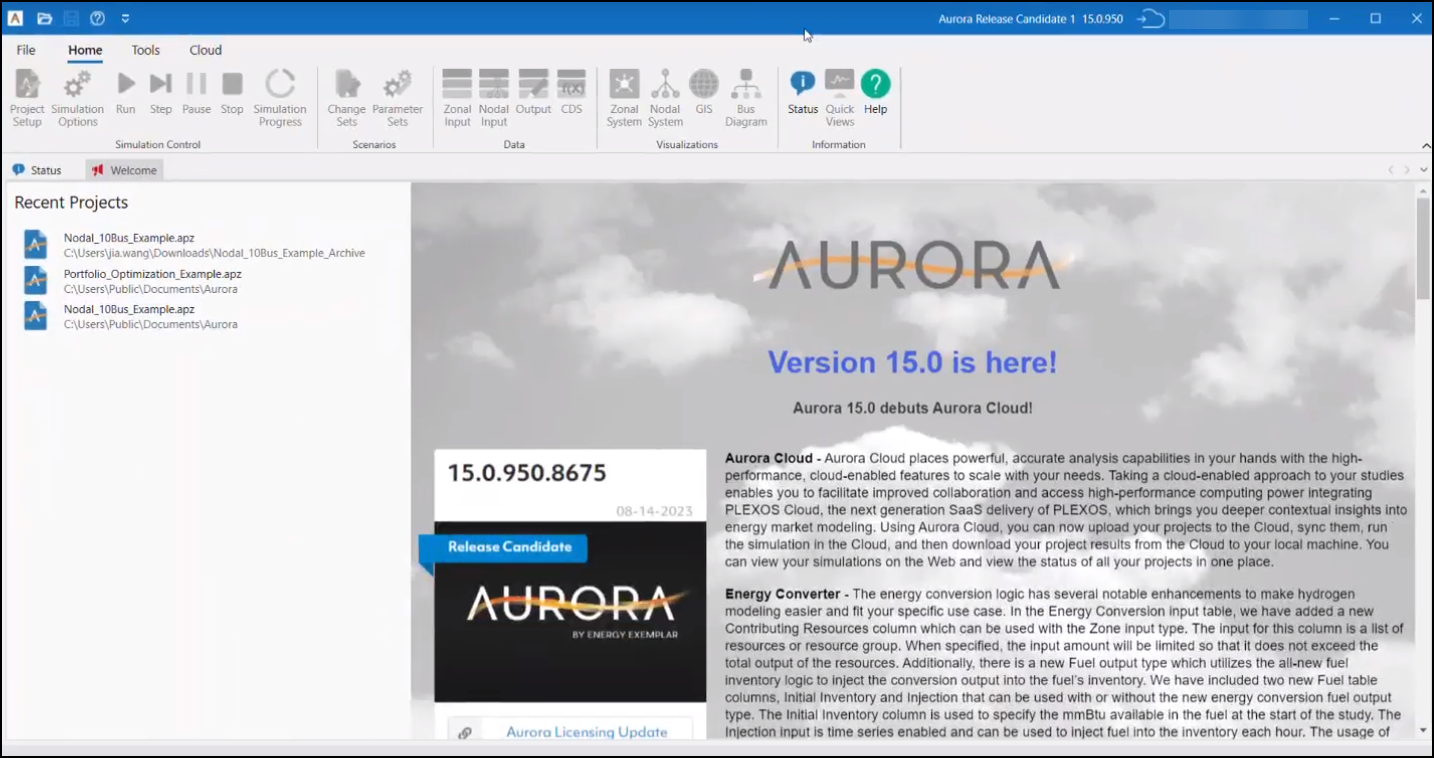
7. The AURORA Desktop application will launch automatically as shown below:
Verify License File for Aurora
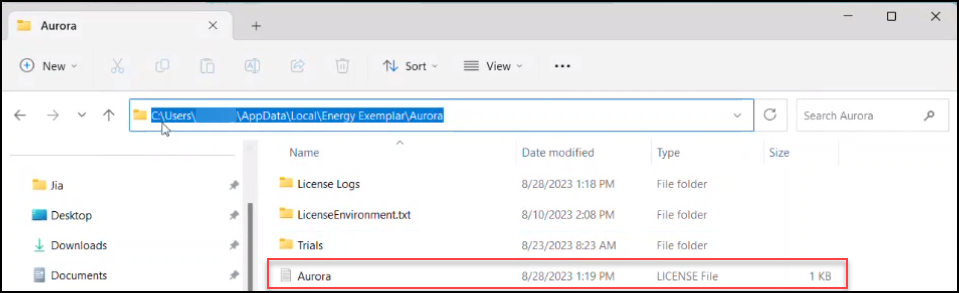
You can verify CLM generated license information in the License file available below on your PC:
C:\Users\Username\AppData\Local\Energy Exemplar\Aurora
Log into previous Aurora Versions
CLM is only supported on Aurora 15.0 or newer versions. To continue using previous Aurora versions, use your legacy login username and password or go to C:\ProgramData\Energy Exemplar\Aurora, and change the renamed license file back to its original name “Aurora.license”.
Troubleshooting
The new centralized log collection feature consolidates essential log files and configuration data into a single, user-defined location on your machine to streamline diagnostics and support for the Central License Manager (CLM). This enhancement simplifies log management and facilitates ease of access and share for support resolution.

Previously scattered across multiple directories, log files for PLEXOS Desktop, Central License Manager, and CLI are now automatically stored in a single, user defined folder, making retrieval straightforward.
To define the destination folder for centralized log collection, run the following command in Command Prompt:
pxc environment diagnostic-information -d "Folder path where the Log Files will be stored"

Upon completion, a confirmation message will appear. Logs are saved in the "PLEXOS-Logs-<Date of Collection>" folder for easy access.