Last updated on: May 08, 2025
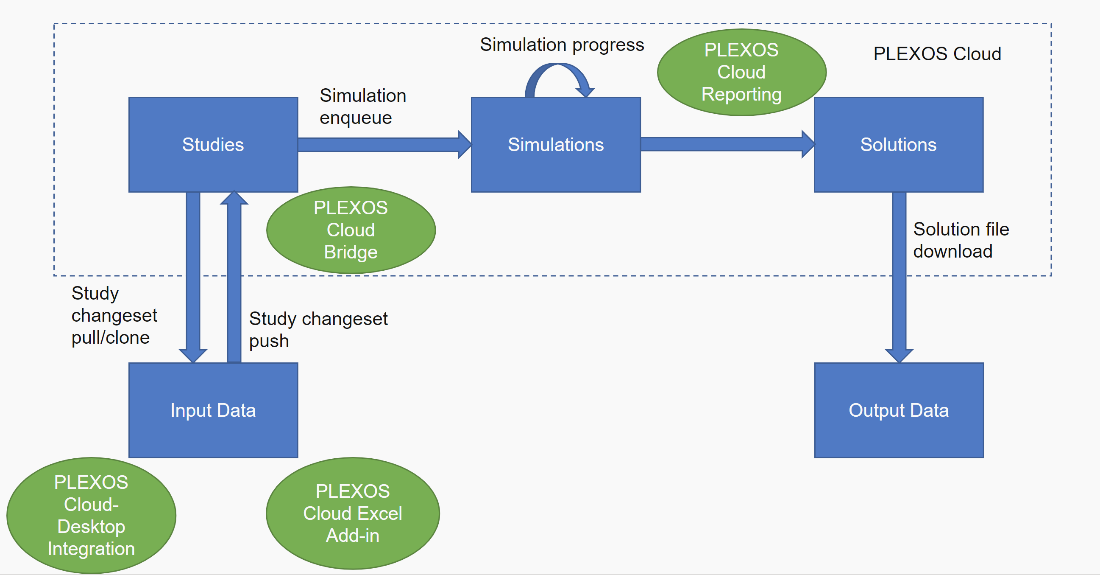
The PLEXOS Cloud Toolkit (also called the Command Line Interface or CLI) automates the end-to-end simulation workflow. The diagram below provides an overview of the processes that can be automated with the CLI, and how the PLEXOS Cloud Desktop Integration, Excel Add-In, Cloud Bridge, and Reporting applications can function along with your workflow.
The CLI supports many basic commands, which can be understood further using the built-in help functionality on any command. The CLI can be leveraged from the command line, or also through batch files or scripting in different programming languages.
PLEXOS Command Line Interface (CLI) is used for integration with the PLEXOS Cloud environment. The basic areas the CLI supports are:
Read more to learn more about the CLI and its functionalities below.
To install the CLI, perform the following steps:

Navigate to the Tools tab within the Marketplace.
Find the PLEXOS Cloud Toolkit for your operating system (Windows or Linux).
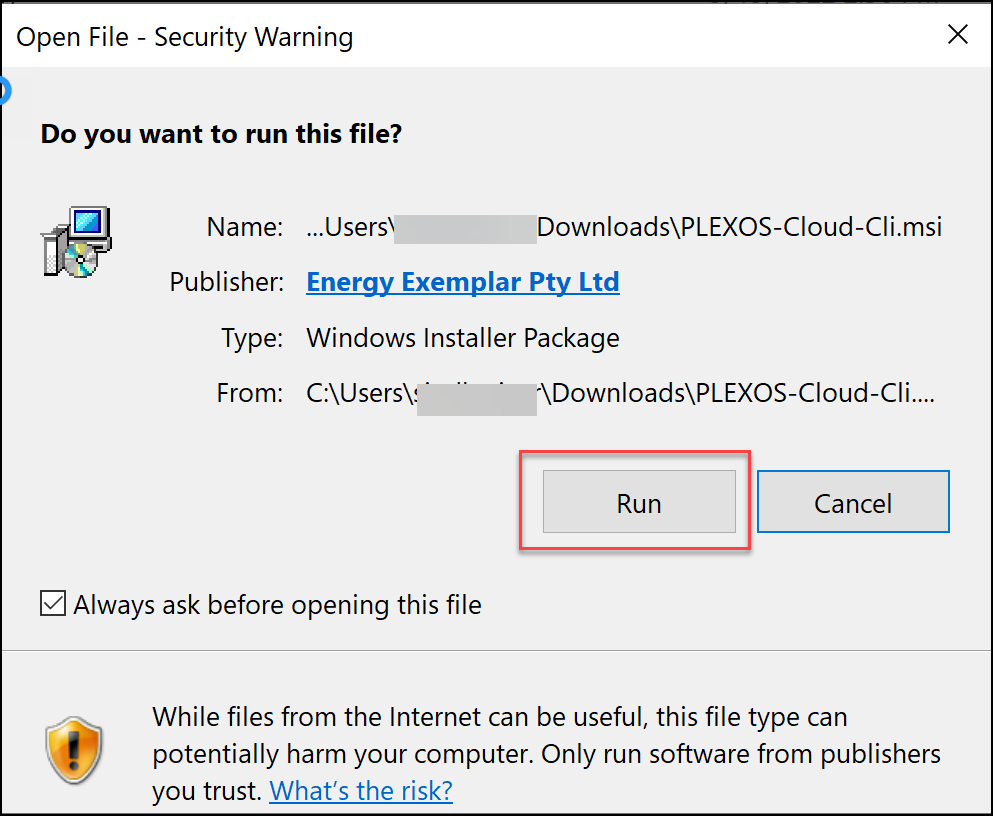
Click the Download button to install the CLI.

After the installer downloads, navigate to your Downloads and finish installing the application.
After installing the CLI, you should follow the steps below to configure your Path environment variable, after which you will be able to open the application from the command line and start automating processes.
A PATH environment variable tells the command line what directories need to be searched to find a command, in this case those related to "plexos-cloud." This needs to be set to allow PLEXOS to trigger CLI commands regardless of the install location on your machine.
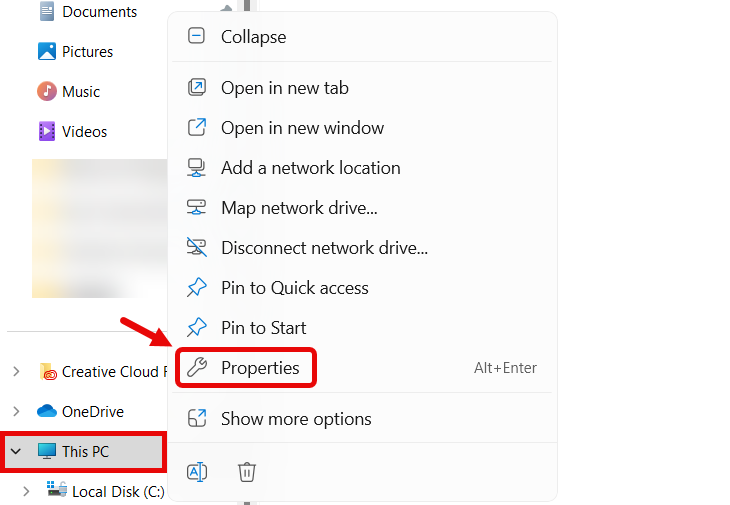
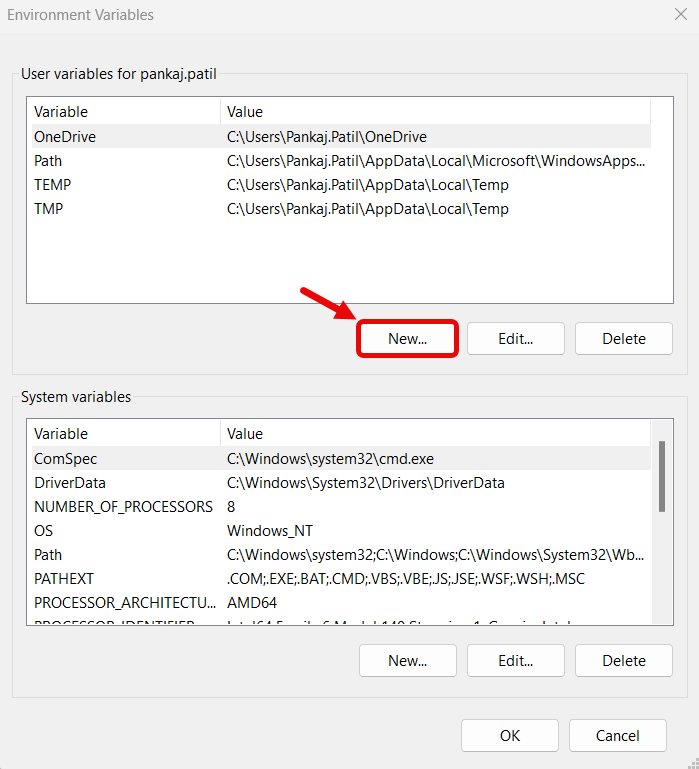
1. From the Windows Search bar enter "Settings" to open the Windows Settings screen. Alternatively, you can go to Windows Explorer, right click and click Properties.
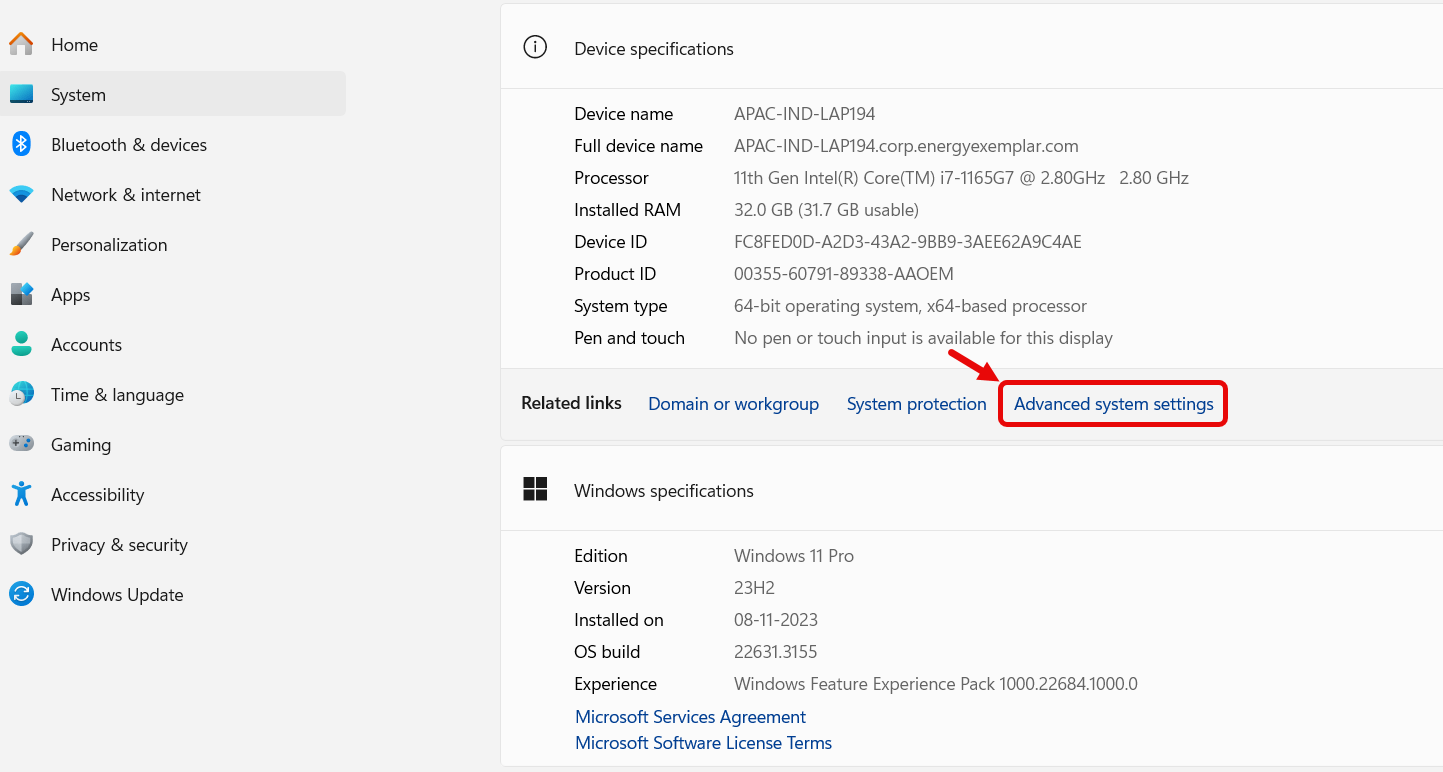
2. On the Settings screen enter "environment variables" in the Settings Search and select Edit the system environment variables.
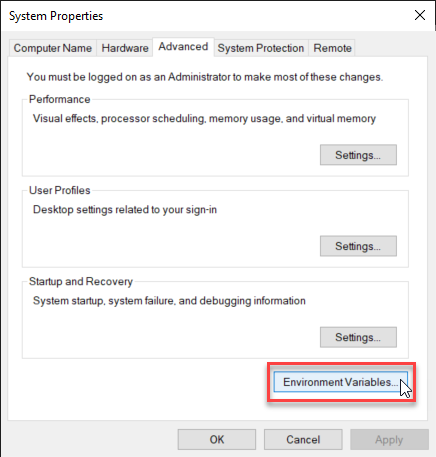
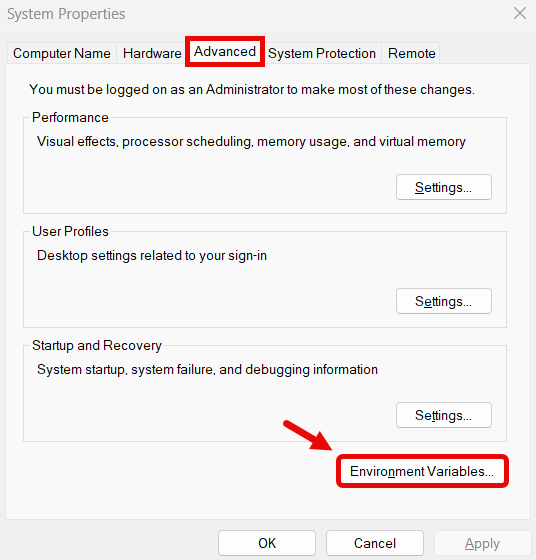
3. A System Properties dialog will appear. In the lower right-hand corner, click on Environment Variables.
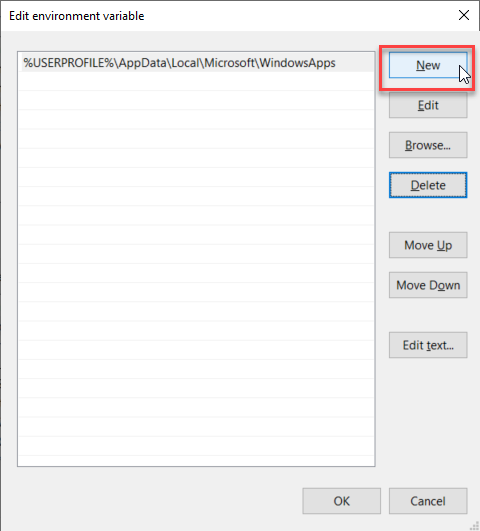
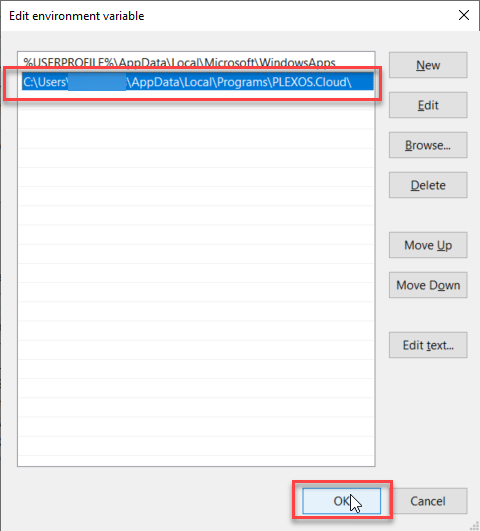
4. From the Environment Variables screen, select Path from the User Variables section and click Edit. Alternatively, if multiple users leverage the same machine you can edit the System Variable for Path below.

5. Click New to create an environment variable.
6. Paste the file path for CLI application, then Click OK
7. Click OK to exit out of the Windows Settings screen.
If you have an HTTP or SOCKS5 proxy server on your network between a host running the CLI and your API endpoint, you must set https_proxy with the hostname or IP address of the proxy server. The https_proxy environment variable holds the hostname or IP address of your proxy server.
The https_proxy is a standard environment variable. As with any environment variable, the specific steps you use to set it depends on your operating system.
The https_proxy variable is set with hostname or IP address of the proxy server in URL format, as in the following example:
https_proxy=http://proxy.example.com
If the proxy server requires a username and password, you must include the credentials, as in the following example:
https_proxy=http://username:password@proxy.example.com
If the proxy server uses a port other than 80, you must include the port number, as in the following example:
https_proxy=http://username:password@proxy.example.com:8080
If the proxy server is a SOCKS5 proxy, you must specify the SOCKS5 protocol in the URL, as in the following example:
https_proxy=socks5://socks_proxy.example.com
To set the https proxy environment variable in Linux:
export https_proxy=http://my.proxyserver.com:8080
https_proxy=http://username:password@hostname:port export $https_proxy
Users can configure the https_proxy setting from the Advanced system settings on Windows using various methods, such as the run command, search bar, or Windows button. The steps provided below are specifically for Windows 10 or above. However, you can locate the Advanced system settings on your computer similarly to perform the change.
To set the https_proxy environment variable in Windows:
https_proxy.
To gain a better understanding of the CLI and its functionalities, explore the built-in help.
To view a list of possible top-level commands enter one of the following in your command line:
 NOTE: You can enter plexos-cloud, plexos-cloud.exe, or pxc to specify the CLI application.
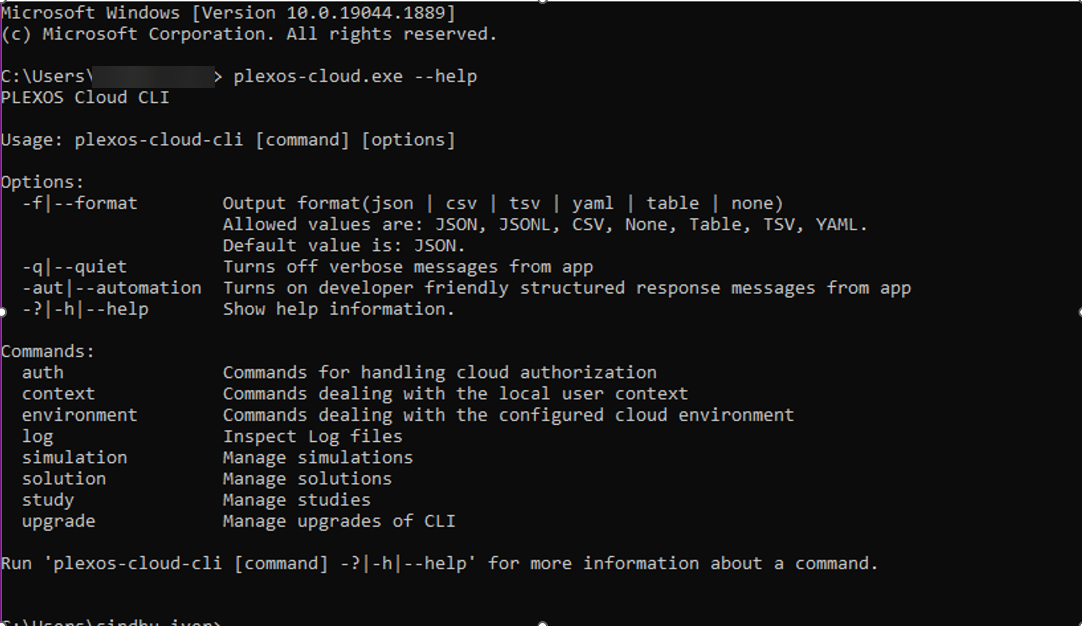
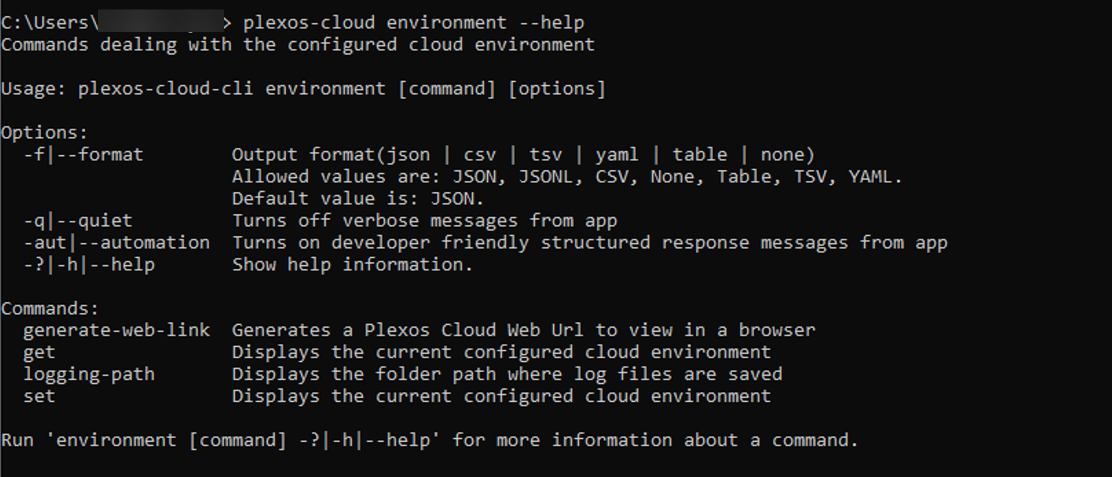
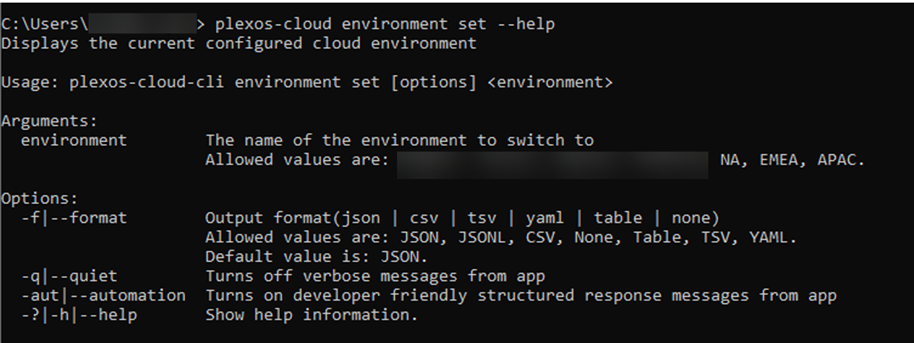
This tells the user that they can change their current environment using a command that resembles:
In this case, NA is the PLEXOS Cloud environment the user is choosing to set. Users can set their environment to NA, APAC, or EMEA depending on their region.
NOTE: Changing environments will log a user out and require them to log into the new environment.
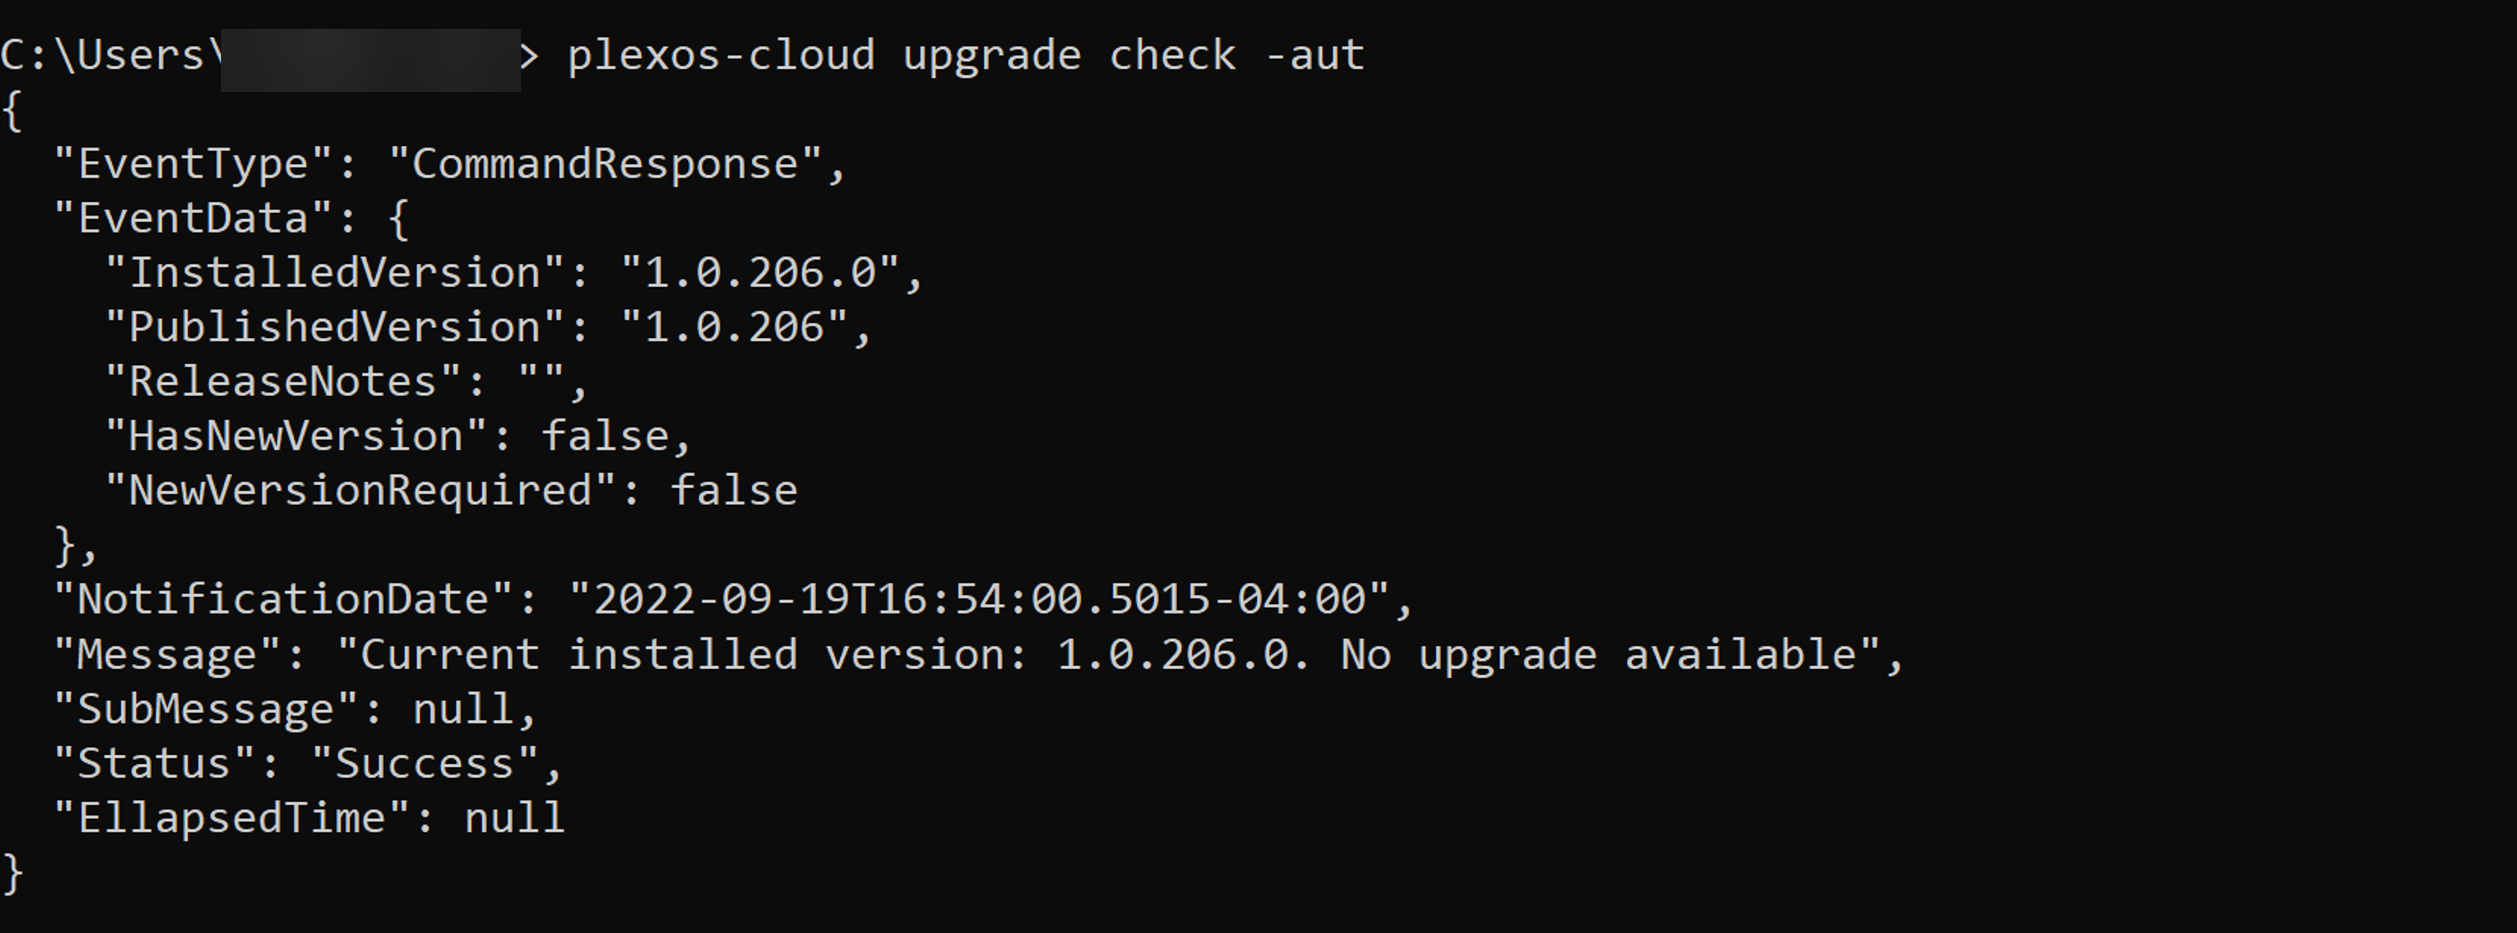
The CLI can upgrade itself. You can check if an upgrade is available with the following command:
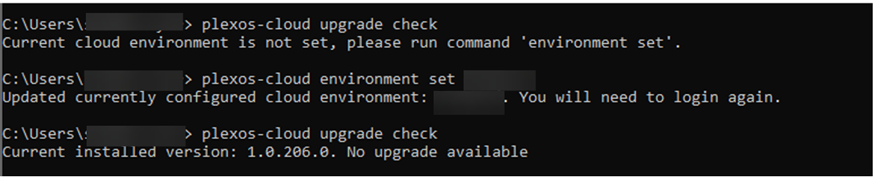
Make sure to set the correct environment before checking if an upgrade is available. If an upgrade is available, the user will be notified. An upgrade may have occurred due to changes in the PLEXOS Cloud Backend APIs or critical bug fixes. The user has a choice of whether to install the upgrade or not, but upgrade check communicates to the user when PLEXOS Cloud may not function as expected without the upgrade.
If there is an upgrade available, the following command will install it:
NOTE: We encourage you to run an upgrade check after every release to make sure you have the latest version of the CLI installed.
If users would like to disable upgrades at a user/system level, set the environment variable "EE_CLI_UPGRADE_DISABLED". If this environment variable is found, the upgrade command shown above will no longer exist as an available command.
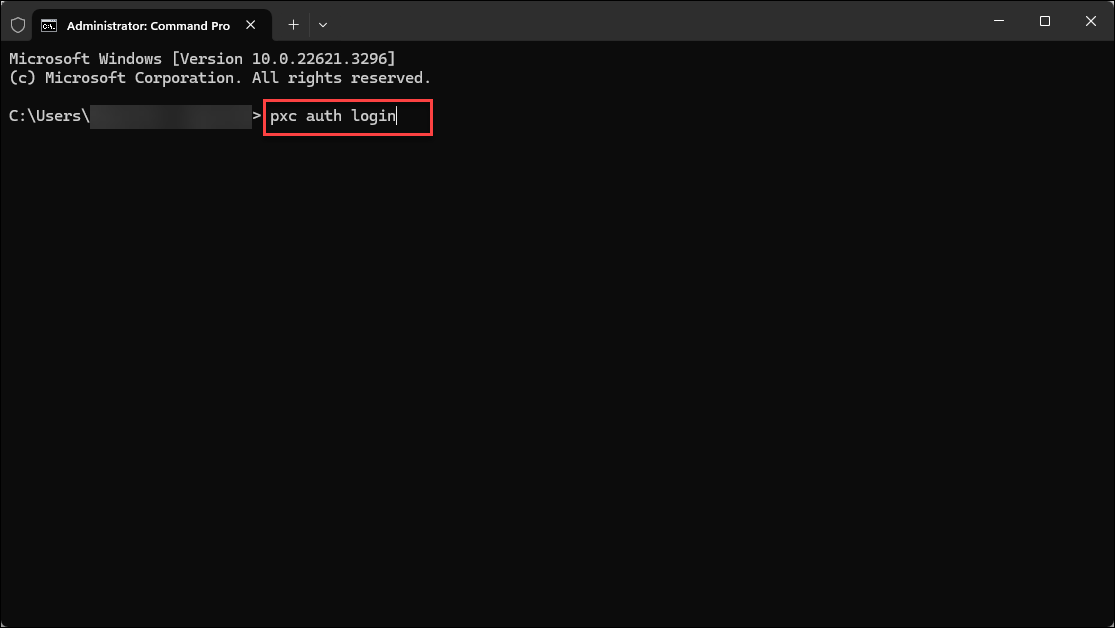
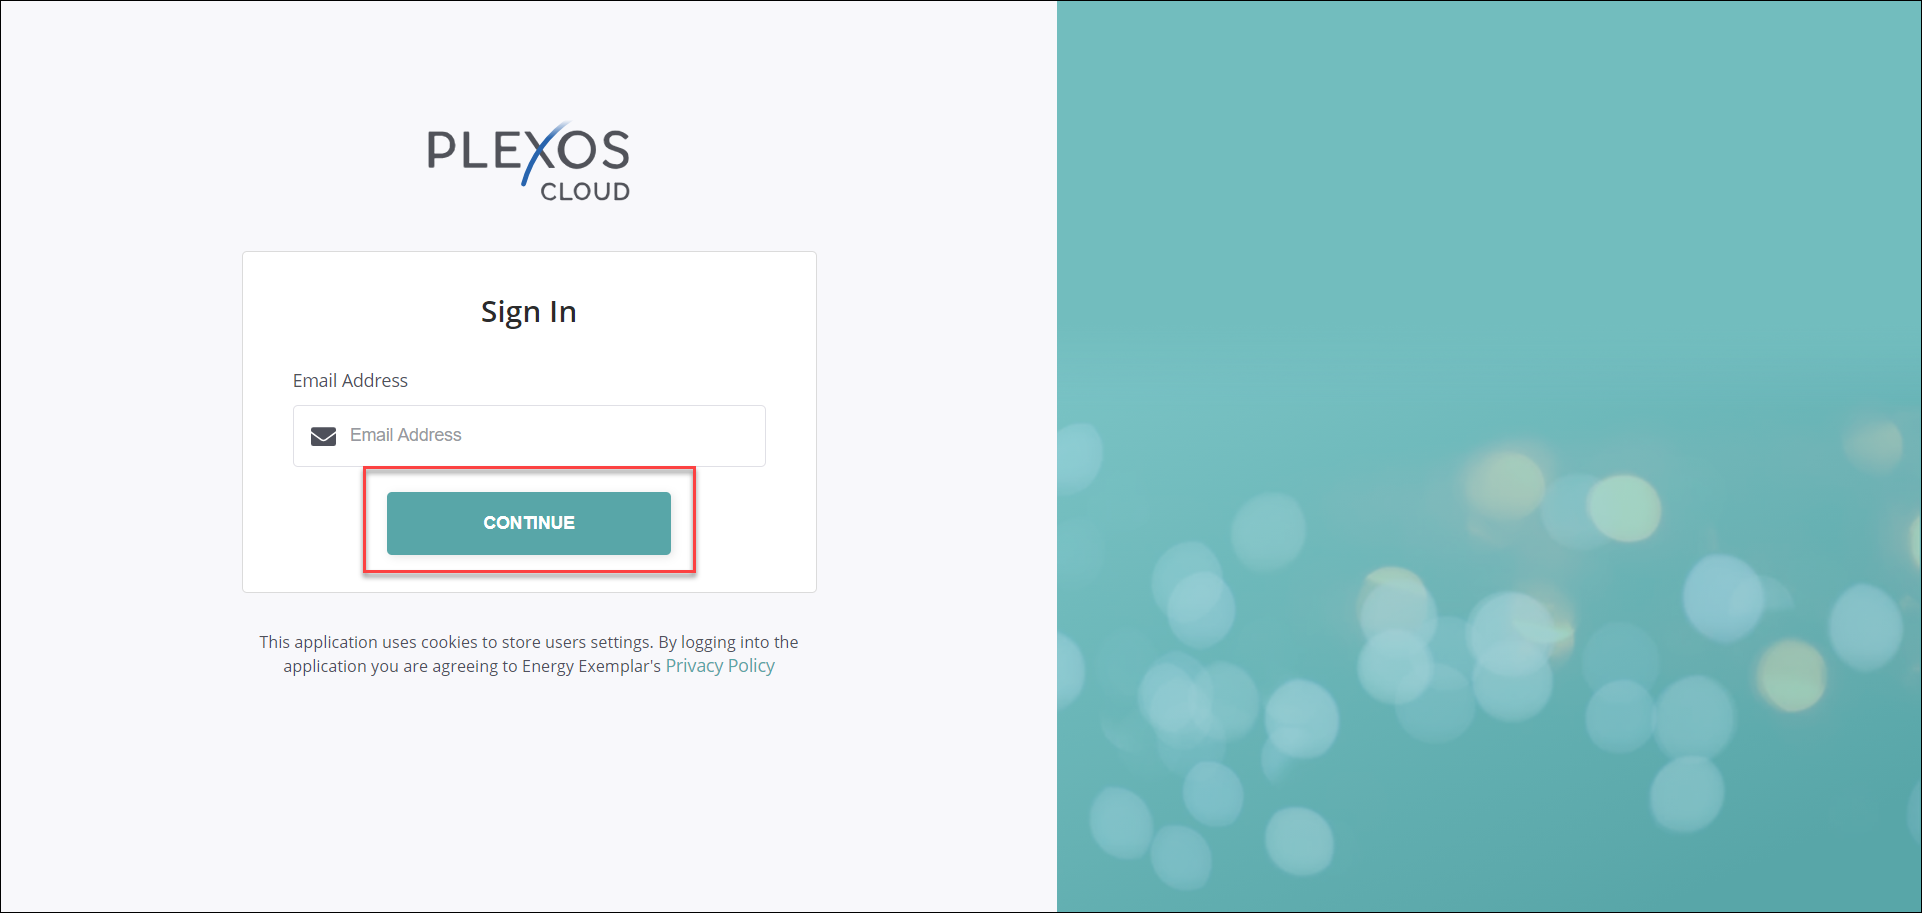
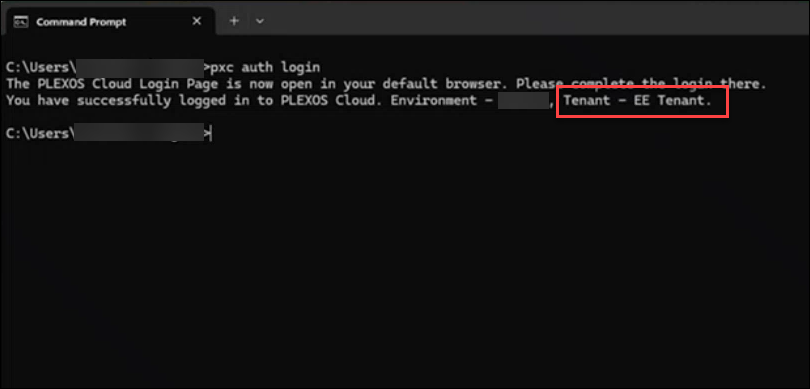
In the CLI, there are two ways to log in to a specific environment:
SSO
Client Credentials
To see a list of the authentication sub commands enter the following command:
plexos-cloud.exe auth --help
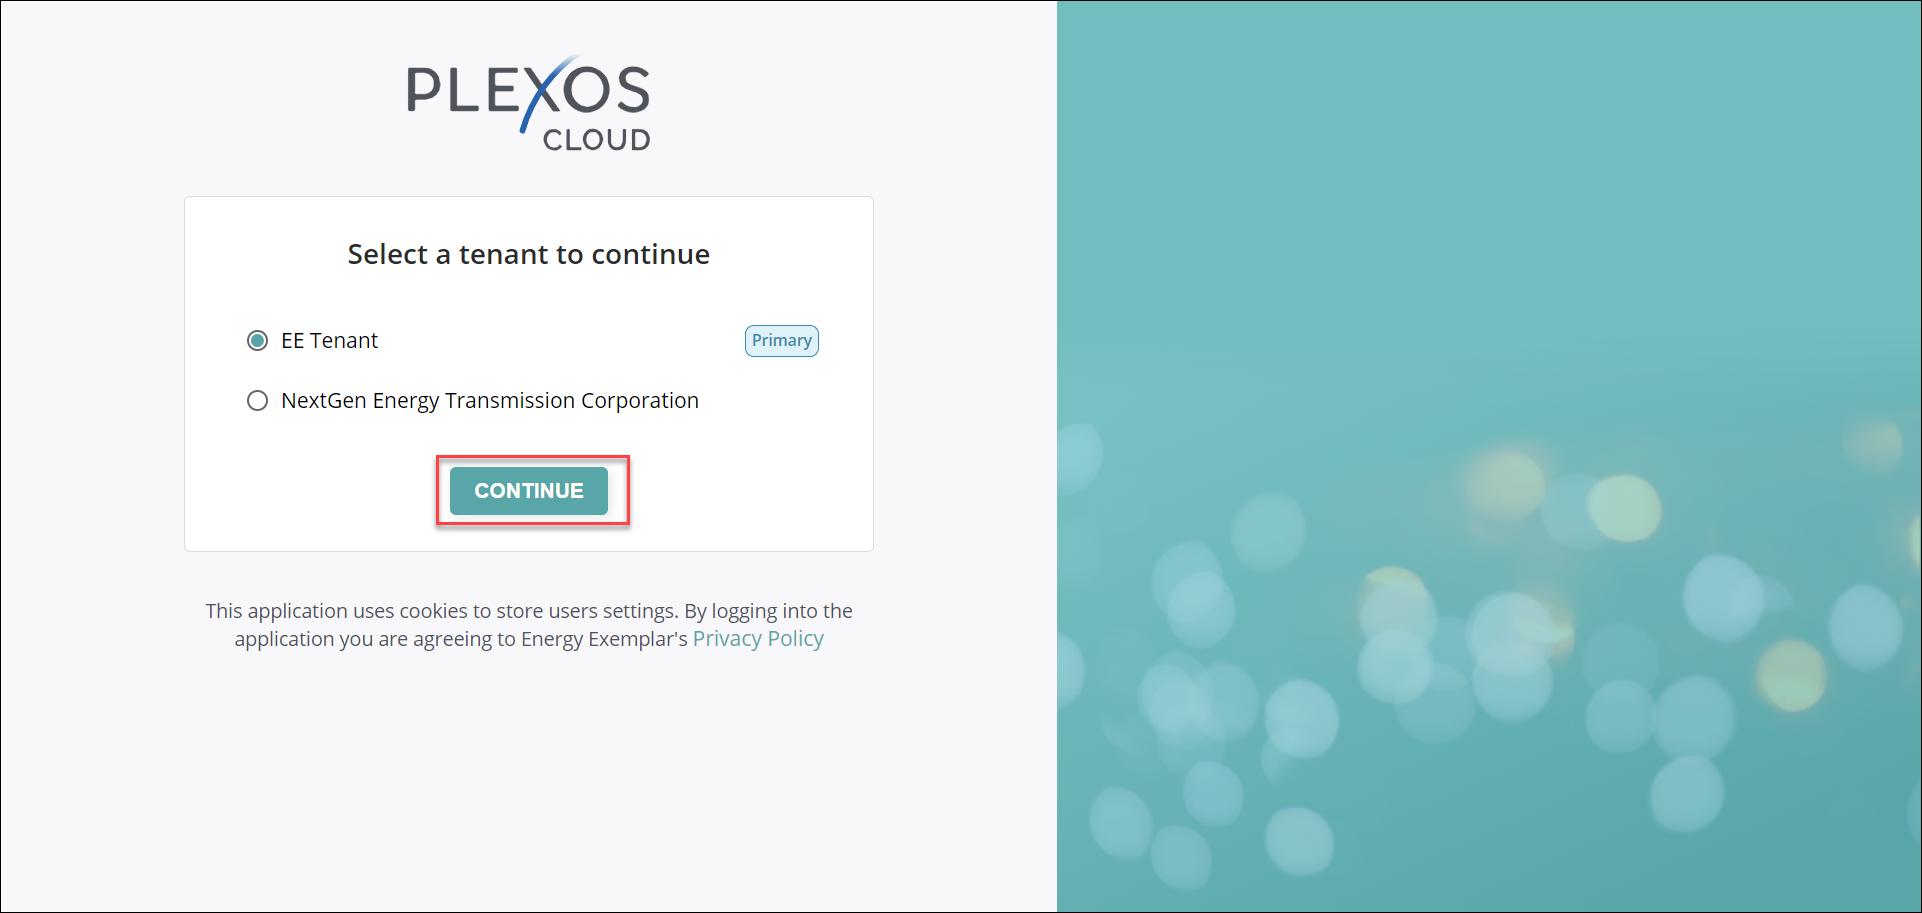
If your requirement is to use the CLI directly without scripts, login via SSO workflow is recommended.Entering the status sub command will notify you where you are currently logged in, and in which environment. When users log in to PLEXOS Cloud through CLI and their email has access to multiple tenants within a single environment, they will receive a prompt to switch to a different tenant. To change the tenant after logging in, users must log out and then log in again to access the tenant selection page.
If your requirement is to trigger automatic workflows against the CLI without human interaction during the authentication process, login via Service Principal (OIDC clients) is recommended.
To obtain the OIDC client credentials, you may reach out to the Energy Exemplar support team.
Once acquired, these credentials can be distributed to the intended users, eliminating the need to individually grant permissions on their respective accounts. These client credentials provide access to various resources, including Studies, Simulations, Changesets for Studies, etc., at the PLEXOS Cloud account level.
Logging into PLEXOS Cloud via Service Principal can be accomplished with the below command:
plexos-cloud auth login --service-principal --tenant-id <id> --client-id <id> --client-secret <secret>
The above used fields are described below:
Tenant ID: The tenant ID provided by Energy Exemplar.
Client ID: The OIDC client ID (username) generated from the CLM (Central License Manager).
Client Secret: The OIDC client secret generated from the CLM. This works like a password.
Service-Principal: It is the flag in the CLI to use this workflow.
It is important to note that these clients are treated like separate users themselves, so any resources (Studies, etc.) created by them will be owned by that client, therefore, to grant access to a user logged into their PLEXOS cloud account, they can utilize the below mentioned CLI command:
plexos-cloud study grant-user-access --studyId <id> --userEmail <email address>
The CLI is meant to be used for building integrations and automation. As with most CLIs, all output goes to two separate standard output streams: stdout and stderr. The current documentation only displays examples sent to the stderr stream because we are showing human-readable output meant for interactive use cases.
For example, to view the developer-friendly output for the upgrade check, enter the following command:
The global option can be used on all commands and subcommands to send serializable object-based contracts to the stdout stream to be consumed by any scripting language.
All automation messages are wrapped in an object type of MessageNotification. The important properties on the MessageNotification object are:
In the above example, after checking for an upgrade, we can see that we got back a CommandResponse EventType, meaning that the command is finished executing and this is the final response. Its Status is Success, meaning that the command successfully returned with no errors. On the EventData property, we get the serialized object contract for the upgrade check command, which has a single property, upgrade, telling the user it is checking for an upgrade.
Some commands may require multiple steps while giving information back to the user along the way. The next command in this demonstration, the auth login command is a good example. In the web login workflow, the CLI must pop open a browser window and wait for the user to accept authorization permission. In commands that take multiple steps, several ProgressEvent commands may be written before the final CommandResponse is returned. For example, if you enter the following command:
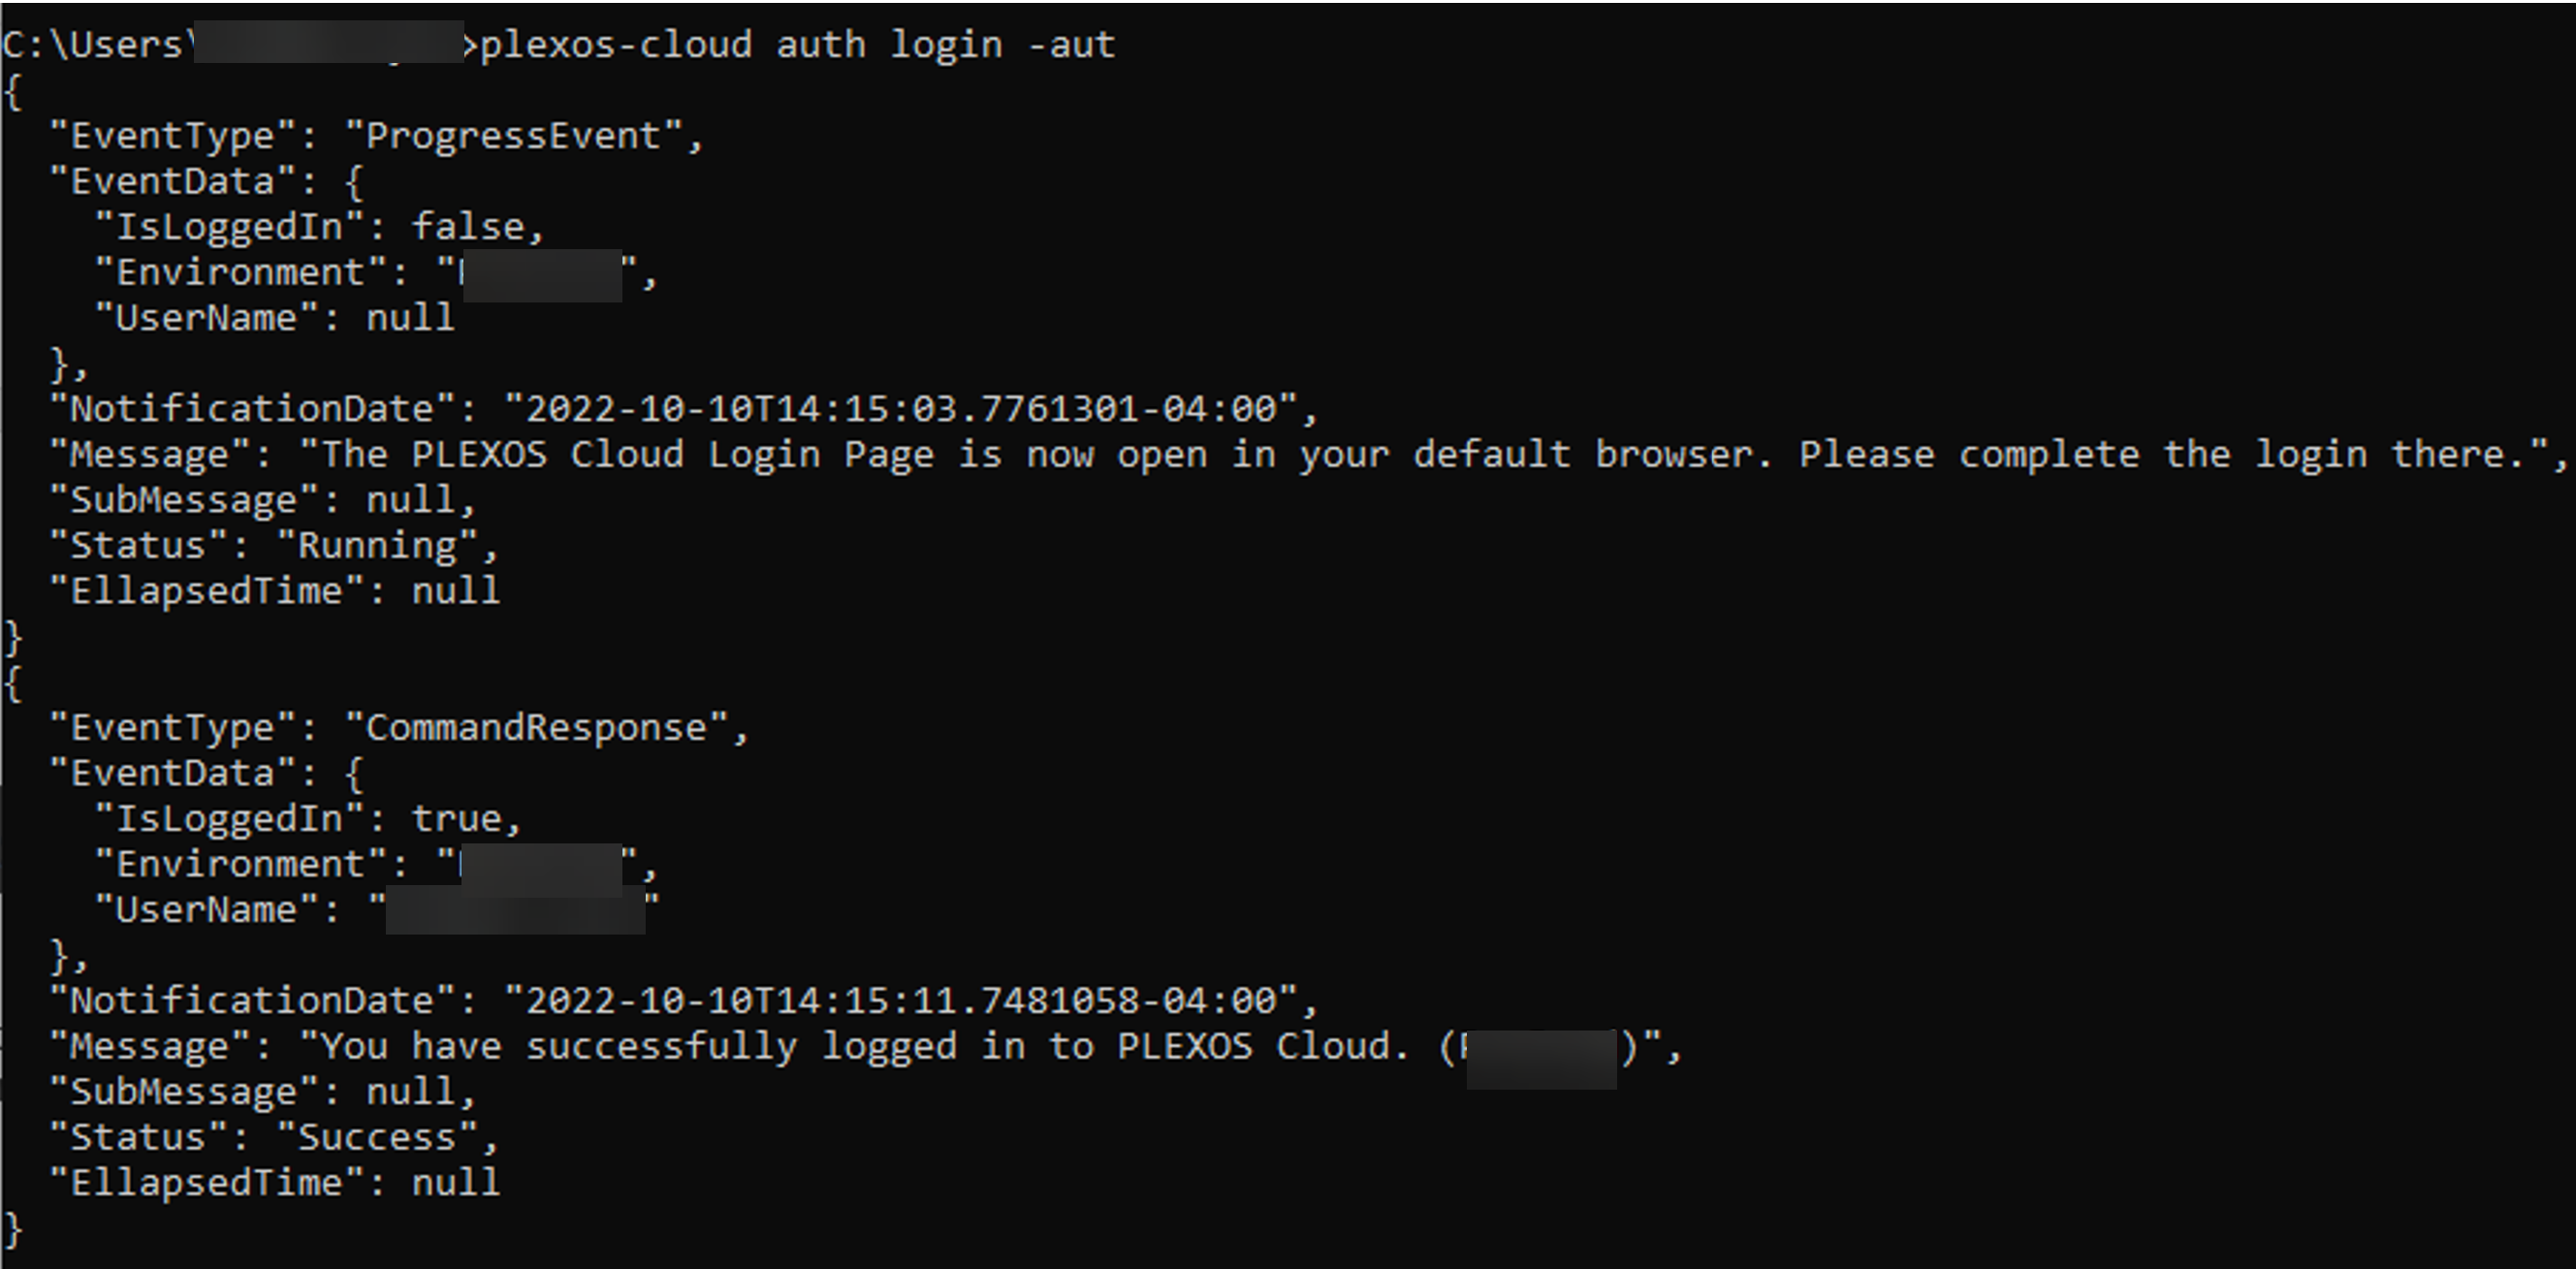
You can see above that the CLI returned two MessageNotification objects, the first of which is an EventType of ProgressEvent, and its Status is Running, meaning that this command has not yet finished command execution but it is still giving information back. After the user allowed authentication, the CLI returned the CommandResponse and Success status. In both messages, the EventData was an object specific to this command, with 3 properties: IsLoggedIn, Environment, and UserName.
In the above examples, each message is serialized to the console in a formatted manner: multi-line and indented JSON objects. This would require consumers to parse multiple lines being sent to stdout and use scripting logic to determine the end of messages. Instead, the --format global option can be used to make this process easier. Since MessageNotification responses are already JSON objects, the only format option that makes sense for use with the --automation option is the JSONL format. This will print JSON objects on a one-object per-line basis.
Each message will be sent as a single line (which wraps around the console window), which allows the user to deserialize each line written to stdout into a separate object instance. Another global option related to automation use cases is the option. This will prevent any interactive messages (not actual error messages) from being written to the stderr stream.
Study management use cases and their outputs are best understood in the automation output format. Refer to the Automation section for more information.
The following options are available for Study management commands by entering the following command:
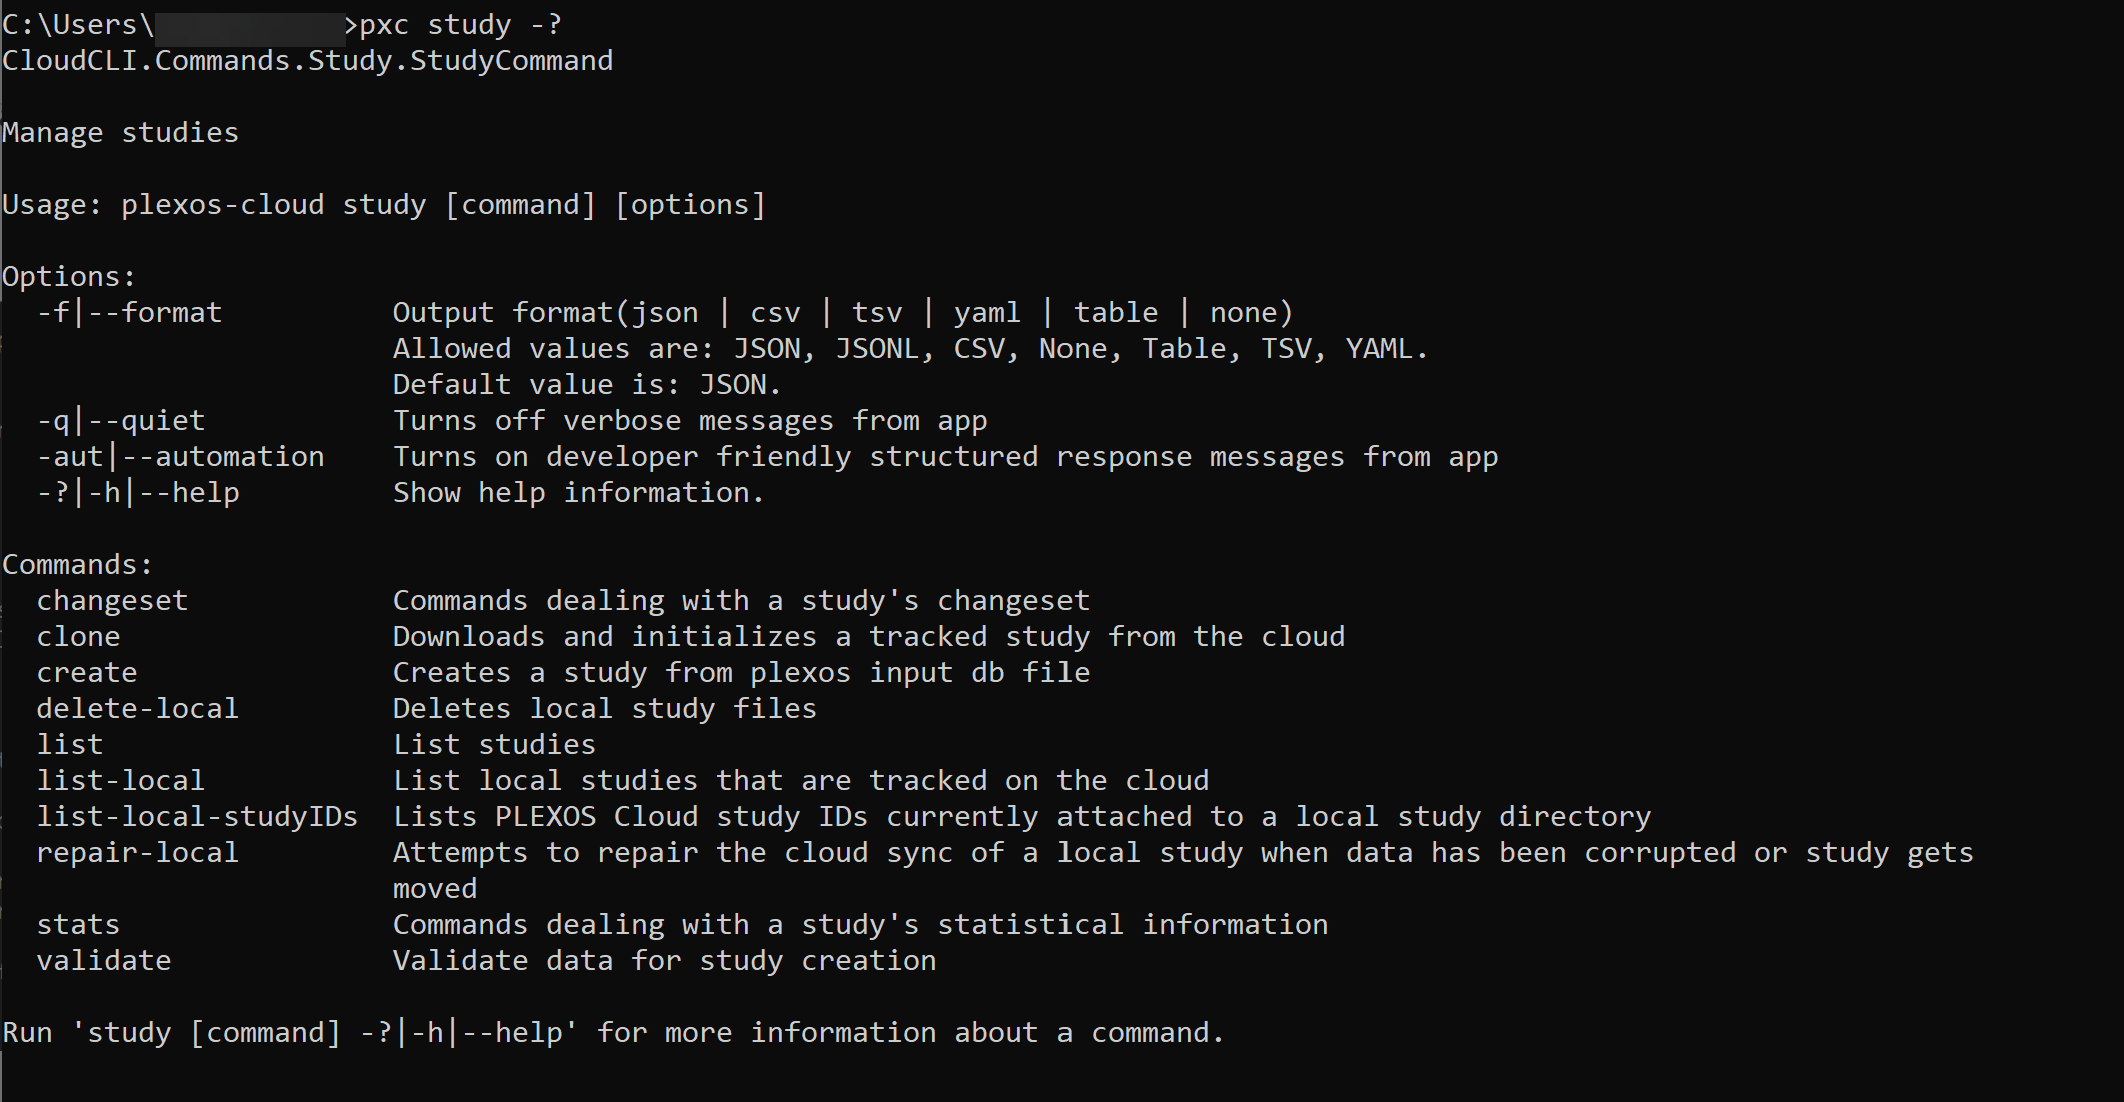
Many of the commands you see in Study Management are meant to align to those seen in Cloud Bridge or PLEXOS desktop.
The first step before creating a Study is to first validate the database to make sure that it is in the format we expect for a Cloud upload.
The following video covers the process of creating a Study through CLI:
Here are the subcommands available for Study validation:
>>>>>>> 105a7a176130cf4cea80354b32df0bde490a0772:Getting_Started/Configuration/CLI_Toolkit.htm plexos-cloud study validate --help
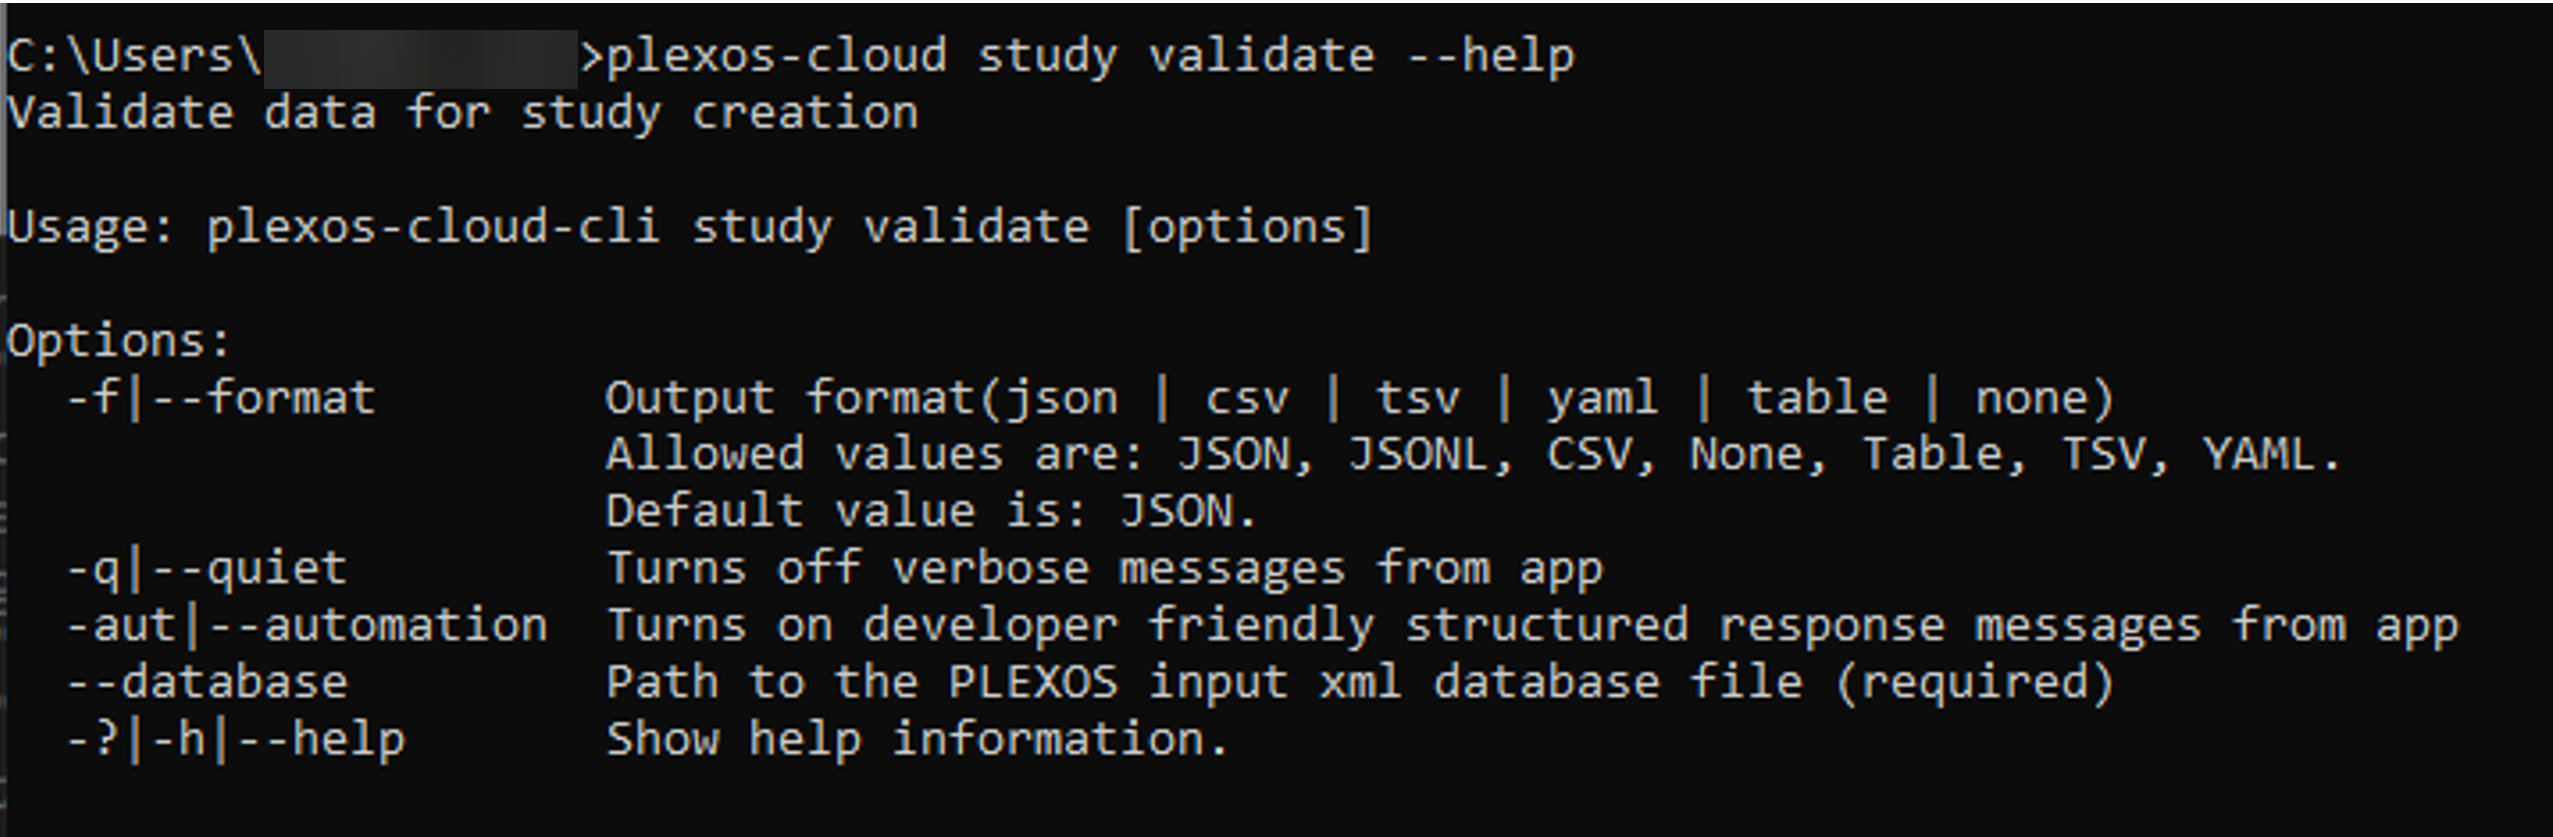
You can see above that the path to the input xml database is a requirement for this command. If you enter the following command, you will see the output screenshot below the command appear in the CLI:
plexos-cloud study validate --database “Path to xml file”

After validating the Study, you can proceed to create the Study with the following command line entry (view the help to understand which commands are required):
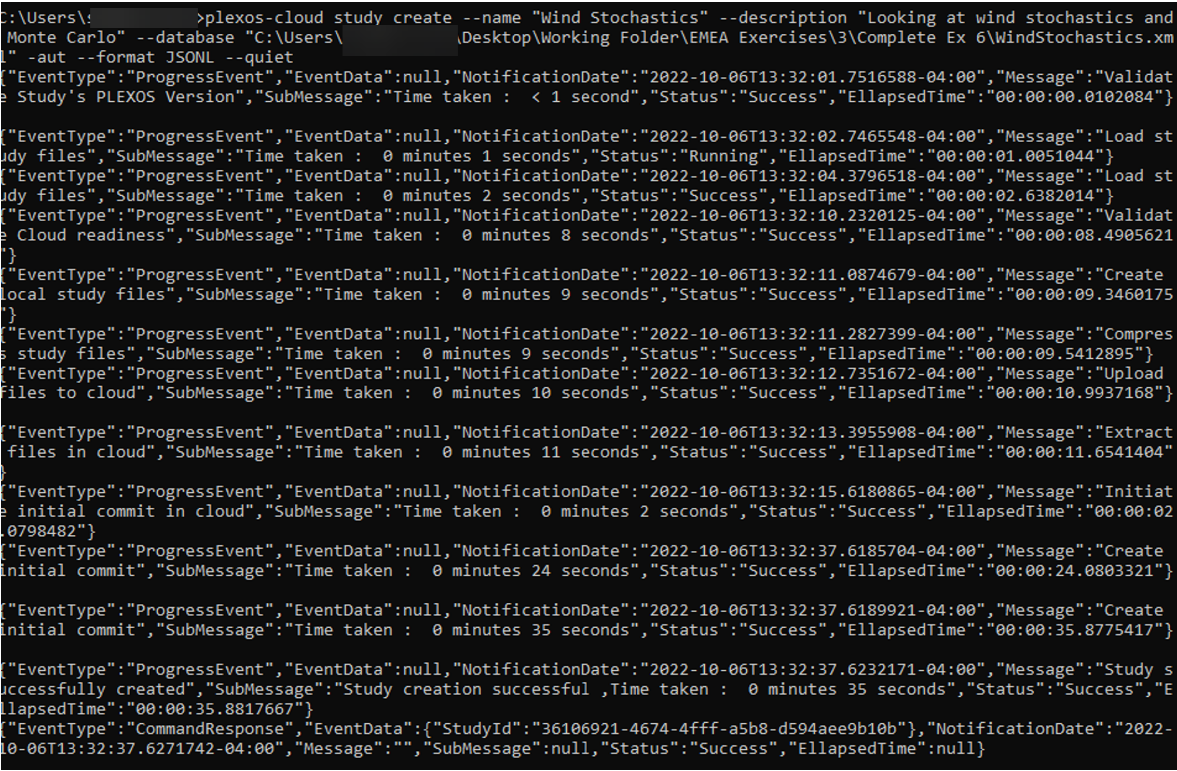
As you can see above, the Study has now been uploaded and the final returns the object contract for this command in its EventData property. This object contains the StudyId of the newly created study. This StudyId will be used for actions against this study, but one could also use the list command to query the studies API for studies.
In the event another let us say a Study with the same name already exists, then the following error message would appear in the command line:
It returns that the Status is Failed along with a high-level error message.
If a teammate has access to a Study that they have not uploaded, they could use the clone command to pull down the Study.
NOTE: The studyId and the path to the local directory to save the Study are both required inputs. Extra options are provided to create the local directory or overwrite files. For example, the command below returns the following from the CLI:

Assuming the user was setup for access to this Study, this command will download and initialize the tracked study in its latest state in the given directory location.
For some operations, a changesetId for a study may be required. Users can query the list of available changesets for a Study they have access to with the following command:
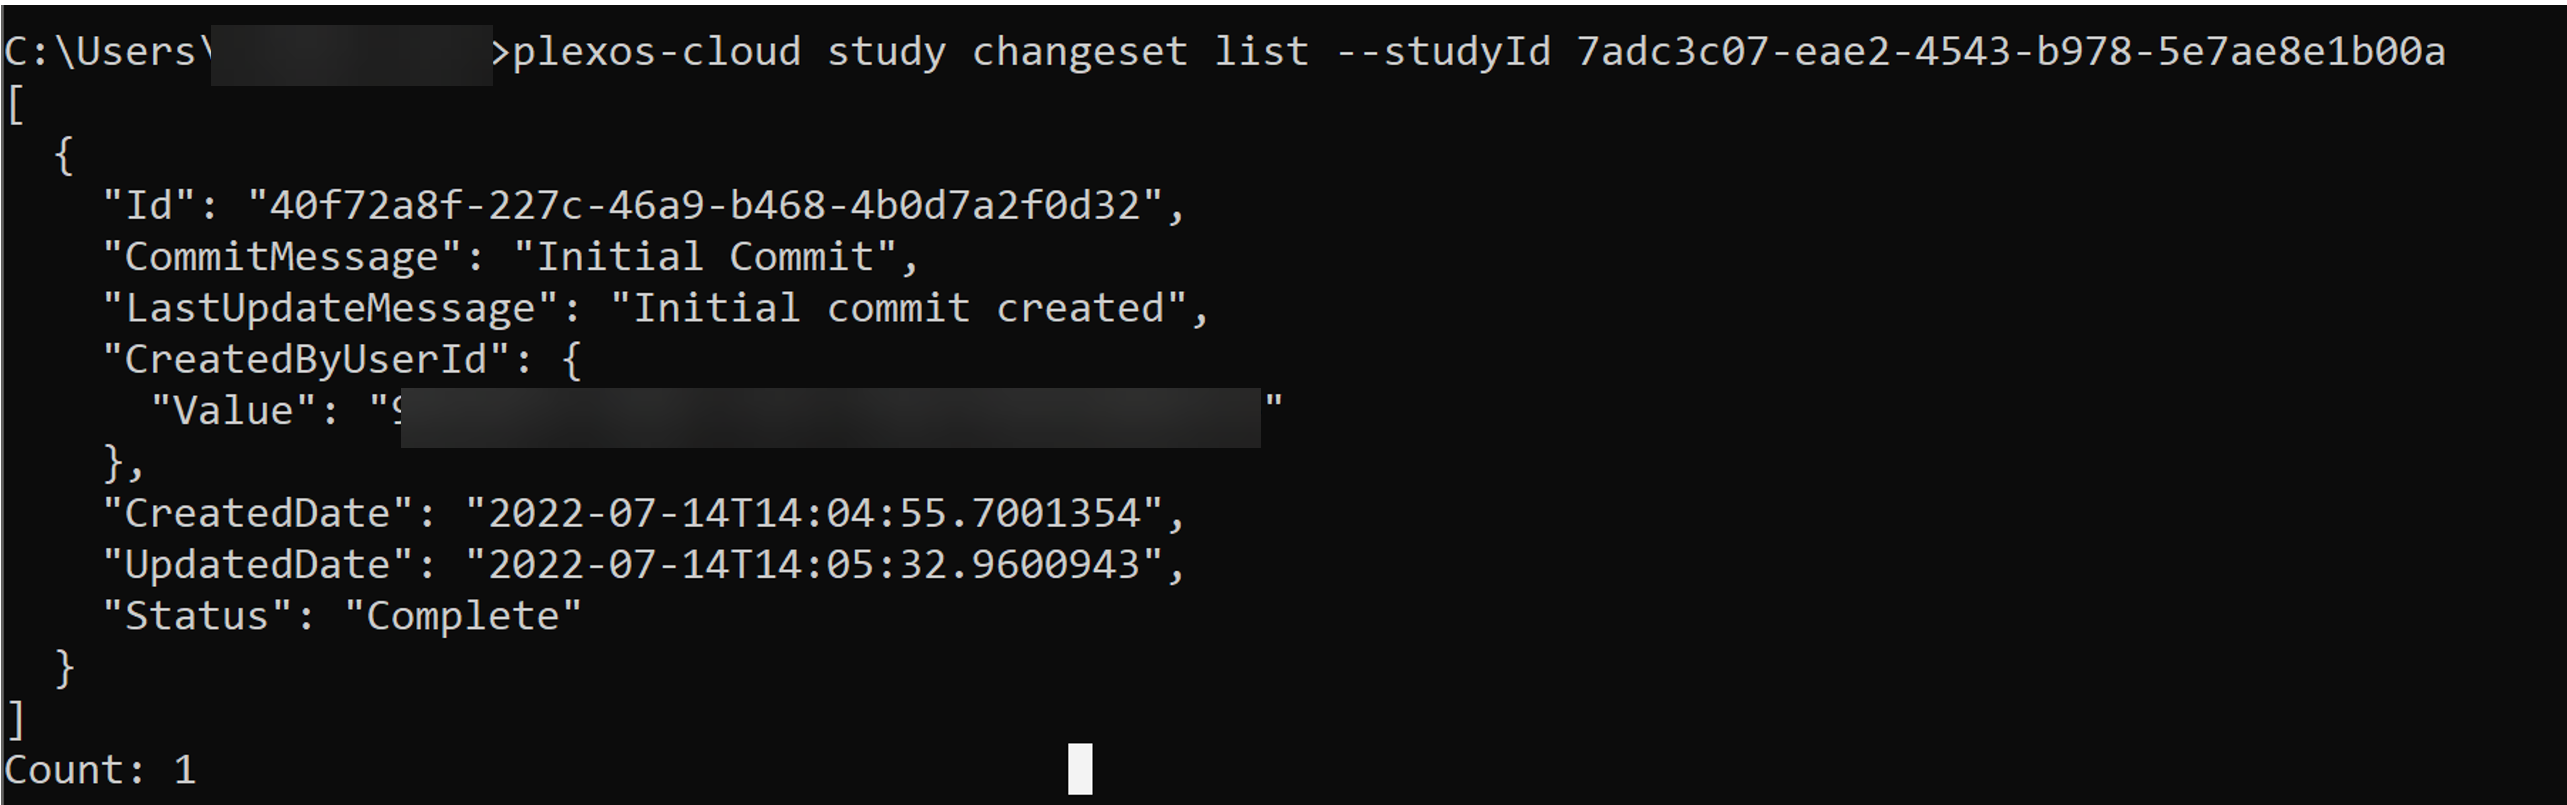
This will return a list of all commits made to the Study.
You can also view the Changeset ID for only the most recent commit with the following command:

The get-status changeset command will inform the user of the current state of a given Study, if the Study is currently in-sync with changes on the master, or if any pending incoming/outgoing changes need to be pushed or pulled.
With just one command, users can now quickly reset a Study on their local computer and clone the most recent study version from the Cloud. Refer below for the command syntax:
study reset --studyId {uniqueStudyID}
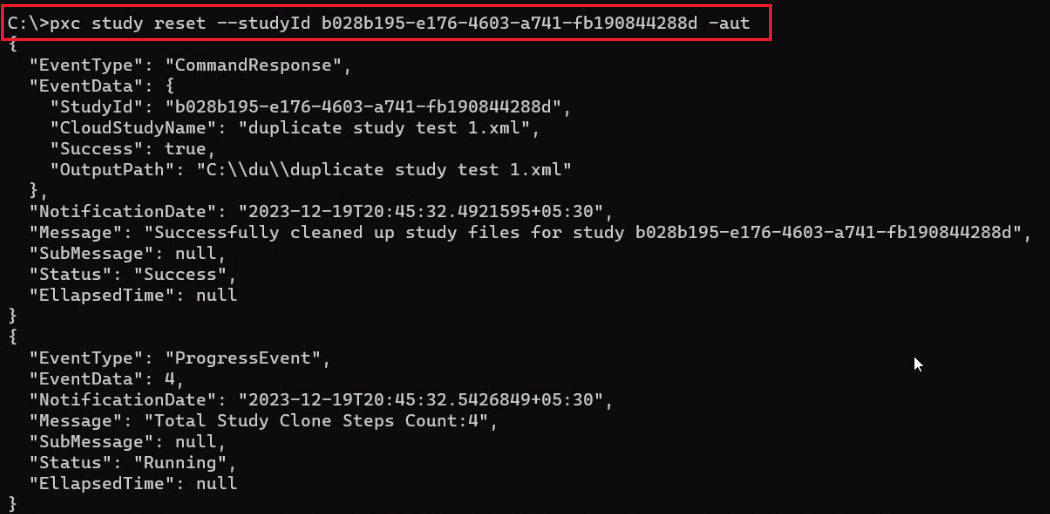
This provides a more organized and effective way to reset a local folder in the event of Study synchronization issues. Additionally, this eliminates the need for users to execute two separate commands for deleting and fetching the latest study version from the Cloud.
If changes have been made to a local Study, they can be pushed using the command. This command requires a studyId and a message (description of changes). For example:

Users will notice the following error message, if a conflict arises while Pulling or Pushing the Local Study changes through the Command Line Interface (CLI) to the PLEXOS Cloud:
UNIQUE constraint failed due to conflict when performing study sync operation because at least one field was modified by two users at the same time.
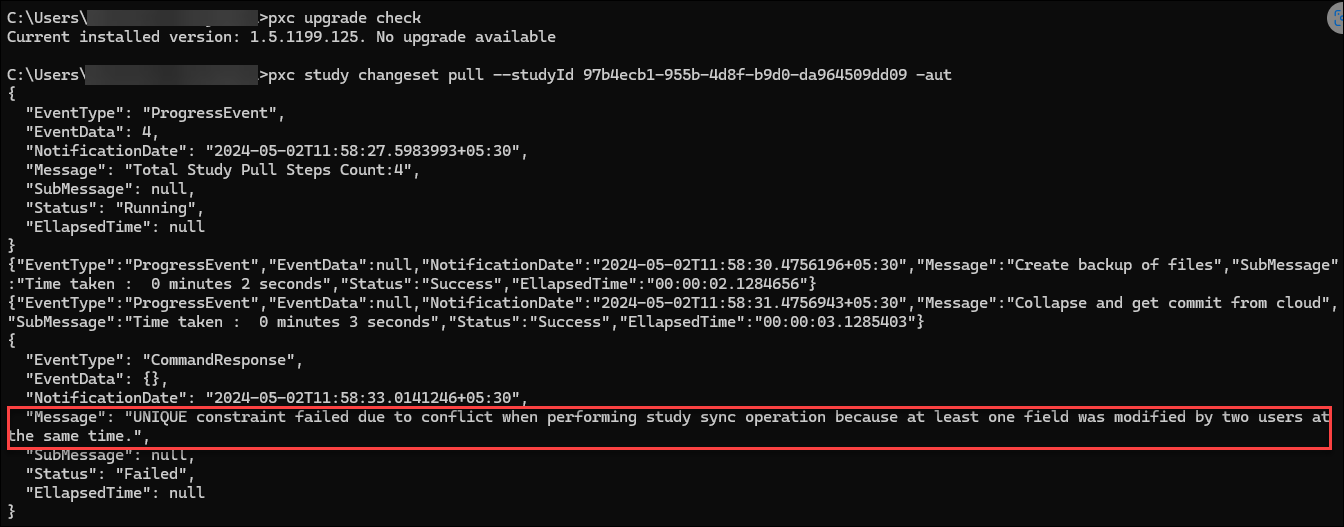
This error typically occurs due to conflicts, where you might already have some changes, you are trying to pull, or you have upgraded your local XML with a newer/older version of PLEXOS before pulling the changes.
Changes since the most recent changeset are required, if there have been no changes you will receive an error message. If there are changes to push then you will only get a successful "Changes Pushed" message at the end of the push operation. You will also be informed of the new ChangesetId as shown below.

The new changeset can also be confirmed by using the study changeset list --studyId command. If there are no changes found, the CLI will output "Study has no changes to push."
If there are pending changes on the server that have not yet been pulled down locally, they can be pulled using this command:
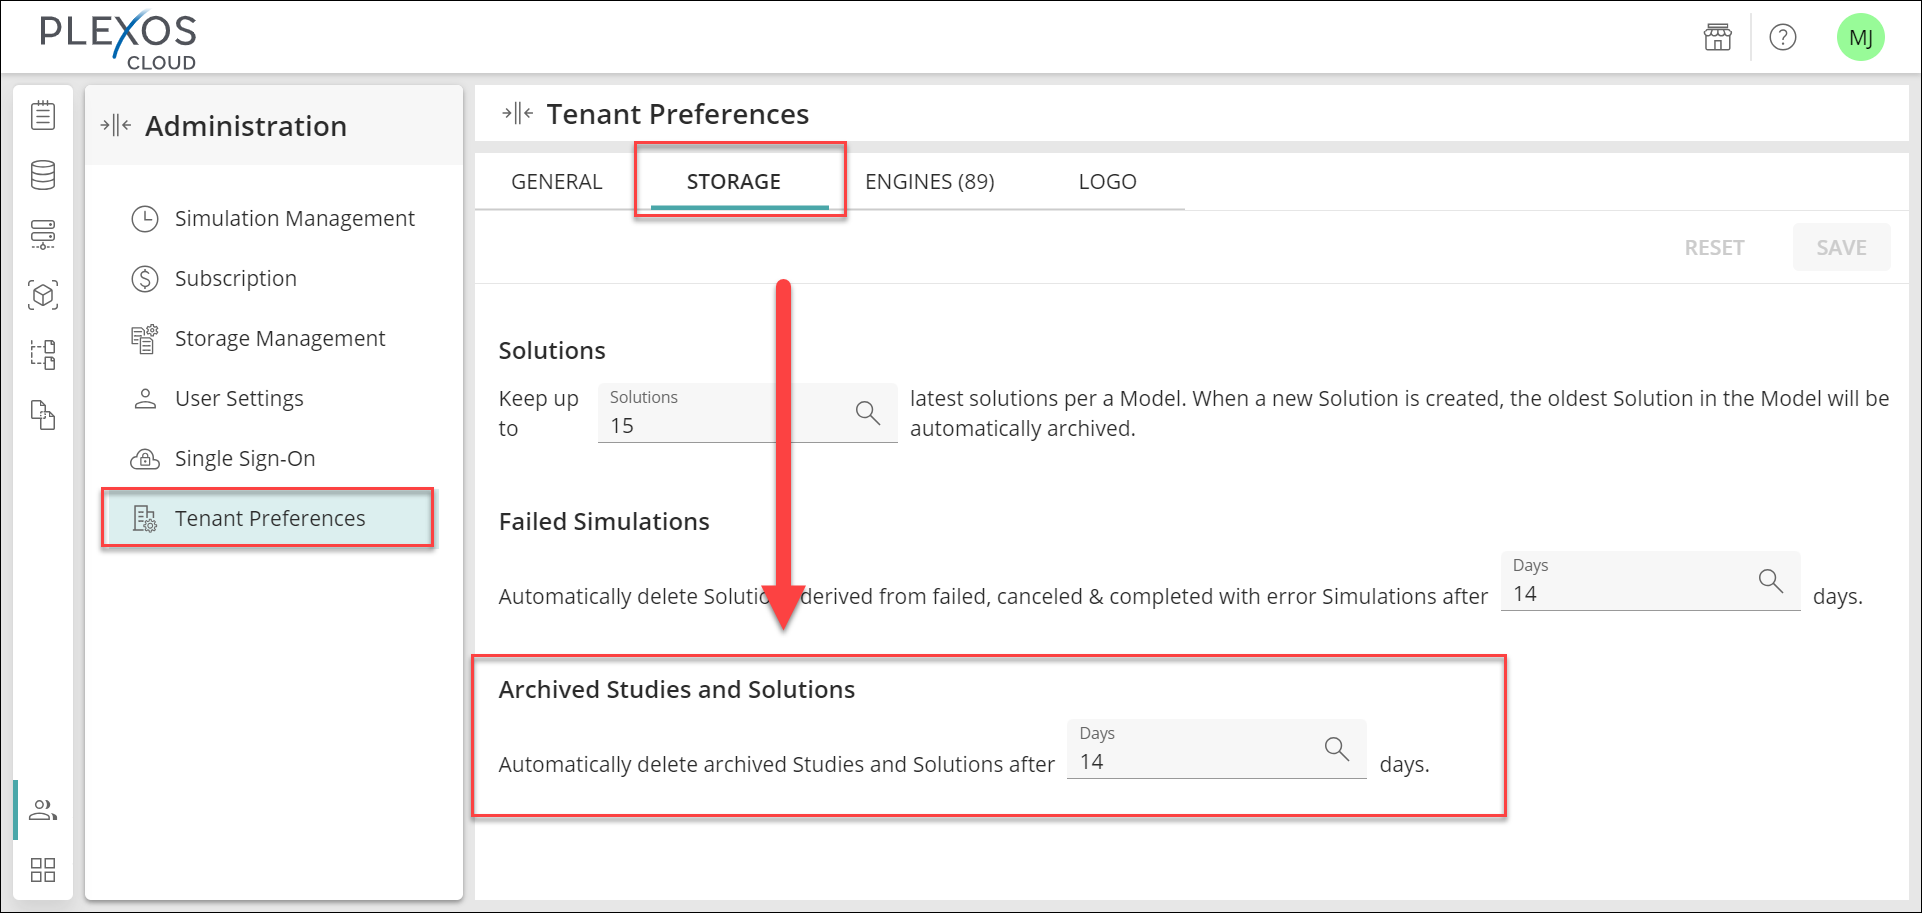
To eliminate the need for manual or batch Study deletions from the Admin > Storage Management > STUDIES tab in PLEXOS Cloud, users can Archive, Unarchive, or Delete Studies directly from the Command Line Interface (CLI) using the command below:
Archiving a Study makes it inactive in the PLEXOS Cloud. This prevents users from accessing inactive Studies and helps manage their Tenant Storage. Only the Study Owner or an Admin can Archive a Study by providing a specific Study ID. Use the command below to Archive the Study via CLI:
pxc study archive –studyId “16a4fcb9-8ee0-4910-89ed-7aae6a4e4487”

NOTE: The Archived Study will get automatically deleted based on the number of days configured by your Tenant Admin in the Tenant Preferences > STORAGE tab.
Once Archived, only an Admin can restore the Study via CLI using the command below:
pxc study unarchive –studyId ”74e6e1db-xxxx-yyyy-zzzz-341103321b7d”
-OR-
From PLEXOS Cloud, navigate to the Admin > Storage Management > STUDIES tab. In the Actions column, click on the Unarchive icon for the desired Study. Refer to the GIF below for more understanding:
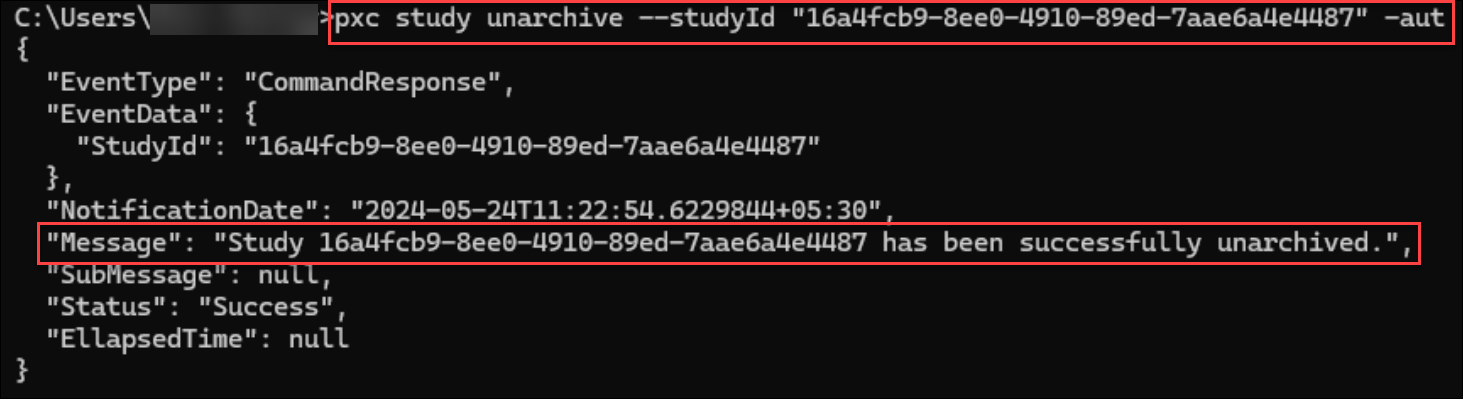
Unarchiving a Study makes the Study available in the PLEXOS Cloud. Only the Study Owner can Unarchive a Study by providing a specific Study ID. Once, Unarchived, the Study can be viewed by all users that have access to it. Use the command below to Unarchive a Study via CLI:
pxc study unarchive –studyId “16a4fcb9-8ee0-4910-7aae6a4e4487”
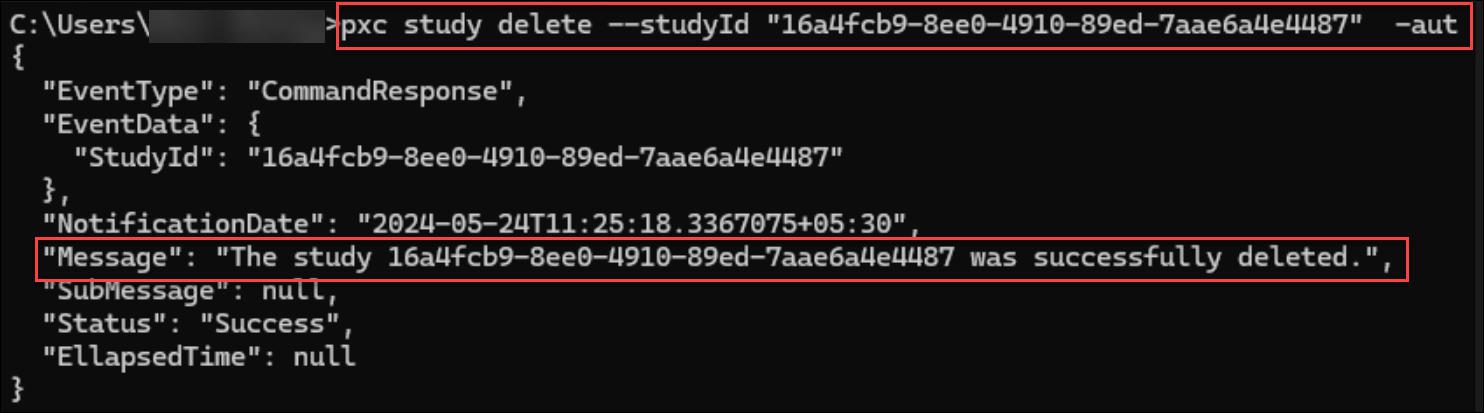
Deleting a Study removes it from PLEXOS Cloud, freeing up Storage space in your tenant. Before deleting a Study, the user must Archive it first. Only the Tenant Admin can Delete a Study by providing a specific Study ID, if you are not an Admin then contact your Tenant Admin to Delete a Study. Once Deleted, there is no ability to recover a Study. Use the command below to Delete a Study via CLI:
pxc study delete –studyId “16a4fcb9-8ee0-4910-7aae6a4e4487”
Using the Command Line Interface (CLI), you can now retrieve the XML and Timeseries files for a specific Study version. This enhancement allows you to download and use the XML and Timeseries files from the Study Changeset for automation or validation, eliminating the need for a one-time clone.
To download the XML and Timeseries files for a Study, you need the following:
Use the command below to download the XML and Timeseries files for a Study:

You can view the number of geocoded objects in a studyusing the pxc study stats geocoded-objects command. This is helpful when trying to determine if you have forgotten to geocode an object in a specific class. Enter the following command to extract this information:
pxc study stats geocoded-objects --studyId f22937c5-d263-4084-83ca-aa2cbd81ad5b --changesetId cd437e2d-e84f-4df1-b11c-3927e3b496
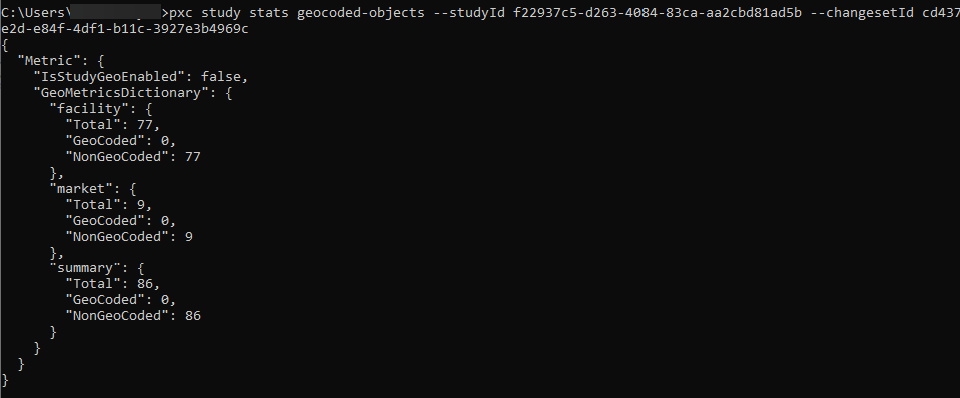
The studyId and changesetId are both required input parameters for this command.
You can view a list of the studies in a given directory path using the study list-local-studyIDs command. This can help improve workflows and reduce confusion when you are working with multiple XML files stored in the same folder. The command can be called as shown below:
pxc study list-local-studyIDs --studyDir "PathToStudyDir"

A Simulation Group is a collection of simulations that can be run in batch. Users can create and edit these groups so that they don't have to manually select multiple Models each time they want to run them, and can instead simply run a predefined group. You can trigger operations related to Simulation Groups using the pxc study settings command. Currently, the only type enabled in the study settings command is the SimulationGroup type.
Users can create, delete, and list Simulation Groups, and add-configurations to existing Simulation Groups. Enter the following command in the CLI and you will be directed to the help options available for the command:
pxc study settings -?
The add-configurations command takes the follow required inputs in the format below:
pxc study settings add-configurations --studyId "studyId" --settingId "settingId" --type SimulationGroup --path "File path to JSON payload file"
You can find an example of the JSON file structure with the following command:
pxc study settings add-configurations --type SimulationGroup --showExample
The create command creates a new study setting based on the type and the information specified in the JSON file.
The list command lists the study settings available for a given study. The command can be called as shown below:
pxc study settings list --studyId "studyId"

As shown above, the command outputs the Name, groupId, Status, and Type of each setting associcated with the study. The groupId;"> and studyId are required inputs to execute the command above. You can also execute simulation groups via the CLI using the following command:
pxc simulation run-group --groupId "groupId" and --studyId "studyId"
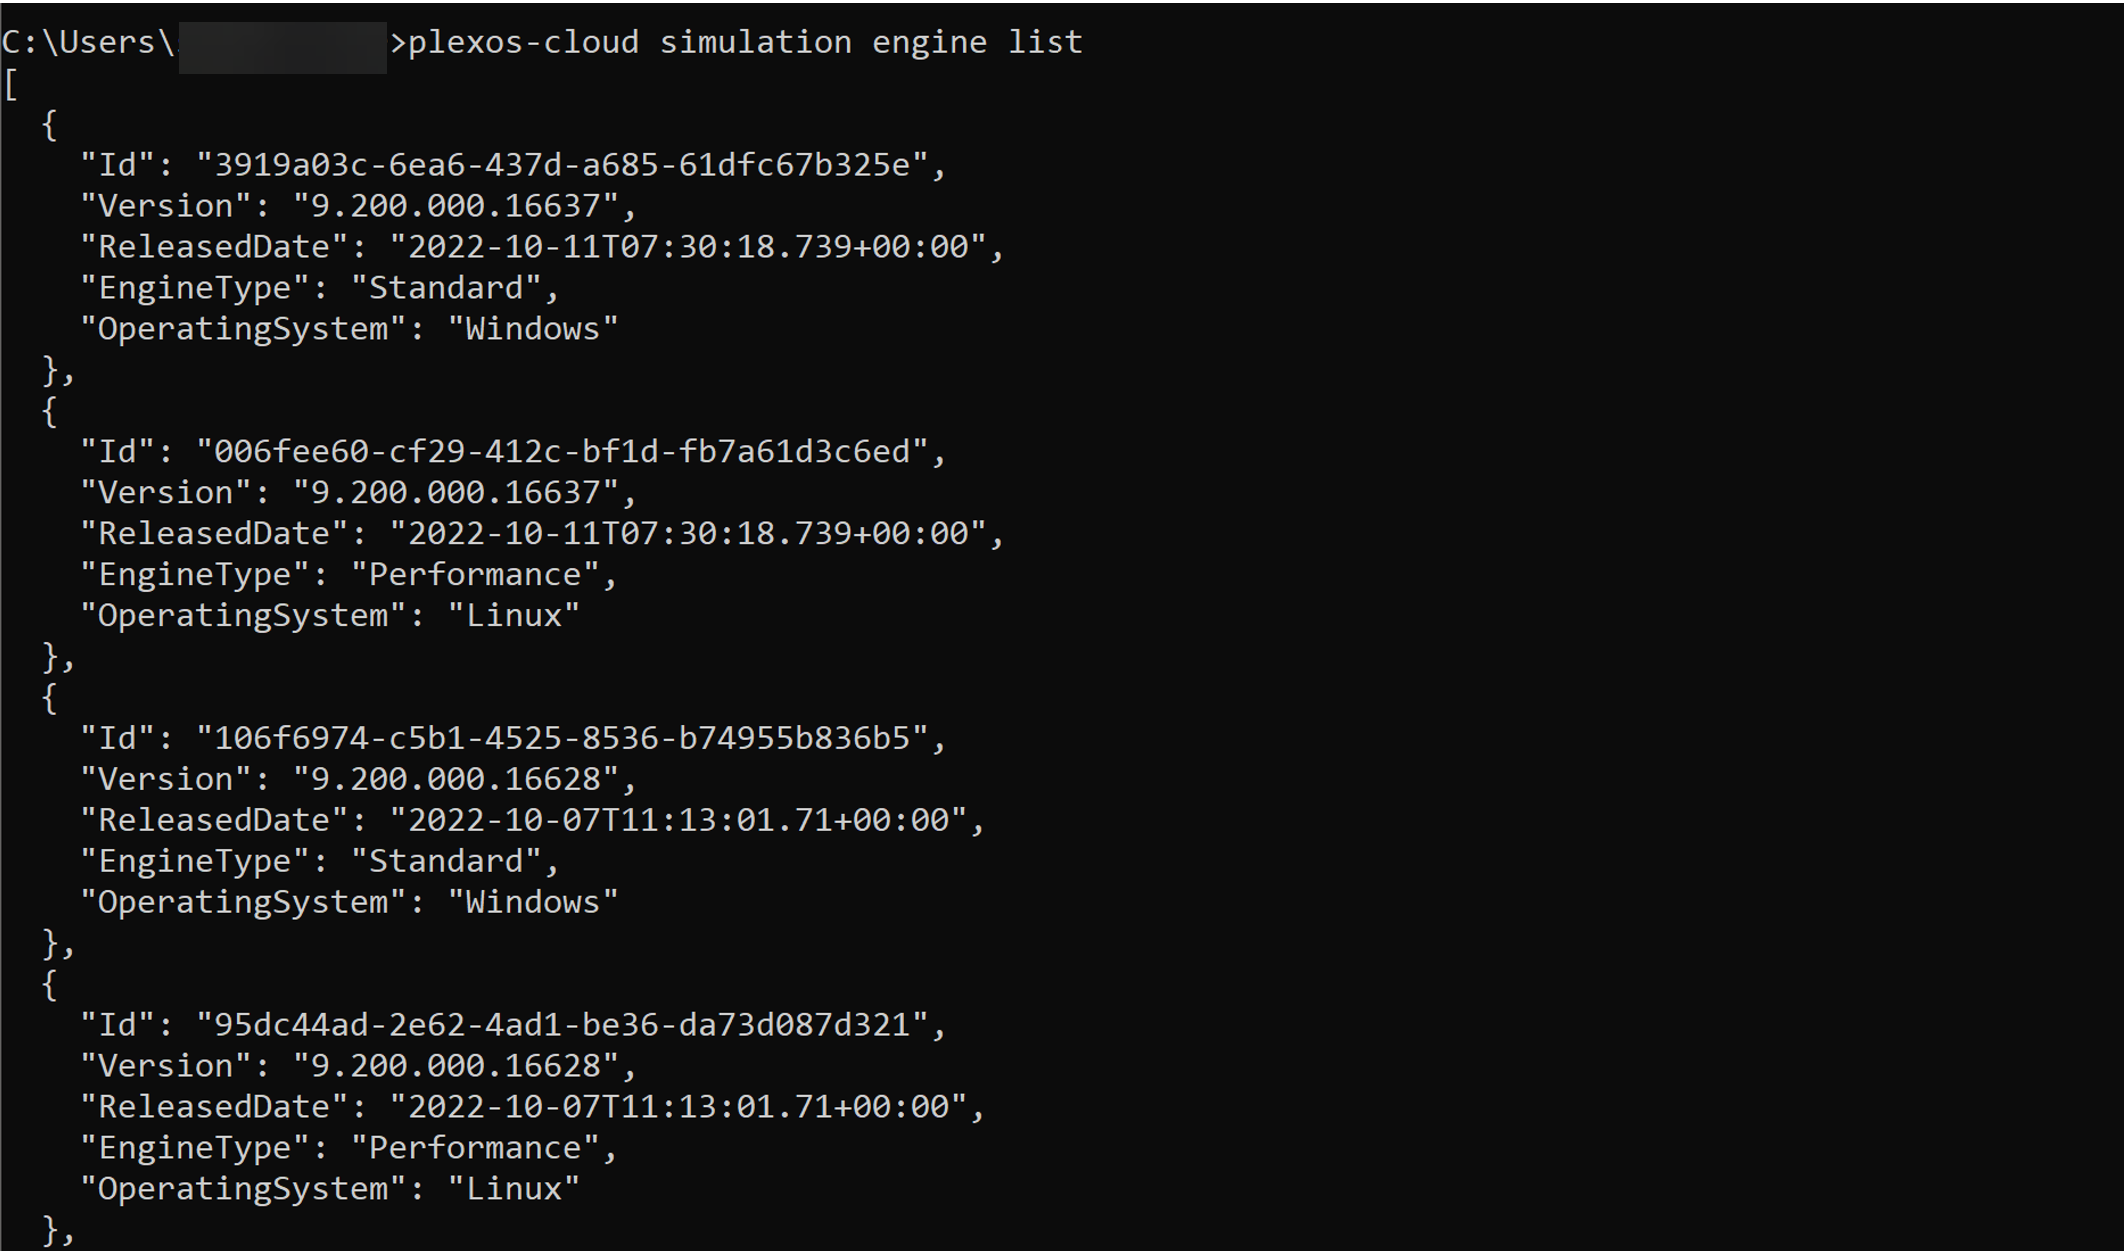
The simulation engine command displays different commands related to the various engines to run simulations against. Currently, the only command available that be executed against engines is the simulation engine list command. This command simply lists the different engines available in PLEXOS to run simulations against.
The simulation capability command lists all the available scalesets available to run simulations against. For example, the following command:
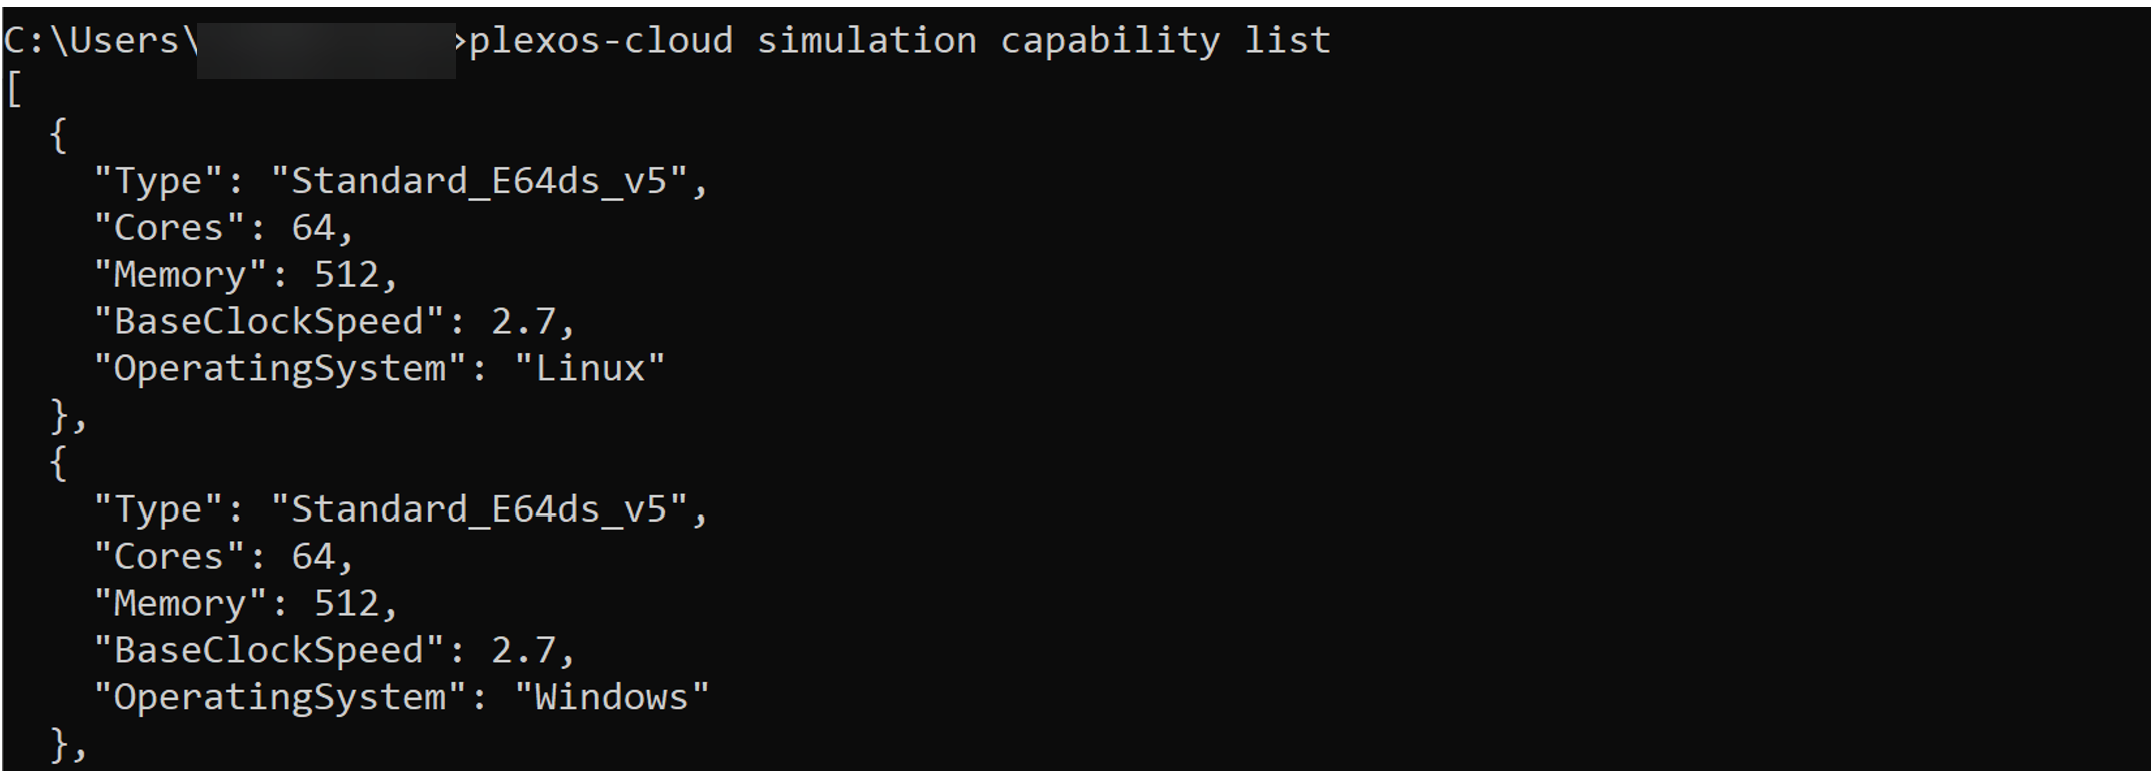
The data return from the capability oData endpoint for each scale set is the following:
Several of the command areas for each API (studies, solutions, and simulations) offer a list command, which gives the ability to query the API oData endpoints to search for records.
The help command for the simulation list provides the following outputs:

This allows the user to use not required options to filter the records by important identifying information, such as simulationId , studyId , executionId , or changesetId . One can also order by any of the supported properties using the --orderBy option, and can order in descending order by pairing with the --descending option.
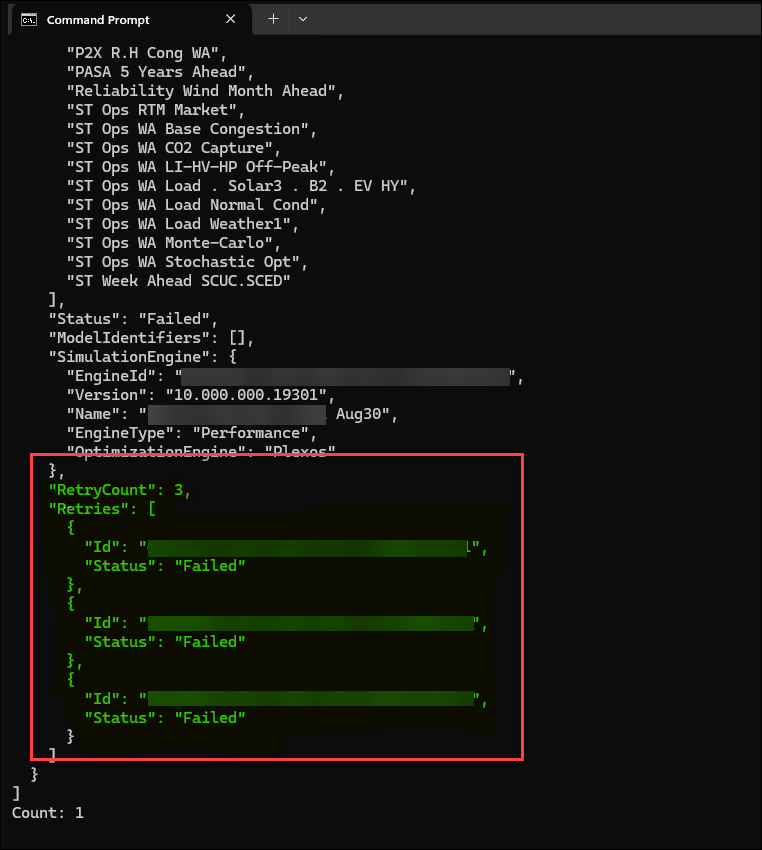
When users enter the command "pxc simulation list --simulationId <xxxxxxxx>," they will notice these additional fields in the response. The RetryCount field assist users in tracking the number of retries made for any failed Simulation, while the Retries field specifies the Status and Simulation ID for which this retry occurred.
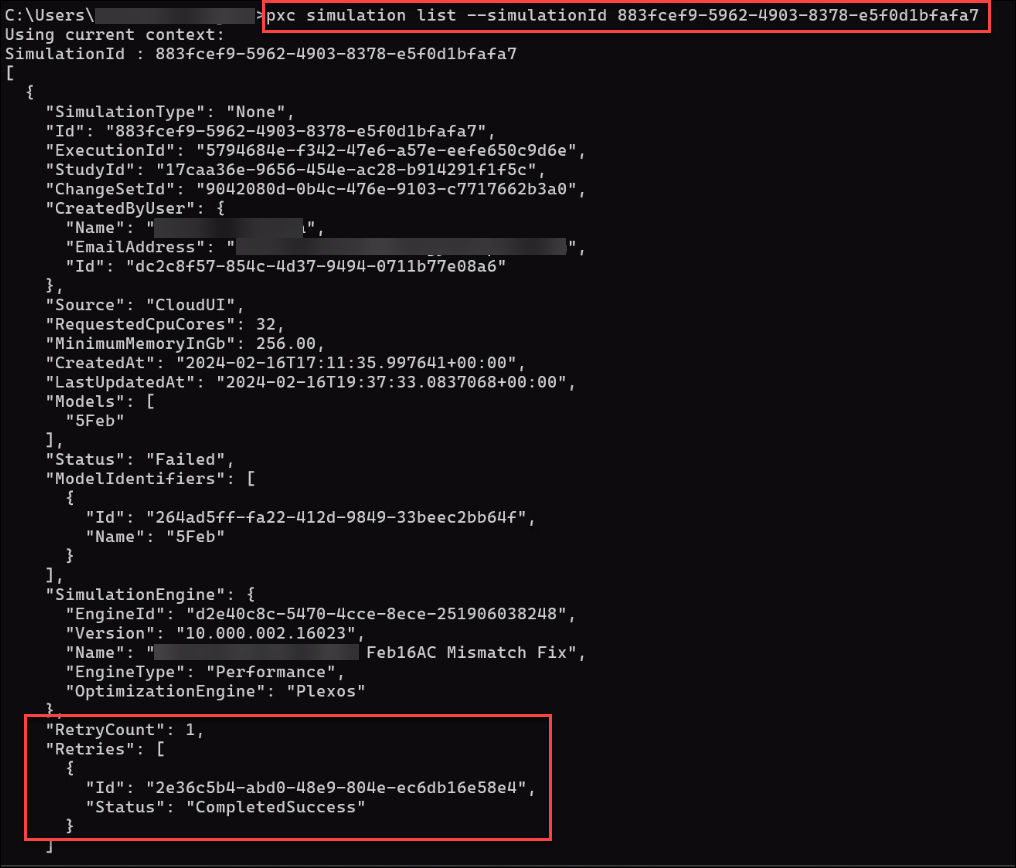
Tracking Simulation Retries allows users to easily determine whether a Failed Simulation has been Retried or not. Additionally, users can quickly identify which specific Simulation prompted the Retry.
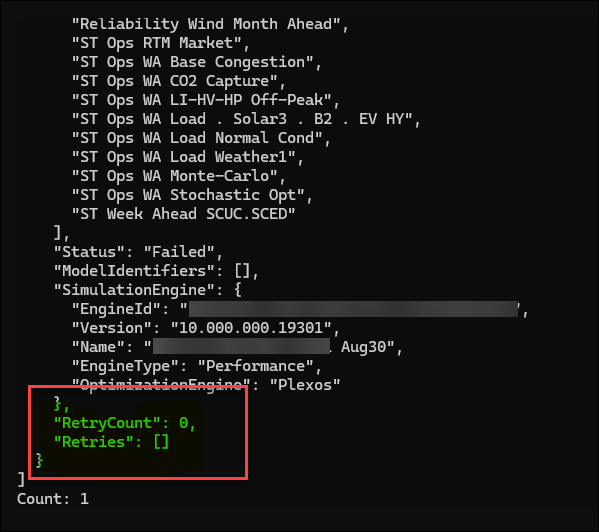
Please note that if a simulation was retried three times, we only receive RetryCount and Retry details for the initially triggered Simulation ID. The remaining Simulation IDs will have a RetryCount of 0 and no retry details. Refer to the example below, Showing the RetryCount as 3 and Retry details available only for the First Simulation ID, while the other Simulation IDs will have a RetryCount of 0 and no retry details.
Since this is backed by an oData API endpoint, a maximum of 250 results will be returned. One could use the --top and --skip options to paginate through results if more than 250 results are required. Note that Odata pagination requires ordering by a property. We are working on a more generic architecture to allow the user to dynamically search for records.
For example, to view the last 10 simulations for a Study enter the following command:
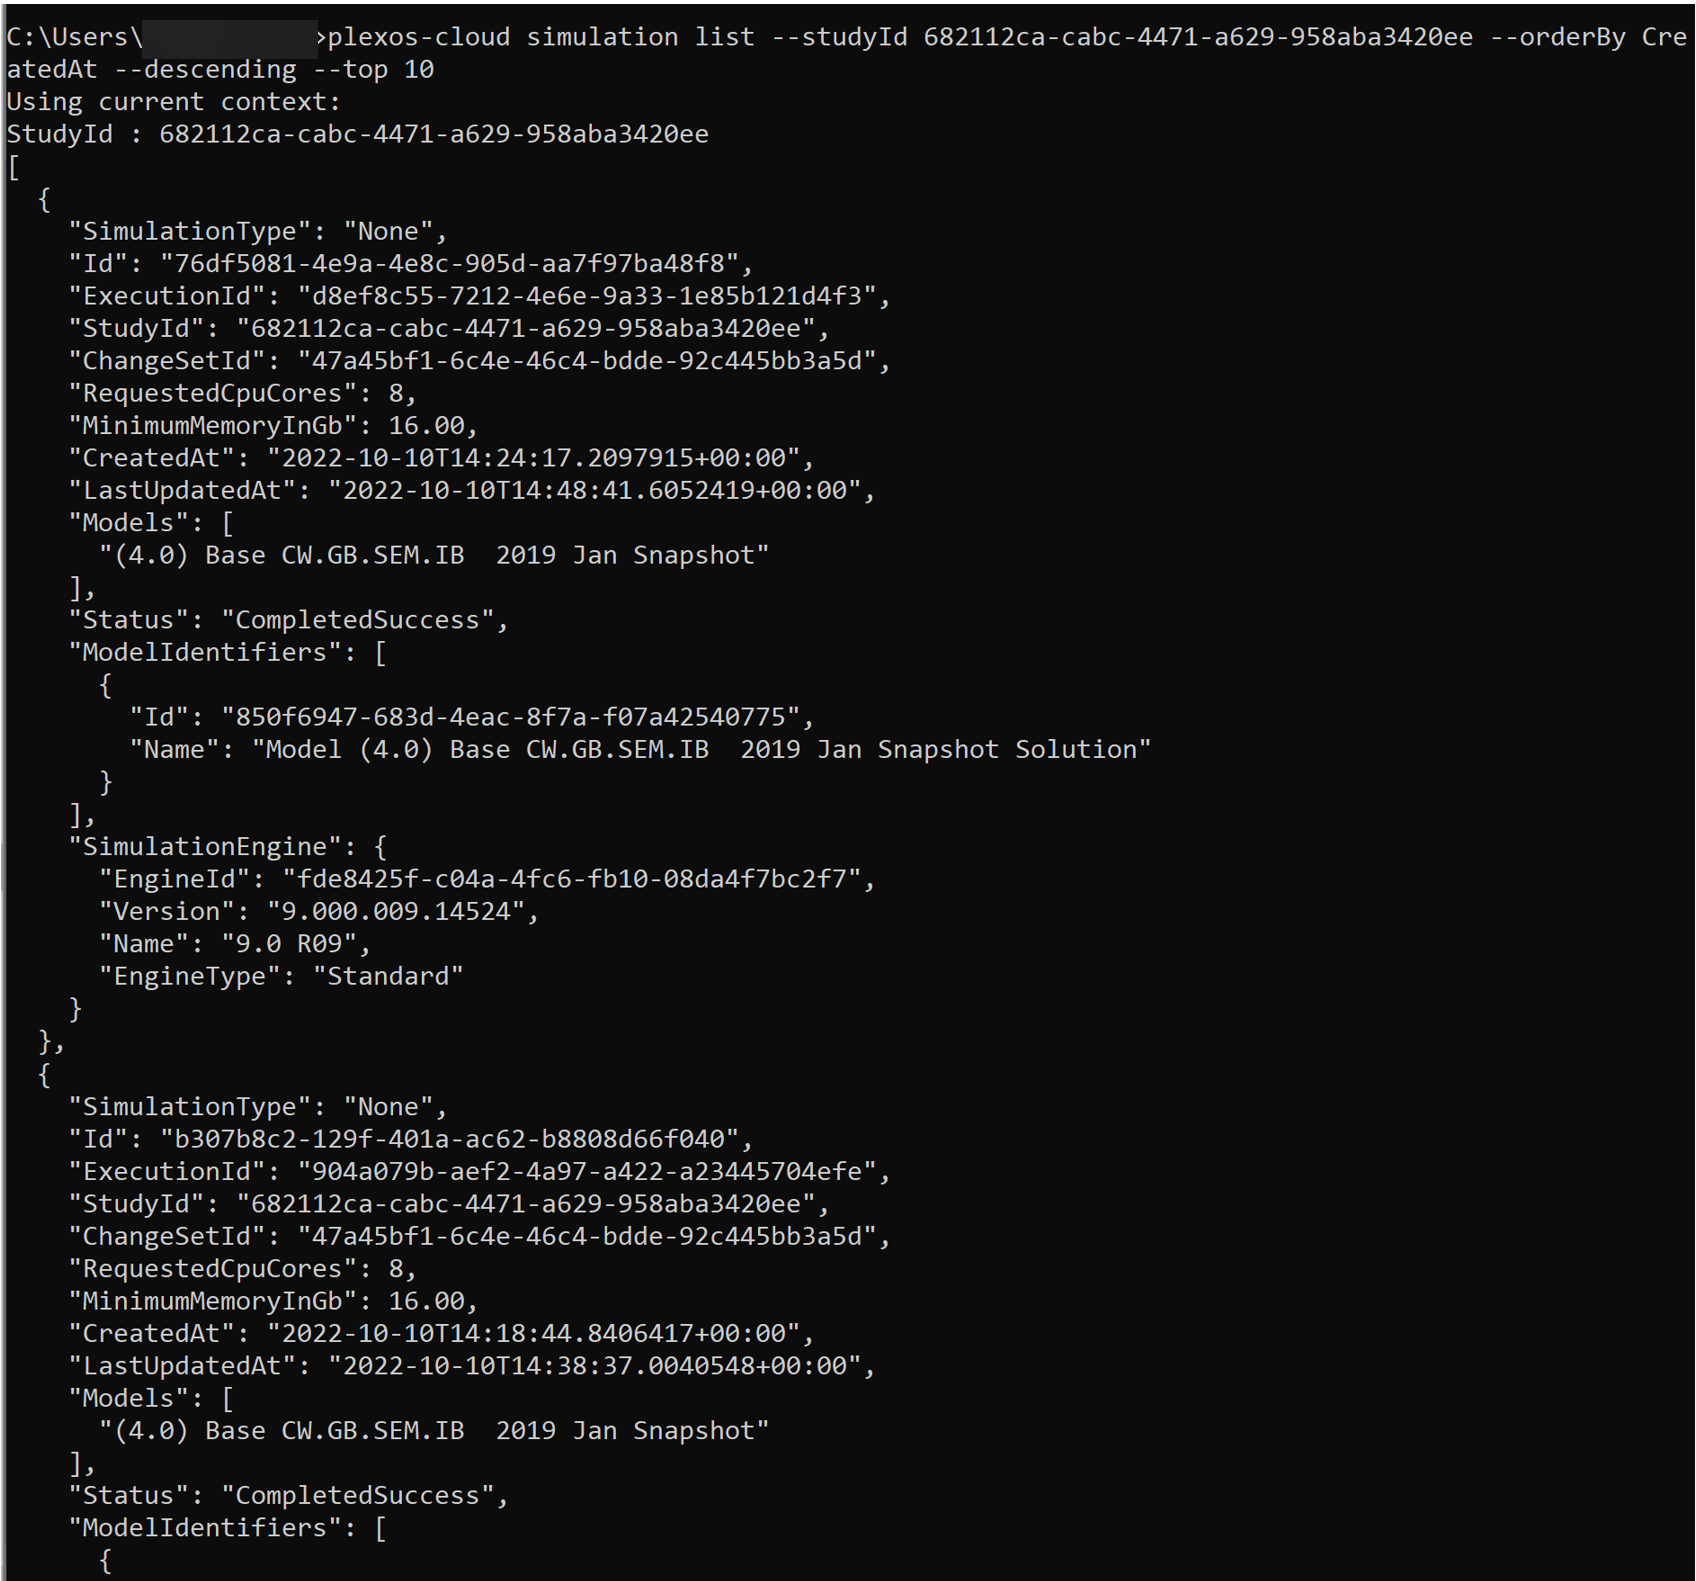
The list returns slimmed-down information from simulation records.
NOTE: The CreatedAt and LastUpdatedAt times are reported as GMT/UTC times, whereas data exported from PLEXOS Cloud will reflect your Time Zone settings under Preferences.
PLEXOS CLI has the ability to generate a simulation request based on a previous simulation request. This allows users to mitigate the need to generate a simulation state from scratch. The following command will show you the options available for the build-request-from-previous command:
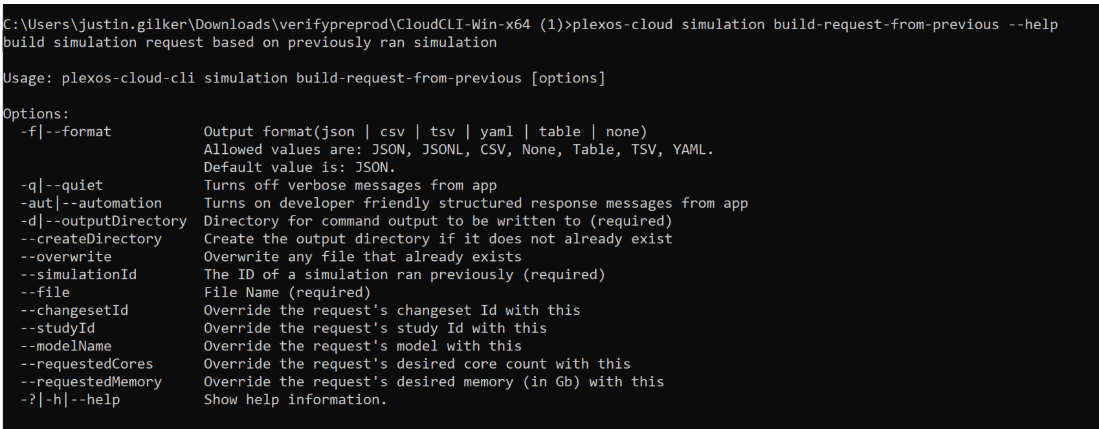
Required options include the filename, outputDirectory, and the simulationId.
Re-running a previous simulation exactly as-is is rarely a valuable action without changes. The user can manually make any modifications to the saved JSON file to get desired new behavior, e.g. modifying the model name, changeset id, engine version, etc. However, there are a few helpful options in this command to accomplish changing some of the most common simulation parameters:
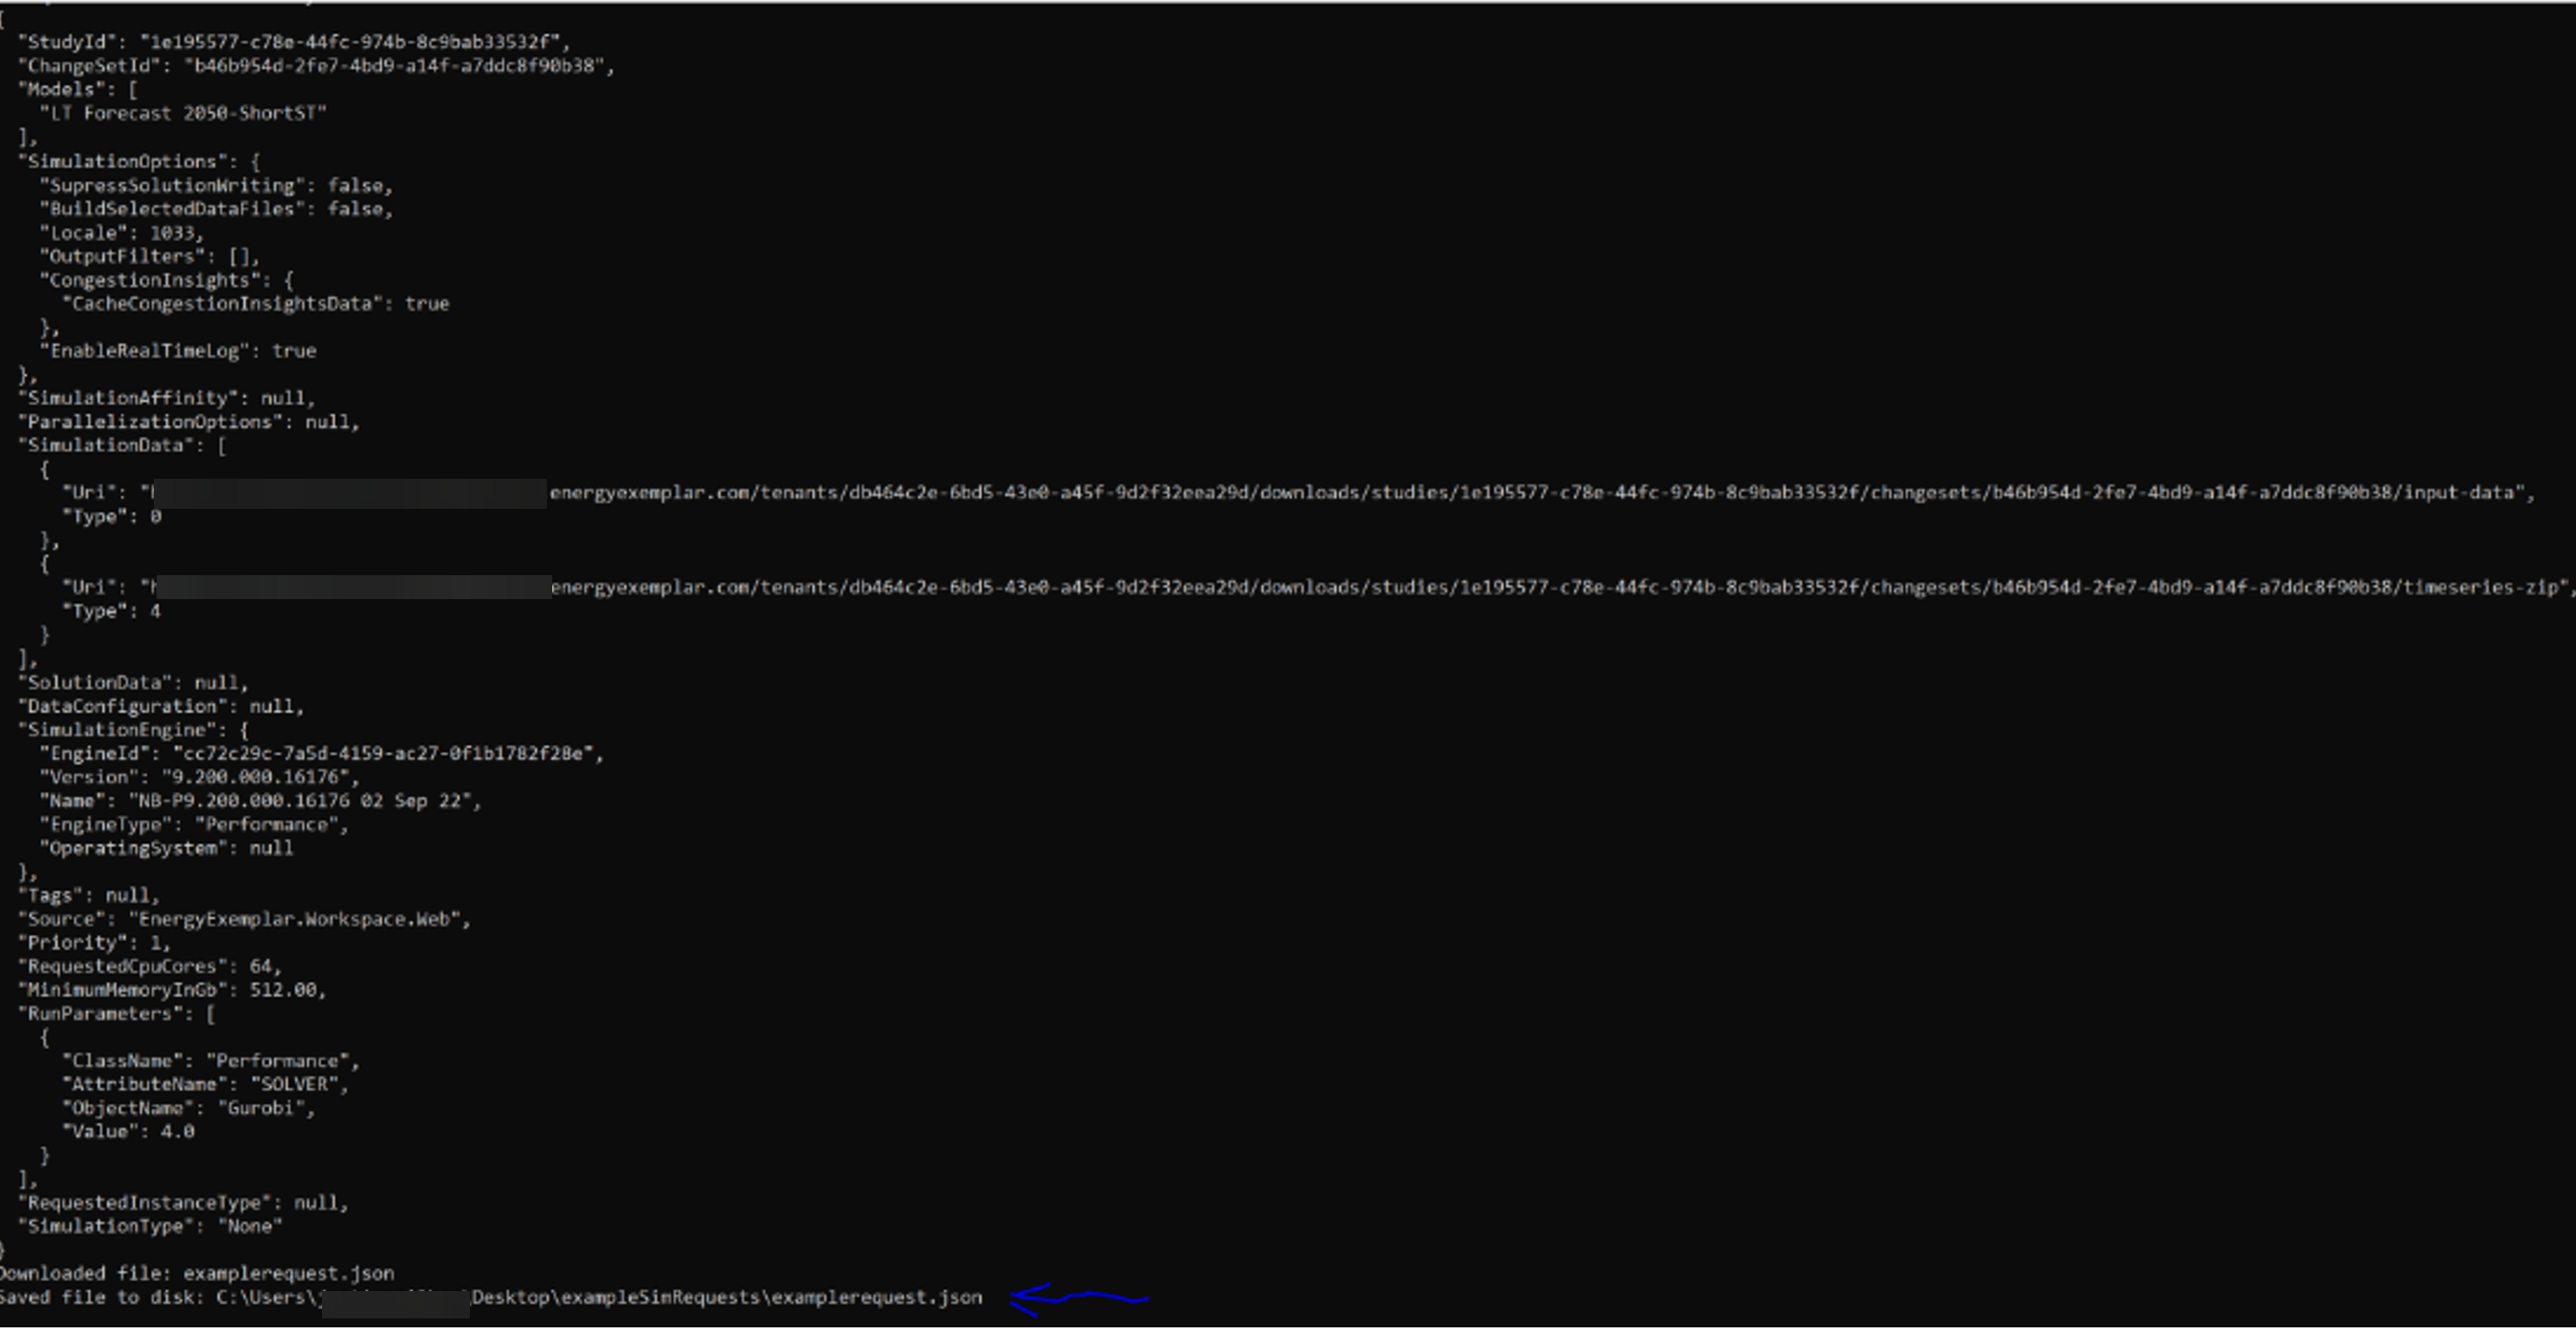
We are actively working on making this easier, but the only current way to enqueue a Smulation through the CLI is by having an example request body JSON file for the API built up. The easiest way to do this today is by using the above example to build a request using a previously Run Simulation as a starting point. For brand-new Simulations that do not have a good starting point to use as a base template, it is recommended to kick off that first Run using the PLEXOS Cloud interface. Otherwise, a good understanding of the API request structure is required. We will cover a few basics here. Here is a very simple example of the request body for enqueuing a Simulation:
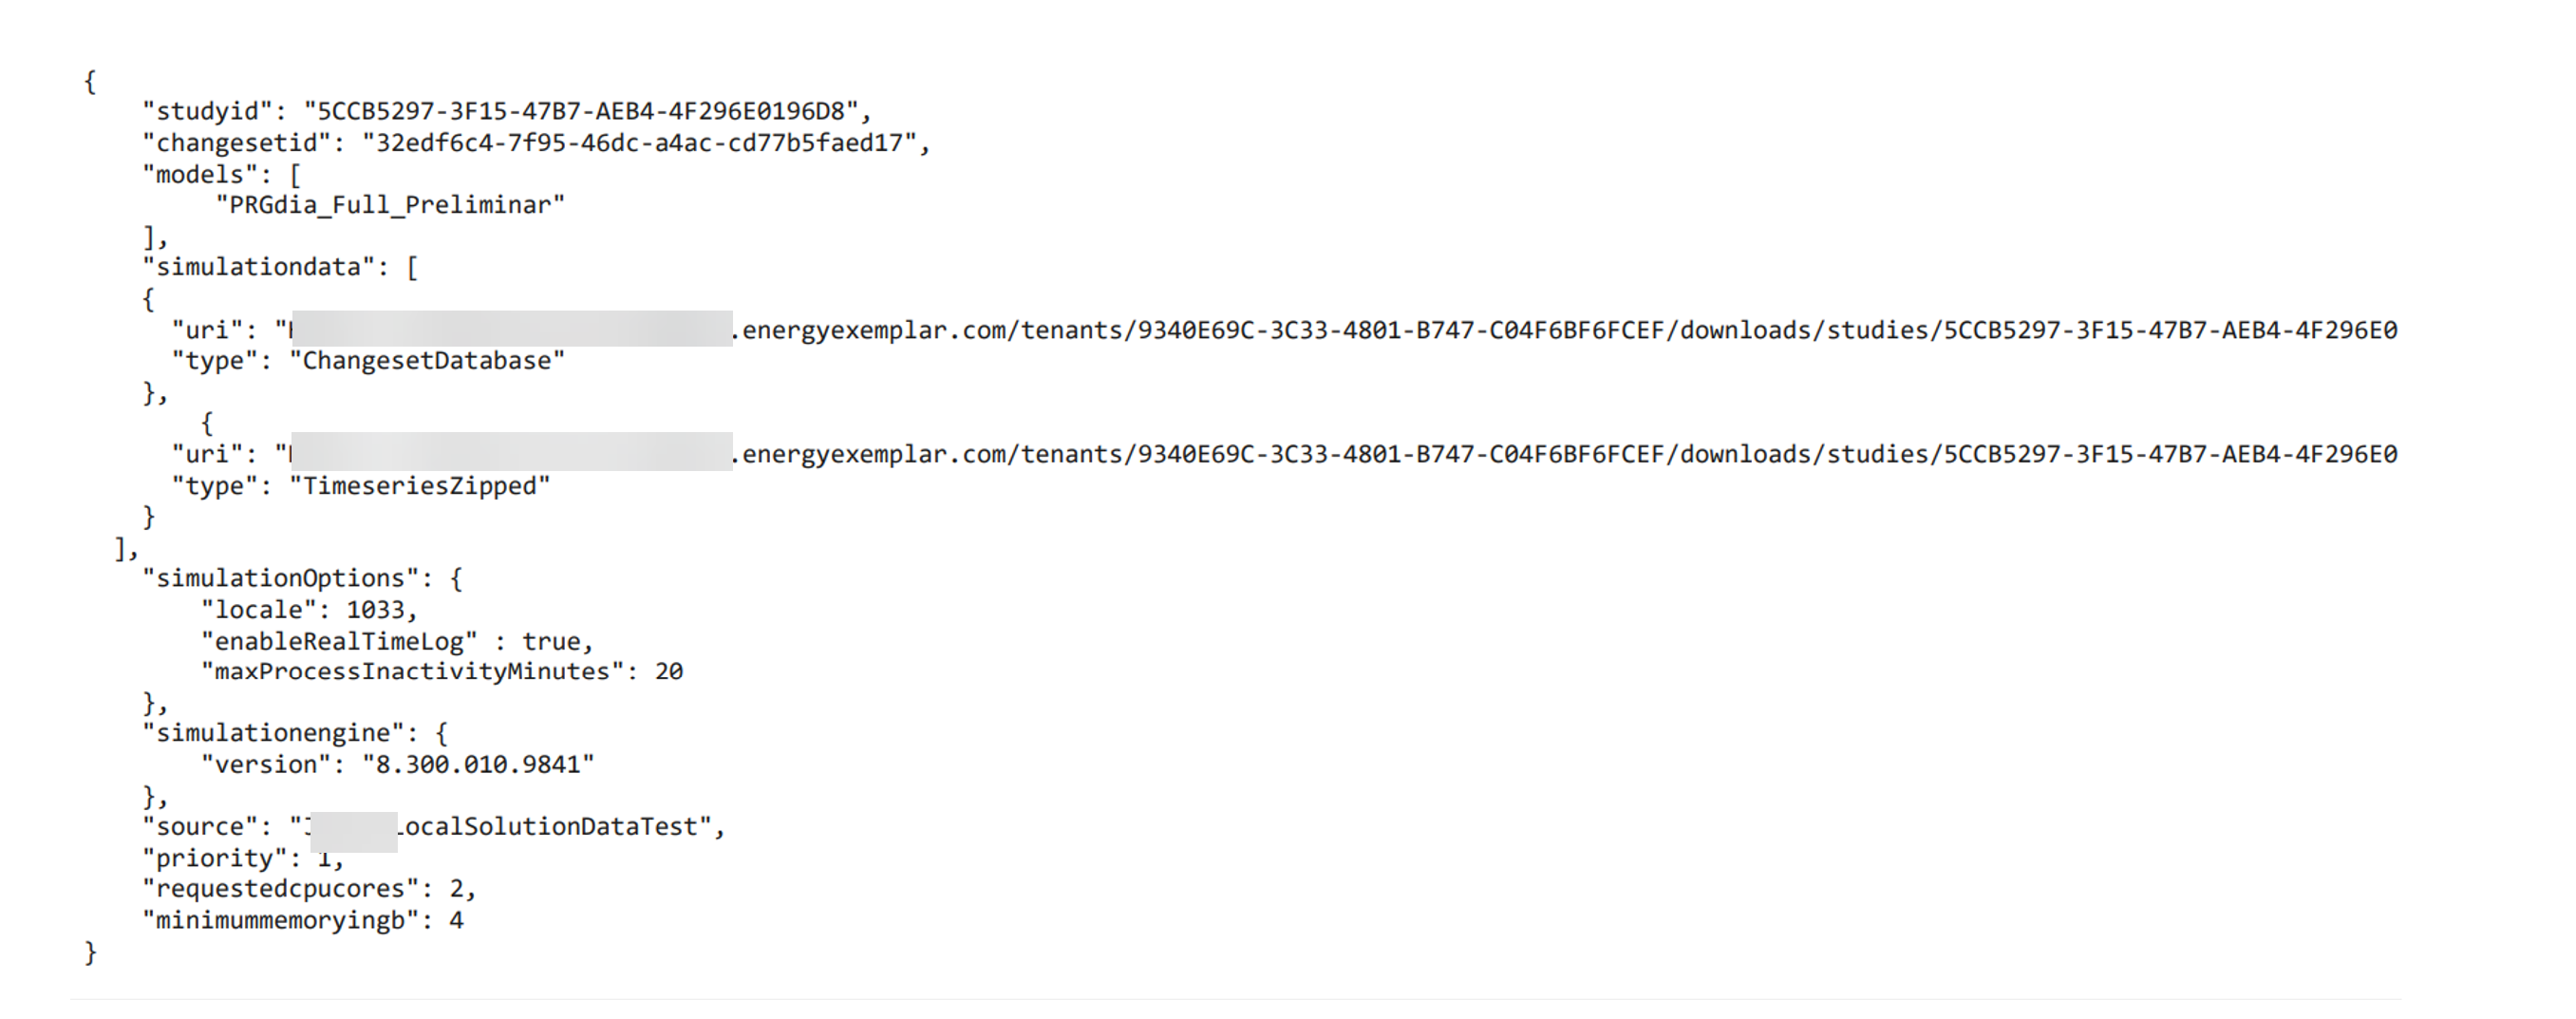
This is a very simple example of Running a single Simulation on Windows for a given checked-in changeset and Model.
The following command will output a full list of all available request properties, their formats, and if they are required or not:
plexos-cloud.exe simulation enqueue --showExample
New Enqueue subcommands have been integrated into the CLI, streamlining the process of queuing various types of Simulations. These additions offer users a more straightforward approach to enqueue requests, enabling them to tailor their customization requests. The aim is to simplify the automation of Simulation enqueuing and facilitate the execution of basic Simulations. Many Simulations only necessitate essential information such as Study ID, CPU cores and memory allocation, Model Names, etc. To aid users, default settings have been established, rendering most arguments optional.
Enqueueing simulations with JSON files have been left unchanged.
plexos-cloud simulation enqueue --file <filePath>
However, six new subcommands correlate to simulation types that can be enqueued:
plexos-cloud simulation enqueue standard - Simulation type None
plexos-cloud simulation enqueue stochastic
plexos-cloud simulation enqueue monte-carlo - Monte Carlo V2
plexos-cloud simulation enqueue chronological-split
plexos-cloud simulation enqueue gurobi - Gurobi tuning
plexos-cloud simulation enqueue custom-plexos - Standard with ability to pass custom arguments to the PLEXOS
Required
Optional for all simulations
Simulation specific arguments (optional)
Custom Plexos - Desired arguments specifically for the PLEXOS Engine.
--custom-arguments "<args>"
Stochastic - How many VM instances/samples to spin up. The default is provided in appsettings.
--instance-count <count>
Monte Carlo - Number of divisions, default in appsettings.
--split-divisions <splitCount>
Chronological Splits - Number of divisions, default in appsettings.
--split-divisions <splitCount>
Split Step - The desired chronological step type to split on. Default present in appsettings.
--split-steps <stepType>
Run as Single Instance -Runs the split in a single instance. The default is false.
--run-as-single-instance
Gurobi Tuning -Maximum time to spend tuning the model in seconds.
--max-tune-time <seconds>
Tune trials - Number of trials to run when tuning the model.
--tune-trials <trials>
MIP gap - Maximum MIP gap.
--mip-gap <gap>
The simulation progress command returns the current progress of the simulation. The command accepts a simulationId and queries information about the current state of the simulation. The simulation progress command is structured as follows:
plexos-cloud simulation progress --simulationId
The phase and message information displays if and only if the status is Running AND if the phase and message information are available. Otherwise, the command only returns the "Current Status" information if the current simulation status is something other than Running. For example, if the status is AssignedToQueue, then the progress command returns Assigned to Pool.
The simulation solution-stitching command allows you to stitch together solution files from Distributed Run Types that use the Monte Carlo Distrbution Method. The required inputs are the Parent Simulation executionId, number of cores, and memory.
plexos-cloud simulation solution-stitching --executionId "executionId" --cores "cores" --memory "memory"
Once a simulation has been moved into a "Completed" status (CompletedSuccess, CompletedError, or Failed), there are some commands in the solution area of the CLI to help with accessing the output data produced by that simulation.
We can first use the solution list command, which is communicating with an odata API and works in a similar manner to the simulation list and study list of data querying commands covered above. Enter the following command to view your options:
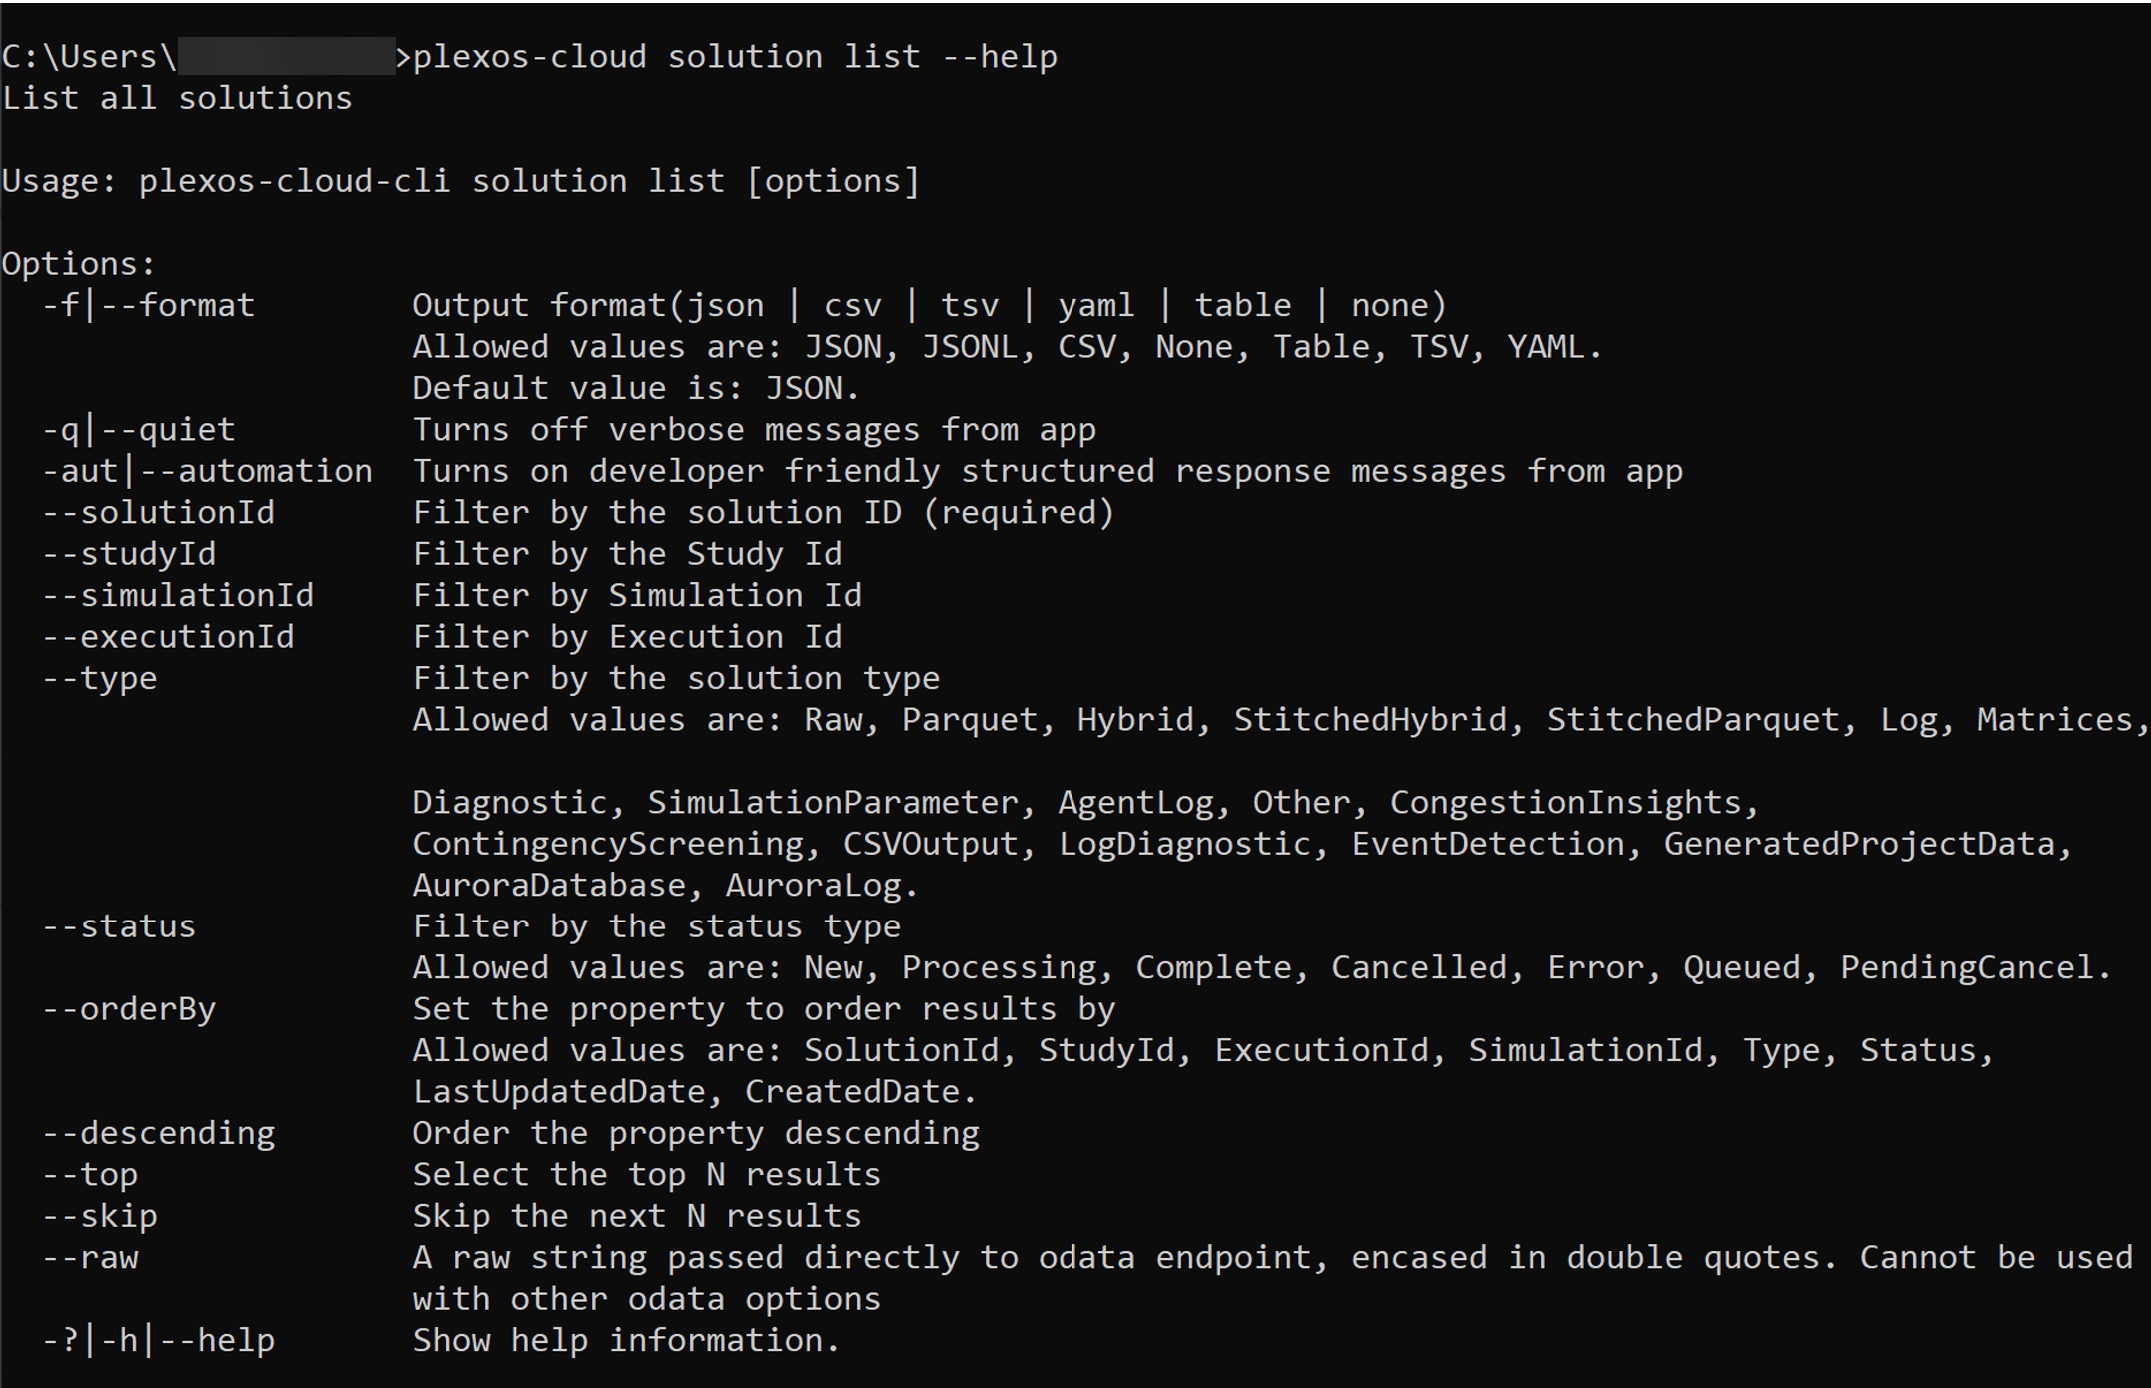
For example, to look for any Solutions produced by the Simulation started at the end of the Simulation enqueue command example above, we can Run this command using the --simulationId option.
plexos-cloud solution list --simulationId.
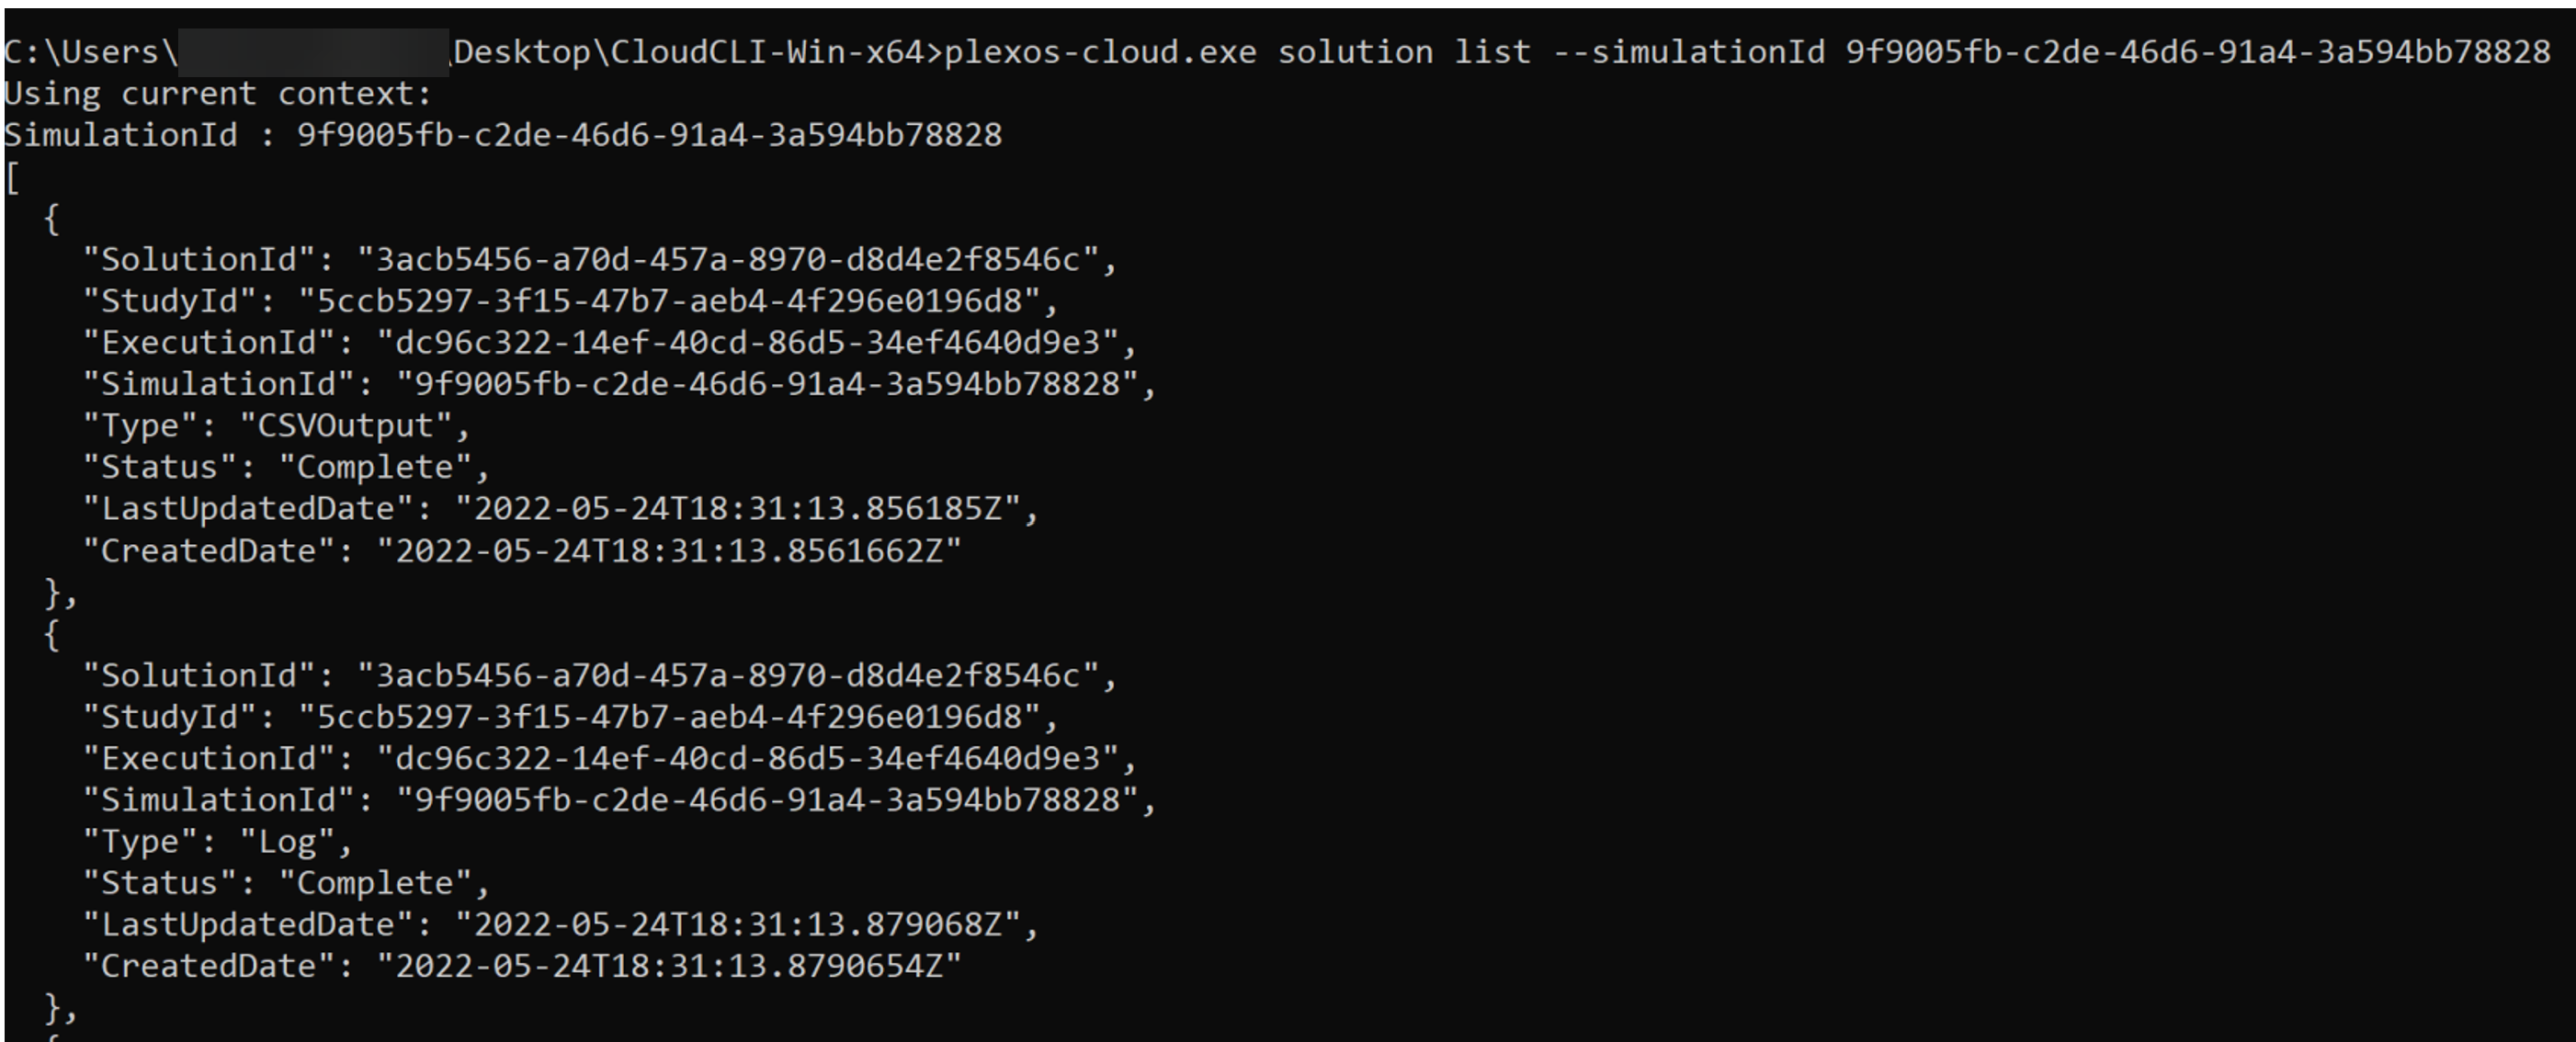
This will list all SolutionType records for all Solutions created by a simulation. A SolutionType is a grouping of output files, for example, the Parquet solution type will contain all parquet files constituting the output database in parquet format. A Solution has a one-to-one mapping with a Model run on a simulation. Because multiple models can be run on a simulation, there may be multiple Solutions tied to a simulationId , with each Solution having multiple Solution types.
There is a files sub-command under the solution area to gain insight into the files behind each of these solution types. Enter the following command:
plexos-cloud solution files list --help
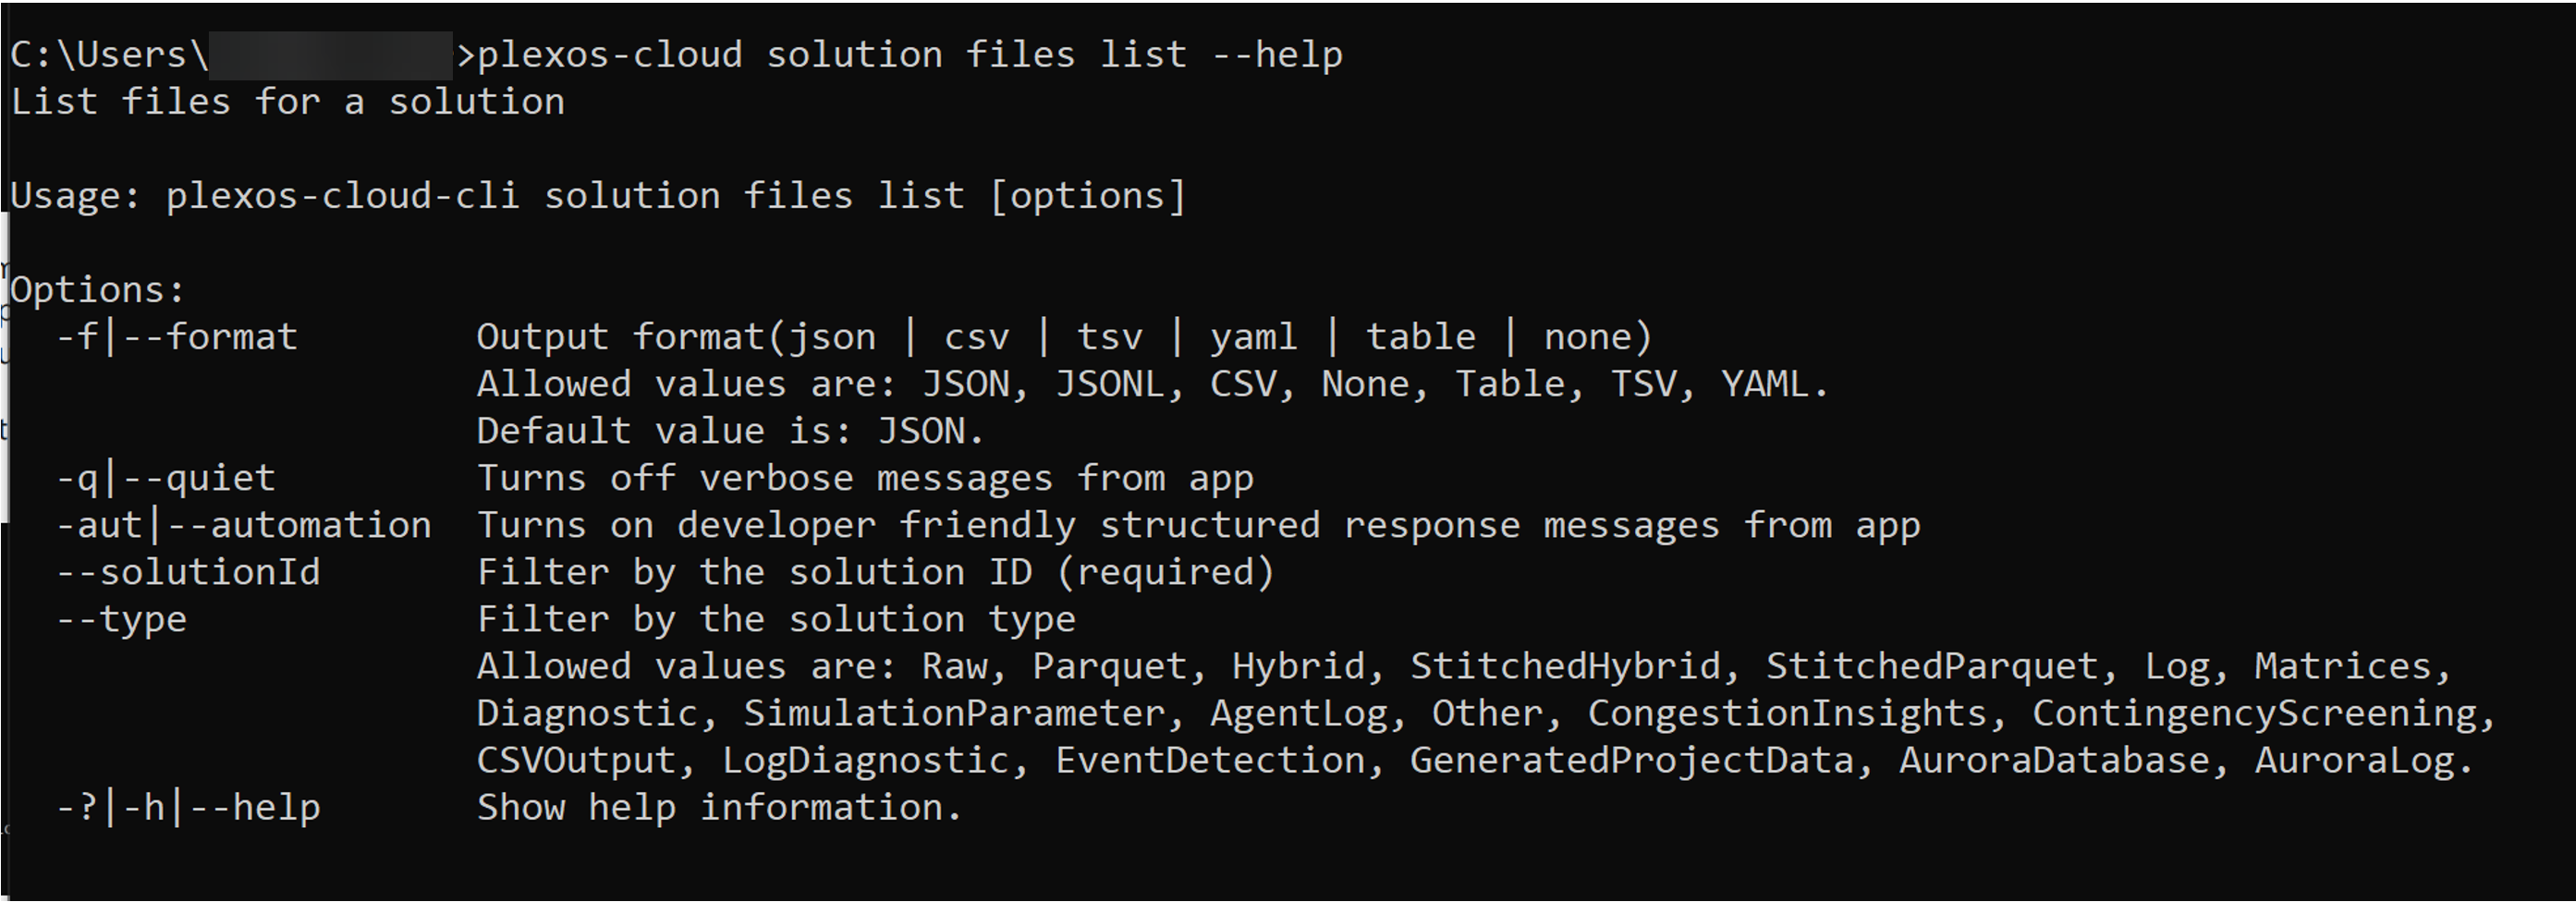
We can see that only the solutionId is required, and there is an optional option to filter by type, with each (strongly typed) possible value listed. I could pass in just the solutionId and list all files for all solution types:
plexos-cloud solution files list --solutionId
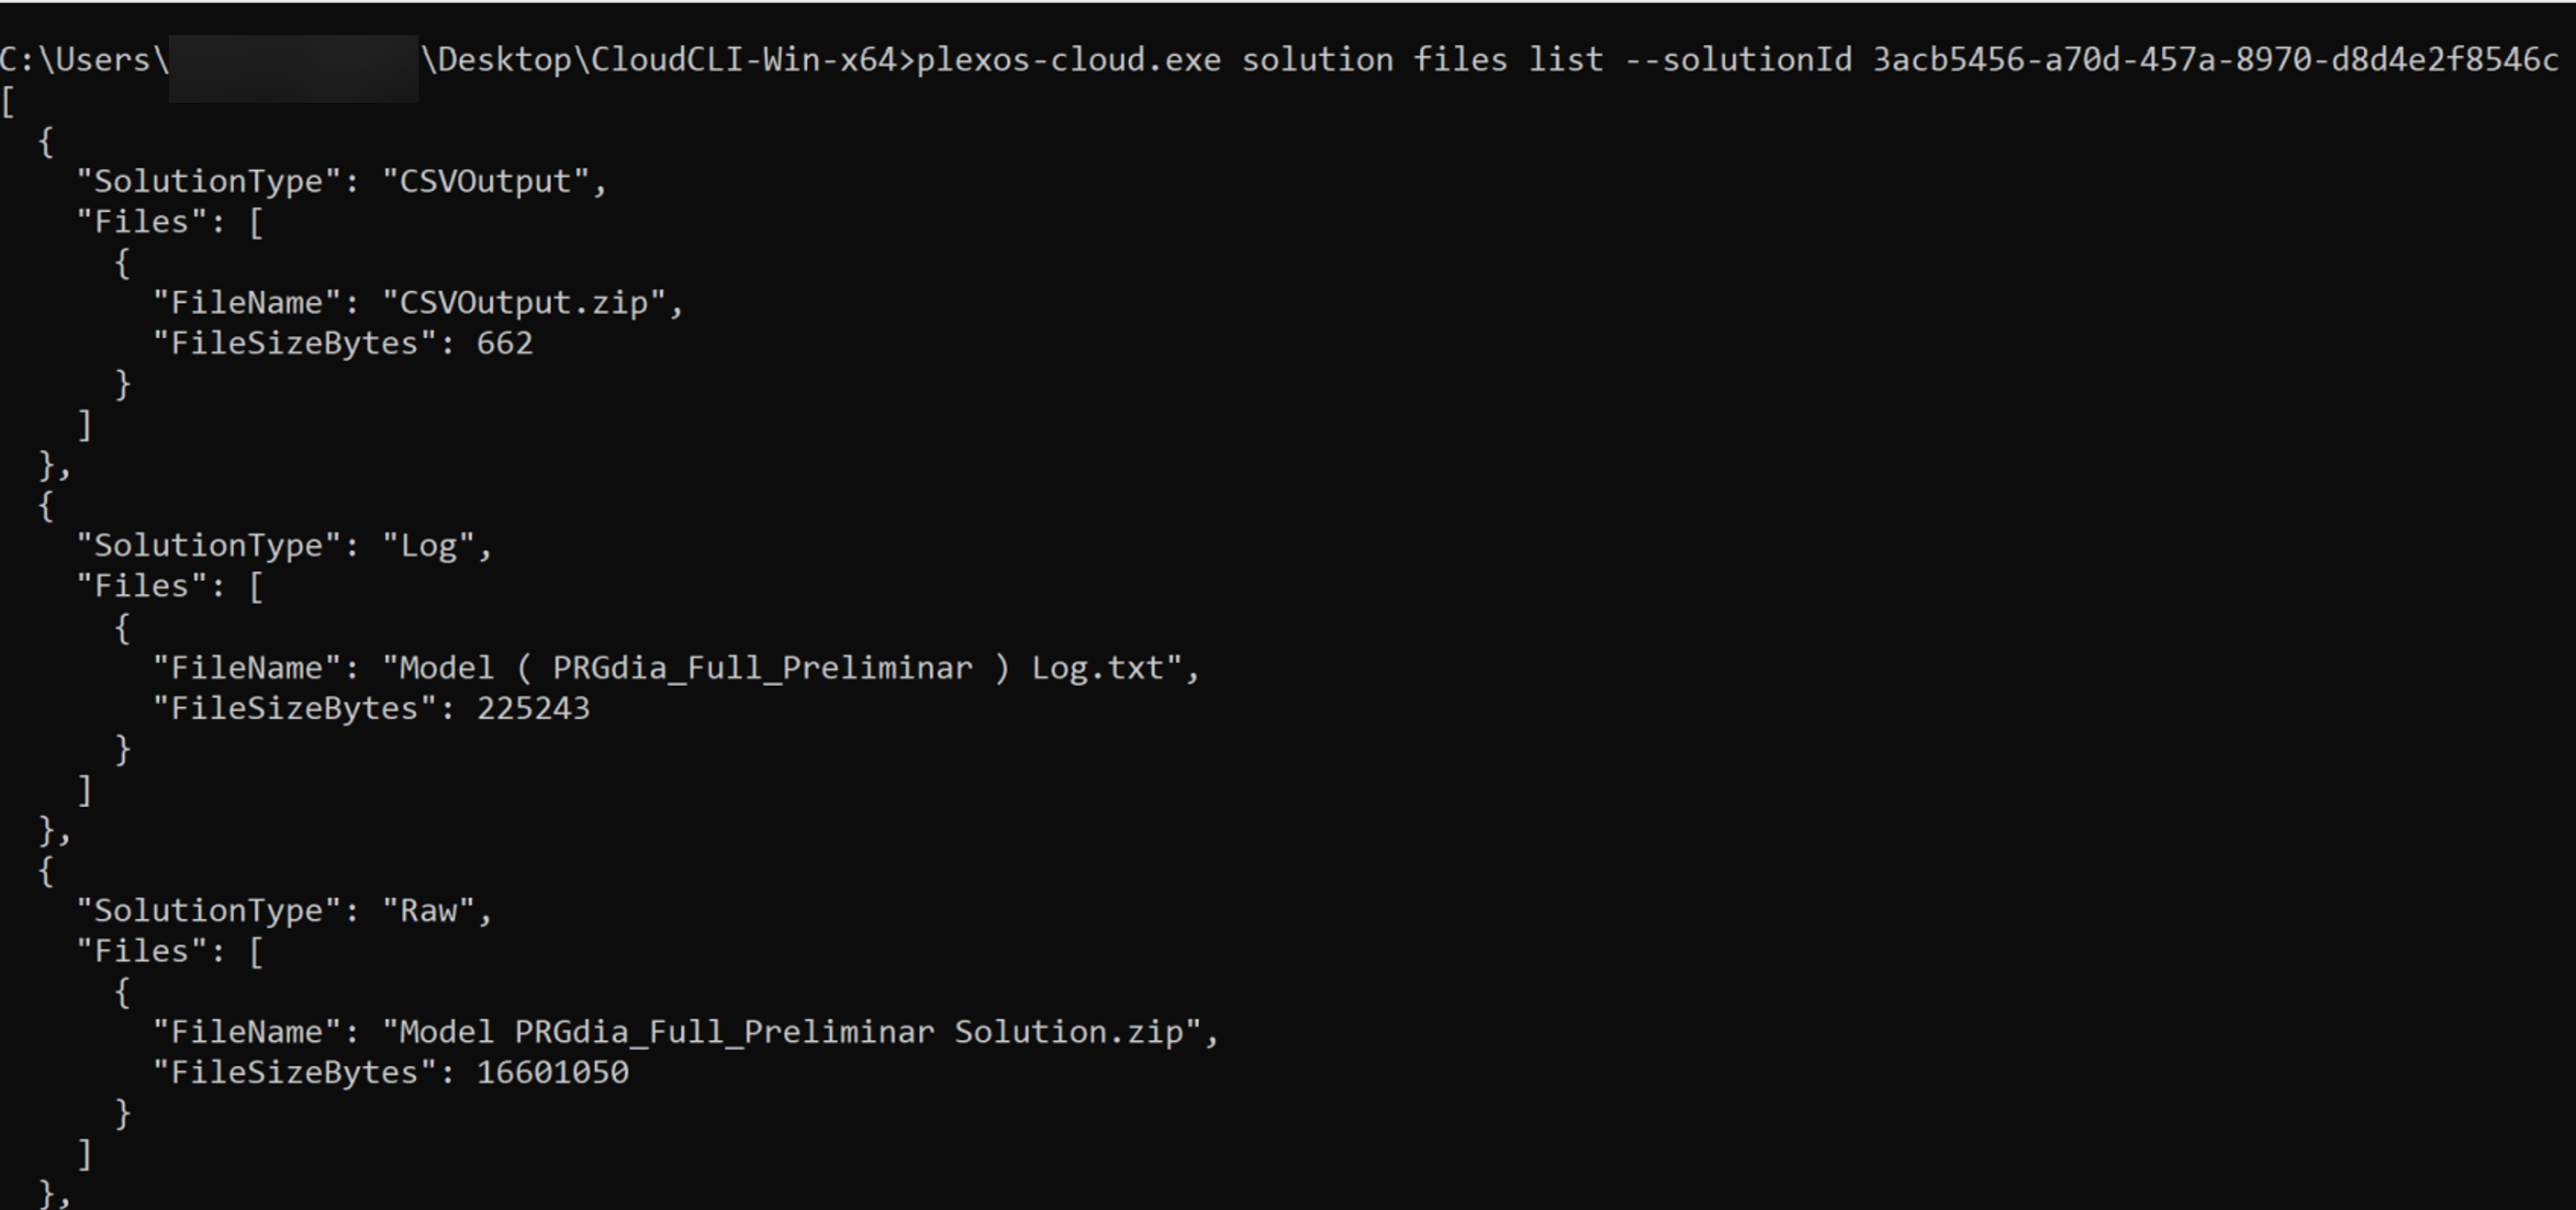
This will give you a grouping of all files by type, with the size of each file. To learn more about the files stored in a zip file, you can use the --IncludeArchiveEntries command. A sample output for the command is shown below:
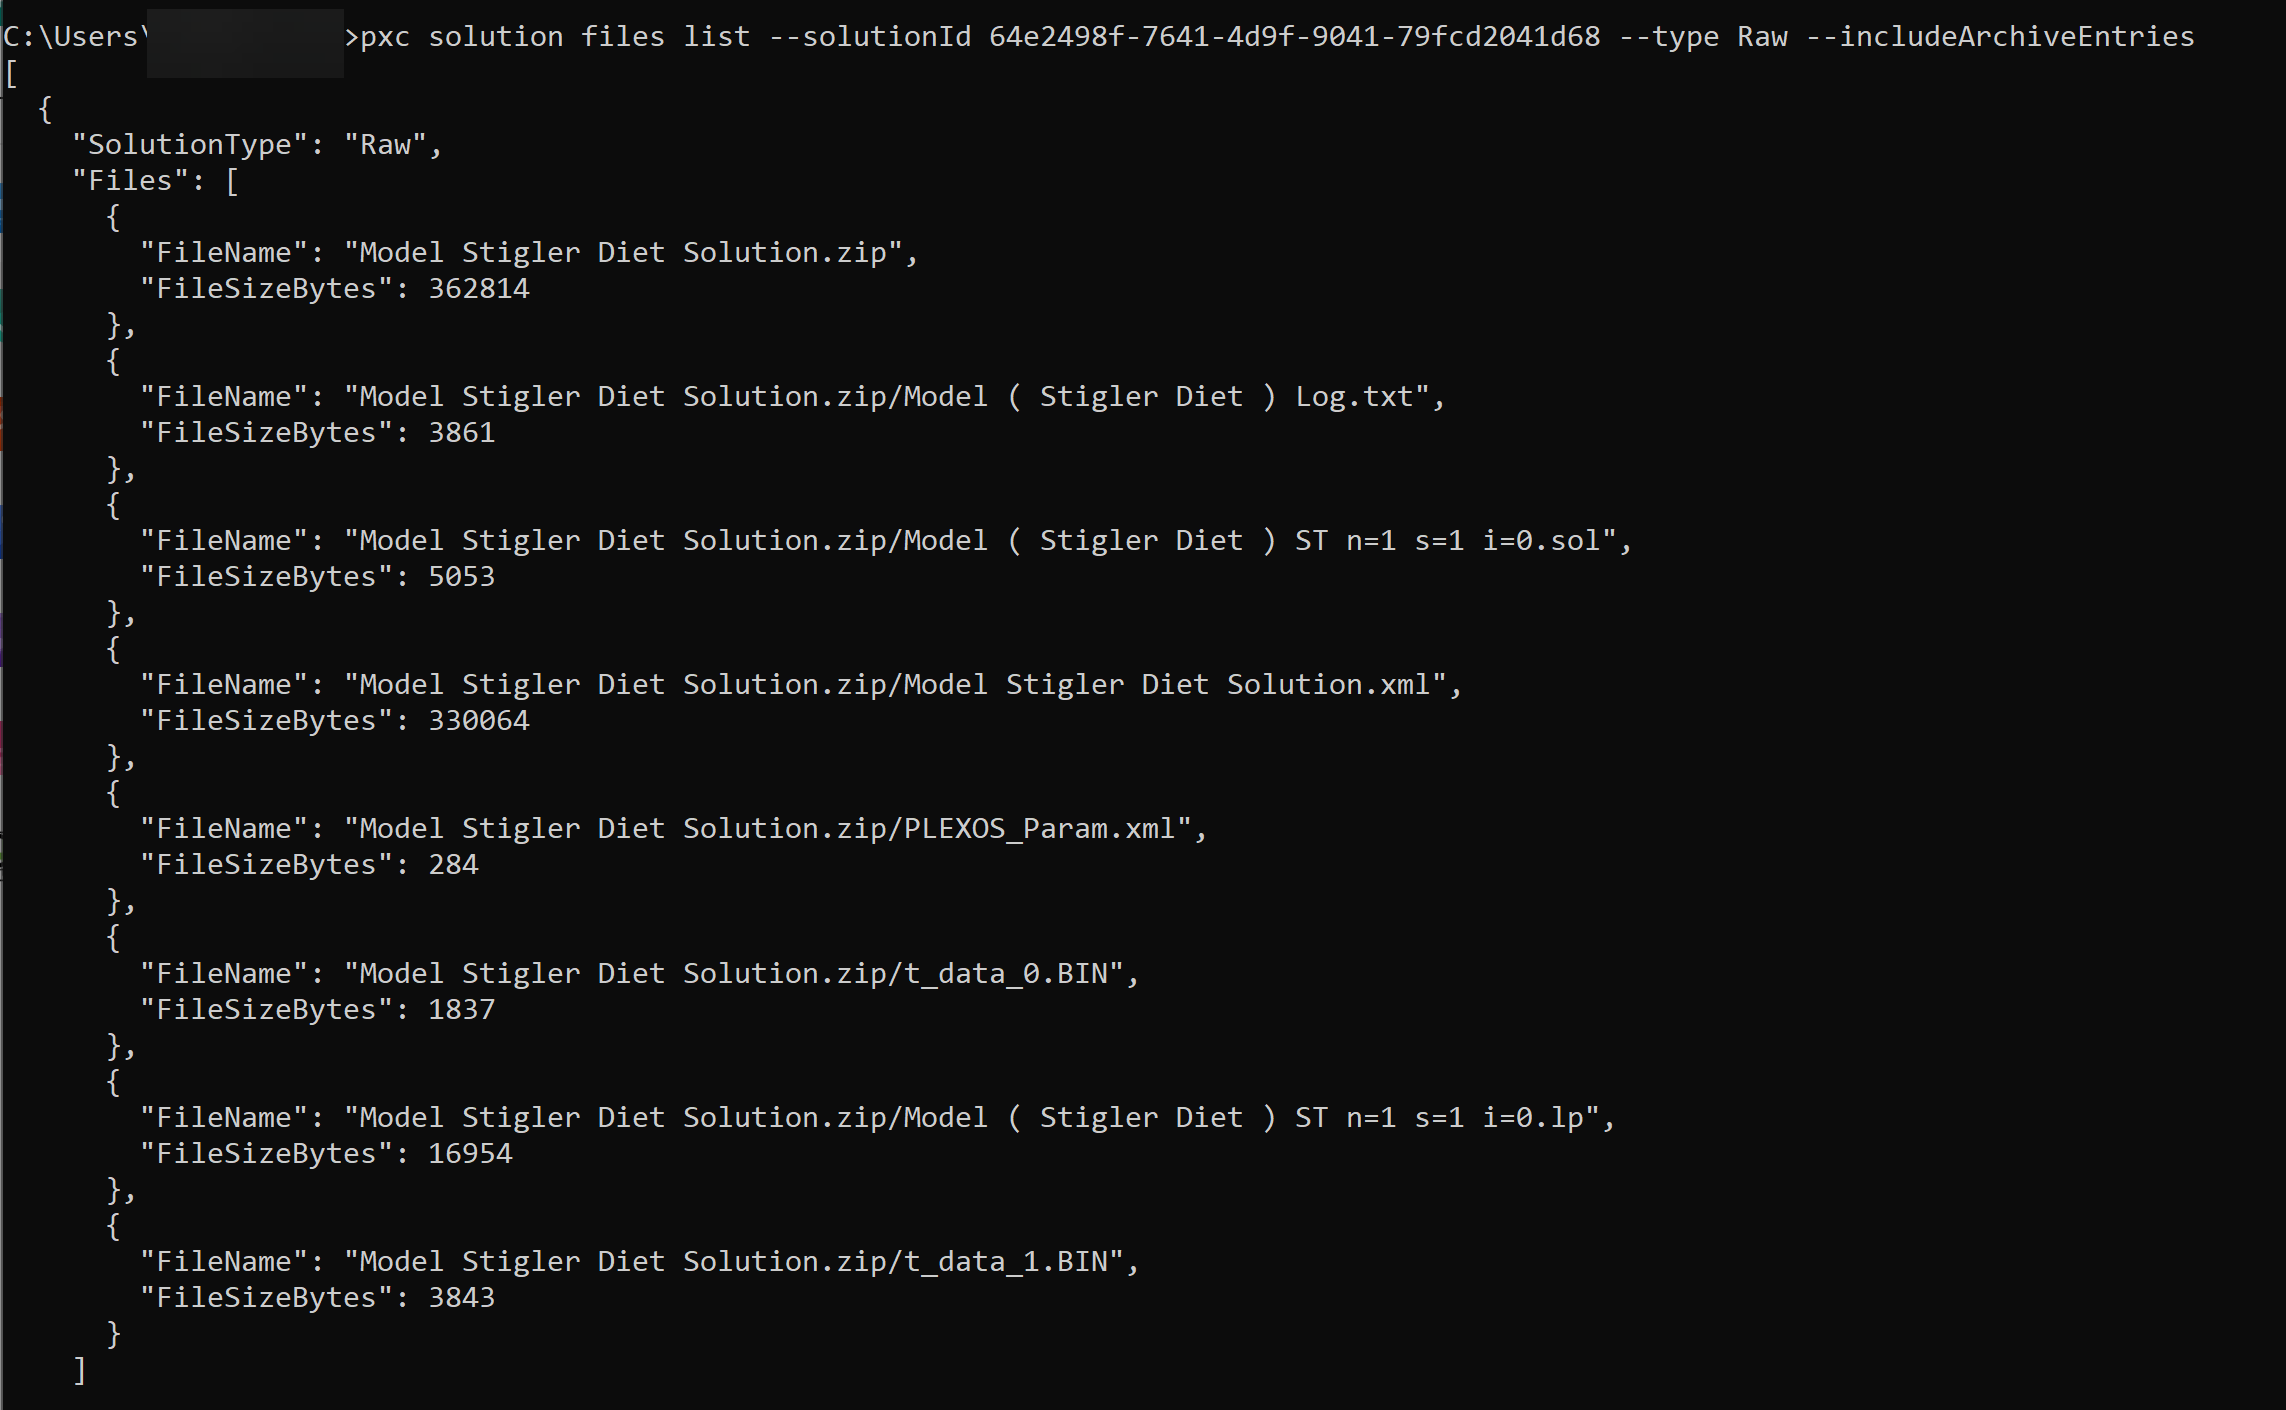
You can see that within the specified type Raw zip file, there are a number of different files including the PLEXOS_Param.xml file stored. Once the desired solution files are discovered, they can also be downloaded using this command:
plexos-cloud.exe solution files download --help
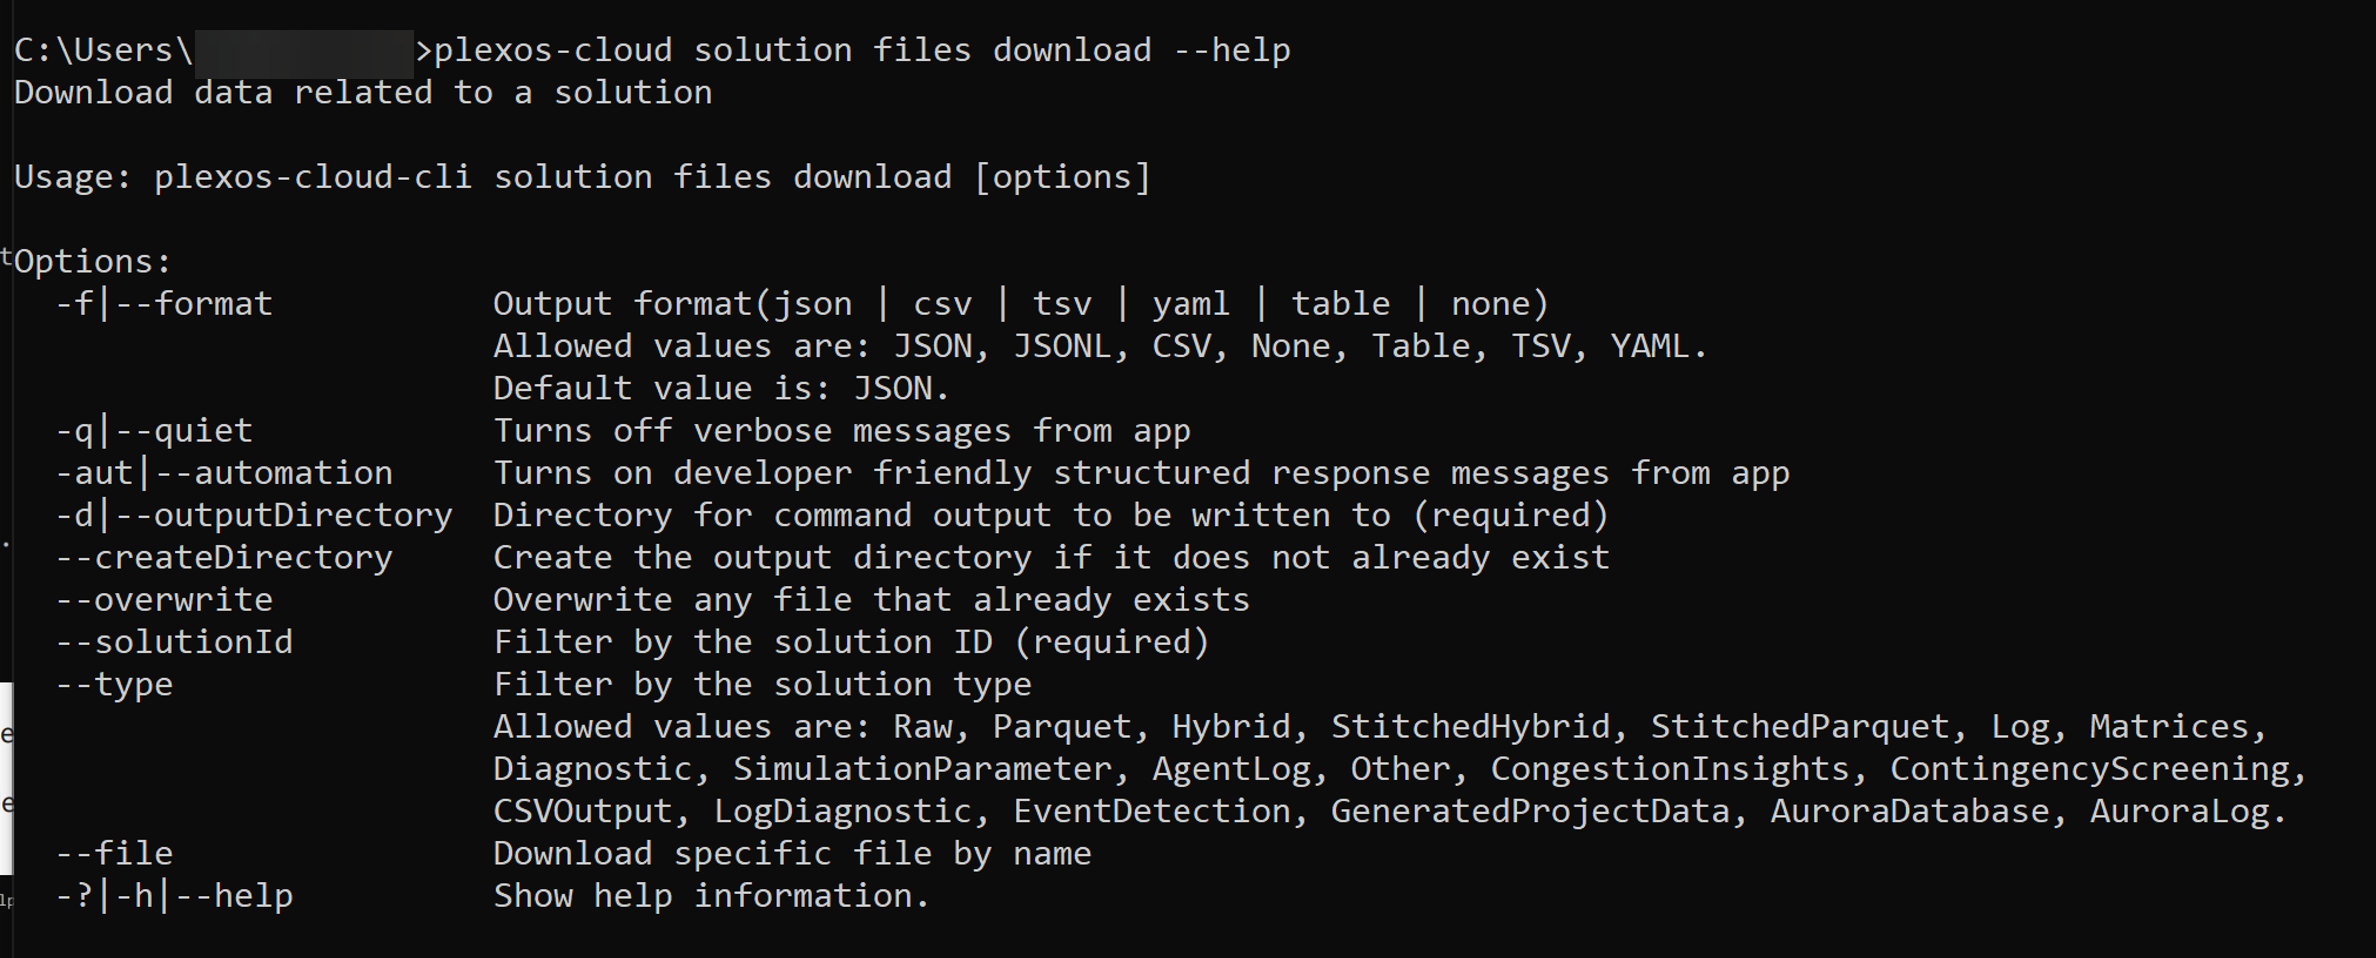
NOTE: The only required options are solutionId and outputDirectory. There are some convenience options related to the output directory to create the directory and overwrite any conflicting local files. The rest of the options are for filtering specific types/files to be downloaded, but they are optional and downloading all files for the entire solution is supported.
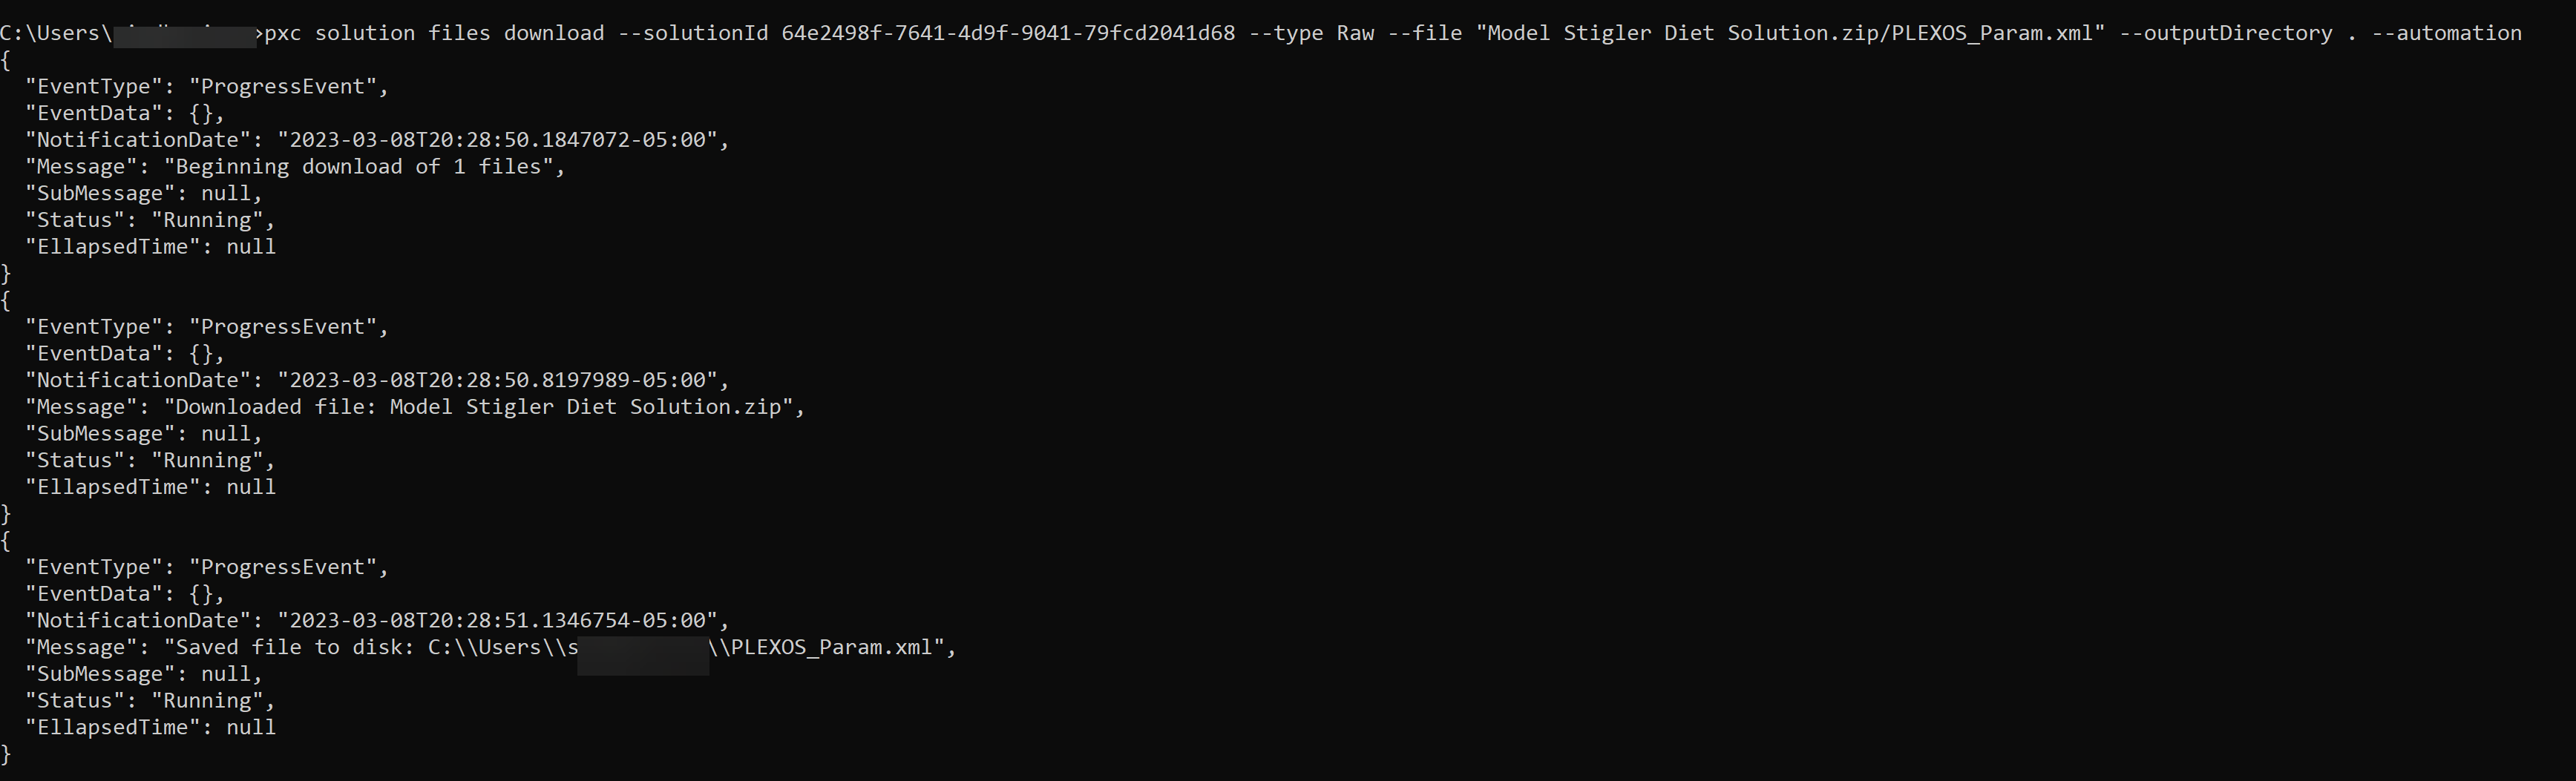
Using the existing solution files download command with the existing --file option, we can also download just a single entry from out of the zip archive by passing the fileName of the entry given back in the above --includeArchiveEntries command. For example, if all I want out of this sizeable Solution.zip file is the small PLEXOS_Param.xml file:
pxc solution files download --solutionId 6c5406b9-0a24-4ad8-8a1e-2edea6a7de40 --type Raw --file "FilePath" --outputDirectory "PathtoOutputDir" –-automation
When downloading solution files, you can also view live status updates as your download progresses. This is helpful in the event that a file size becomes too large while downloading, or if you want to know which file is being downloaded and its size. A sample command is shown below:
pxc solution files download --solutionId 64e2498f-7641-4d9f-9041-79fcd2041d68 -d "PathToOutputDir" --type Log

The solutionId and outputDirectory are both required input parameters for this command. The solution functionalities explored in this section can best be leveraged for automation using scripting.
Access and view a list of Solution Reports associated with a specific View ID that has been shared with you. This command eliminates your need to navigate through the Executive View interface to view the Solution Reports. It is beneficial for users who prefer command-line operations or require quick, scriptable access to report data, thereby enhancing productivity and simplifying the process of report management in the PLEXOS Cloud.
pxc solution view list

Upload your Solution Reports directly from the CLI using the below mentioned command:
pxc solution solution-report-upload --file <pathtojsonfile> --reportName <reportName>

With this enhancement, users can create and upload Solution Reports by specifying the JSON file path and Report Name. Once uploaded, these reports will be readily accessible in the CLI using the command below:
pxc solution list-reports
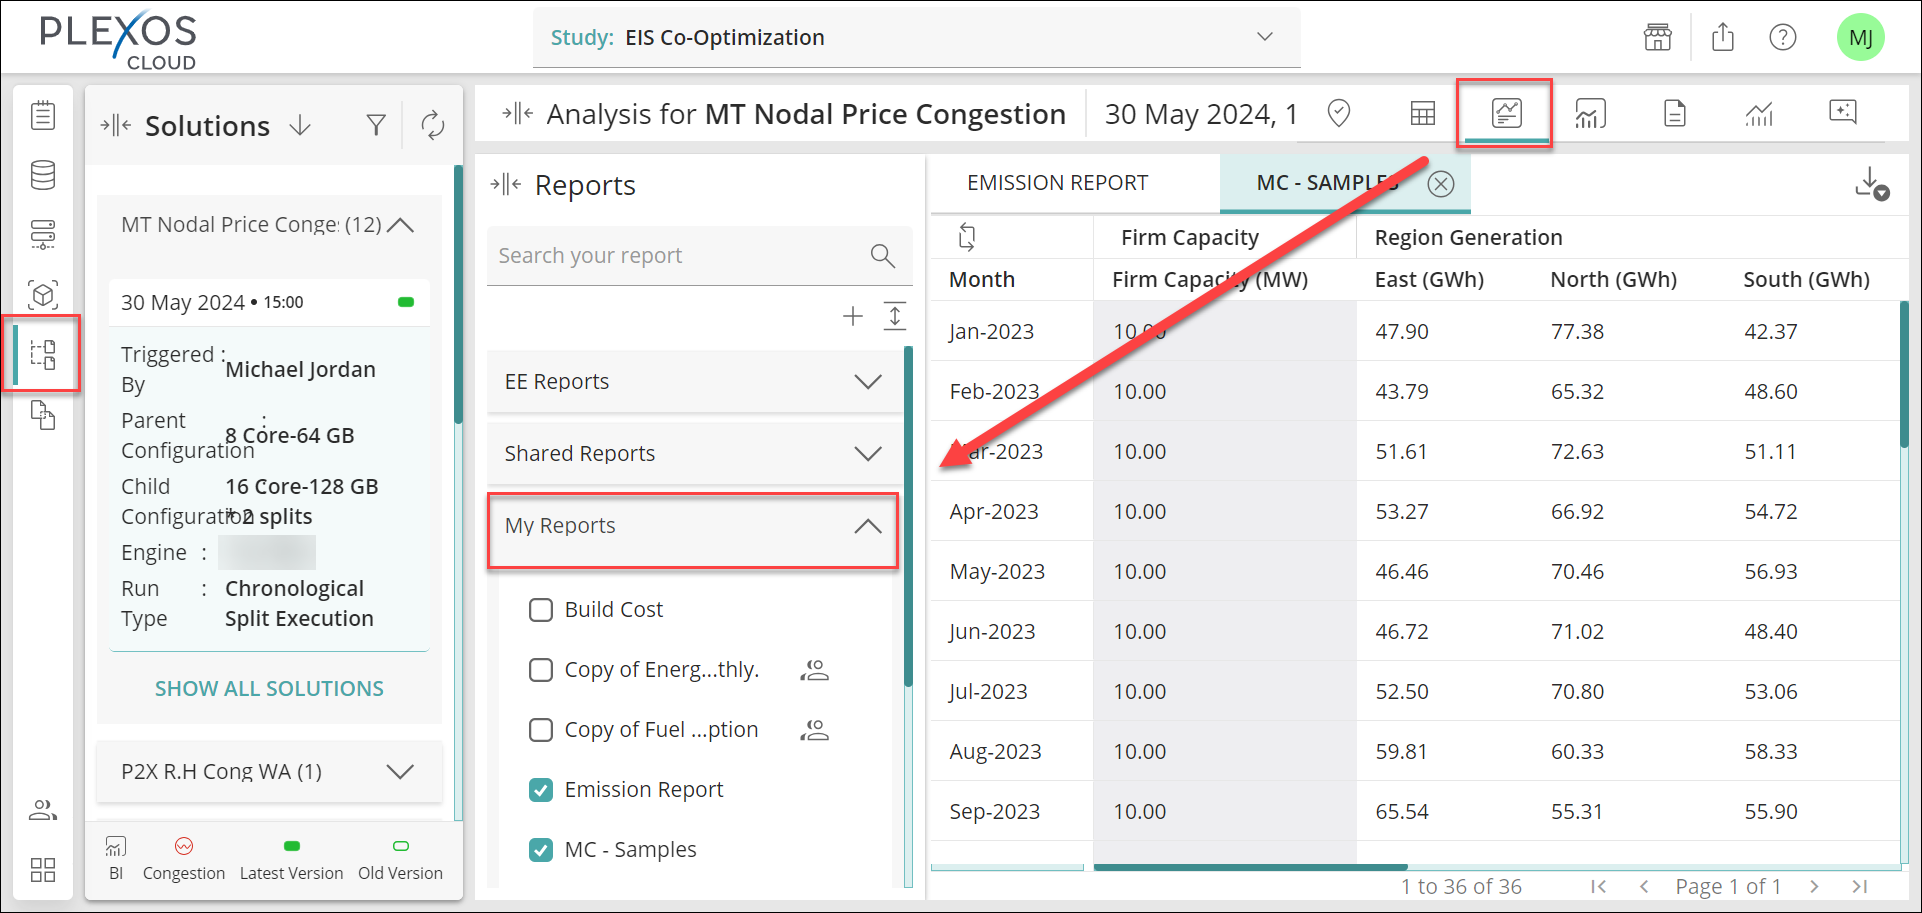
You can also view these Reports at this path in the PLEXOS Cloud: Solutions > Reports > My Reports dropdown.
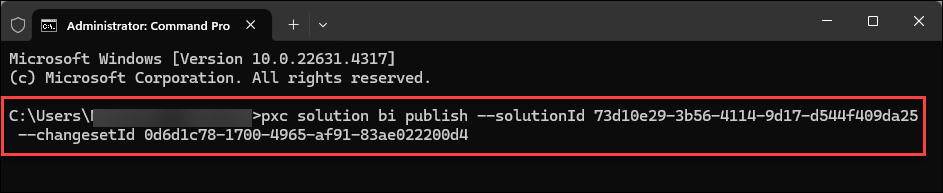
You can publish Solutions to Business Intelligence (BI) directly through the Command Line Interface (CLI). By using the following command, you can add Solutions to the BI by specifying the solutionId and changesetId:
solution bi publish --solutionId <solutionId> --changesetId <changesetId>
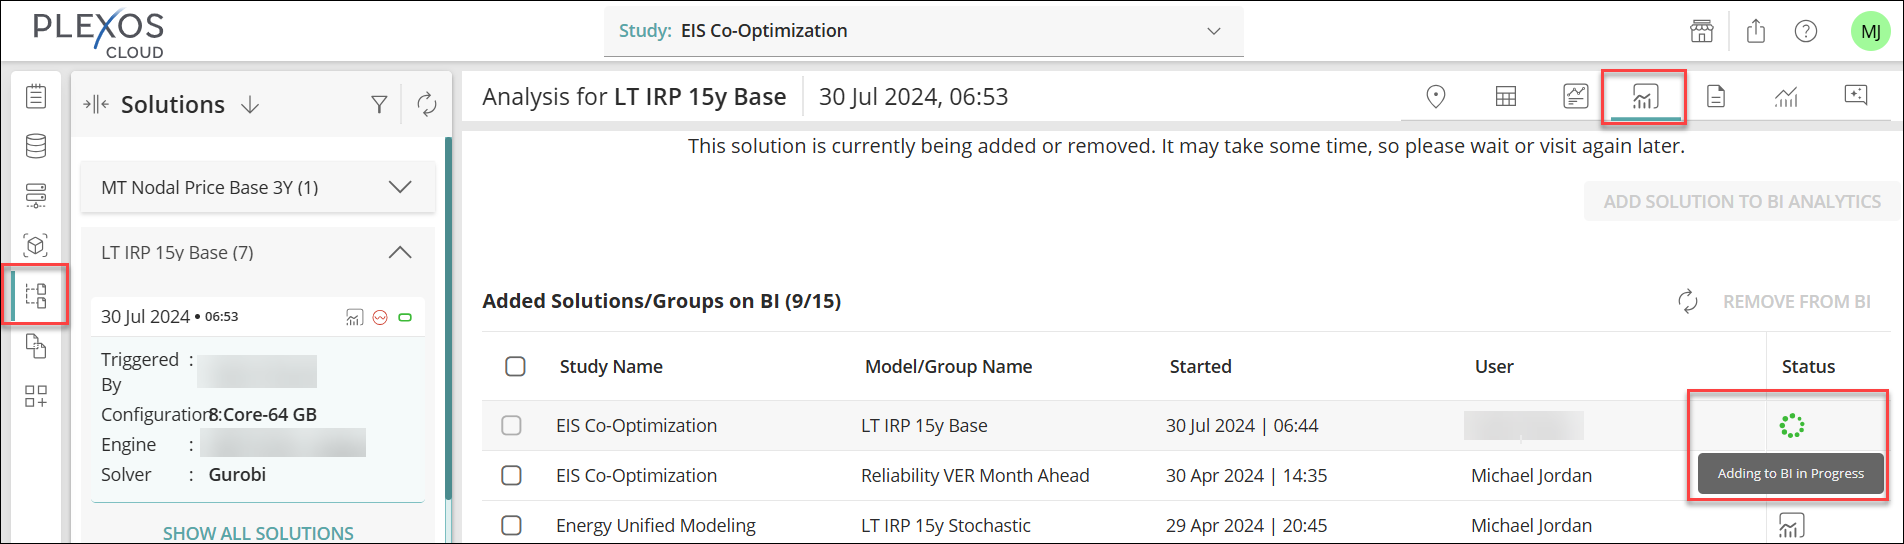
Further, you can check the Solution status in the Solution page > BI Analytics tab as follows:
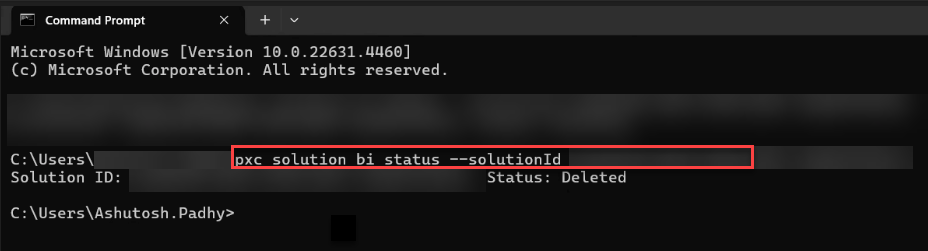
Quicky check the status of a specific BI Published Solution using its Solution ID with the following command:
pxc solution bi status --solutionId <Enter Solution Id>
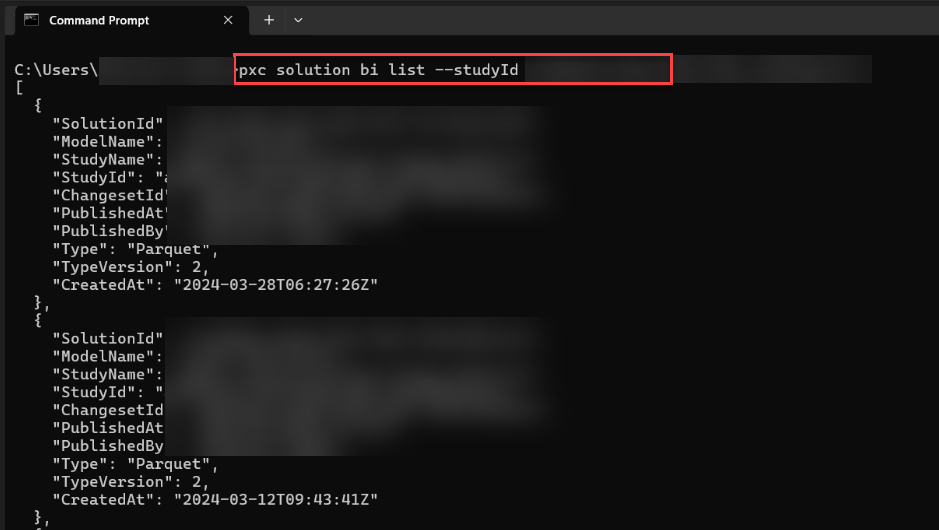
View all BI Published Solutions under your tenant or filter by a specific Study ID for better organization and tracking with the following commands:
pxc solution bi list
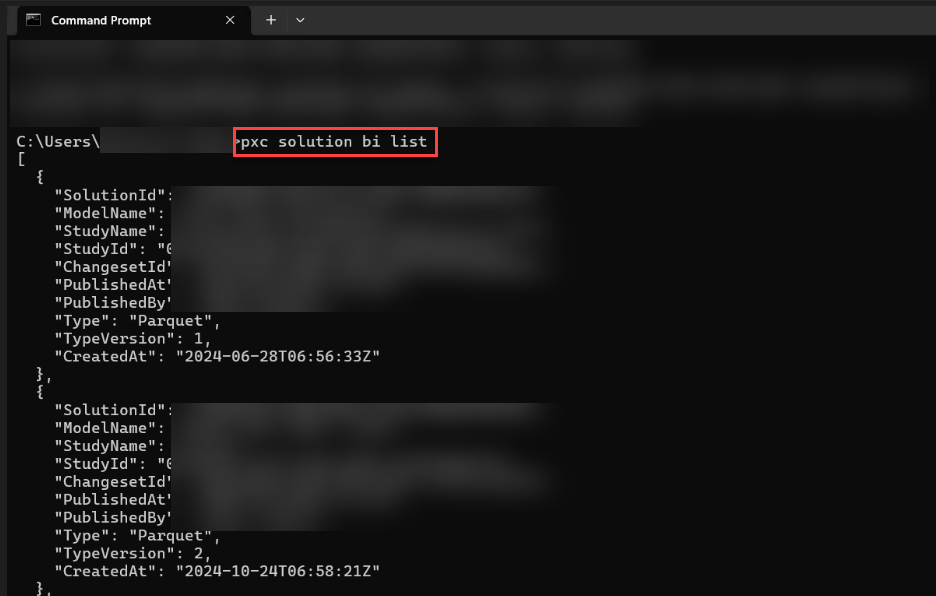
NOTE: It fetches BI Published Solutions from all Studies under your tenant, regardless of Study access.
-OR-
pxc solution bi list --studyId <Enter Study Id>
Using the Solution ID, you can delete any BI Published Solution across all Studies under your tenant.
pxc solution bi delete --solutionId <Enter Solution Id>

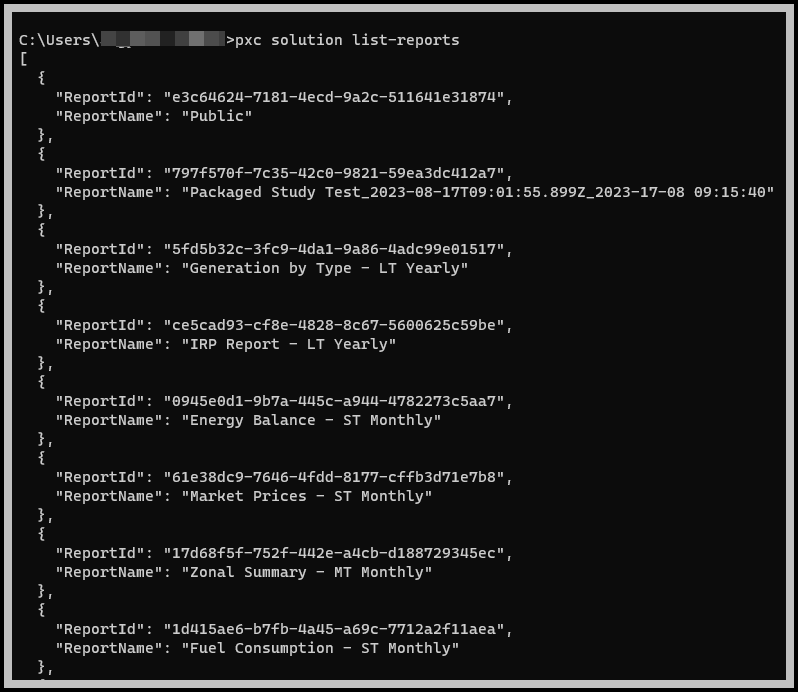
With the "pxc solution solution-reports" command, you can now get the list of Solution Reports directly from the command line, streamlining automation processes that involve Solution Reports. Please note that specifying the output directory is mandatory when using this command.
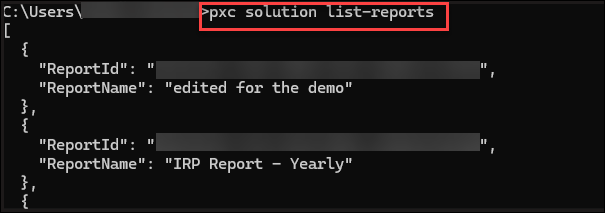
In order to utilize this command effectively, users should be aware of the corresponding report ID.
To assist with this, the "pxc solution list-reports" command has been implemented to provide you with a list of reports with their names and IDs. This empowers you to easily select the desired report ID from the list and proceed to download the associated solution report in CSV format.
This integration aims to enhance your experience and efficiency when working with Solution Reports.
For better storage management, you can now Archive, Unarchive, or Delete any Solution directly from the CLI. By integrating these capabilities into your automation processes, you can eliminate the need for manual or batch Solution deletion from the Admin > Storage Management > SOLUTIONS tab in PLEXOS Cloud.
Enter the following command to Archive a Solution using its Execution ID:
Enter the following command to Unarchive a Solution using its Execution ID:

Enter the following command to Delete a Solution using its Execution ID:

Please note that when initiating a batch Run with multiple Models sharing the same execution ID, deleting any single Model using that execution ID will delete all associated Models. Please exercise caution when using execution IDs for deletions.

Insights allows you to learn more information about your models. Enter the following command to view your options:
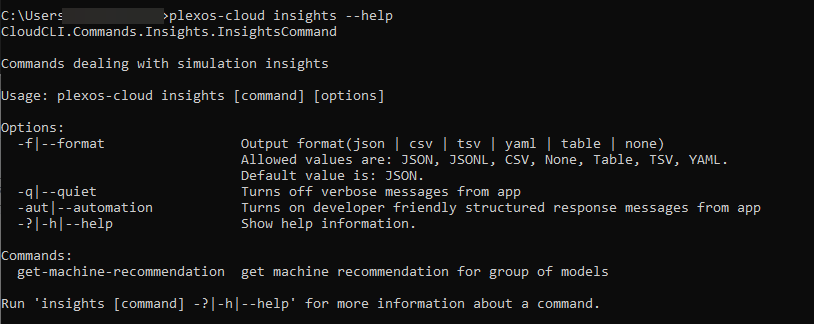
Insights currently take a single command get-machine-recommendation which provides machine recommendations for a group of models.
plexos-cloud insights get-machine-recommendation --help
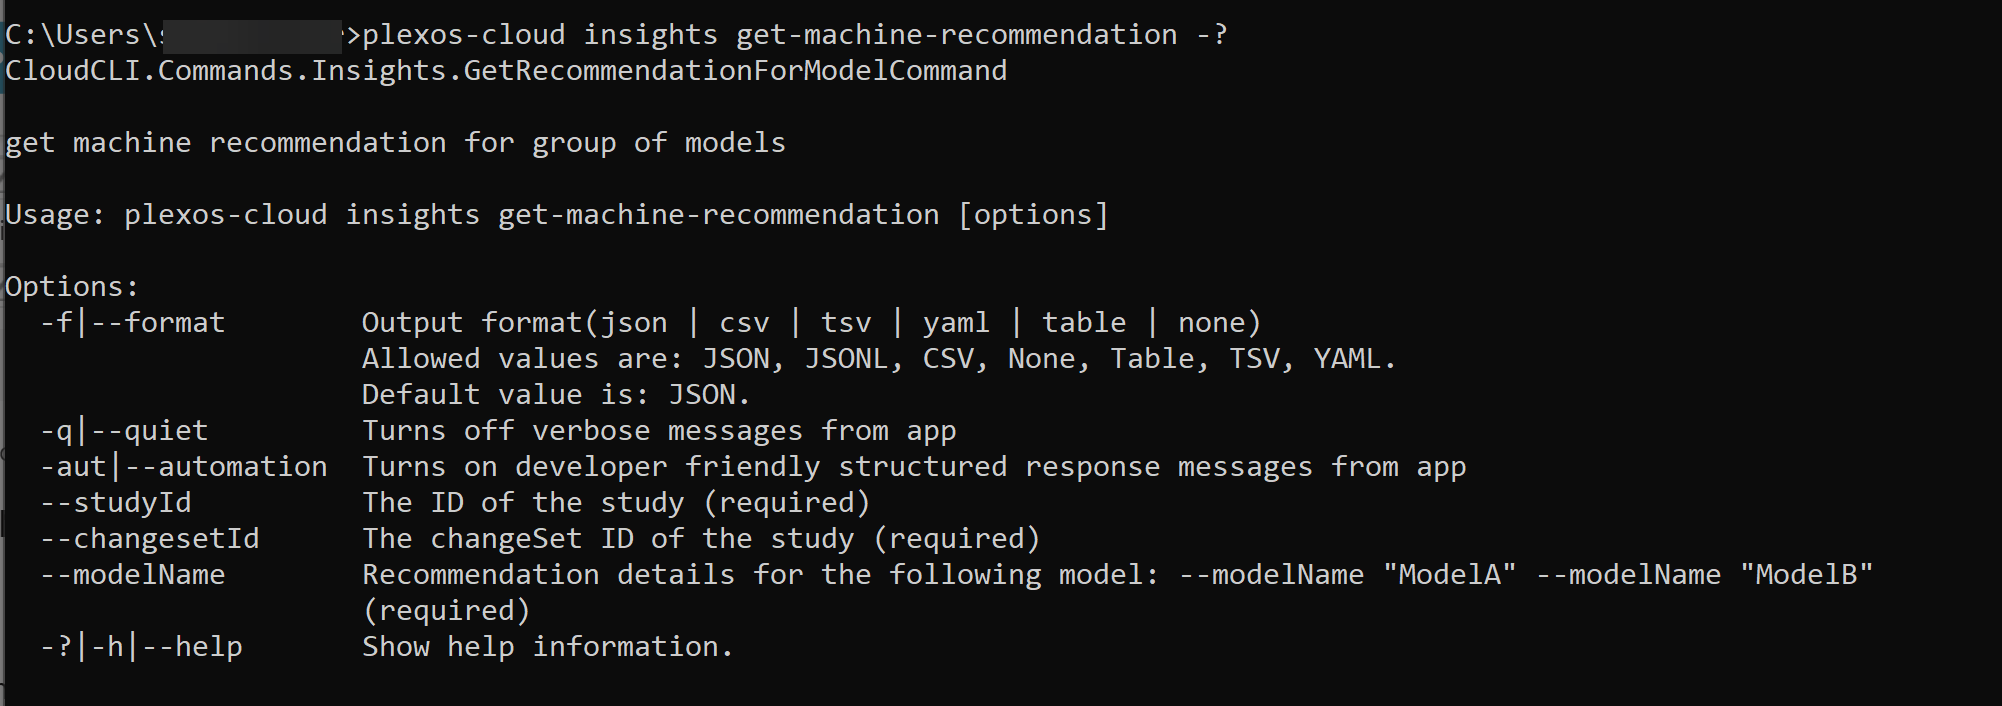
The studyId, changesetId, and modelName are requred inputs for the command.
Users can now create and publish Executive Views via the Command Line Interface (CLI). This improvement provides several benefits, such as the efficient publishing or automation of Views, making the sharing of critical reporting and data easier. It optimizes resources, streamlines the process, and reduces manual efforts.
Users can utilize the Command-Line Interface (CLI) to publish Views that incorporate Solution and BI Reports, by using the following CLI command:
pxc solution view publish --file {filePath}
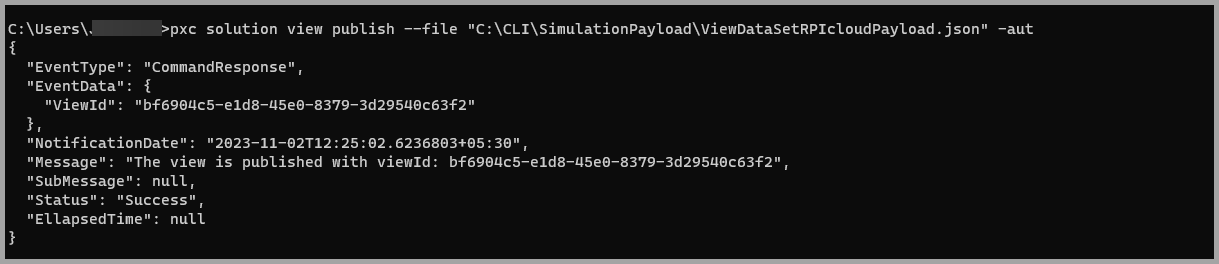
The above command includes path to a JSON file which contains View name, View Description, tenant ID and Study Id, etc. as shown in the image below -
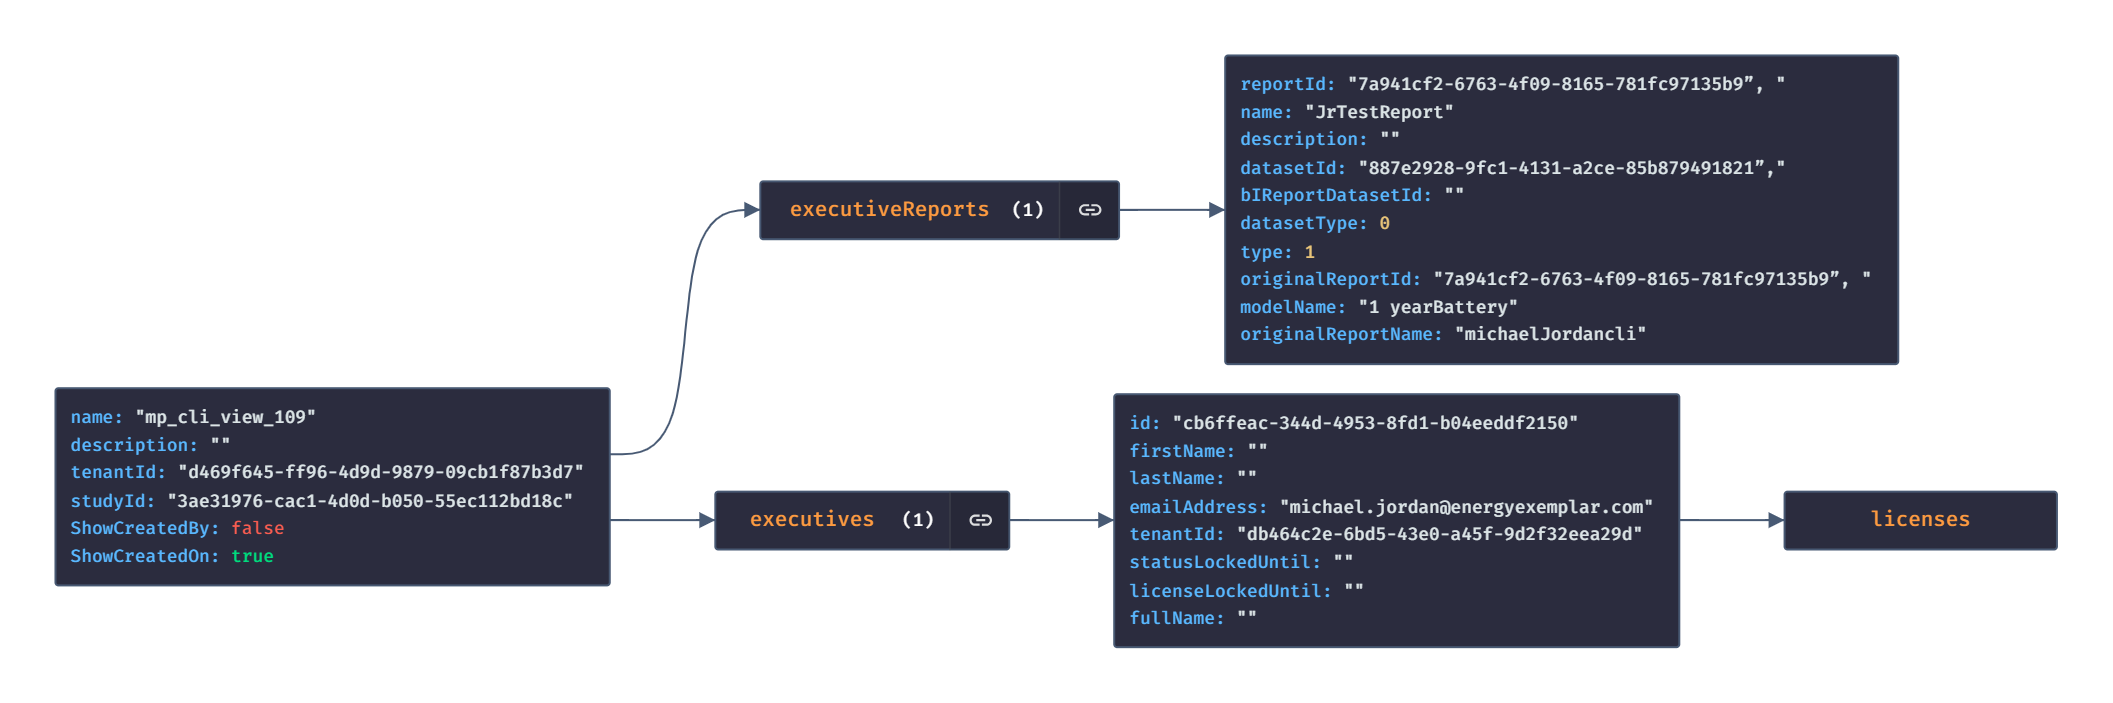
Definition of the Parameters used in the above shown JSON sample:
By executing the following command, users can obtain details about the Solution Report available for download. This information can then be used to retrieve Solution data and download the Report in .csv format.
pxc solution view get-downloadable-report-details --viewId [ ]
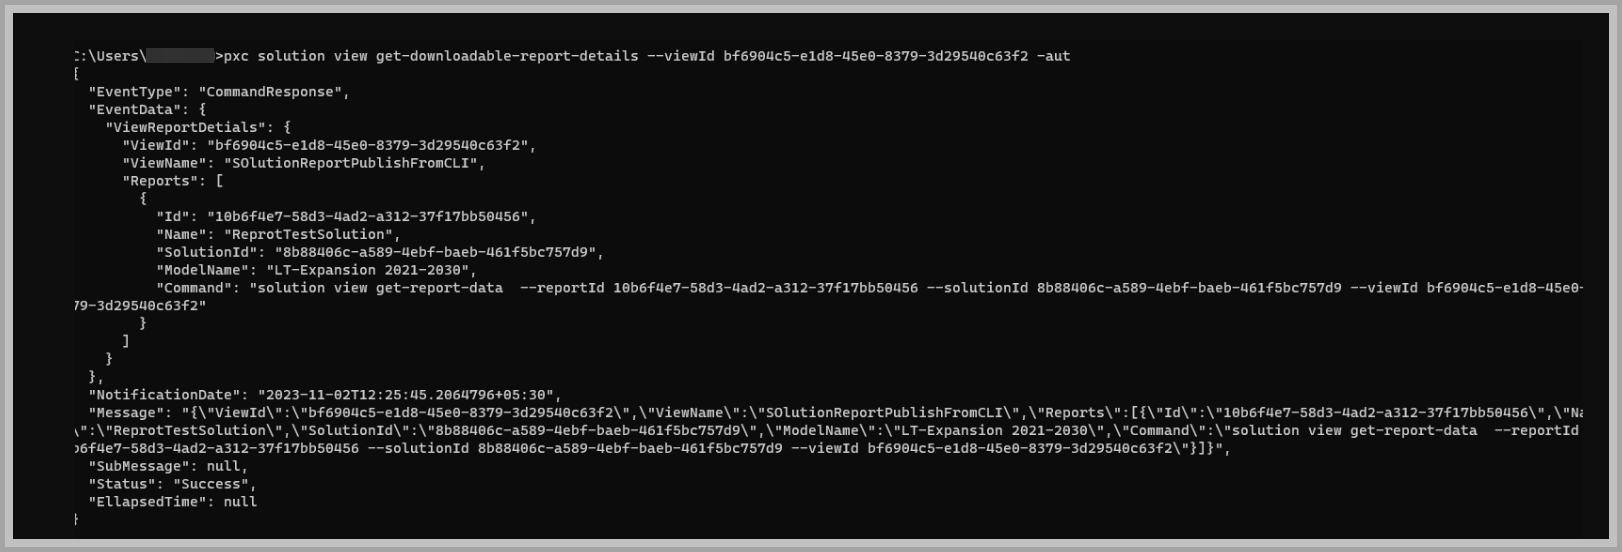
This CLI command can be used to fetch the Solution or BI Report details of a View which then can be used to download the Report in .csv format.
This command will return ViewID, reportId, name of the View, datasetId and type of Report.
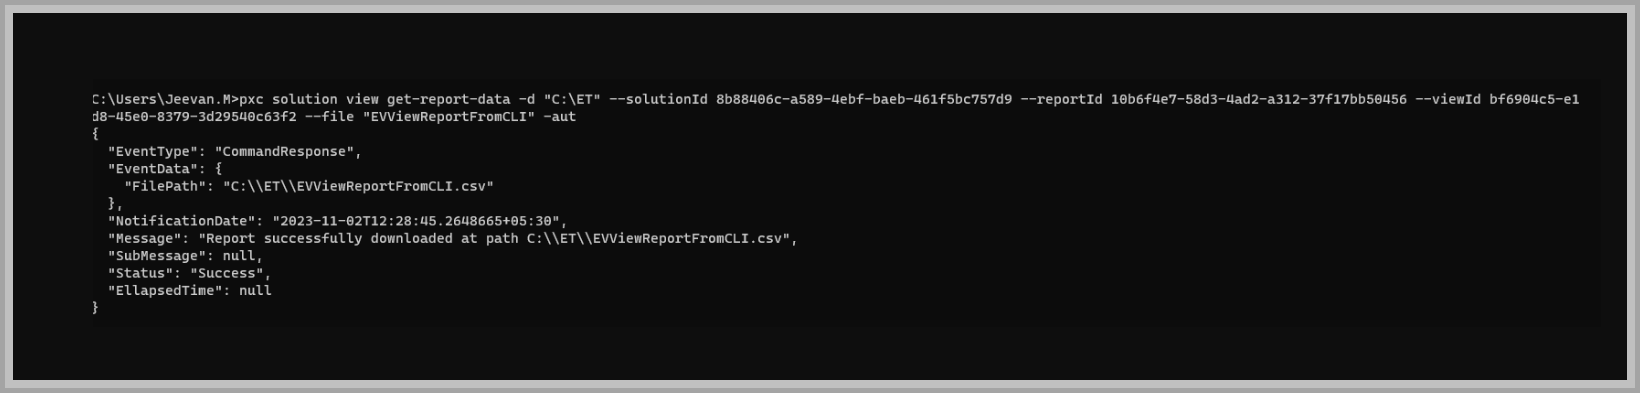
pxc solution view get-report-data --outputDirectory {DirectoryName} --file {fileName} --reportId {reportId} --solutionId {solutionId} --viewId {viewId}
The new centralized log collection feature consolidates essential log files and configuration data into a single, user-defined location on your machine to streamline diagnostics and support for the Command Line Interface (CLI). This enhancement simplifies log management and facilitates ease of access and share for support resolution.

Previously scattered across multiple directories, log files for PLEXOS Desktop, Central License Manager, and CLI are now automatically stored in a single, user defined folder, making retrieval straightforward.
To define the destination folder for centralized log collection, run the following command in Command Prompt:
pxc environment diagnostic-information -d "Folder path where the Log Files will be stored"

Upon completion, a confirmation message will appear. Logs are saved in the "PLEXOS-Logs-<Date of Collection>" folder for easy access.
NOTE: Log files will automatically delete after 30 days. Additionally, if you are facing issues with the CLI, please share your logfile with EE Support so we can help you address the problem.