
PLEXOS Desktop introduces a new PLEXOS Cloud Integration in version 9.1 R03. The Cloud Integration seamlessly integrates PLEXOS Desktop and PLEXOS Cloud for key workflows and reduces dependence on the PLEXOS Cloud Bridge application. PLEXOS users will notice a Sign In button in the PLEXOS Desktop title bar and a Cloud button in the ribbon. Users who do not yet have access to PLEXOS Cloud will experience no other differences in PLEXOS Desktop.
The PLEXOS Desktop 9.1 R03 and up embeds key PLEXOS Cloud actions directly in the PLEXOS Desktop interface. It will allow you to execute key PLEXOS Cloud functions from PLEXOS Desktop. Currently, the following functions are supported for version 9.1 R03:
To successfully run & perform the activities in the PLEXOS Desktop, you must install PLEXOS 9.1 R03 or later and download and install the PLEXOS Cloud Toolkit (CLI). The PLEXOS Cloud Toolkit is required for the integration to work.
Overview of steps to set up the integration:
Download and install PLEXOS 9.1 R03 from https://portal.energyexemplar.com/
PLEXOS Desktop uses the PLEXOS Cloud Toolkit (also known as the PLEXOS Cloud Command Line Interface or CLI) for communication with the cloud. This Toolkit is also useful for integration and automation activities. It is easy to use and does not require programming experience. Learn More about Introduction to PLEXOS Cloud CLI.
Follow the steps below to download and install the CLI:


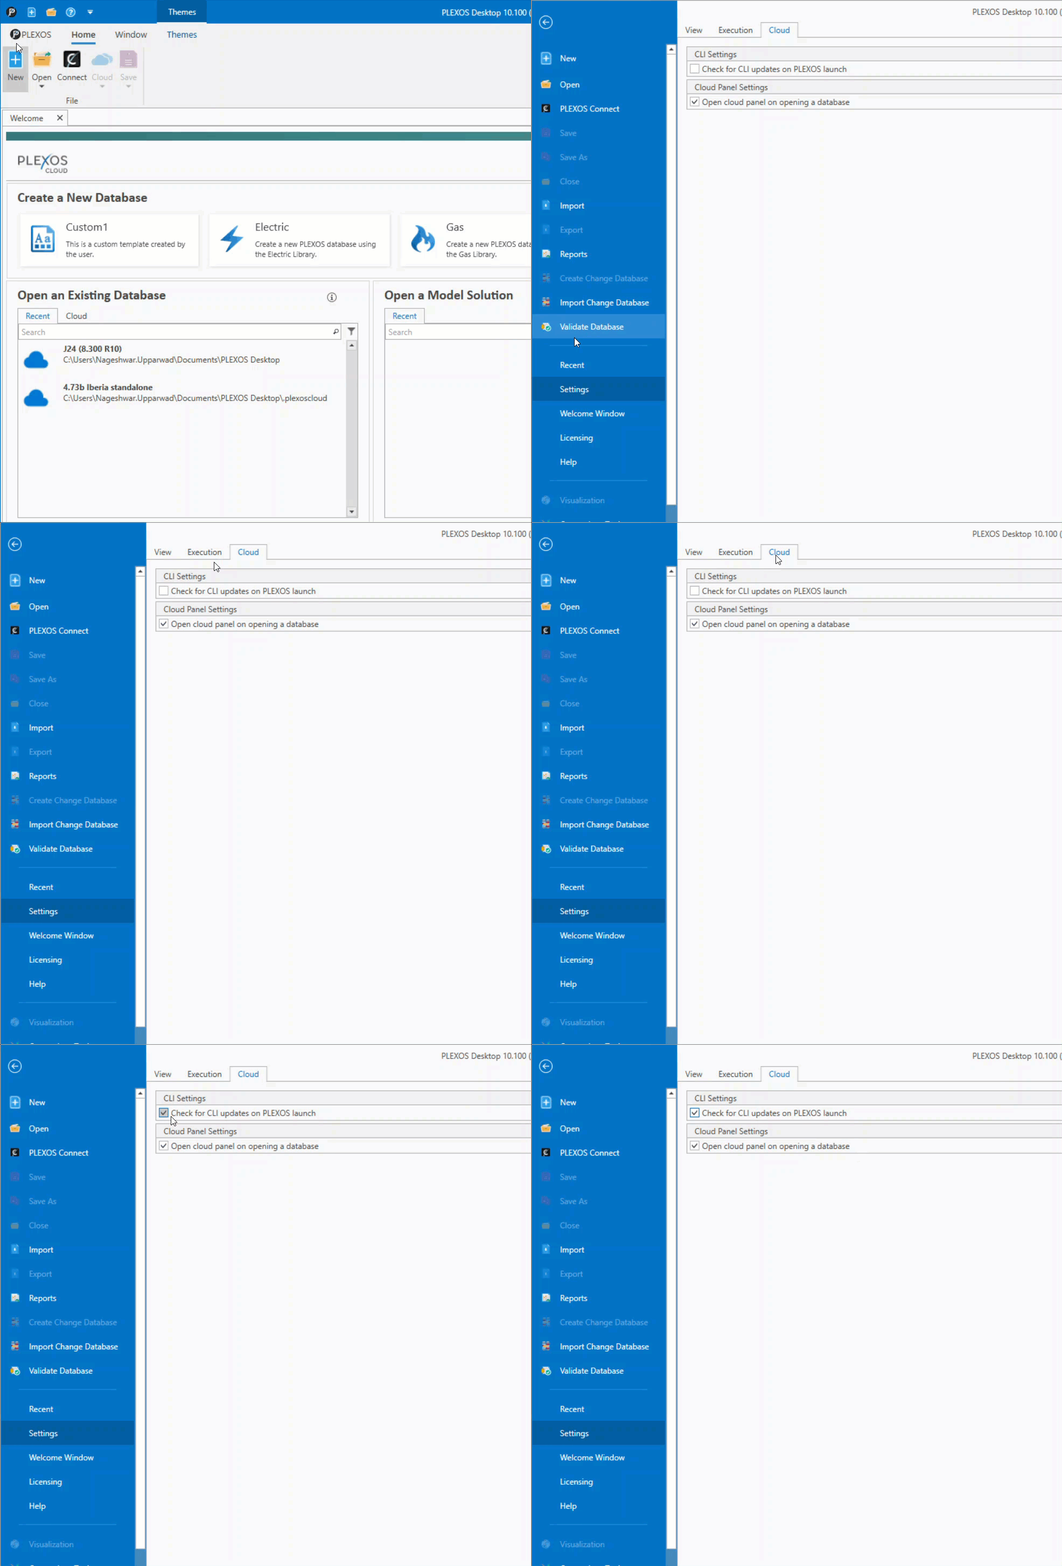
PLEXOS triggers the CLI to run commands in PLEXOS Cloud. A Windows environment variable, the Path, needs to be set to allow PLEXOS to trigger those CLI commands regardless of the install location on your machine. To do this you need to set the Path Environment Variable.


1. After installing PLEXOS Desktop and the PLEXOS Cloud toolkit (CLI), open PLEXOS Desktop version 9.1 R03 or above.
2. Click the Sign In button at the top right of the screen.


3. Select the required environment from the list. The environment is the region where your PLEXOS Cloud environment is hosted. You can validate this from the URL you use to login- North America (NA), Europe (EU), Australia (AU). The Other is for Energy Exemplar employees.
NOTE: The PLEXOS Cloud Sign-In panel may show up on the left side of the screen, just Pin the panel so it will stay on the right side of the screen.

4. Click on the Sign In button to get redirected to the PLEXOS Cloud Sign In page. Enter the your email and click on the CONTINUE button.

5. If your email has access to multiple tenants within a single environment, you will get redirected to the Select a tenant to continue page. Users who belong to a single tenant will be logged in to their respective tenant without being prompted to select a tenant.
6. By default, the Primary Tenant is selected but you can select the desired Tenant from the list and click on the CONTINUE button.
NOTE: When an Admin creates a user and assigns their initial tenant, it will be designated as the Primary Tenant. The user will only see the "Primary" tag associated with this tenant's name.

7. After successful authentication, you will get logged in for the selected tenant. You are now ready to use PLEXOS and PLEXOS Cloud together.
NOTE: After you Sign In successfully, your name will display in place of the Sign In button in the upper right section of the screen.
8. If a user needs to change the tenant after logging in to the PLEXOS Desktop, they can either change the tenant from PLEXOS Cloud (without Signing out) or can sign out and sign in again within PLEXOS Desktop, to access the tenant selection page.
The Welcome Window in PLEXOS Desktop is designed to identify and show a list of all the PLEXOS Cloud Studies and downloaded Solutions on the local machine. Users can click on the Study name to open that Study in PLEXOS Cloud directly. The Welcome Window provides users instant access to the following features:
The Welcome window provides a more user-friendly experience on start-up and a convenient way to get started with a new or existing database, either locally or on PLEXOS Cloud.

Learn more about the things you can do in the Welcome Window.
The Clone to Desktop functionality in PLEXOS Desktop allows users to add a PLEXOS Cloud study to their local machine for editing. PLEXOS Desktop users can browse all the available studies on PLEXOS Cloud that have been shared with them and Clone a local copy of a Study to their PC to start collaborating on the Study in PLEXOS Desktop with integrated version management features. Follow the steps below to Clone a Study from PLEXOS Cloud to Desktop:
NOTE: The Clone to Desktop Study feature is available with PLEXOS Desktop 9.2 R05 and above.
1. Navigate to PLEXOS Desktop > Welcome Window > Open an Existing Database panel > Cloud tab > Kebab menu for the desired Cloud Study > Clone to Desktop option.

2. A Clone Study pop-up displays with the following caution message (Before selecting a folder to clone the Study):
“For better results, avoid saving to shared drives or OneDrive. Please choose a local drive to prevent potential sync issues.”

If you proceed and select a folder within OneDrive or a shared drive, the caution changes to a warning message as follows:
“It looks like the selected drive is OneDrive. Cloning studies from Cloud to OneDrive may result in sync issues and other unexpected errors. Please select a local drive before cloning to avoid any issues.”
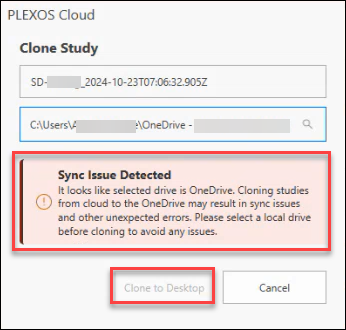
This warning disables the Clone to Desktop button, requiring you to select a local drive before proceeding.
3. Select the destination folder where you want to store the Study.
4. The Study Cloning process will start. This process may take several minutes, depending on the size of the Study, and the progress is indicated in the Application Status Bar at the bottom left of the screen.
5. After cloning is complete, the cloned Study will open automatically on PLEXOS Desktop as shown below:

A PLEXOS database that has been saved to PLEXOS Cloud is known as a Study. The following video covers the process of uploading (saving) a Study to PLEXOS Cloud from PLEXOS Desktop:
Cloud. Network drives perform much slower than local drives. Additionally sharing a study on a network drive among multiple users for collaboration purposes will cause conflicts with versioning.
3. Known Limitations for Saving Study from PLEXOS Desktop to PLEXOS Cloud are as follows:
For Model Names we allow only the characters as below in the Model Names:


A. Caution Messages for New Study Saved on Shared Drive or One Drive
You will notice a caution message if the Study is currently saved on a Shared drive or OneDrive. In this scenario, the Create Study on Cloud button remains enabled but prompts you to move the Study to a local drive if it is saved on a Network or Shared Drive to prevent possible issues. Refer to the following caution message:
“If the Study is saved on a Shared drive or OneDrive, uploading it to the cloud may cause sync issues and other unexpected errors. To avoid potential problems, ensure the Study is saved on a local drive before uploading.”

B. Warning Message for New Study Saved on OneDrive or Shared Drive
If the Study is saved on any OneDrive or Shared Drive folder, the following warning message displays. This warning disables the Create Study on Cloud button, requiring you to select a local drive before proceeding.
“It looks like this study is located on OneDrive. Uploading studies from OneDrive to the cloud may result in sync issues and other unexpected errors. Please move the study to a local drive before uploading to avoid any issues.”
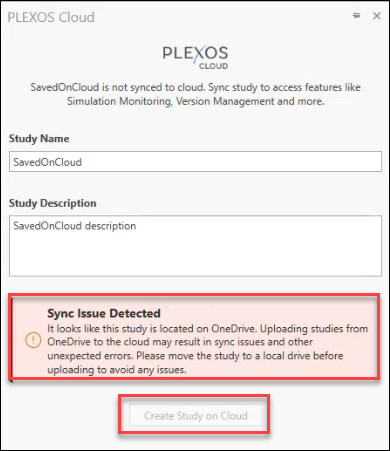
C. Warning Message for Uploading Studies to Cloud
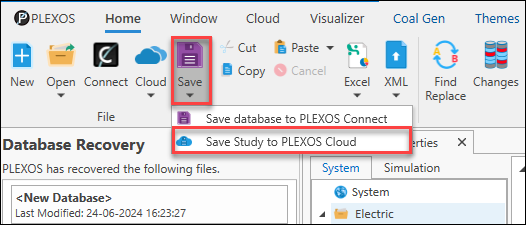
If you attempt to upload a Study to PLEXOS Cloud that is saved on OneDrive or a shared drive via the path: Save dropdown > Save Study to PLEXOS Cloud option, a warning message will appear to prevent the upload.This warning disables the Create button until the study is moved to a local drive.
“It looks like the Study is located on a shared drive. Uploading studies from shared drives to the cloud may result in sync issues and other unexpected errors. Please move the study to a local drive before uploading to avoid any issues.”


7. If the upload fails, an error message will appear at the bottom left of the desktop interface, with an option to open the CLI Logs.


|
Status
|
Description
|
|---|---|
|
Local Study
|
The Study is in Offline state
|
|
Cloud Study
|
The Study is in Online state
|
|
Out of Sync
|
The Study is Out of Sync state
|


11. In this case you can check the CLI Logs to view the error details at this location: C:\Users\Username\AppData\Local\PLEXOS Cloud\Logs.


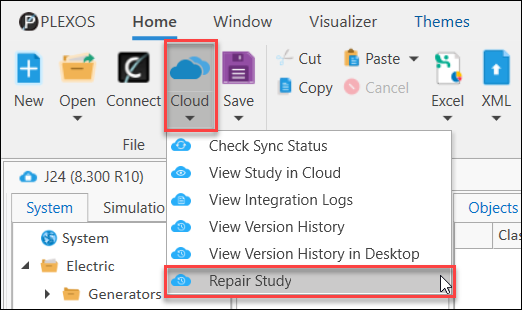
The Repair Study option enables users to define a new path where the Study exists. This allows users to continue working with Local Studies without the need for manual deletion and download. It effectively resolves corruption issues in Study data files or situations where the folder of a Cloud Study was modified or renamed.
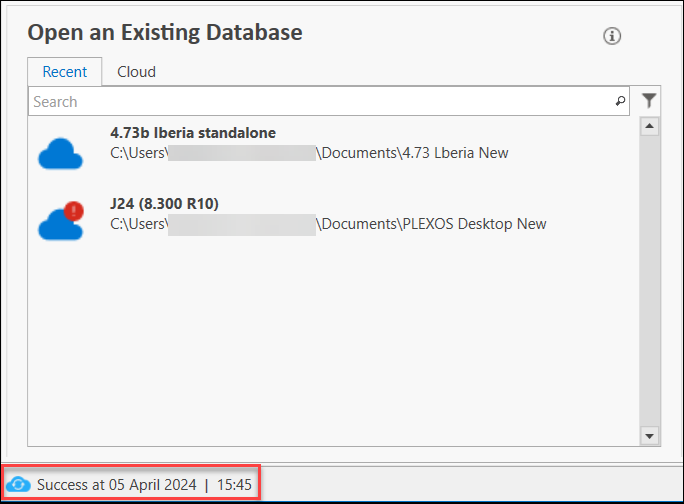
Users can easily identify Studies requiring repair by observing a red dot on the Study icon within the Open an Existing Database panel in the Welcome Window.
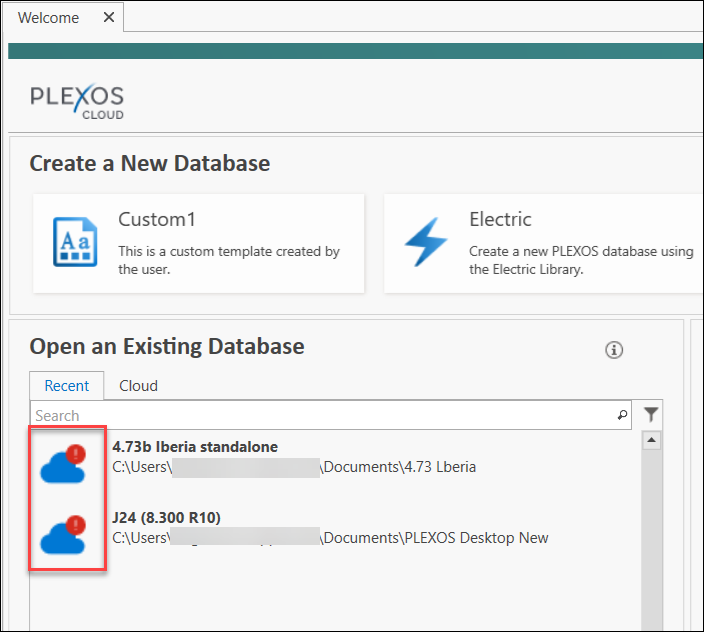
Follow the steps mentioned below to repair a Study that has a red dot on the Study icon within the Open an Existing Database panel in the Welcome Window:

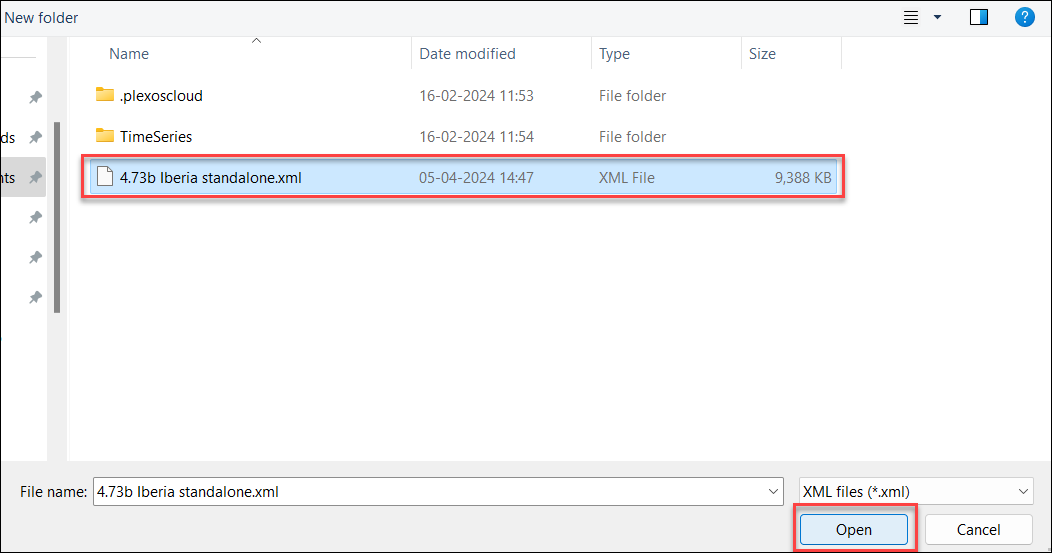
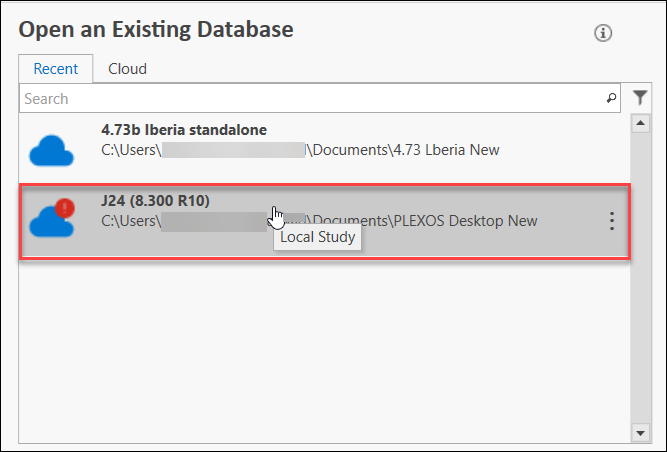

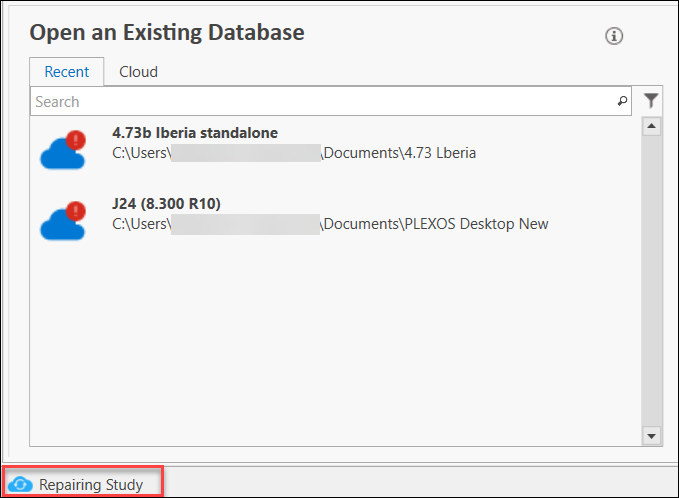
Follow the steps below to repair the Study, when you open a Study directly from the Open dropdown in the PLEXOS Desktop and notice the Study repair error:


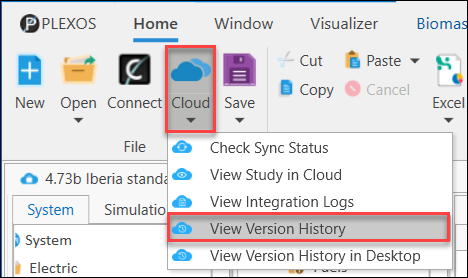

With the 10.0 R02 release of PLEXOS Desktop, users can access and manage the Version History and Simulation data for their Cloud Studies directly from PLEXOS Desktop. The Version History panel provides a dedicated side panel for Study Version Management, offering users a clear overview of the Study's current status and its change history. The Version History is shown in a timeline, providing users with visibility of the project's history. Users can conveniently pin the side panel to the PLEXOS display, ensuring it remains visible during editing sessions, enabling seamless Push of changes as they work, and being notified when collaborators on Cloud have made new changes.
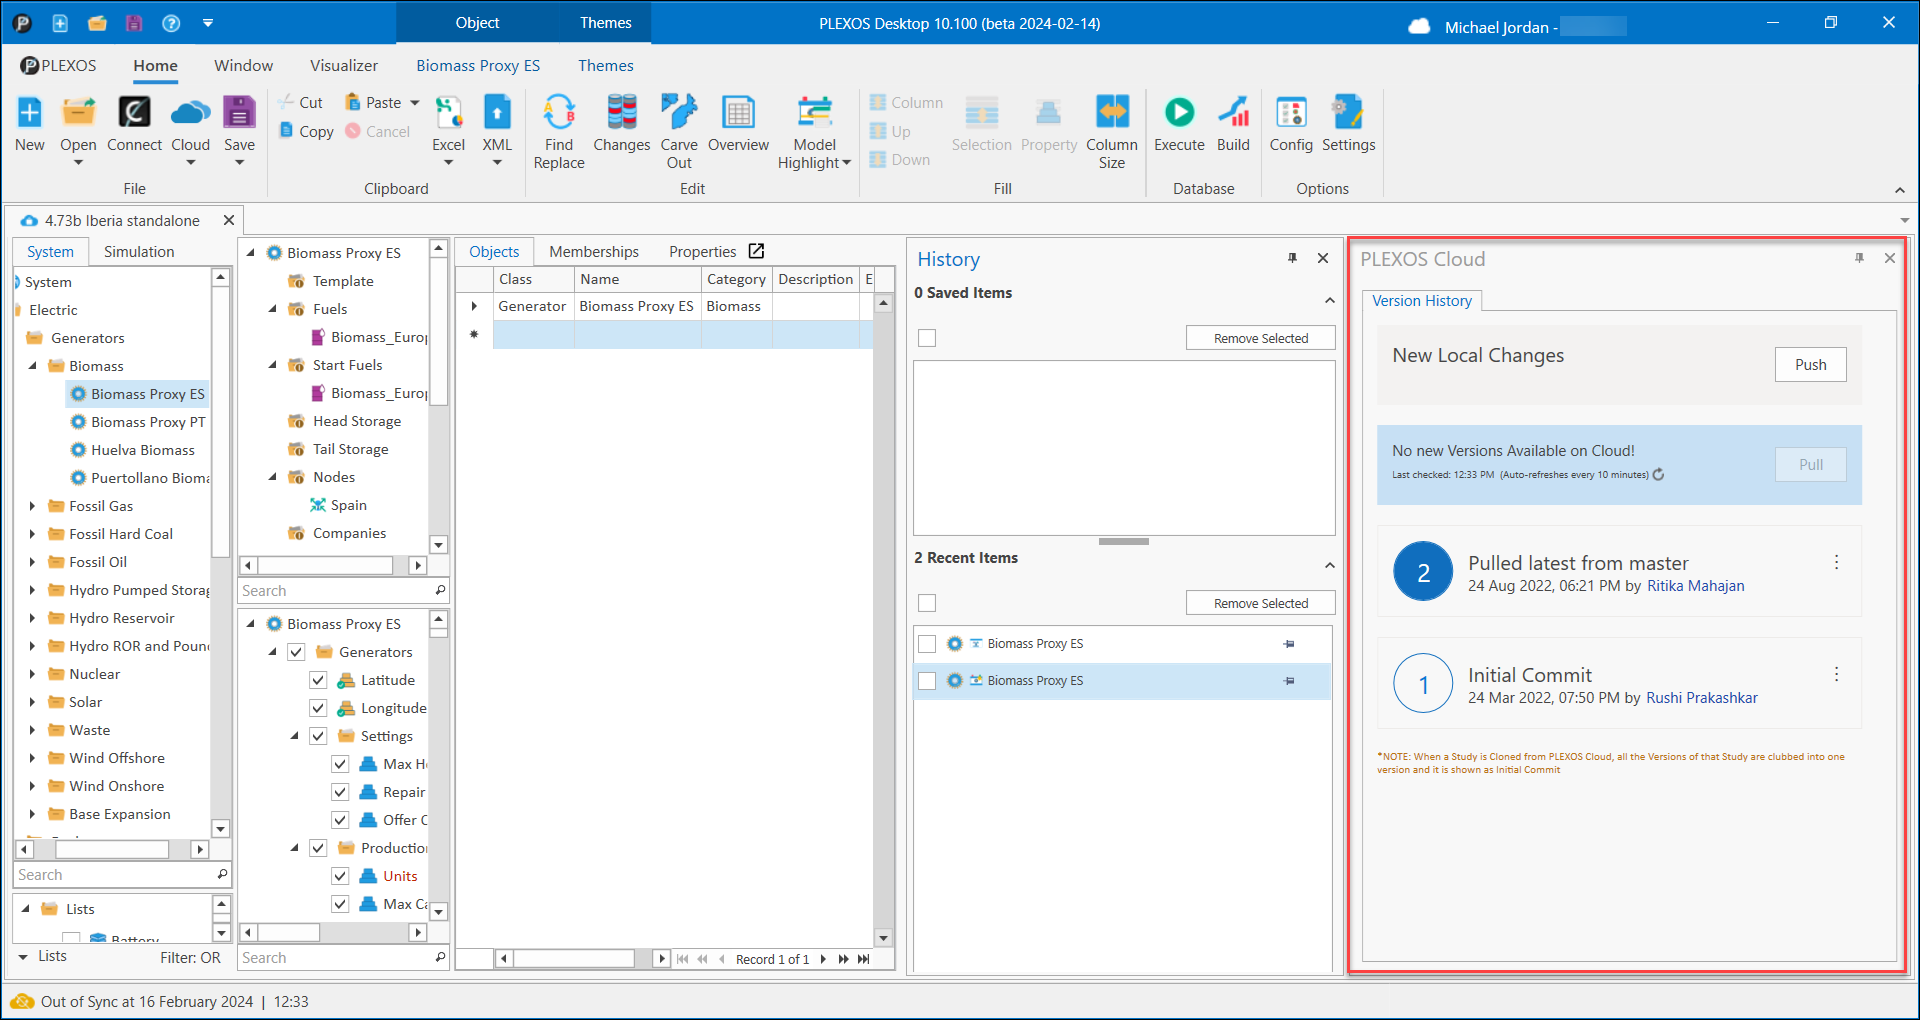
NOTE: When a Study is Cloned from PLEXOS Cloud, all the Versions of that Study are grouped into one version and are shown as Initial Commit in the Desktop Version History panel.
Follow the steps below to View and Manage Study Versions in PLEXOS Desktop:


The Versions panel will display on the right of the screen showing the associated Local Versions of the selected Study.

Additionally, users can Pull and Push the changes from Local Study to Cloud using the dedicated Push and Pull button available at the top-right of the Version History panel.
This issue can occur due to the following reasons:
A. Synchronization Process
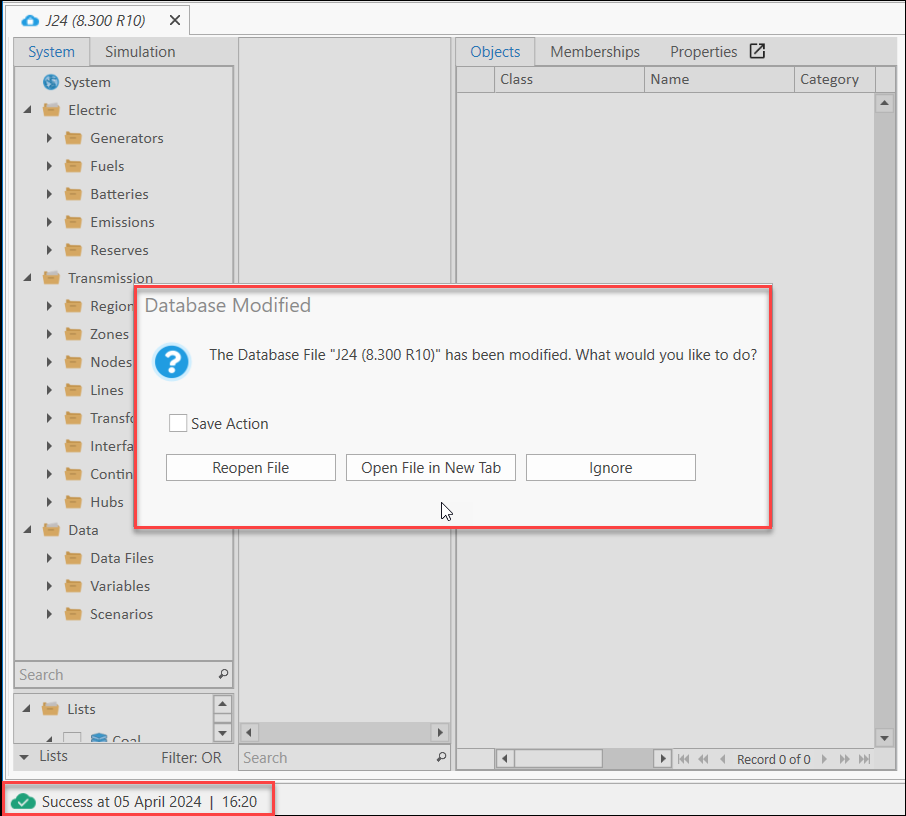
During the synchronization process between PLEXOS Desktop and the PLEXOS Cloud, when you execute the Pull Changes command, if updates are pulled from the PLEXOS Cloud into the input XML (database) file, the PLEXOS Desktop application prompts you to reopen the file to apply the changes.

If the Ignore option is selected instead of reopening the file and the XML file is subsequently saved, the changes pulled from the PLEXOS Cloud are not retained.
On the next Push operation, these lost changes are shown as Removed on the version history page. For instance, changes from version 39 may appear as removed in version 40.
This behaviour can be configured in the PLEXOS Desktop settings to align with your workflow and prevent change loss during sync operations.

B. Version Mismatch
If team members are not using the same PLEXOS version for a project or study, discrepancies can arise. Version upgrades or downgrades often alter IDs in the XML file, which results in additional removals and additions during changeset creation.
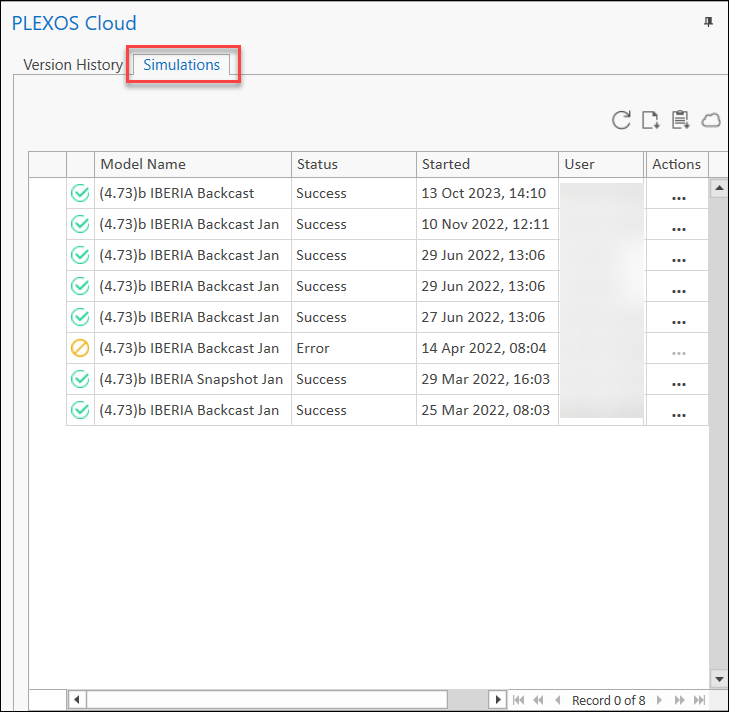
The Simulations tab allows users to view Simulation lists and download Solutions or Solution Log Files directly from the PLEXOS Desktop. The Simulations tab provides easy access to Simulation-related data in one place and a Refresh button to fetch the updated Simulation data. It includes the following columns to provide users with all the Simulation information for the currently selected Study:
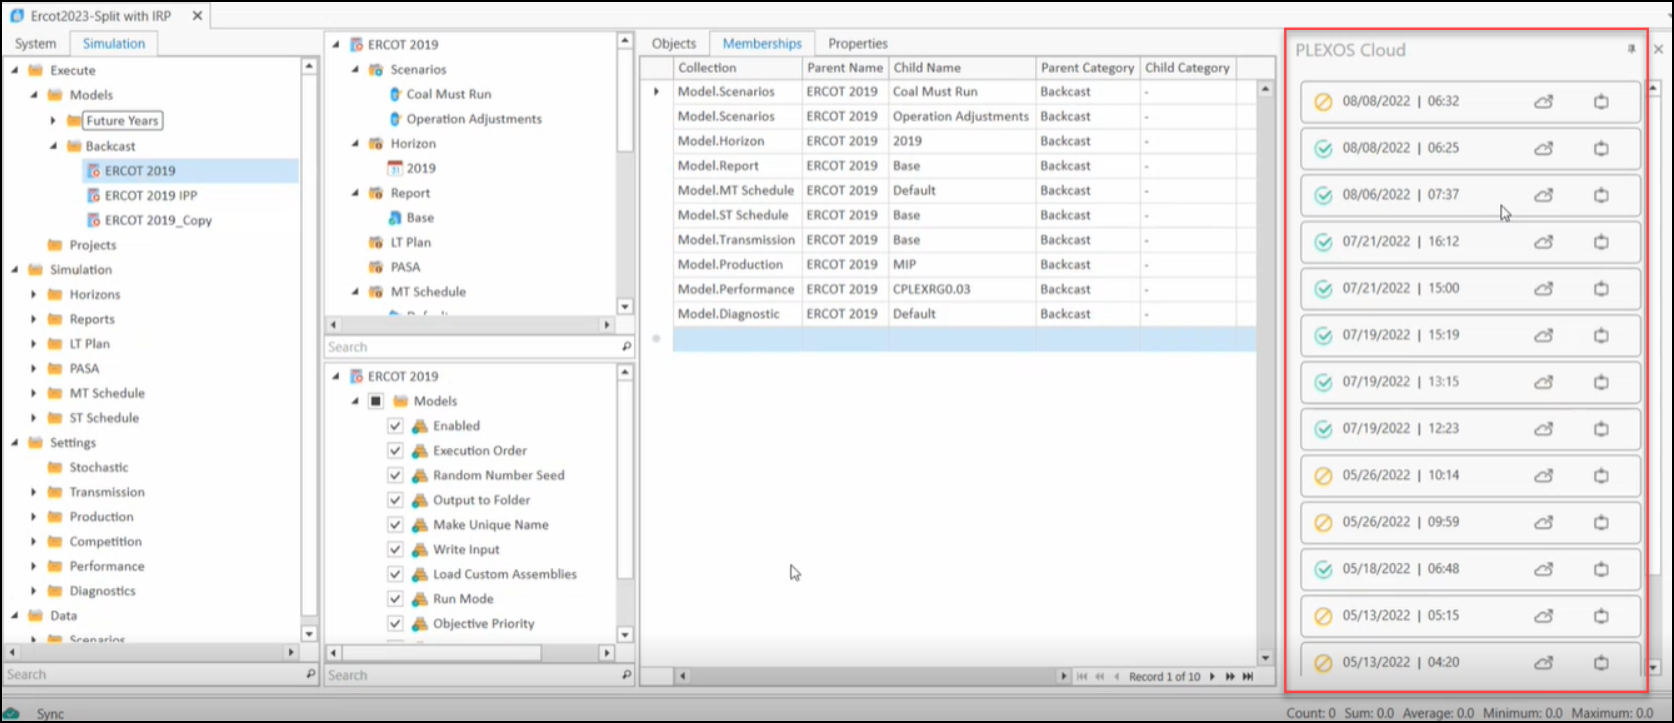
 icon to download the Solution File. Upon successful download of the Solution File, users will notice a Windows pop-up at the bottom-right of the screen regardless of whether they are in the same tab, a different tab, or another application. This is helpful when a user initiates the Download Solution process for a large Solution that takes time to download, allowing them to continue with other tasks until the download is complete. This notification will proactively inform you of the successful completion of the Solution Download process.
 icon to launch the Solution in PLEXOS Cloud. This allows you to evaluate the output using map-based visualizations, Solution Reports, Congestion Analysis, and other tools not available in the desktop.


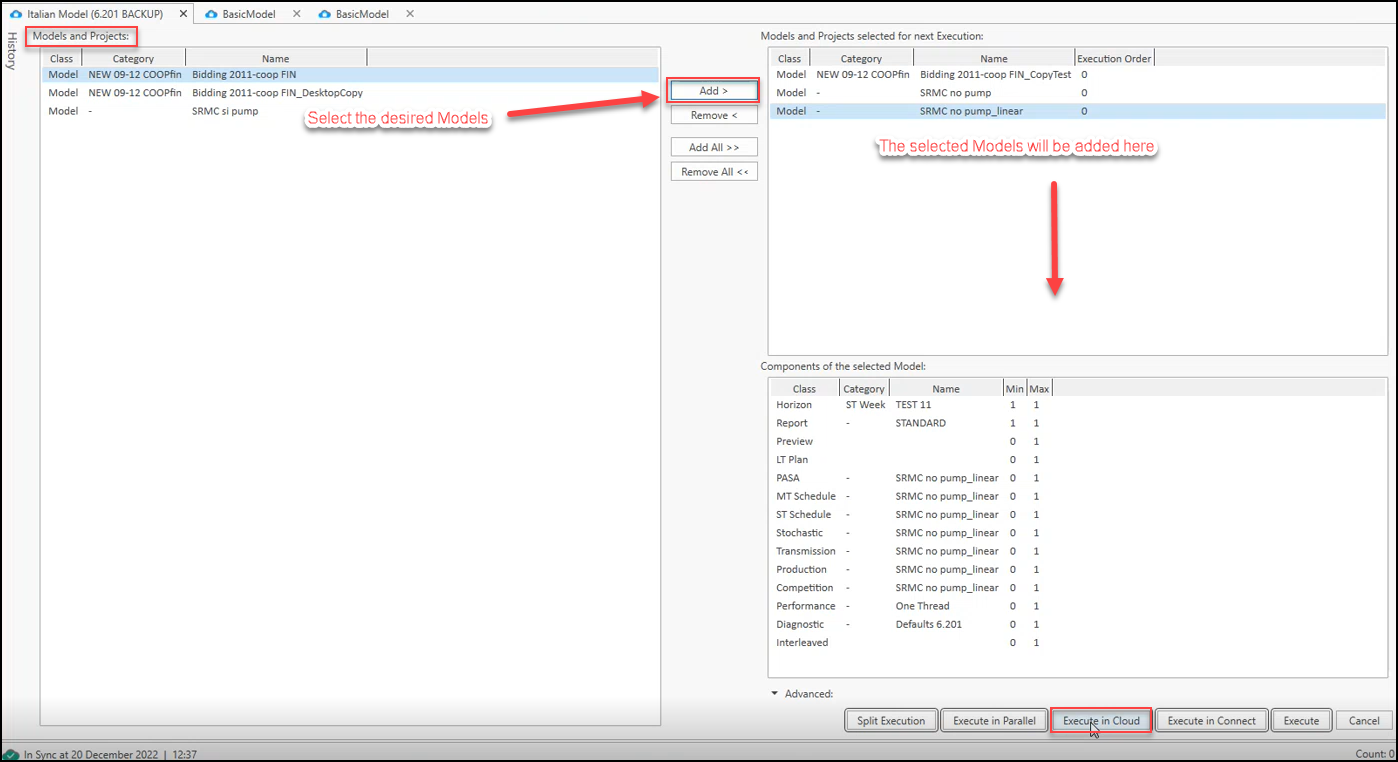
a. If any of the selected Models has previous successful run, your Simulation will be queued for all selected Models based on previous run recommended machine configuration.
b. If none of the selected Model have successful run before, you will be re-directed to the PLEXOS Cloud Run Configuration pane. where you need to configure and run the simulation.


NOTE: Very large uploads can experience performance issues during the initial upload or creation of a study in PLEXOS Cloud. This is because larger files require more time to upload and the process can strain the system's resources. To avoid such situations files above 10 GB are not supported by PLEXOS Cloud, attempting to upload them is likely to fail.
The new centralized log collection feature consolidates essential log files and configuration data into a single, user-defined location on your machine to streamline diagnostics and support for the PLEXOS Desktop. This enhancement simplifies log management and facilitates ease of access and share for support resolution.

Previously scattered across multiple directories, log files for PLEXOS Desktop, Central License Manager, and CLI are now automatically stored in a single, user defined folder, making retrieval straightforward.
To define the destination folder for centralized log collection, run the following command in Command Prompt:
pxc environment diagnostic-information -d "Folder path where the Log Files will be stored"

Upon completion, a confirmation message will appear. Logs are saved in the "PLEXOS-Logs-<Date of Collection>" folder for easy access.