The Microsoft Excel Add-in allows you to review and edit Model Input Data and synchronize changes to PLEXOS Cloud directly from Excel. Also, you can fetch the Output Data for analysis and sharing purposes. The Microsoft Excel Add-In replaces the now deprecated Excel Plugin. The Add-In is lightweight and supports both Model Data and the Data Files associated with the Study. Small, targeted changes or complex bulk changes based on formulas can be done easily and saved back to the PLEXOS Cloud with just a few clicks.
![]() NOTE: This applies to Analytics Tier customers only.
NOTE: This applies to Analytics Tier customers only.
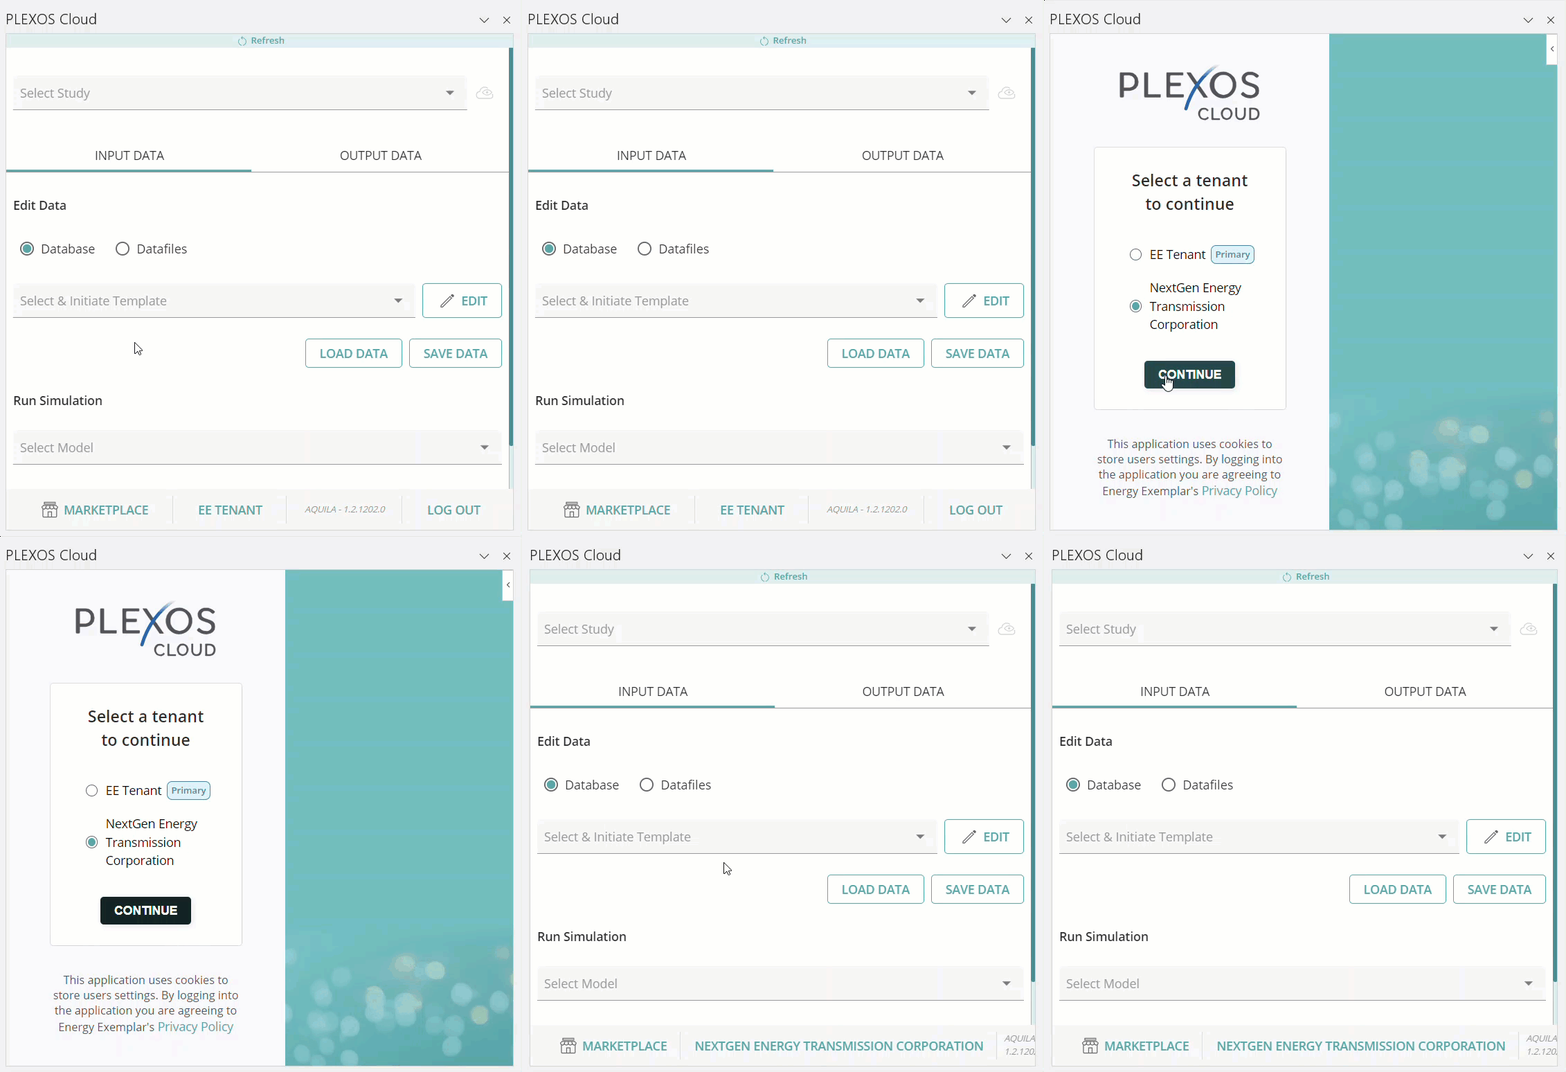
Perform the following steps to download the Excel Add-In tool from PLEXOS Cloud:

![]() NOTE: You can also find these installation steps in the excelwebaddin-installation- steps file (Open the downloaded zip file > click excelwebaddin-installation-steps file).
NOTE: You can also find these installation steps in the excelwebaddin-installation- steps file (Open the downloaded zip file > click excelwebaddin-installation-steps file).
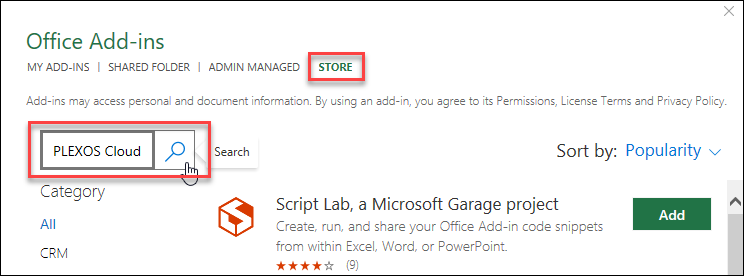
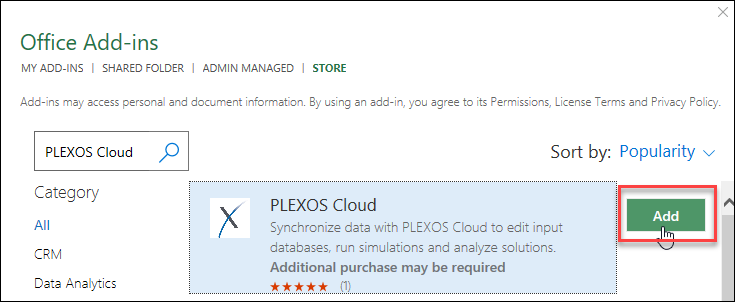
Users have the convenience of adding the Excel Add-In to their Excel web or Excel desktop versions directly through the Microsoft Store. This installation is fully automated and offers users a fast and easy way to install the Excel Add-In in one click on their machine. This eliminates the need for manual downloads and configuration, enabling integration of PLEXOS Cloud functionalities directly within the user's Excel environment.

Follow the steps below to add the PLEXOS Cloud Excel Add-In on your machine:






The Excel Add-In is accessible with both the Simulate and Analytics tier license. This licensing allows you to access key Excel Add-In features based on your assigned roles, enabling more flexibility and control in managing and analyzing your data within Excel. Whether you're working in Analytics or Simulate, you can integrate your PLEXOS data directly into your workflows, streamlining operations and improving efficiency.
Please note that, you will not have access to any features of the Excel Add-In with No Cloud tier license, regardless of any role assignment.
Refer to the following key features of the Expanded Access to Excel Add-In for Simulate tier:



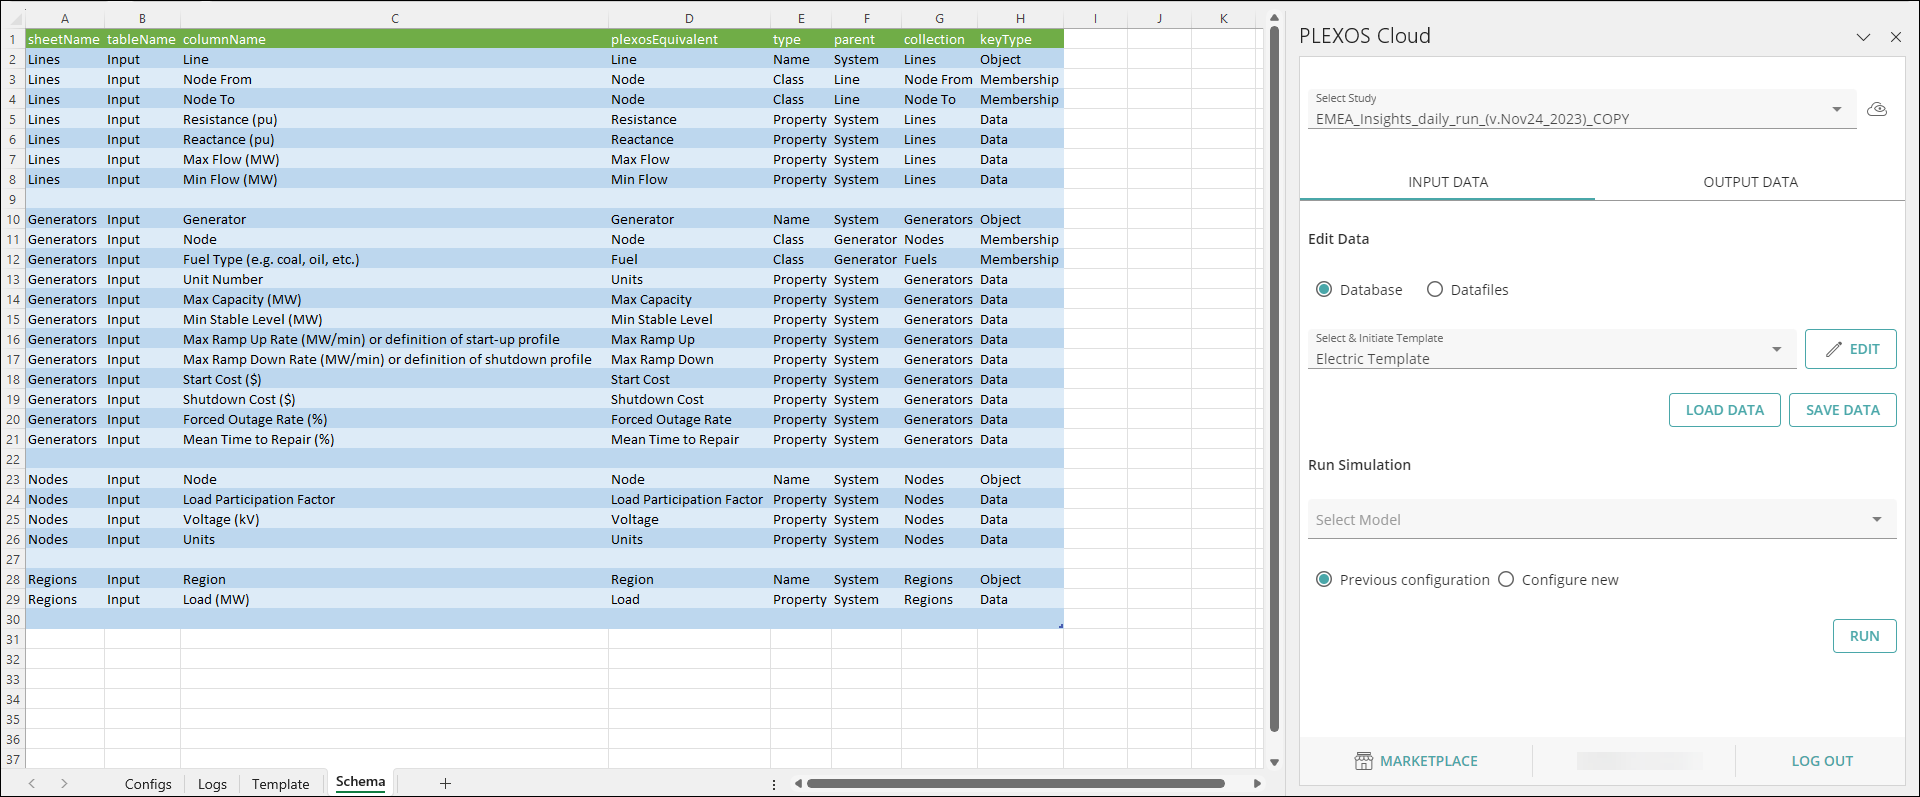
![]() NOTE: Leave a row empty after each table’s column schema.
NOTE: Leave a row empty after each table’s column schema.
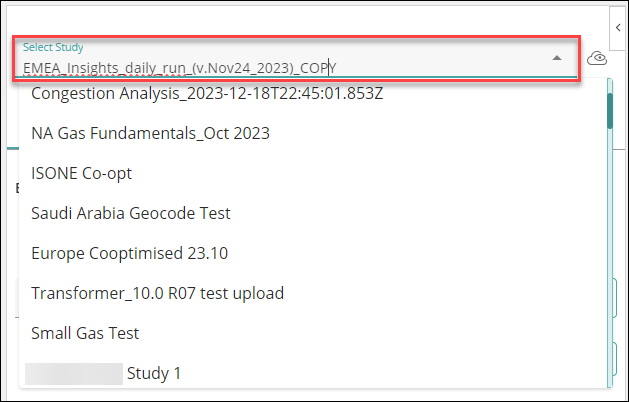
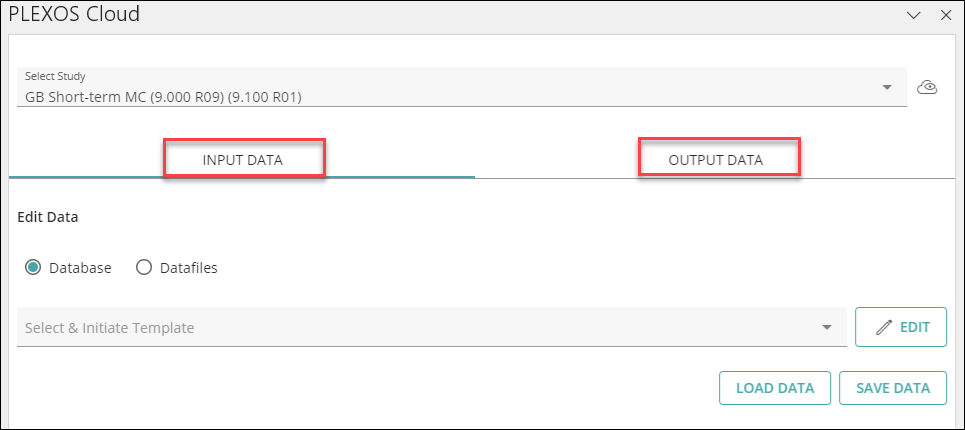
A. INPUT DATA
B. OUTPUT DATA
This tab allows users to load Output Data for a successful Simulations.
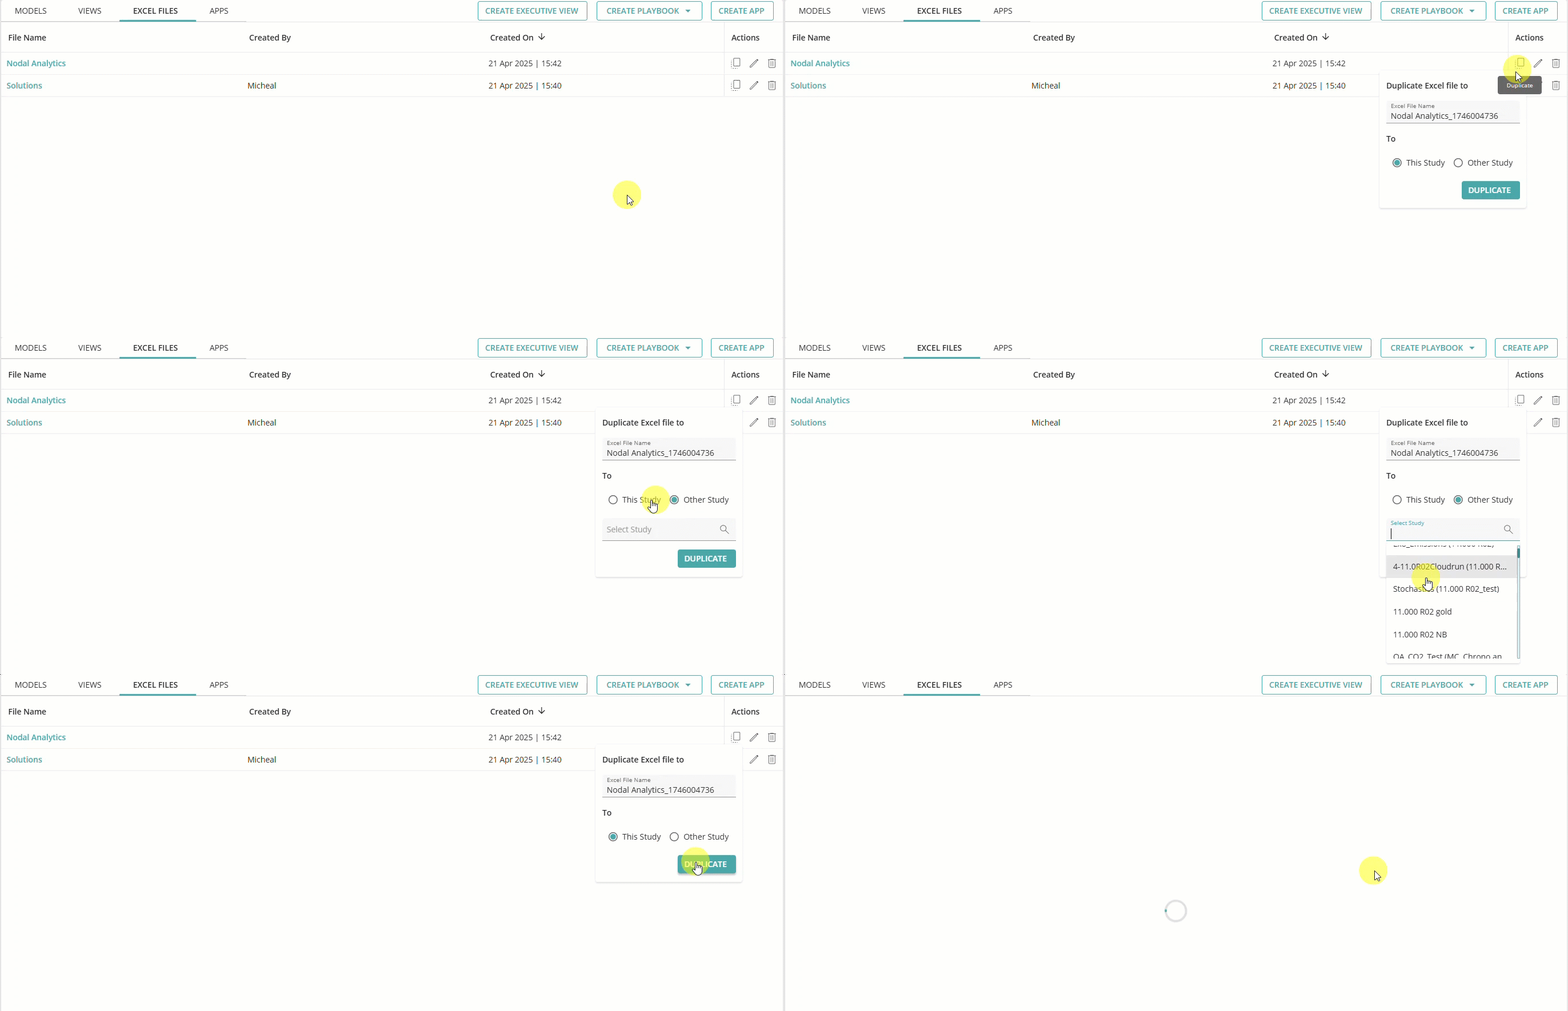
The Excel Files tab on the PLEXOS Cloud Overview page allows you to manage Study-linked Excel files directly through the web interface. This integration streamlines collaboration and version handling between the Excel Add-In and the PLEXOS Cloud platform.
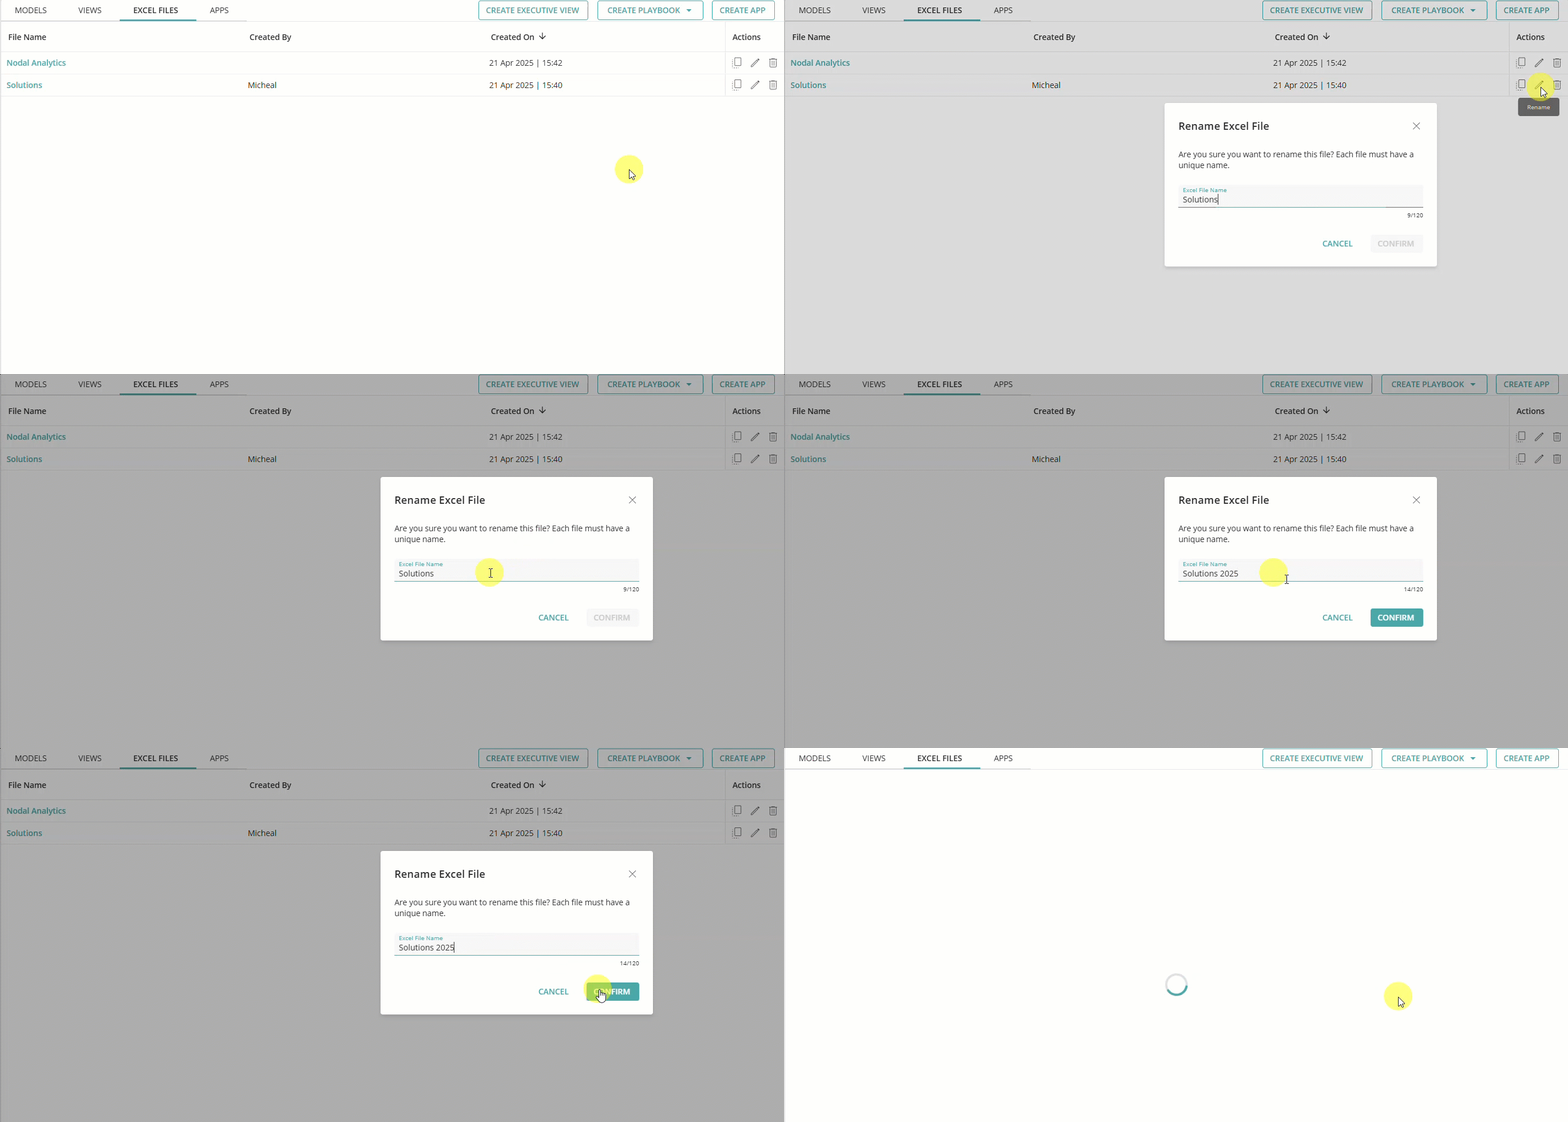
You can duplicate, rename, or delete Excel files directly from the interface, eliminating the need for manual downloads or reuploads.
Rename Excel File: You can rename Excel files by clicking the pencil icon next to the file name.
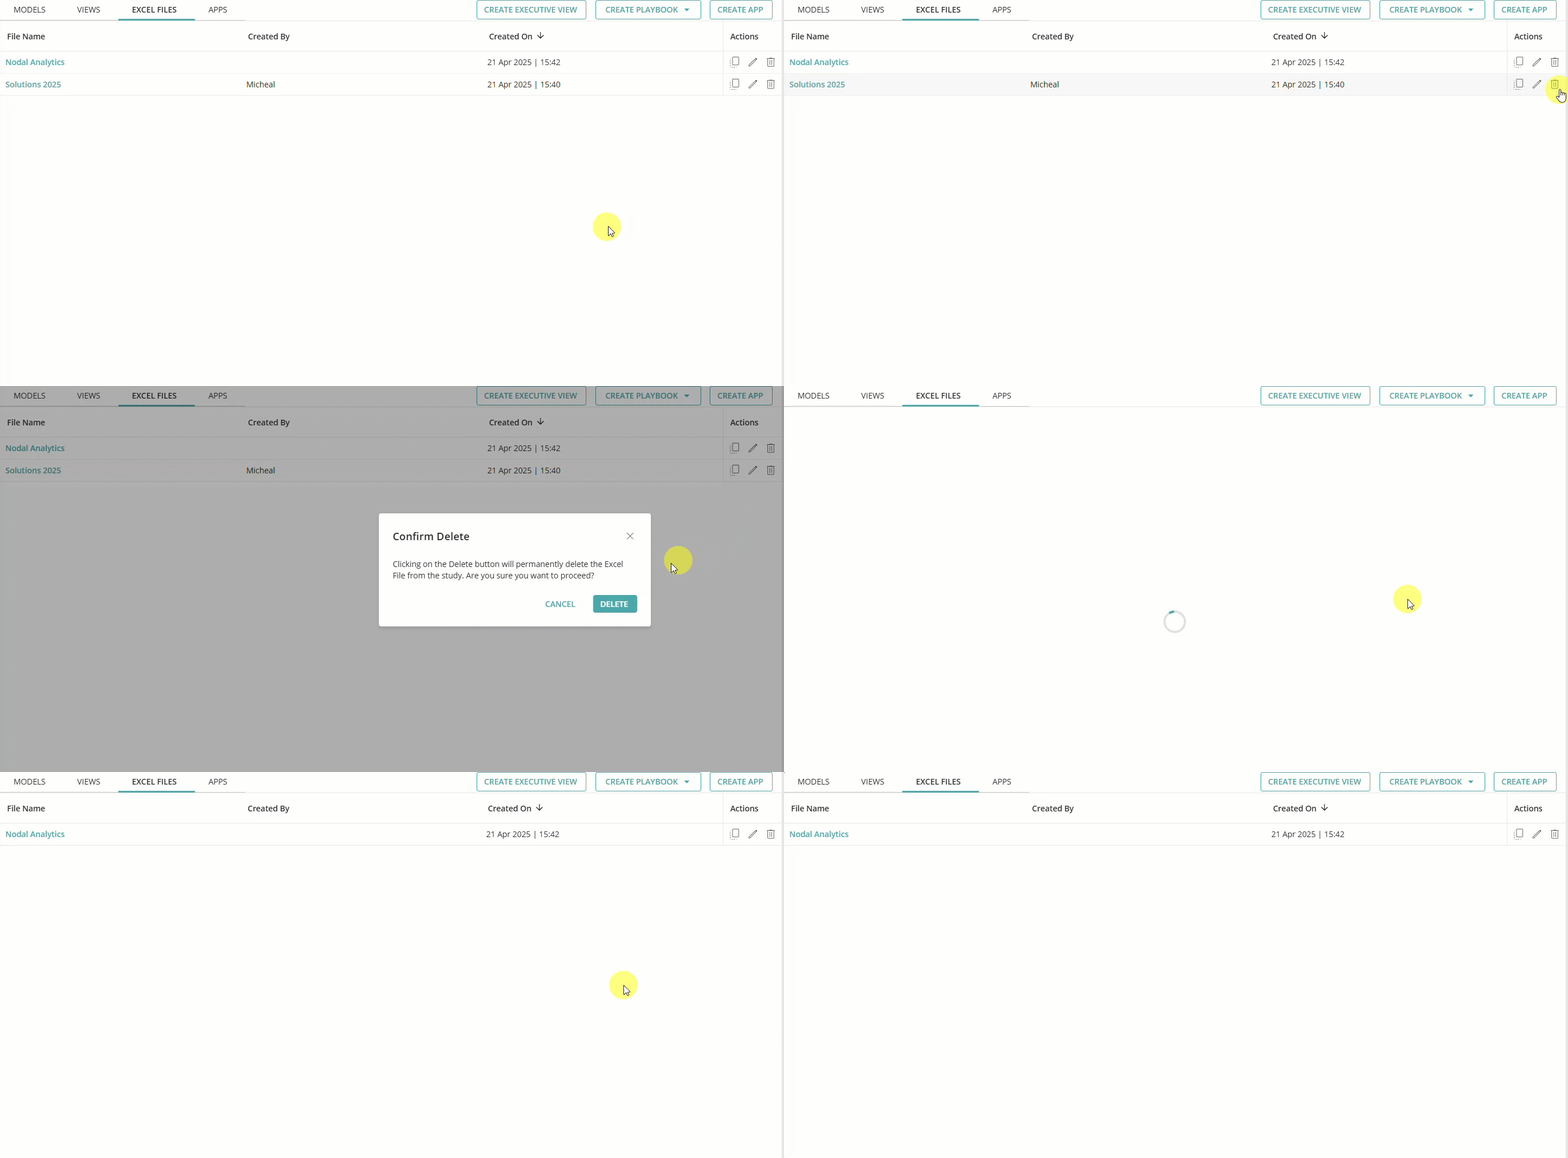
Delete Excel File: The delete icon allows you to remove Excel files that are no longer needed from the selected Study. This helps keep the Study file lists clean and organized.
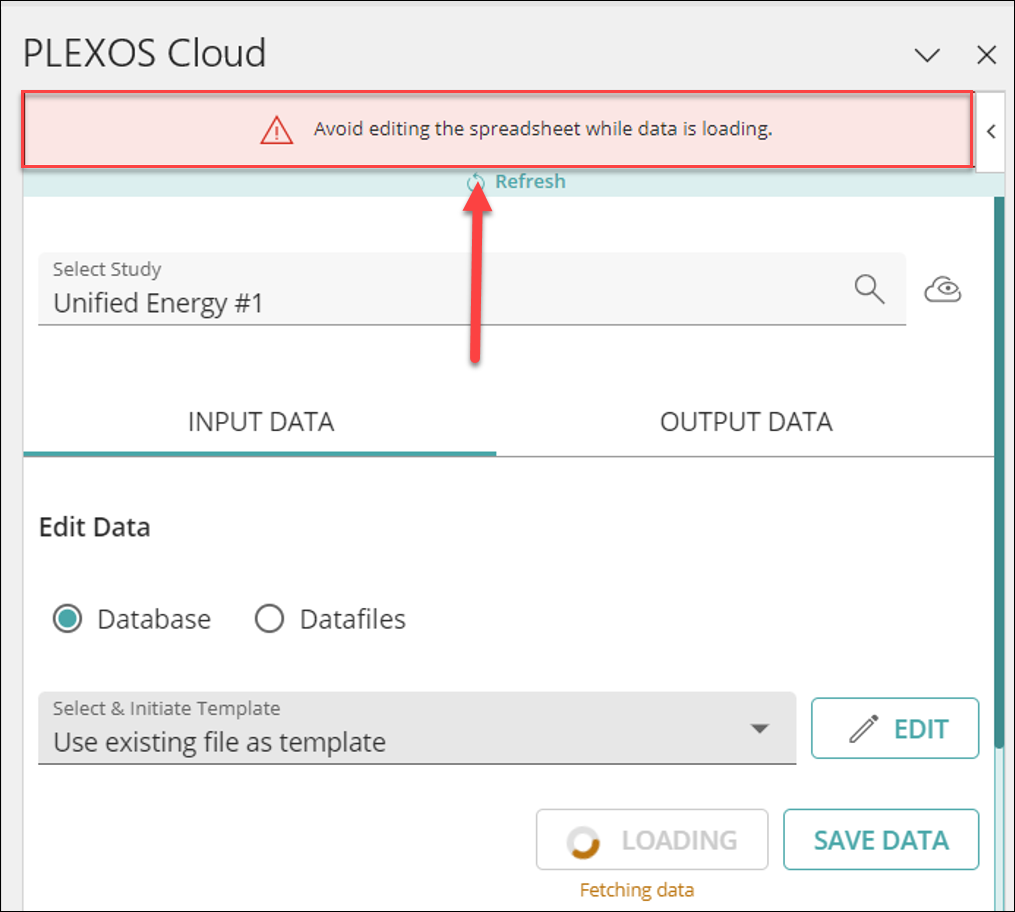
1. In the INPUT DATA tab, click on the LOAD DATA button to fetch all the data from the selected Study.

![]() NOTE: To prevent Data load failed error when clicking the LOAD DATA button, a message " Aviod editing the spreadsheet while data is loading." This message advises users to not click any spreadsheet cells until the data loading is complete and remains visible during the process.
NOTE: To prevent Data load failed error when clicking the LOAD DATA button, a message " Aviod editing the spreadsheet while data is loading." This message advises users to not click any spreadsheet cells until the data loading is complete and remains visible during the process.
2. You can now view an indication of progress for the tasks running in the background. This will help the user understand the progress of the process taking place in the background along with the sheet name for which the data is being downloaded or uploaded.

3. Navigate through different tabs, to update data for your Study per your requirement. You can leverage the power of Excel including formulas to make your updates.

button.
![]() NOTE:The Save Data button will enable after you make any changes to the data.
NOTE:The Save Data button will enable after you make any changes to the data.

The Input Data tab supports both Database and Datafile inputs. This offers two distinct options for loading timeseries files efficiently:
These options streamline the data loading process, boosting analyst productivity and enabling faster model setup by supporting bulk actions directly from a centralized configuration table.

The Logs sheet in the PLEXOS Cloud Excel Add-In provides clearer insights into input/output operations and helping you troubleshoot issues more efficiently.
When loading data using the Input or Output tabs, the Add-In logs specific status messages to help you quickly assess the result of the operation:
✅ Success
⚠️ No Data Loaded
⚠️ Partial Load
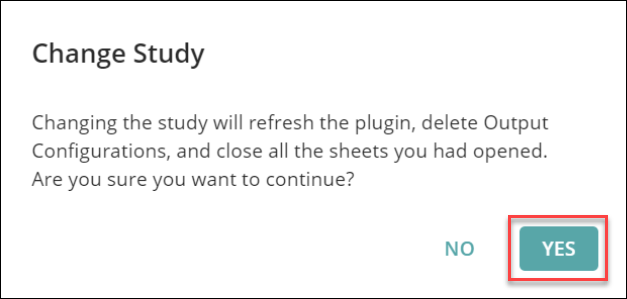
The Output Query Configuration sheet supports Study-Agnostic behavior, allowing you to retain diagnostic settings when switching between Studies.
To support this functionality, the Logs sheet displays validation messages when invalid or unmatched configurations are detected during a Study switch.
Example:
If you previously added a Solution from Model A, and upon switching to a new Study, Model A does not exist:

These validations help ensure you’re always aware of data load status and potential mismatches when working across multiple Studies, reducing confusion and improving overall reliability within your Excel-based workflows.
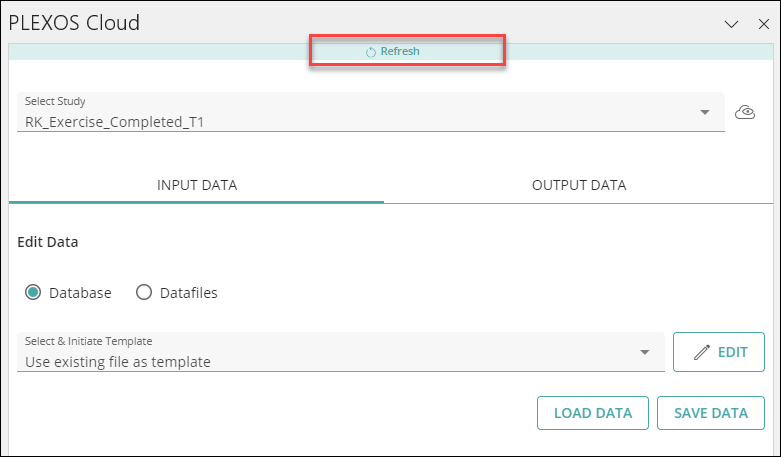
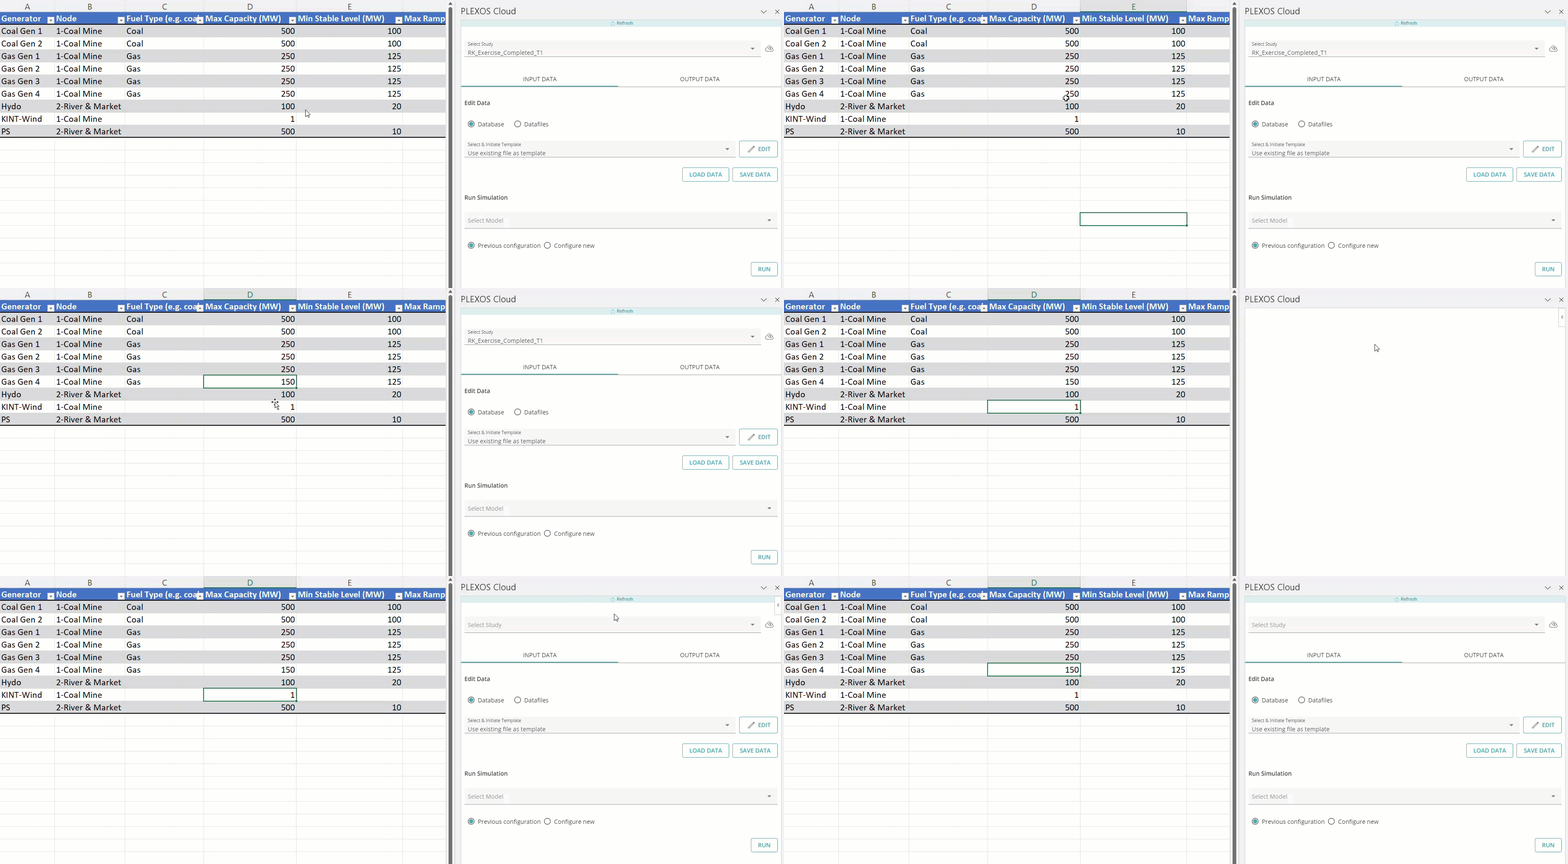
The Refresh button in the Excel Add-In interface allows you to easily refresh the data on the page whenever required without restarting the application or manually refreshing the entire worksheet, even if the Excel Add-In comes under any error loop. This will improve your data reloading experience and reduces the page loading time for you.
Clicking the Refresh button starts reloading the current page data. Once refreshed successfully, the page shows the updated data from connected sources, ensuring that unsaved changes remain intact.
When a user Loads the Input Data from the Database, an Expression Tag column gets created in the [ClassNameProperty] sheet to the imported dataset. To change a Variable Object for any PLEXOS Property, a dropdown with the list of Variable Objects in the Model will be available. Users can select from the existing Variable in the dropdown and click on the SAVE DATA button to save the changes.

While creating new Objects, the Memberships can be created only with already existing Objects.
For example: If I try to create a new Line A running from Node1 to Node2 cannot be new Nodes that are being added in the same version. So to create Line A, first create Node1 and Node2 and push your changes, then pull the latest data and create Line A and push your changes again.
After pulling data, the following tables will be created according to the template. Primary table will be created in sheet named ${sheetname} as per the Schema.
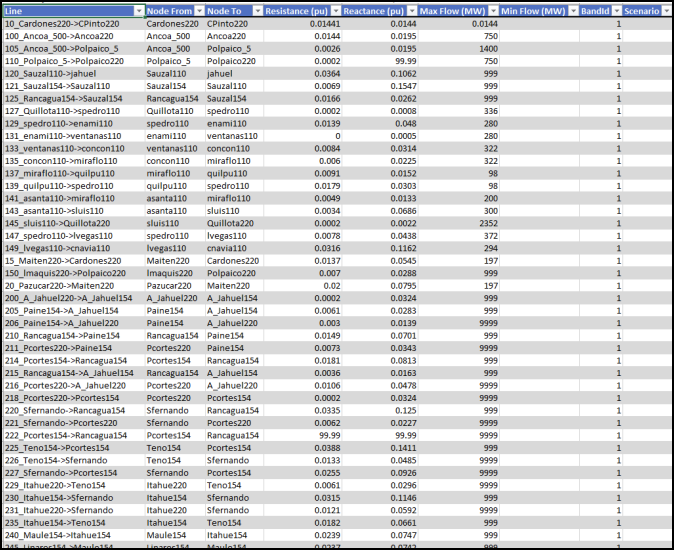
For the Dynamic properties or if you have entered Yes in the AllDynamic column for any template, a new table will be created in a sheet named {sheetName}Property.

While the Excel Add-In loads any Data, users are recommended to not click on any cell as it may interrupt the loading process and the data will not load. In this case, you must click on the PLEXOS icon under the Data tab to load the data again.
![]() NOTE: Your offer does not work on Microsoft 365 versions earlier than 16.0.11629 on Windows 10.
NOTE: Your offer does not work on Microsoft 365 versions earlier than 16.0.11629 on Windows 10.
![]() NOTE: Your offer does not work in Microsoft 365 version 16.0.11629 or later without Edge WebView2 (Chromium-based) installed on Windows 10.
NOTE: Your offer does not work in Microsoft 365 version 16.0.11629 or later without Edge WebView2 (Chromium-based) installed on Windows 10.
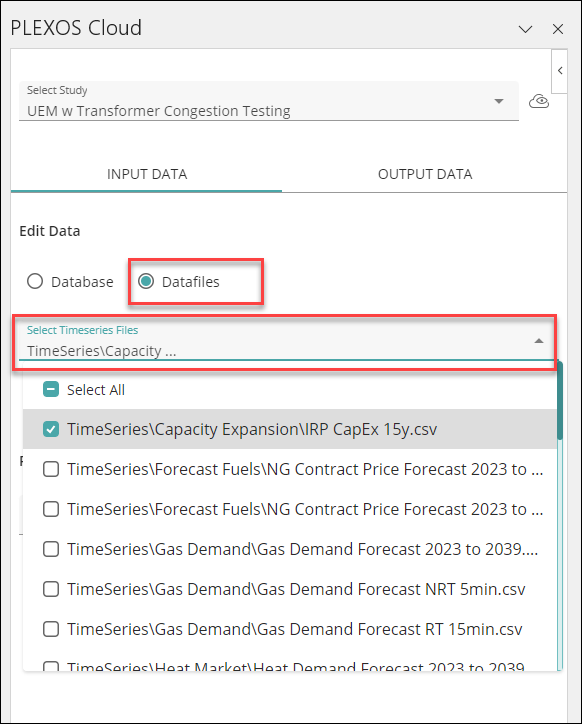
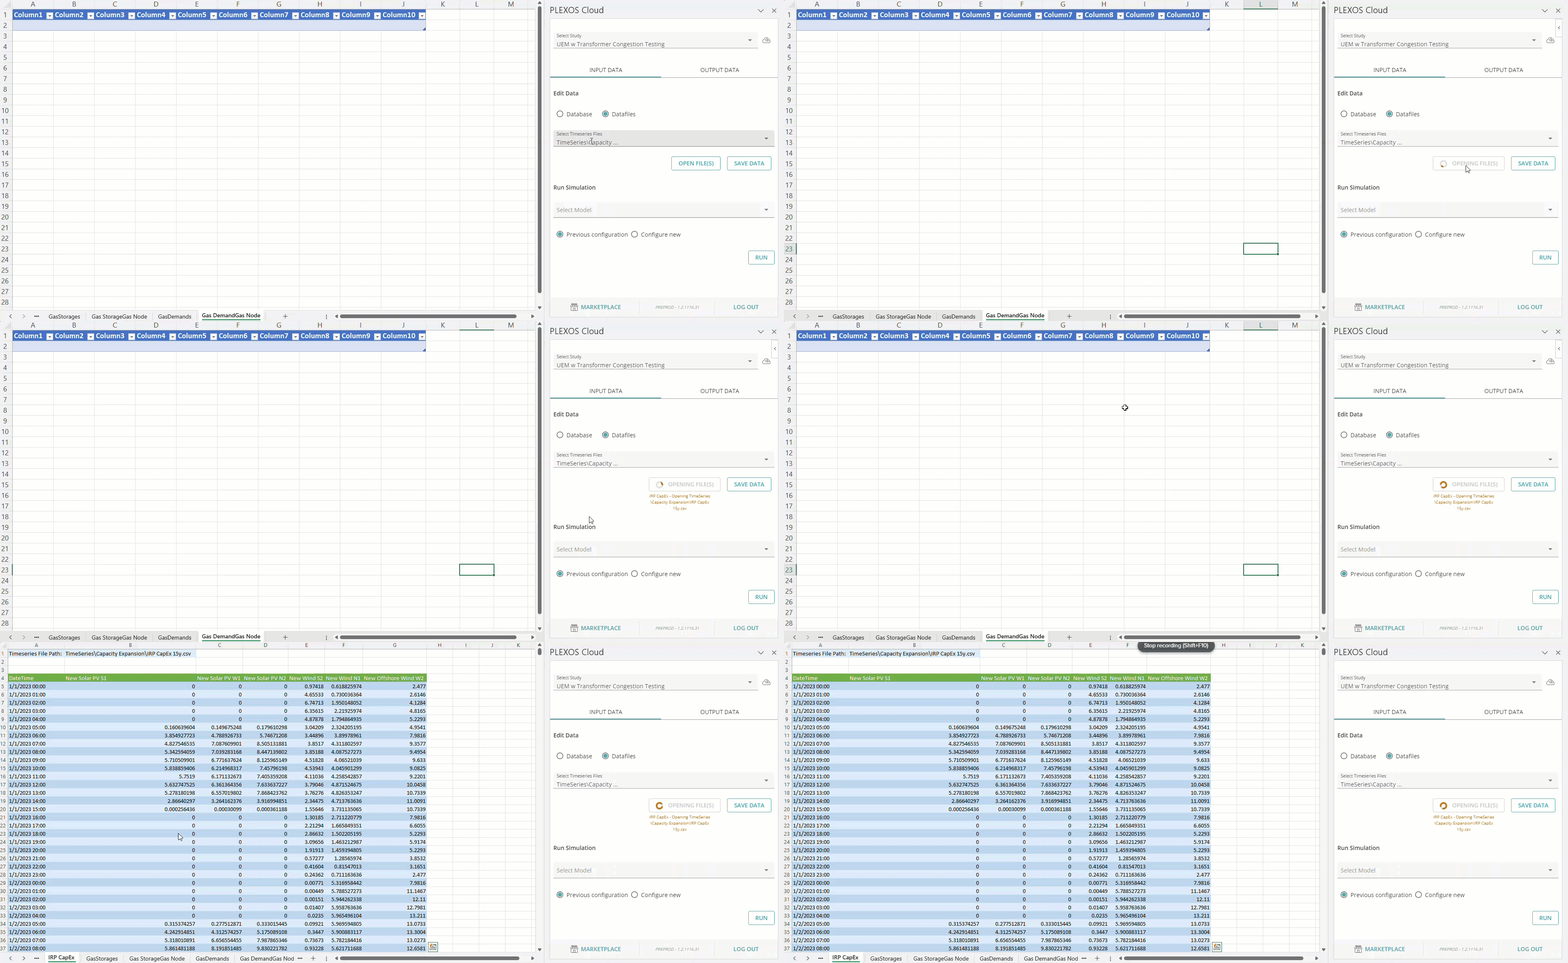
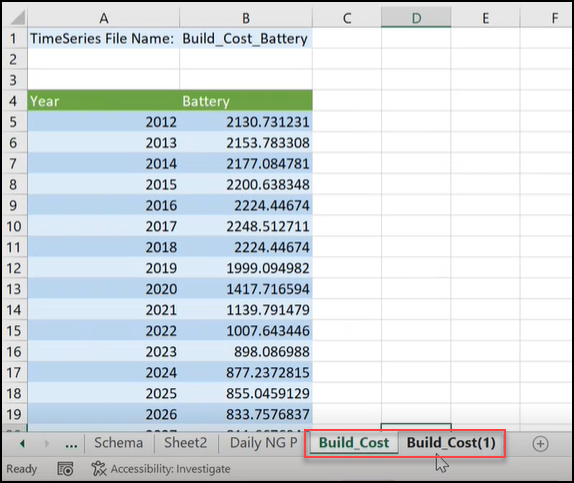
![]() NOTE: The Timeseries File name will be set as the Sheet Name for easy identification. For duplicated names, you will see a suffix added after Sheet Name.
NOTE: The Timeseries File name will be set as the Sheet Name for easy identification. For duplicated names, you will see a suffix added after Sheet Name.
Previously, the changes made to the Data Files had to be pushed before closing the Excel but the Persistent Data File functionality eliminate this effort by allowing the Data File to load automatically with the recent changes saved when you save the Data File and re-open it again. It will select the associated Study and Data Files by reading the data from the Config sheet. The MS Excel Add-In preserve the connection to the last study used, as well as any data files that was open during the last editing session. When the user re-opens the Excel editing template file, the Study selection will be populated automatically, and any data file tabs will be re-opened.
Perform the following steps to use this feature:
1. Select the desired Study from the Select Study dropdown.
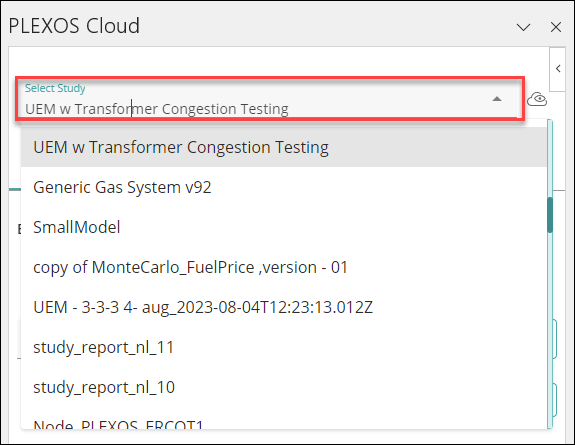
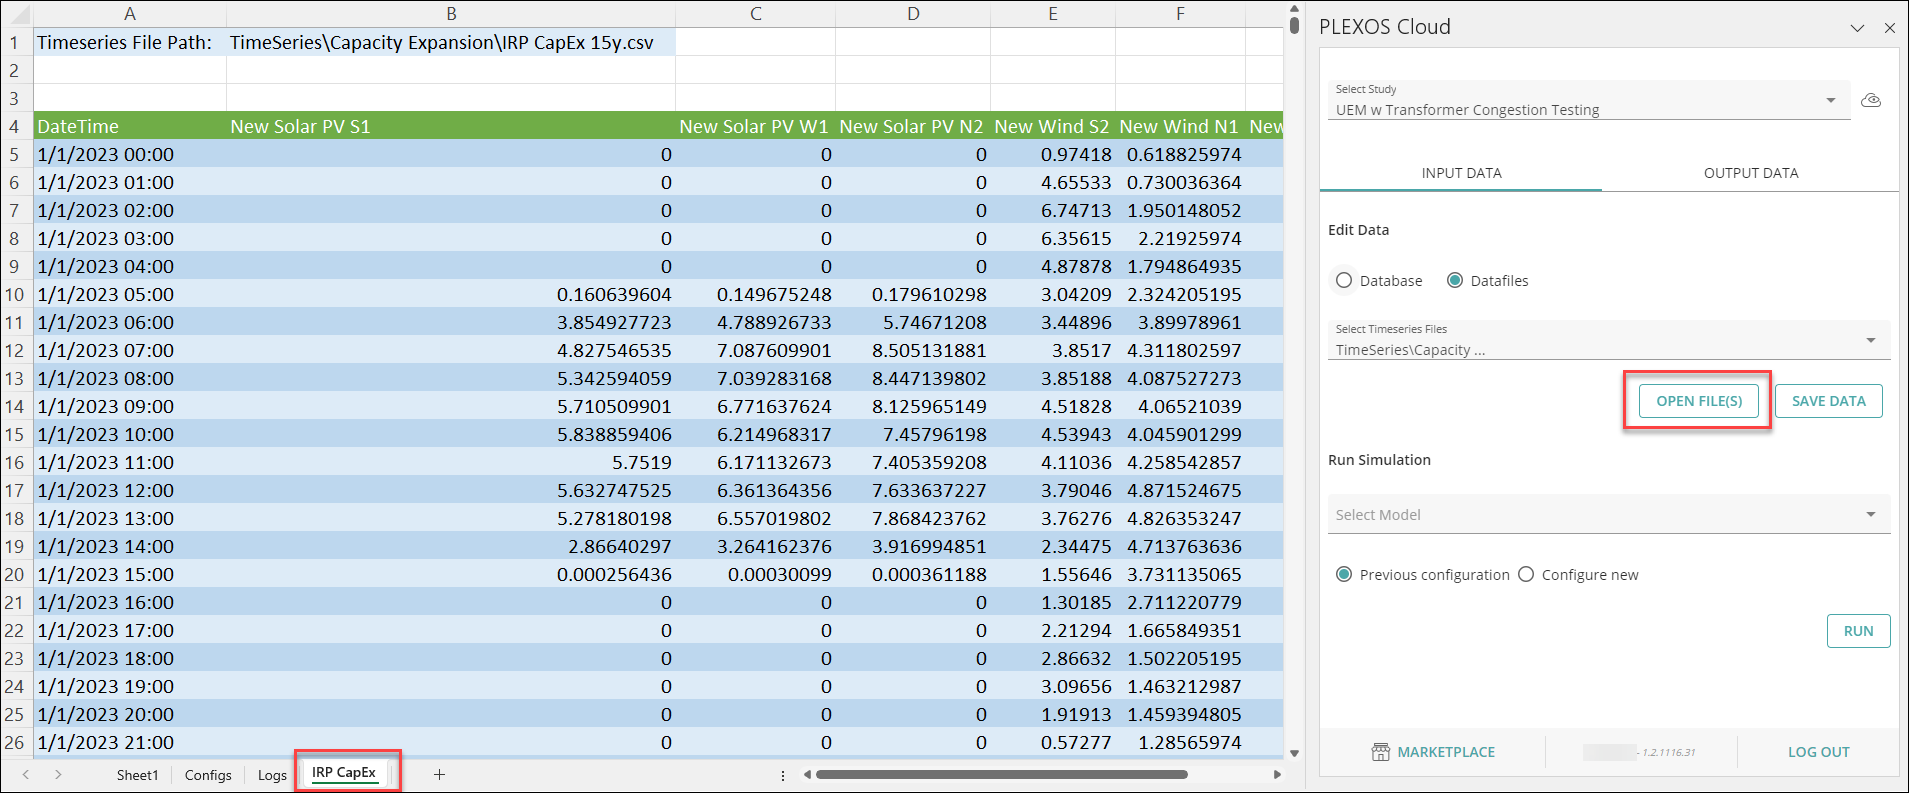
2. The Datafiles associated with the Study will show in the Select Timeseries File dropdown.Browse and select the desired Timeseries File.

3. Click on the OPEN FILE(S) button to view and edit the data.
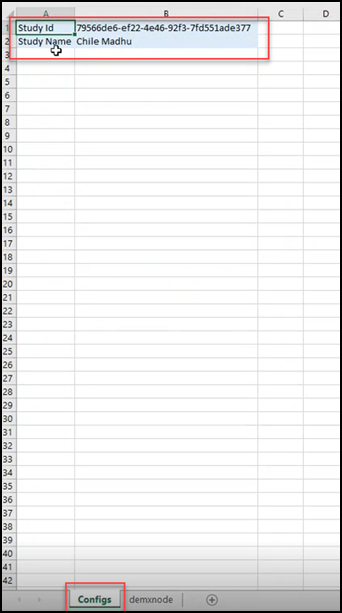
4. A new sheet called Configs gets created. This sheet shows Study ID and Study Name for the currently selected Study. Do not delete this sheet or change the data, it will be used by the Add-In and API to communicate with PLEXOS Cloud.
5. Make the necessary changes in the data file and click on File menu > Save As to save the Data File in .xlsx format. So, next time when you open the Data File, you will see the previously saved changes.

6. Close the Excel Workbook and re-open it from the path where you have saved it earlier.
7. Navigate to the Data tab and click on the PLEXOS icon (Energy Exemplar).

8. PLEXOS Cloud automatically reads the data from the Config. sheet (Study ID, Name) and loads the associated Study and Data File.
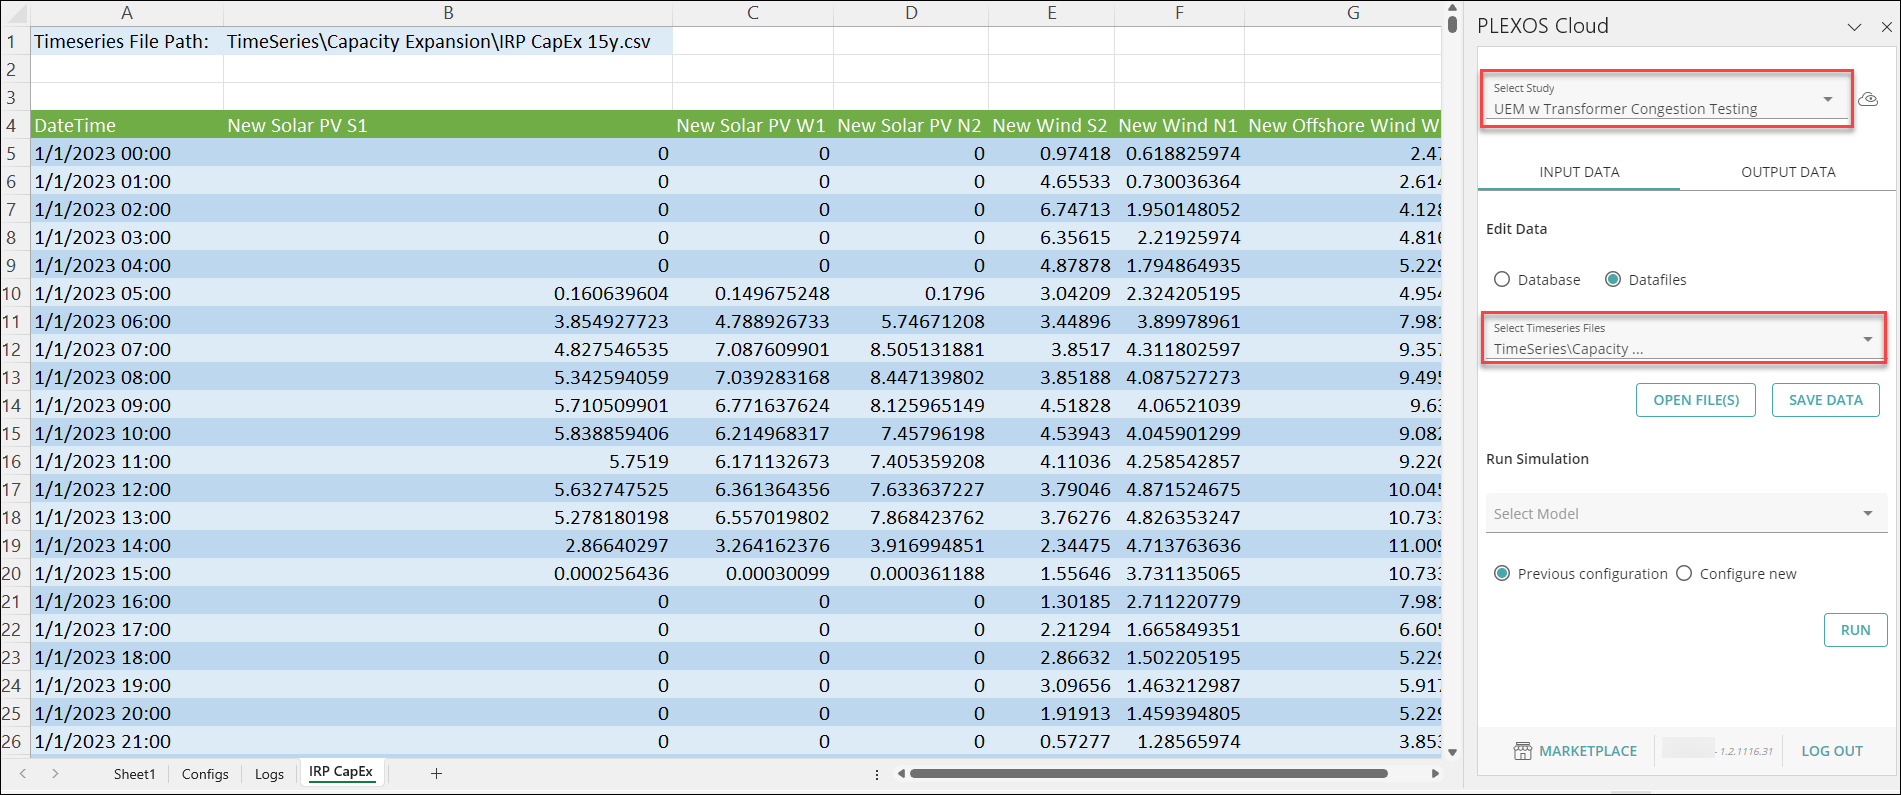
9. Make the necessary changes to the values of the Datafile.
10. Click on the Save Data button to save your changes.

The PLEXOS Cloud Excel Add-In includes Data File Query Configuration sheet that enables you to manage and extract multiple timeseries files within the same Study more efficiently.

This configuration table streamlines how you work with timeseries files by allowing you to add and manage multiple files in a single, centralized view. It enables you to selectively extract specific files or load all of them at once into Excel using the Bulk Load functionality, removing the need to process each timeseries file individually.
The Data File Query Configuration sheet lists your timeseries files in a structured, editable table and works seamlessly with the Bulk Load functionality.

The table consists of the following columns:
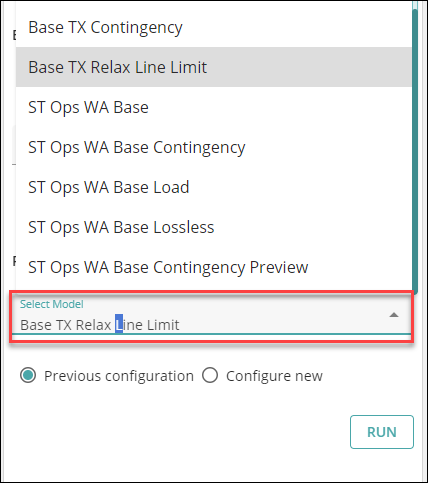
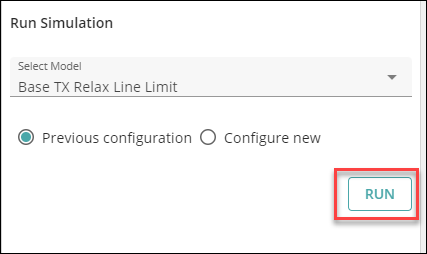
Perform the following steps to Run a Model:
5. Click on the LOG OUT button anytime to end your session.
Perform the following steps to remove the older VSTO version of the Excel Plug-In.
Clear the checkbox next to the Plug-In that you want to inactivate and click on the Remove button.
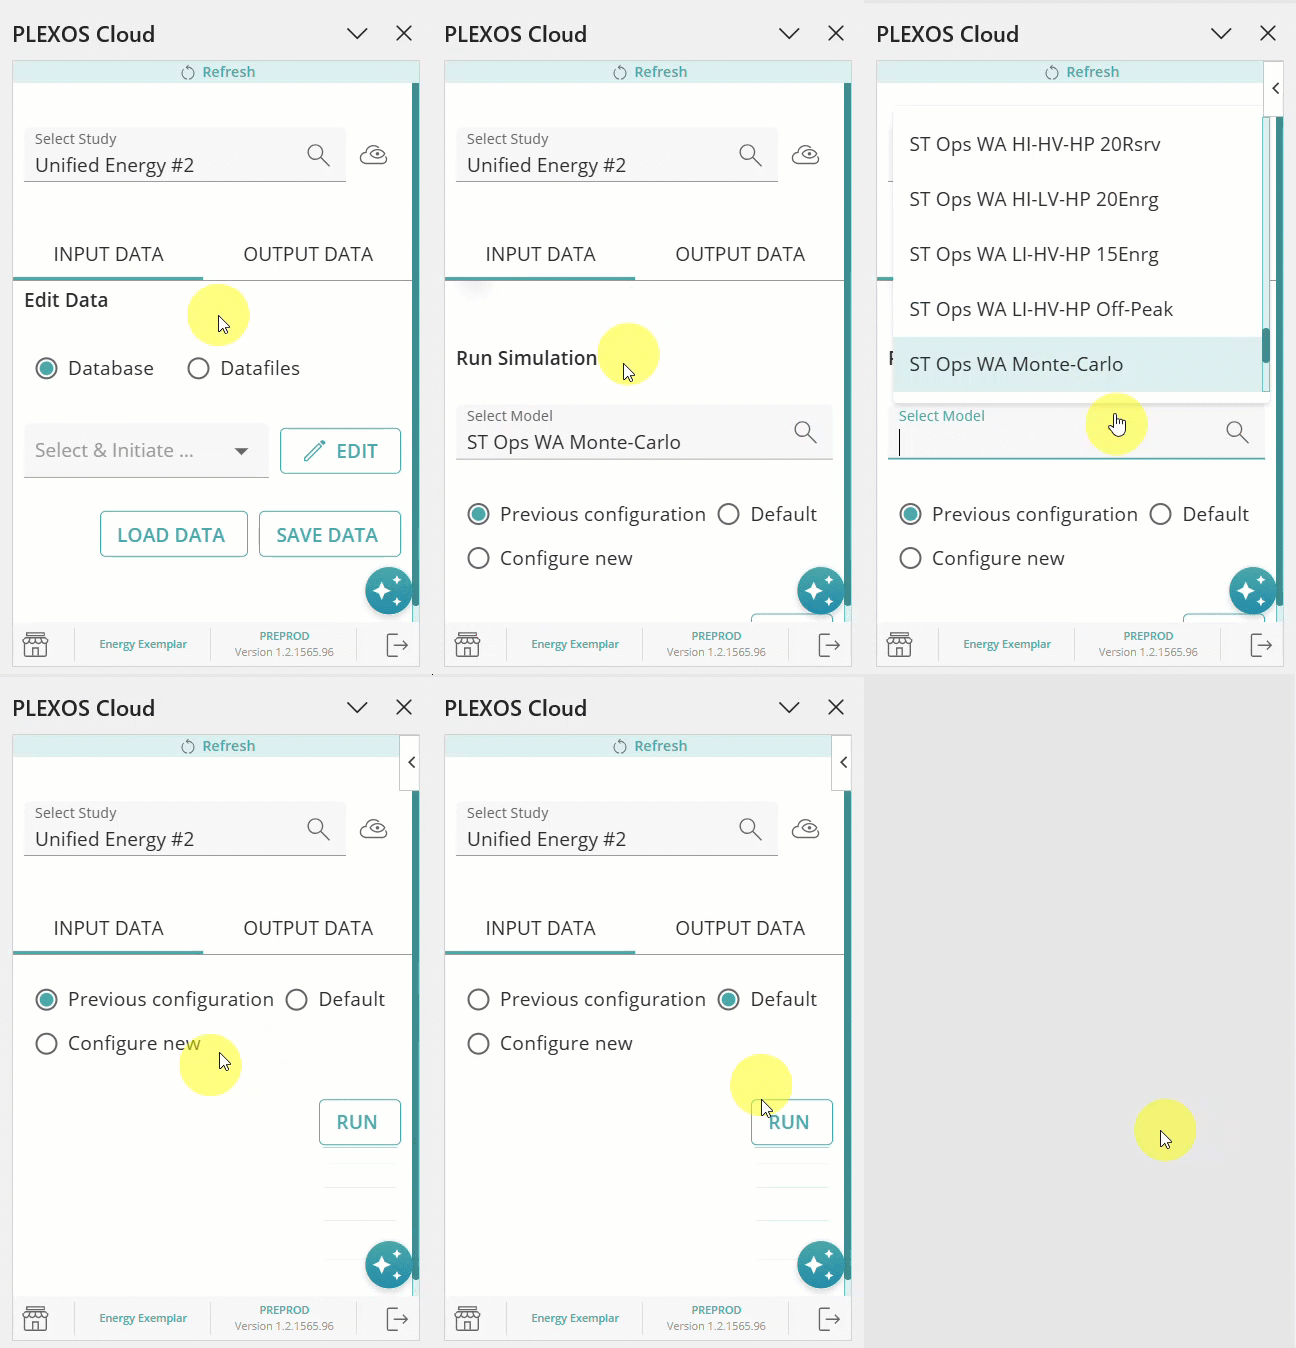
The Excel Add-In supports streamlined simulation execution through a Default option in the Run Simulation workflow. This feature allows you to submit simulations quickly using predefined preferences set in PLEXOS Cloud, eliminating the need for manual setup during each run.
Perform the following steps too fetch the Output Data in Excel Add-In:
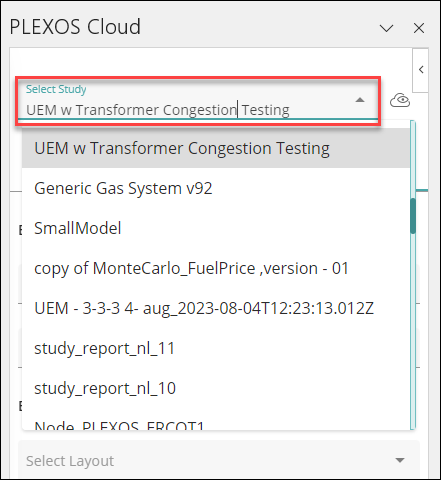
Select the desired Study from the Select Study dropdown.
Navigate to the OUTPUT DATA tab.

Select the Model from the dropdown.
Select the desired layout from the drop-down.

Select the Model and Solution under the Export From option.
![]() NOTE: Make sure you have a successful Solution in the study.
NOTE: Make sure you have a successful Solution in the study.
Provide the sheet name in the Export To section.
Click on the Extract button.

Note that if a user refreshes a page or closes and re-opens the Excel File and Runs the Output Data Query, the latest Solution file will be automatically rendered to show you the updated Solution data.
You can see the data loaded in the sheet along with the latest Solution file rendered automatically and the Output Query Details as shown below:

The Solution Output Query Configuration table in the Configs (Configurations) sheet allows you to configure and retrieve Cloud Solution Output Data directly into the Excel by specifying the details such as Study, Model, Solution, Layout, and Sheet Name exclusively under the OUTPUT DATA tab. This allows you to edit the values in the Solution Output Query Configuration table and extract multiple Solutions’ Output Data (Up to ten) with a single click.

Refer to the below-mentioned column description:
To support this functionality, the PLEXOS Cloud panel incorporates the Add to Configuration Sheet and Extract All from Configuration Sheet buttons within the new Config Sheet Actions section in the OUTPUT DATA tab.
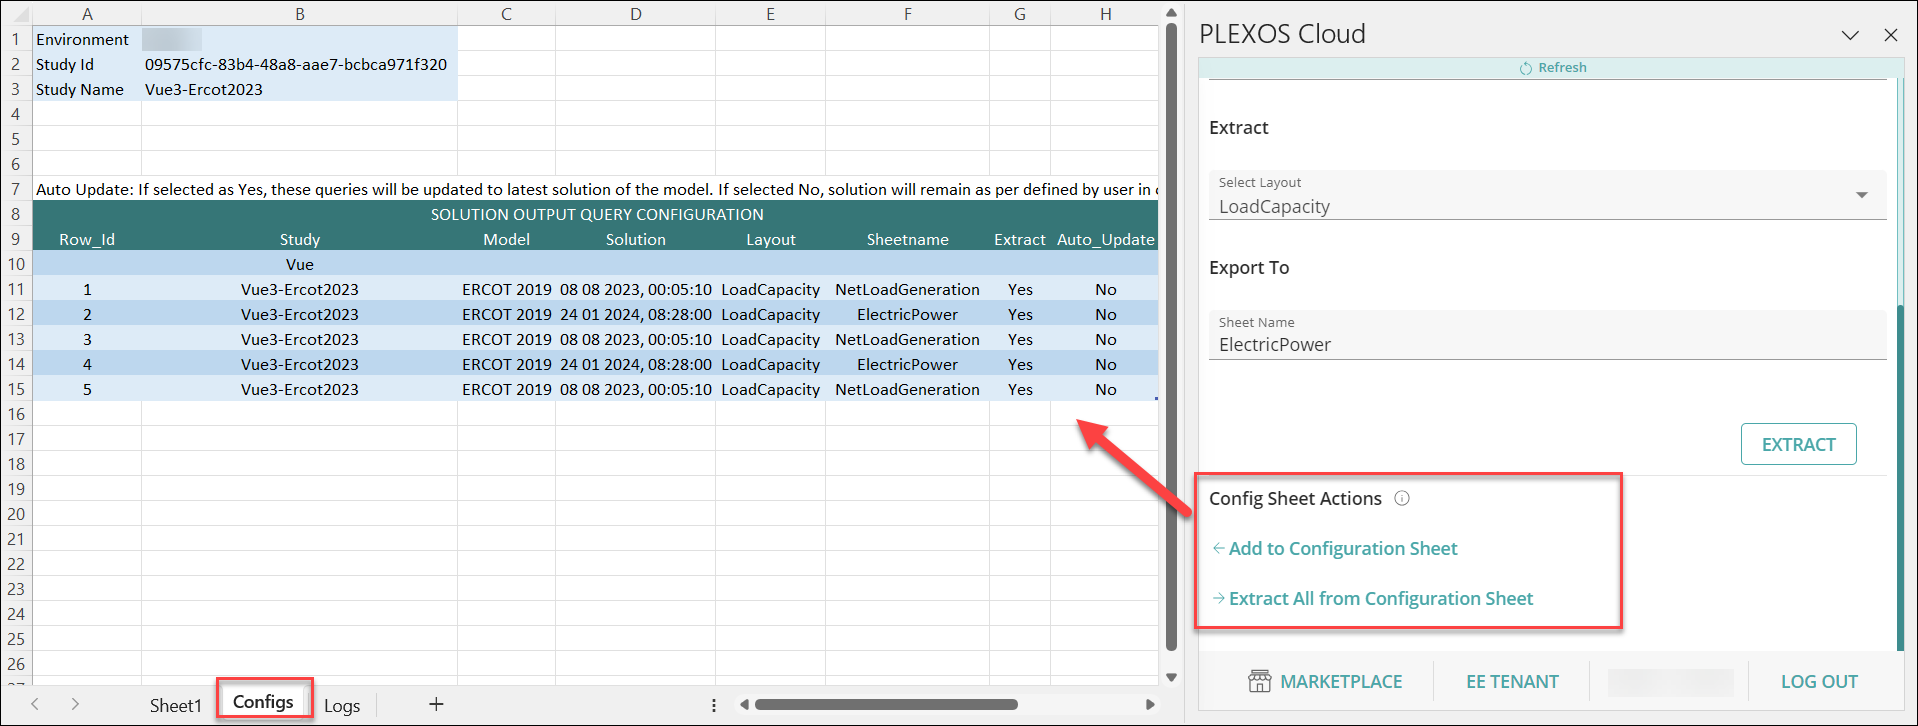
Perform the following steps to add and extract the Solution Output data from the Configuration table:


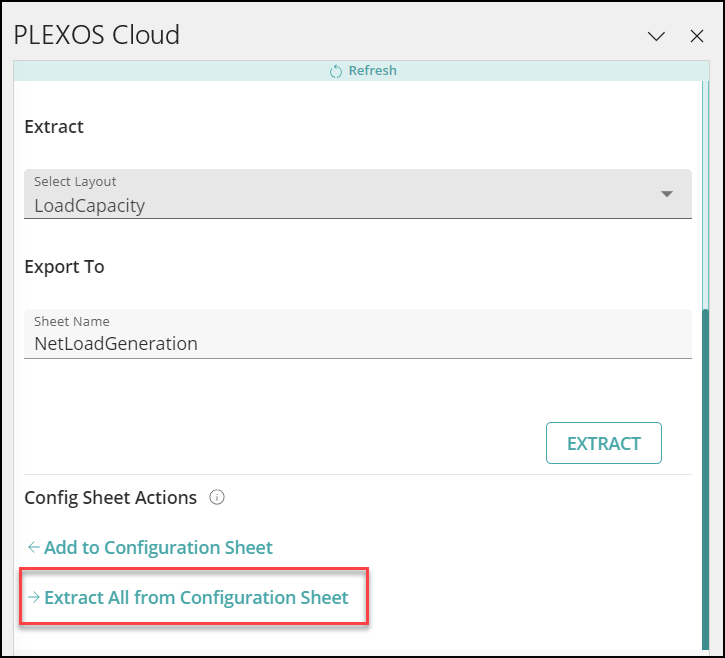

The Output Data tab includes separate options to extract Solution data:

The Excel Add-In includes study-agnostic behavior for the Output Query Configuration sheet, allowing you to retain and reuse diagnostic setups across different Studies without the need to rebuild the configuration table each time.
Refer to the following GIF for an example:
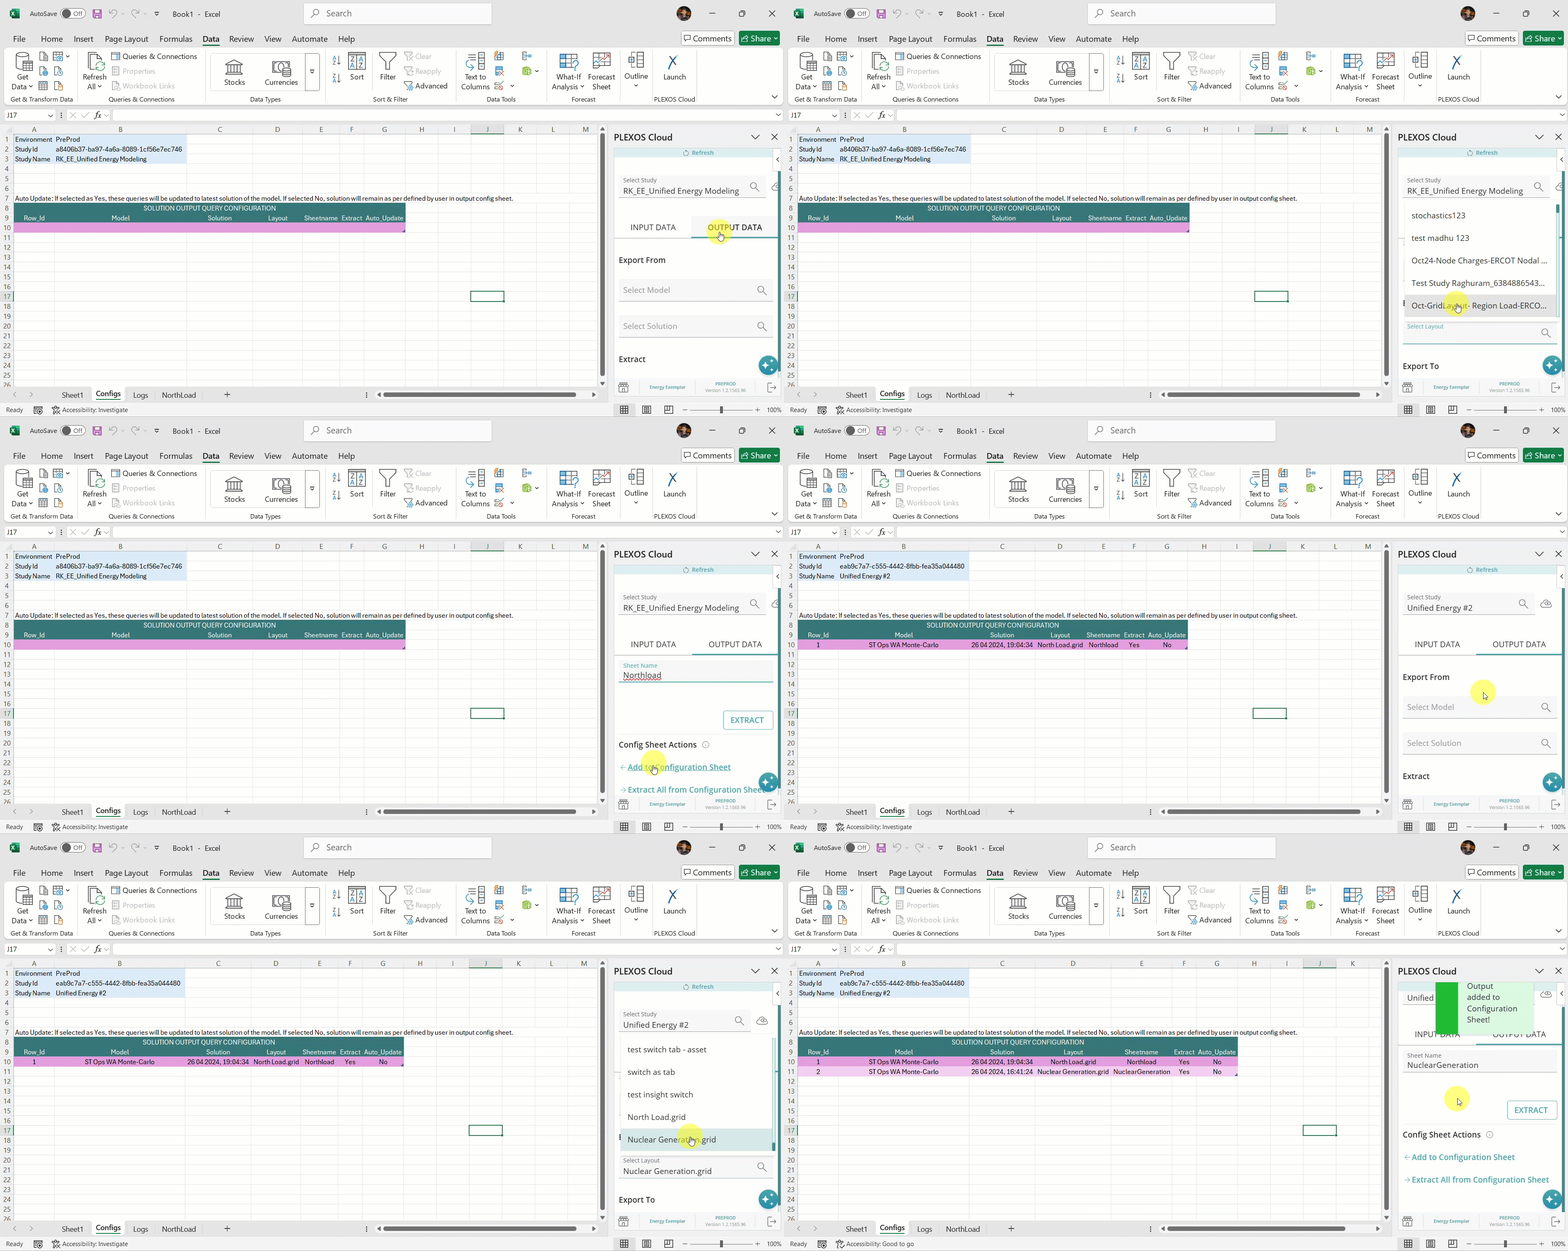
➤ Example
You configure the Output Query sheet to retrieve generation data for specific Generators in Study A.
When you switch to Study B, the Excel Add-In will:
This saves significant time by removing the need to manually recreate the configuration when analyzing different Studies.
The Excel Add-In enables you to view the Study Version and Commit Message associated with each Simulation Output directly within the spreadsheet interface. This information provides enhanced traceability and helps contextualize simulation results without needing to refer back to PLEXOS Cloud or configuration logs.
This visibility allows you to track version history and understand model changes directly within the Excel interface, without switching to PLEXOS Cloud or inspecting configuration logs. It simplifies auditing, debugging, and collaboration by surfacing this important data alongside your output data.
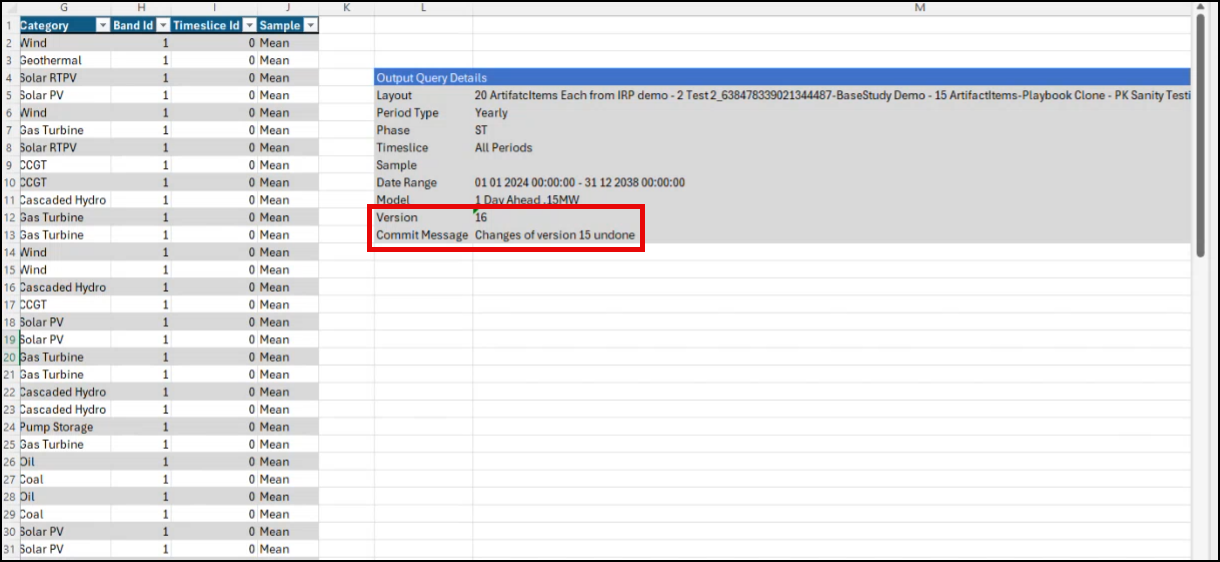
Improves traceability by clearly showing version and change context alongside each Solution.
Saves time by reducing the need to trace back changes from the PLEXOS Cloud manually.
Supports version comparison across multiple Solutions or Studies.
Excel Add-In allows users to edit the Category of a PLEXOS Object within a Model Database. Users can now also create new Categories to assign Objects to via the Add-in. The new Category column available in any Class sheet now shows a list of all Categories that are available for the ClassName you selected in the Template. This will make the data more precise for users and they can see the particular category data as required. Users can modify the Category values as required or create a new Category if it is not available in the dropdown list.
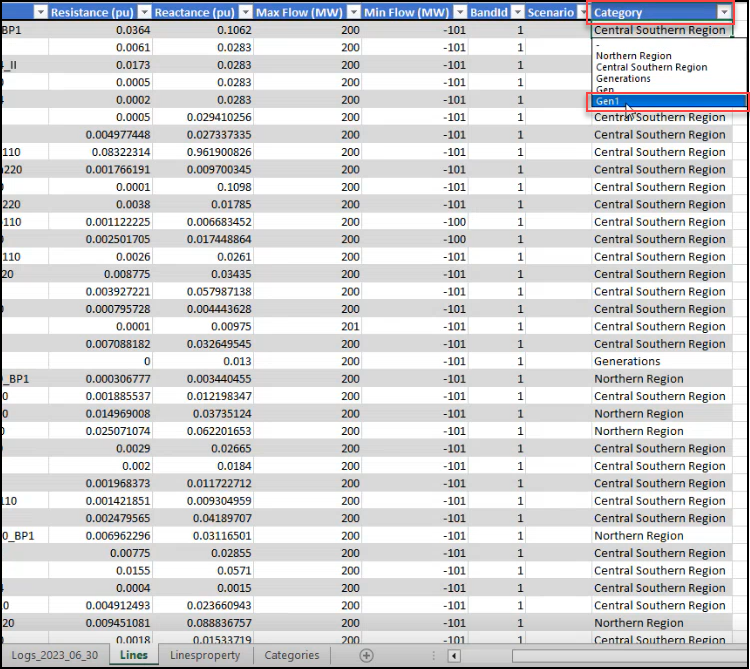
To create a new Category, follow the steps below:
1. In the Excel Add-In, navigate to the Template sheet and fill in the values below in a new row:
![]() NOTE: You don’t have to enter anything in the className and category columns because the Category column is not dependent on any Class and its categories to fetch the data.
NOTE: You don’t have to enter anything in the className and category columns because the Category column is not dependent on any Class and its categories to fetch the data.

2. Switch to the Schema sheet and enter the values as shown below:

3. Select the desired Study from the Select Study dropdown and click on the LOAD DATA button.
4. A new sheet is created with the sheetName you entered in the Template. “Category” for example in the screenshot below. It shows a list of Categories and ClassNames that have already been created for the selected Study.
![]() NOTE: You cannot make any edits to the existing values in both Category and ClassName Columns but you can add a new category.
NOTE: You cannot make any edits to the existing values in both Category and ClassName Columns but you can add a new category.

5. Add a new row and enter the desired Category name in the Category column.
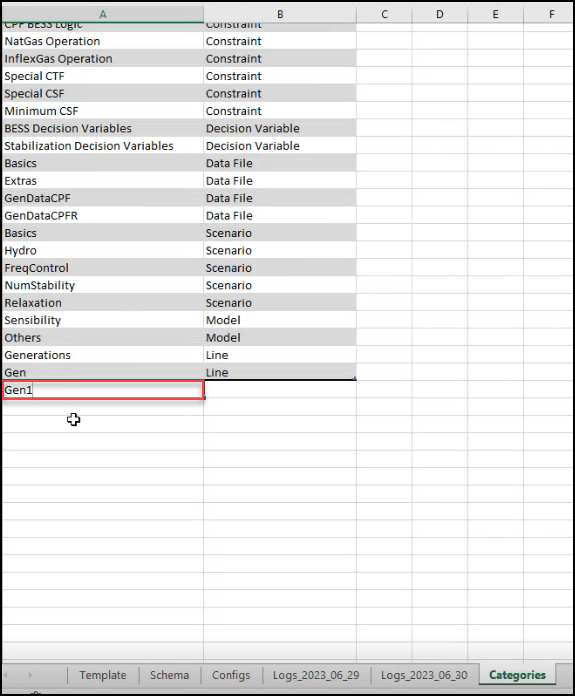
6. Click on the ClassName column dropdown and select the required Class from the available list. Click on the SAVE DATA button to continue.
![]() NOTE: The ClassName needs to match with the PLEXOS Classes and the drop-down helps the user in this scenario.
NOTE: The ClassName needs to match with the PLEXOS Classes and the drop-down helps the user in this scenario.
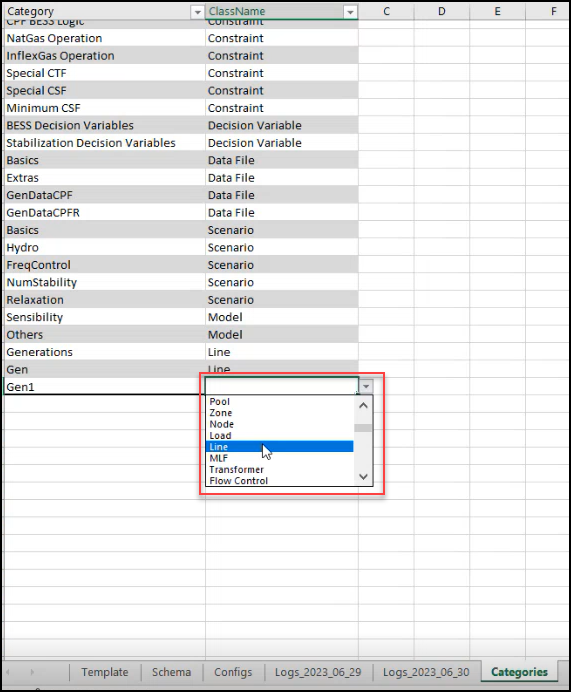
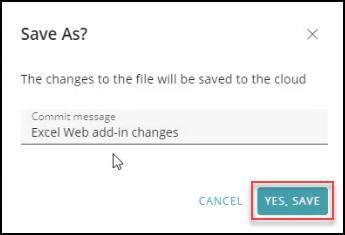
7. The Save As? dialog appears, you can enter the details of the change (short description) in the Commit message field. Click on the YES, SAVE button to continue.
8. You will see a new Category added to the Categories sheet.
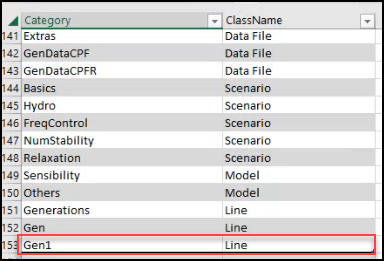
9. The newly created Category will be available in any ClassName sheet under the Category column dropdown for your selection.

The Excel Add-In supports you to add new Dynamic Properties to Studies directly within the interface. This simplifies Property management by allowing you to easily create and manage Dynamic Properties that vary over time directly in Excel. Thus, you eliminate the need to rely solely on the PLEXOS Desktop interface for variable demand or fuel prices. Refer the following sections to learn more about adding Dynamic Properties to an existing Object or new Object:
To add new dynamic Properties to your study using the ClassName {Property} sheet, perform the following steps:

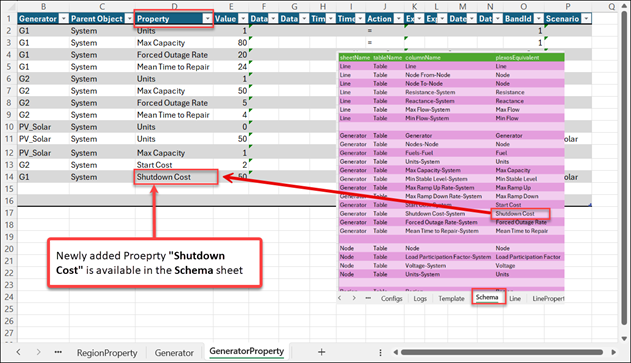


After saving the changes, the updated ClassName {Property} sheet reloads automatically. Refer to the following Errors section to identify different validation errors you may see while saving your changes.
You can create an Object using the ClassName sheet and add new Dynamic Properties for those Objects in the ClassName {Property} sheet using the following steps:

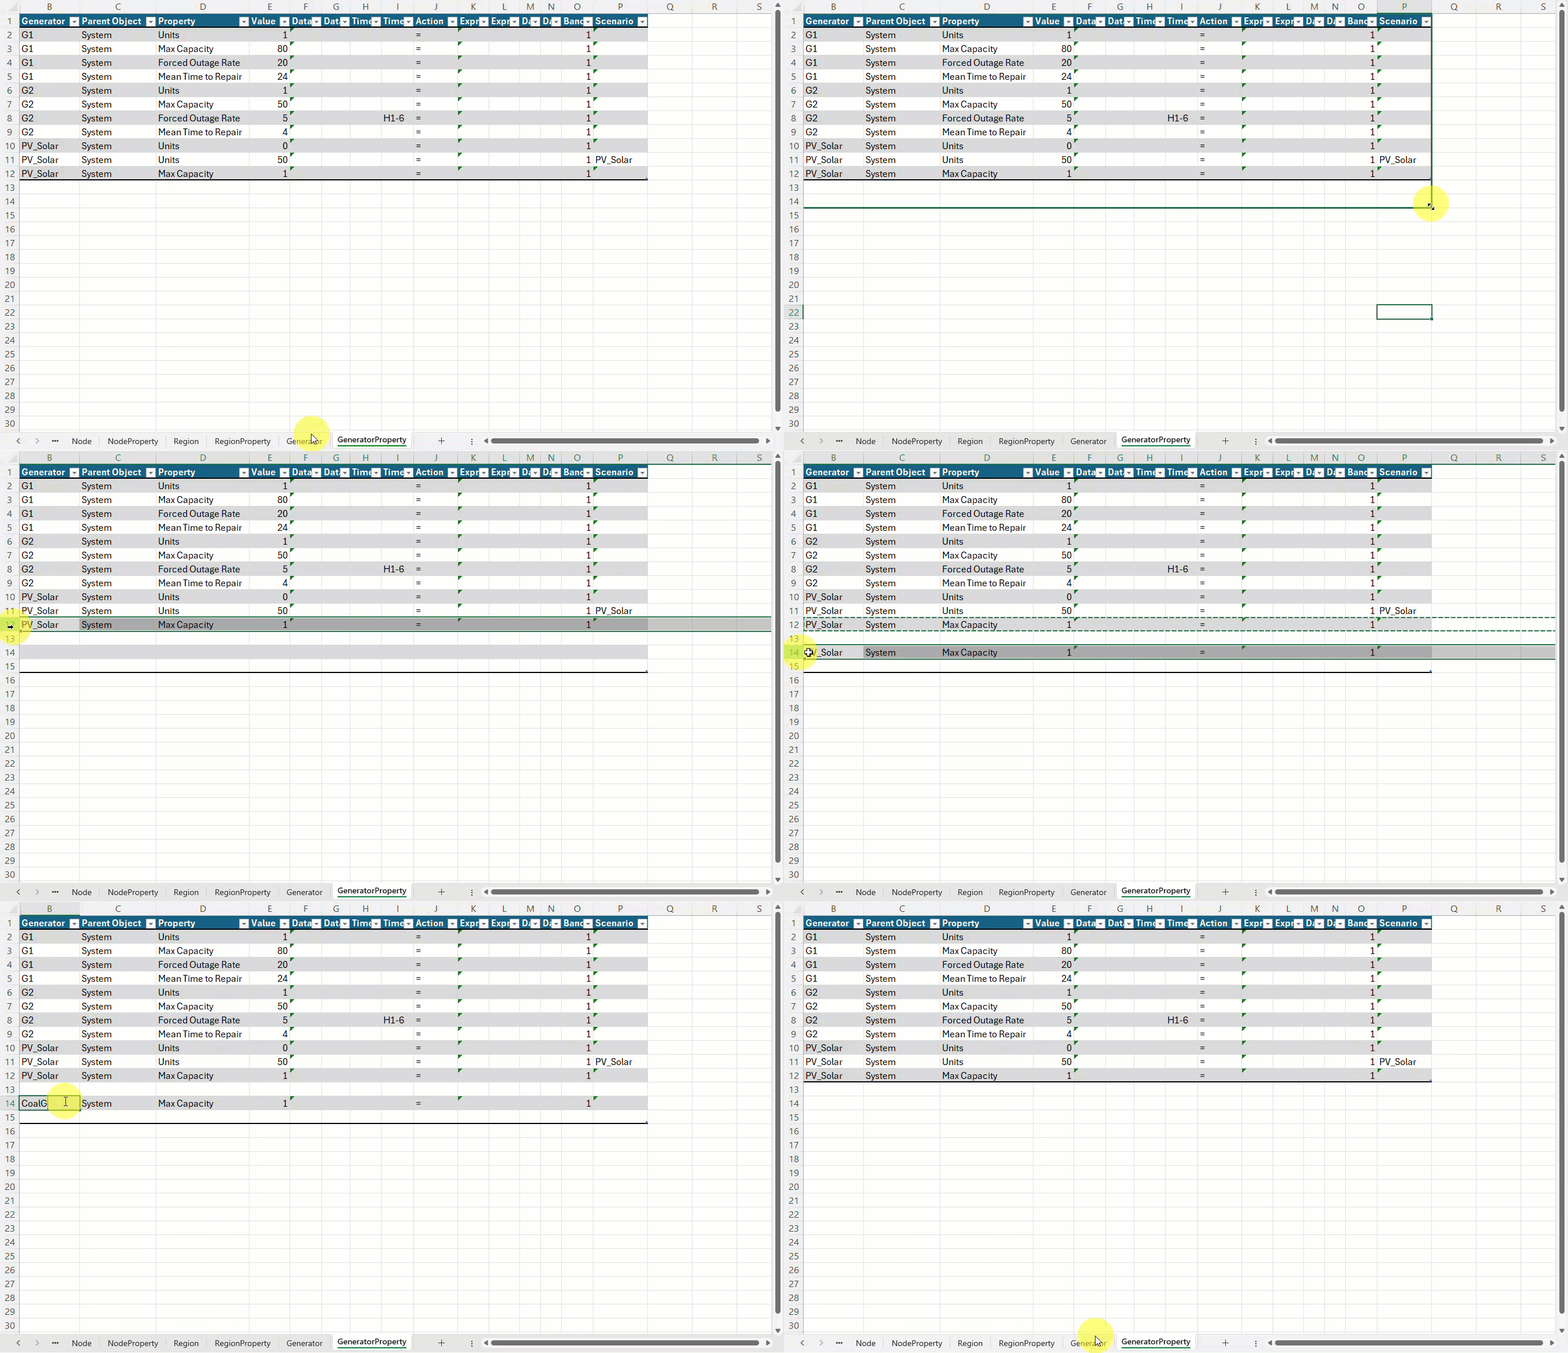
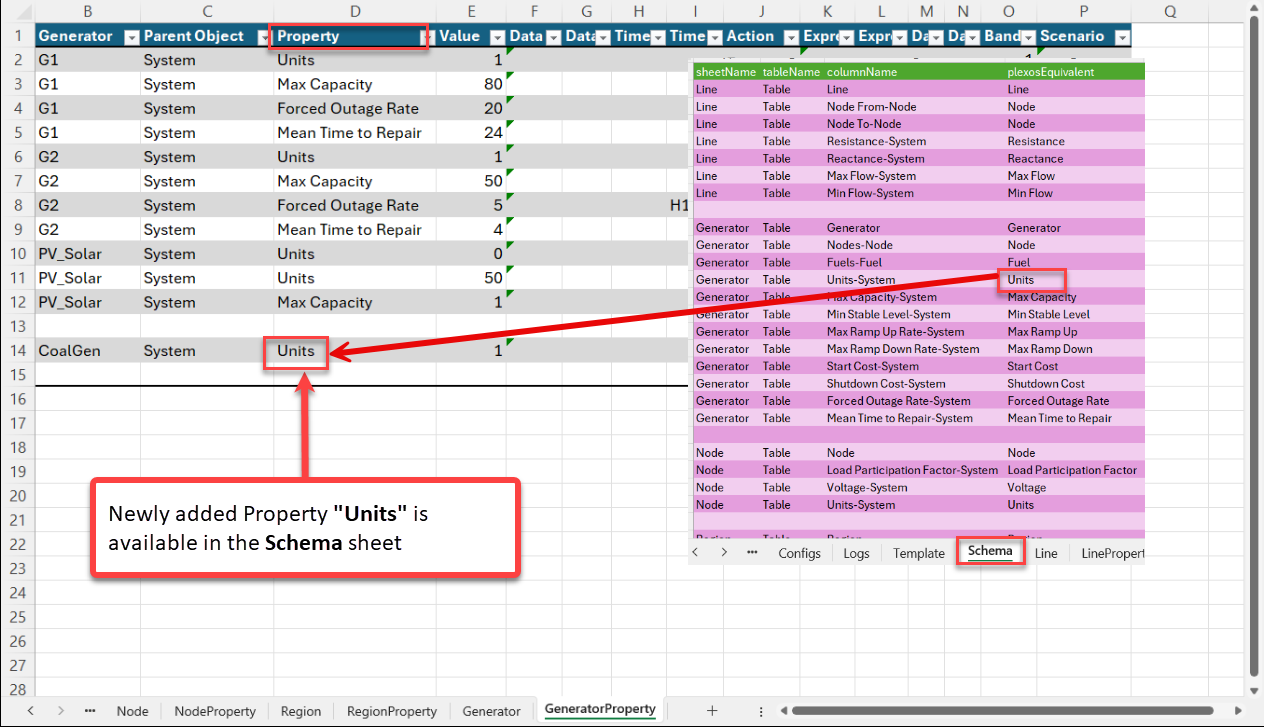


After saving the changes, the updated ClassName {Property} sheet reloads automatically.
The following errors may appear when adding new Dynamic Properties to the existing or new Objects:
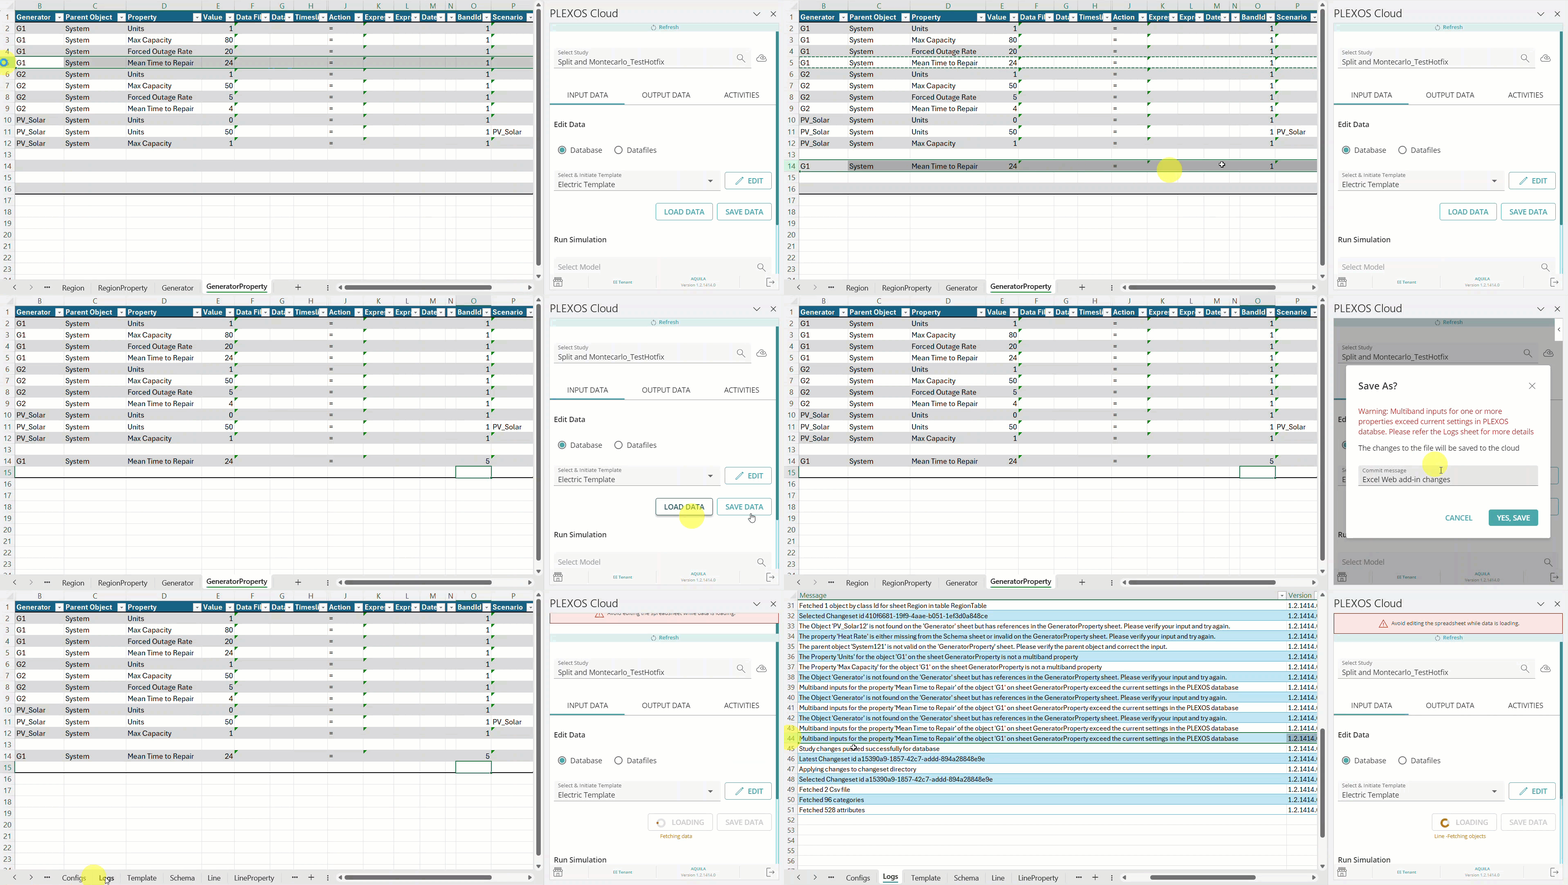
Entering any invalid value in the new row: An error message, “Validation errors detected. Please refer to the Logs sheet for more details and correct them before saving” appears. These errors are recorded in the Logs sheet for reference.
Following are some error messages you will notice in the Logs sheet when you try to save data with invalid entries:
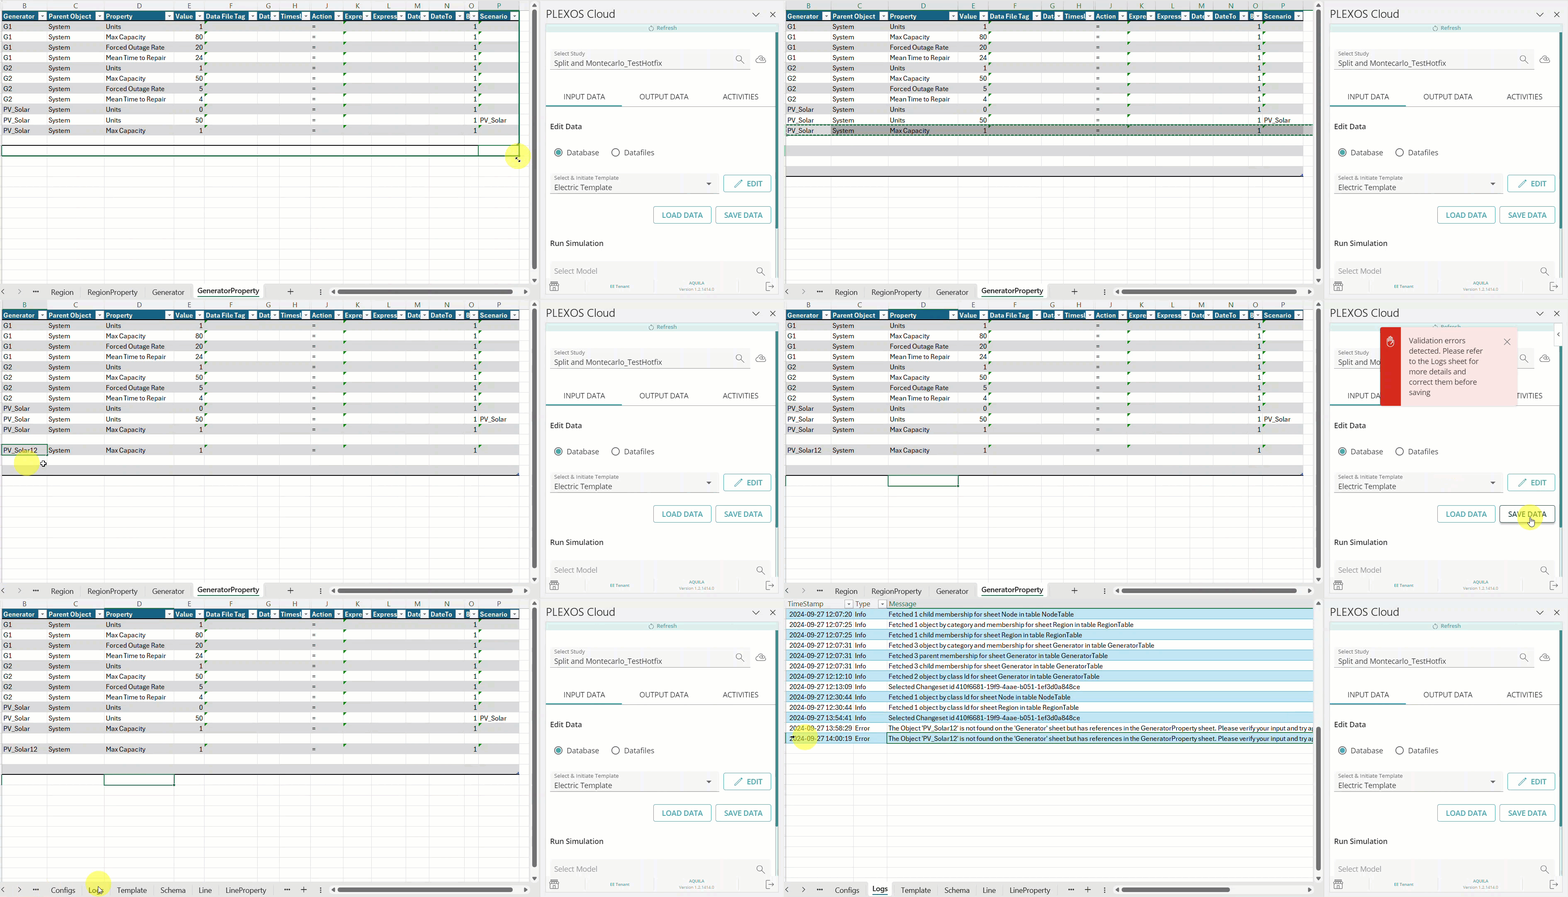



The Excel Add-In now provides support for tagging Scenario Objects to any Property data. The Scenario column in the {ClassName}Property sheet allows user-friendly editing of Scenarios, by providing a drop-down input with the list of available Scenarios.
Using the drop-down, the users can browse the available Scenario names and select, avoiding the need to remember names or accidentally enter an invalid name. Users previously had to enter Scenario Object names manually, so this improvement reduces the required keystrokes for users.

The Excel Add-In now provides Timeslice support for Timeslice Files for a Class property. The two new columns get created when data is loaded. Users can attach the Timeslice tag to any property in the Timeslice Tag column to identify variations and add the Timeslice path in the Timeslice Text column.
The Timeslice reference can be defined for a property using the Timeslice Tag and Timeslice Text columns. These columns are editable. Refer to the description of the columns below:

The Excel Add-In now provides Datafiles support for a Class property. The two new columns get created when data is loaded. Users can attach the Datafile tag to any property in the Datafile Tag column to identify variations and add the Datafile path in the Datafile Text column.
The Datafile reference can be defined for a Property using the Datafile Tag and Datafile Text columns. These columns are editable. Refer to the description of the columns below:
The updated Template format in the Excel Add-In allows users to view Dynamic properties along with Static properties in any [ClassName] Property Sheet. This will eliminate the need for users to specify Dynamic properties (those Properties with a Datafile, DateFrom, DateTo, Timeslice, or Scenario), as these will be automatically determined based on the PLEXOS input database.
Static and dynamic properties will be imported into tables in separate worksheets. Like PLEXOS Desktop, users can choose to specify the "allDynamic" flag in the Template configuration table, which will import all properties into a single worksheet using the dynamic property schema.

To view Dynamic Properties:
![]() NOTE: The user can specify the Property only in the Schema, and the property will be treated as Static or Dynamic based on:
NOTE: The user can specify the Property only in the Schema, and the property will be treated as Static or Dynamic based on:


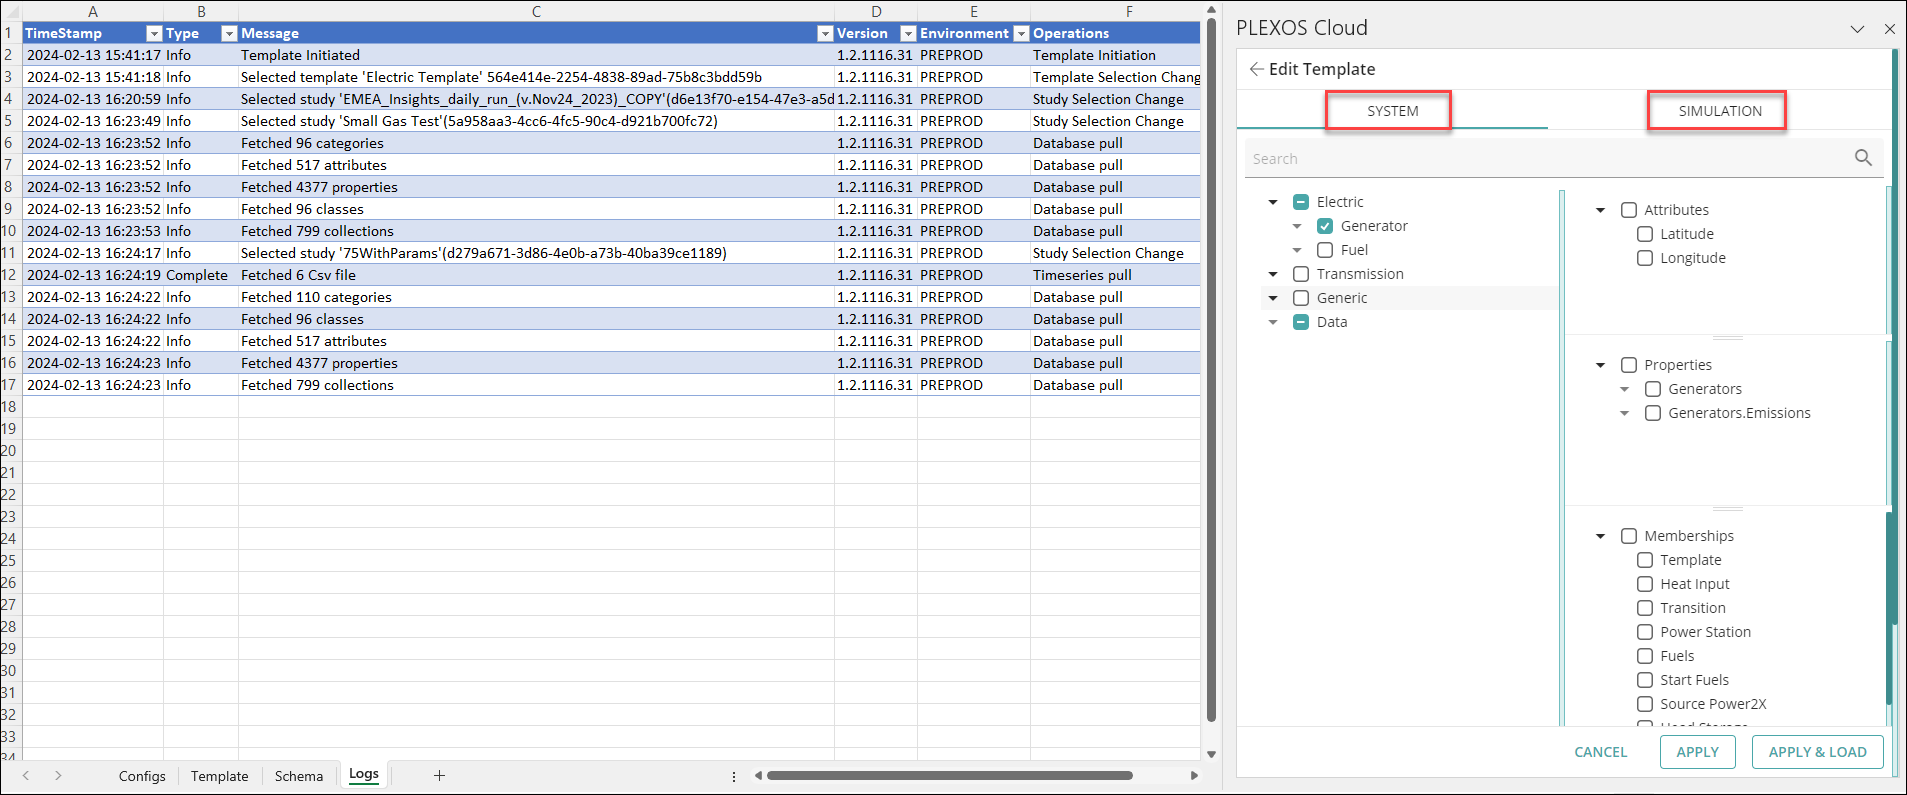
The Template Builder feature enables users to interactively create or modify a Template, defining various Classes and Properties to be synchronized for editing/updating within the Excel workbook.
This feature offers a user-friendly interface for constructing or editing Templates, given the extensive range of Classes and Properties that can be edited in a PLEXOS Model. Users can browse Classes, and select their Properties, Categories, Memberships, and Attributes to construct a Template that specifies the properties synchronized via the Excel Add-In.
Utilizing the Template Editor enhances the process of filtering, finding, and selecting the correct properties to include in a Schema, eliminating the potential for manual data input errors that can occur when manually editing the Template. This saves time and minimizes errors for users creating Templates for themselves or sharing them with their team.

Follow the steps below to Create or Modify a Template and Schema using the Template Builder:


The Excel Add-In supports filtering Membership data for multiple Classes and Objects. You can modify the Membership column in the Template or Schema sheet to tag one or more Classes and Objects, allowing you to fetch Membership data only for those specified. This enhancement is useful when working on a specific region and viewing data for particular Classes.
Previously, the Membership column defaulted to All, fetching data for all Memberships. Now, you can target Objects with Memberships associated with the specified Classes and their respective Objects, providing more focused and relevant data retrieval.
In the GIF below, we initially loaded data with the Membership value set to All, resulting in 43 Generator Objects from all Nodes. Now, If we wish to view the Membership data for specific Nodes, we will enter the Node information in the Membership column (e.g., Node.S1.S2.S3.S2_30.S4_230) and click the LOAD DATA button. As a result, we will see only 10 Generator Objects displayed. This functions as a filter, eliminating the need to manually filter the loaded data.

Users can perform the Input Data Editing and Synchronization for Memberships and Properties having one-to-many relationships between objects. This feature enhances Property Data and Membership editing by using the alternative data table format equivalent to PLEXOS Desktop to synchronize one-to-many relationships using Excel Add-In. Additionally, users can also specify these one-to-many relationships in the Template Builder.
To support this enhancement, a new column “Parent Object” was added to the Properties sheet for dynamic Input Properties to identify the Parent of the Properties with one-to-many relationships for each Object in the Class. Previously, Property Data Synchronization was available only for Memberships having one-to-one relationships between Objects. Now, with the introduction of the "Parent Object" column in the Properties sheet, users gain the ability to edit Property Data for one-to-many relationships in the Property sheets of Excel Add-In, which displays data in a dedicated worksheet for both Static and Dynamic Properties.
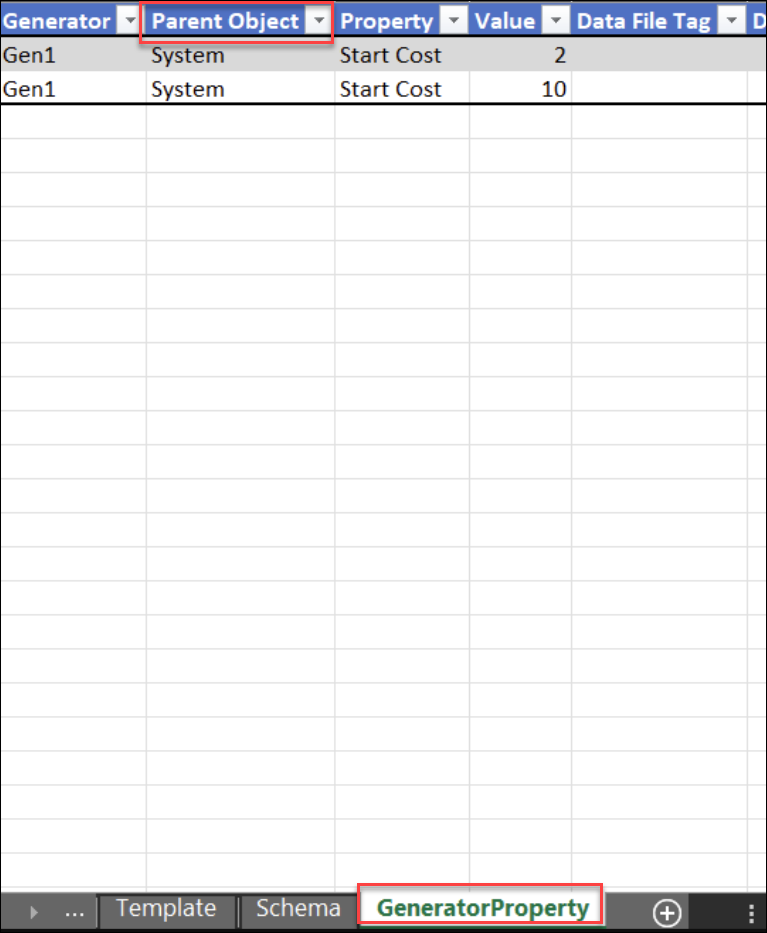
A new {ParentClass}{ChildClass} sheet will be created when a user enters any Membership having a one-to-many relationship. In the table shown below, the value specified as "1" denotes a relationship between the Objects.
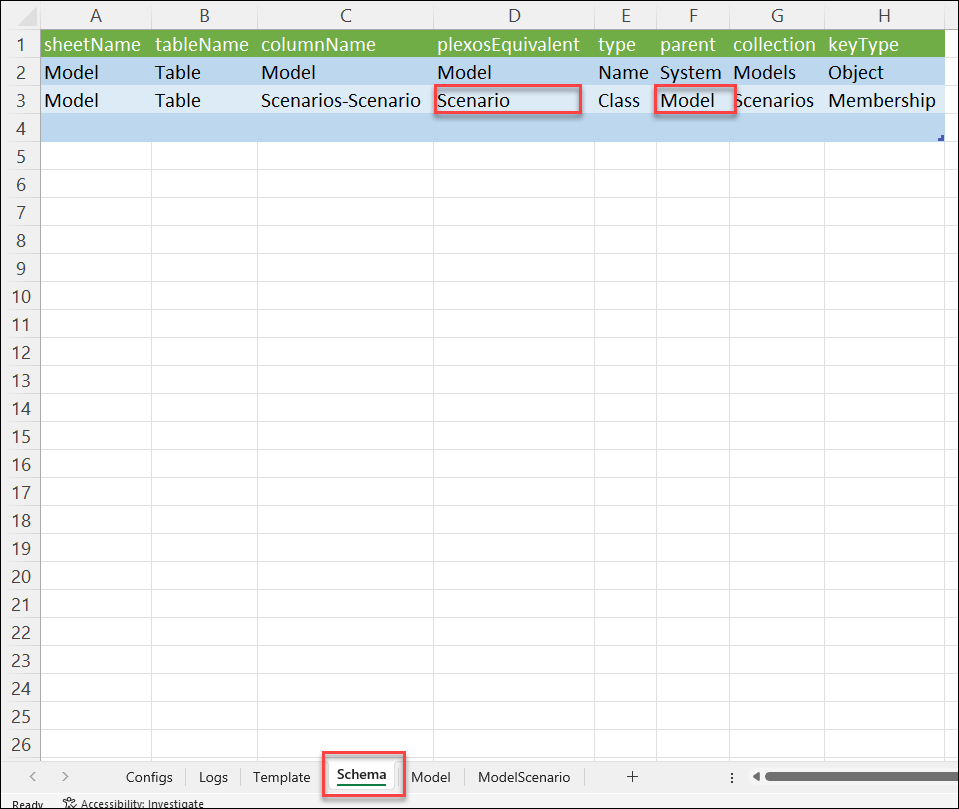

The Excel Add-In now supports flexible view options for displaying One to Many Memberships in either Matrix or List format. When working with a Model containing One to Many Memberships, you can choose to view the data in Matrix format (default) or switch to a List format by adjusting settings in the Schema sheet. In the following example (GIF), the Model and Scenario have One to Many Memberships that are being viewed in both Matrix and List format:
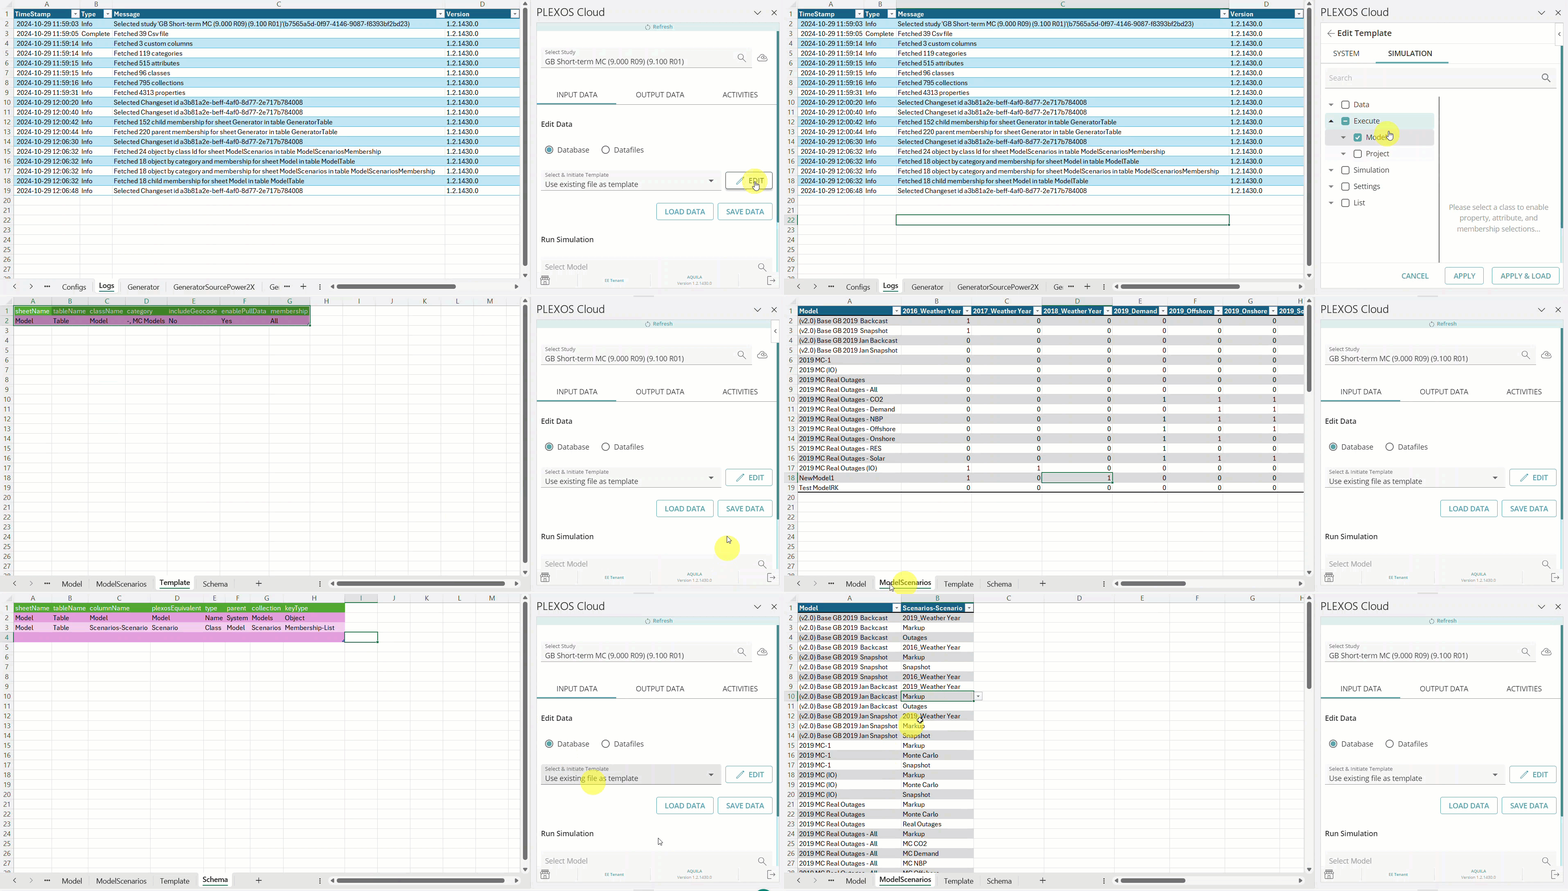
Whereas, in the following example (GIF), the Generator and Fuel have One to Many Memberships that are shown in List format:

The new Formula Persistence in Excel Add-In ensures that the worksheet formula and references to cells and ranges in synchronized worksheets are not broken during a page refresh when a user clicks the LOAD button. This helps users to define Model Inputs and Datafiles using Excel's calculations, Modeling, and Analytics. It enables the utilization of outputs from these calculations as inputs or datafiles for their PLEXOS Model, creating a seamless and efficient workflow. Using worksheets synchronized to Model Solutions, users can create reports using Excel’s built-in data analysis tools, such as formulas, charts, and PivotTables to generate insights from PLEXOS solutions. These can automatically be refreshed when Models are updated and Run again.
Additionally, the Schema sheet now allows users to specify write-only data, calculated in PLEXOS that are to be pushed to the PLEXOS Model and prevents accidental deletion of formulas in worksheets that are used to determine PLEXOS parameter values. See the GIF shown below for more understanding:
The Formula Persistence for Output Data ensures the integrity of links to worksheets containing PLEXOS Model data during updates.
When a user creates Graphs, Charts, or Tables based on Simulation results using formulas, and provide references of the Output Sheet in their sheet to persist the value of that field upon refresh on the Output Sheet.
Custom columns are added to the Object grid in the PLEXOS Databases to store additional information or unique identifiers for each object. The Excel Add-In allows you to view and interact with these custom columns within the PLEXOS database, making it easier to map and manage various objects like generators and more using unique identifiers such as the EIA Plant/Gen ID. This feature enables seamless tracking of unique attributes for various objects, such as generators, directly in Excel, making it easier to view, interact with, and map these custom data points within your workflows.
To retrieve custom column data via the Excel Add-In, you need to provide the following inputs in the Schema sheet:
For example, if your PLEXOS Database has EIA Plant ID as a Custom Column, you need to provide the following highlighted inputs:


Click on the Load Data to fetch the relevant information.

If any incorrect data is provided for custom columns, the data will not load, and an error message will appear in the logs sheet for troubleshooting.

The Excel Add-In supports editing the DateFrom and ChronoDateFrom fields for Horizon objects. These attributes define the start of the simulation horizon and can be directly configured within the spreadsheet environment.
These attributes define the start of the Simulation horizon:
These fields are editable within the Input Data tab. When values are entered, they are recognized and automatically formatted as valid dates by the Add-In.

![]() NOTE: When updating the DateFrom and ChronoDateFrom values, ensure that the Chronological Horizon (ST) remains a subset of the Planning Horizon. Misalignment between these may lead to simulation errors.
NOTE: When updating the DateFrom and ChronoDateFrom values, ensure that the Chronological Horizon (ST) remains a subset of the Planning Horizon. Misalignment between these may lead to simulation errors.
The PLEXOS Cloud Excel Add-In supports background data loading for both input and output operations, allowing you to remain on your active worksheet while data loads in the background.

This eliminates unnecessary screen shifts, improves focus, and boosts productivity, especially for users managing multiple configurations or working with large simulation datasets.