Table Selection (Reporting)
This window provides table selection options for output databases and uniform reporting information for each report type across all the time period options. The output database contains all the selected reporting information for the study.
Use these links to access more information about the Table Selection form.
Output Reporting Options
The lower section of the Output window contains an interactive group of settings used to select the output tables and time periods for output reports.
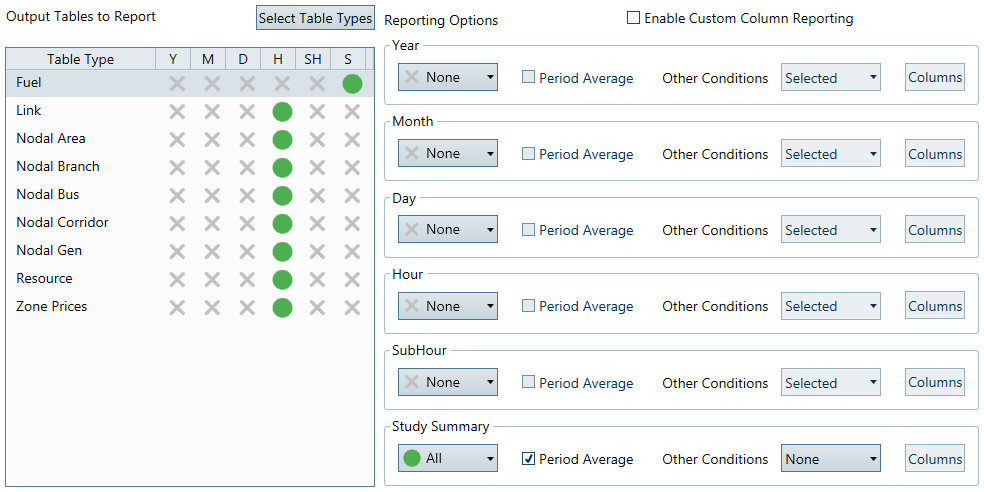
Output Tables to Report
The left-hand region shows the output table types selected for reporting. To select/deselect the table types click on the Select Table Types button, which will launch a new window used to select tables for display.
Reporting Options
Then, click on a table in the display to select it and use the Reporting Options area to further refine which time periods and other criteria for your output database tables.
|
|
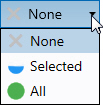
Select to ReportThis dropdown selects the time period for reporting.
To quickly make these selections for ALL time periods of a table type, use the right-click menu by clicking on the table name to select it, then choosing from the options similar to the ones listed above.
|
|
|
Period AverageIf this switch is selected, Aurora will report the average for the given time period. |
|
|
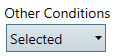
Other ConditionsAurora will report results for conditions listed in the Conditions Table. As with Select to Report above, Selected will report only those conditions that have been selected in the Report Column of the Conditions Table, whereas All will report all conditions from the Conditions table. The None option is typically only used when Period Average has been selected. |
|
|
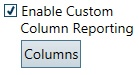
Enable Custom Column ReportingThis switch and the accompanying buttons for each time period are used to limit the amount of reporting by selecting only the desired columns for output. See Custom Columns for more information. |

Custom Columns
Custom Column reporting provides additional options for some output table types. It is especially useful in reducing output database size and model run time. Custom Column settings are saved in the project file (.apz).
Follow these steps to use Custom Columns:
-
Select the checkbox to Enable Custom Column Reporting. This activates the period-level column selector buttons.
-
Select the output Table Type from the list of tables found on the left. Click on a table in the list to edit desired output columns in Column settings.
-
Click the Columns button for the desired time period. Note the time period must first be Selected for reporting.
-
A box will pop-up with a list of available columns, with all columns selected by default. Uncheck the ones you are not interested in, or use the Clear All button and just select the ones you want.
-
Click Copy Selections to All Time Periods to apply the selection in bulk to other time periods.
-
Click OK and run the simulation.
![]() NOTE: When using the Write Multiple Simulations to the Database option in the Reporting folder of Simulation Options, the same column settings must be selected for each subsequent run. For example, an error will occur if default settings are used in the first run and a custom column set is used for the second run. In addition, an error will occur if new columns have been added to the output database tables after a Custom Column has been defined for a table. This may happen when Energy Exemplar includes additional reporting in patches or new release versions of Aurora. Custom Column settings will need to be redefined in this instance.
NOTE: When using the Write Multiple Simulations to the Database option in the Reporting folder of Simulation Options, the same column settings must be selected for each subsequent run. For example, an error will occur if default settings are used in the first run and a custom column set is used for the second run. In addition, an error will occur if new columns have been added to the output database tables after a Custom Column has been defined for a table. This may happen when Energy Exemplar includes additional reporting in patches or new release versions of Aurora. Custom Column settings will need to be redefined in this instance.
Custom Columns can also be setup and applied thru Scripting, using the CreateCustColSet, SetCustomCols, and LoadTemplate AURORA Commands and the SetDataItemRow AURORA Datasets.
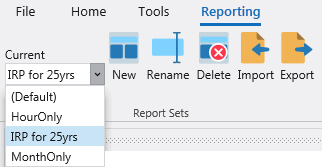
Report Sets
Report Sets are accessed via the ribbon toolbar on the Reporting window and are useful for creating various custom reporting that can be quickly and easily changed in a project, or shared with other projects.
|
|
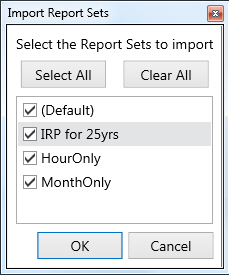
CurrentThe Current dropdown selector is used to choose which Report Set will be used for the simulation. Changes to the Report Sets are saved upon project save. NewThe New button is used to create a new Report Set from the active (currently selected) set. It basically makes a copy of the current Report Set, asks for a new name, and then makes it active for further editing. RenameThe Rename button is used to rename the current/selected Report Set. DeleteThe Delete button is used to delete the current/selected Report Set from the project. There is no undo for this action. ImportThe Import button is used to import custom Report Set from the Aurora ReportSet File (.arp) after it has been exported from a project (below).
ExportThe Export button is used to save selected custom Report Sets in an external Aurora ReportSet File (.arp) for ease of sharing with other projects or Aurora users. |
![]() Table Selection
Table Selection