PLEXOS User Interface Guide Chapter 5
Contents
- Objects
- Categories
- Memberships
- Lists
- Templates
- Properties
- System vs Second-level Properties
- Data Fill Tools
- Timeslice Editor
- Data Files
- Variables
- Scenarios
- The System Object
1. Objects
Objects are the fundamental building blocks of a PLEXOS model. All power system elements like generators and transmission lines are objects, as are more abstract elements such as data scenarios and options.
There are multiple ways to create new objects:
- Enter the name of the new object in the Objects grid.
- Paste a list of names into the data grid in the Objects grid.
- Use the New Object command in the context menu of system collections.
- Import objects from external text files: see the Import and Export PLEXOS help article.
- Select the system collection (folder in the Main tree) for the type of object(s) you wish to create. For example, click the Generators collection to create a Generator.
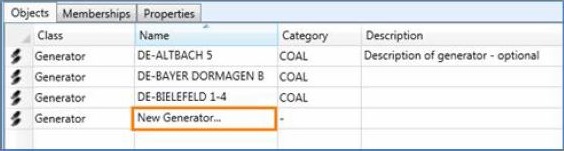
- Select the Objects tab in the data grid.
- Type a name for the new object, and optionally a category and description.
Paste a list of objects
If the objects are all the same class:
- Prepare the list of object names (must be unique names) in a program like Excel.
- Copy the list of names to the clipboard.
- In the System or Simulation tree select the class of objects you want to paste. Generators, for example.
- On the Objects Grid, highlight the Name cell of the New Record row (the last row of the grid). Note the cell must be highlighted but not in edit mode.
- Paste the contents of the clipboard by clicking Paste in the Ribbon or pressing Ctrl+V on the keyboard, You will be prompted to confirm the operation.
Note: You can also paste the object category name at the same time as the object name as long as you have defined the categories first: see Categories.
If the objects are of different classes:
- Prepare the list of object classes and names in a program like Excel.
- Copy the list of classes and names to the clipboard.
- In the System tree select the System object.
- Select the Objects Grid.
- Select the Class and Name cells in the New Record row: make sure you highlight both cells together by dragging across both with the left mouse button pressed.
- Paste the contents of the clipboard.
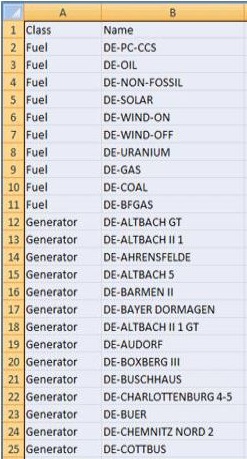 Excel, defining both Class and Object Name
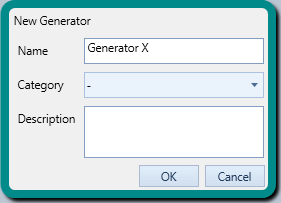
Create an Object Using the New Object Dialog
Follow these steps to create an object using the New Object Dialog:
- Click the right mouse button on the appropriate system collection in the primary tree. The Generators collection, for example.
- Select "New [Object Name]...". For example, "New Generator...".
- In the dialog that appears, enter a name for the new object, and optionally select a category and enter a description. Then click OK.
The object will be created in the database and the common object properties window will appear. This window is common to objects of all classes except simulation settings.
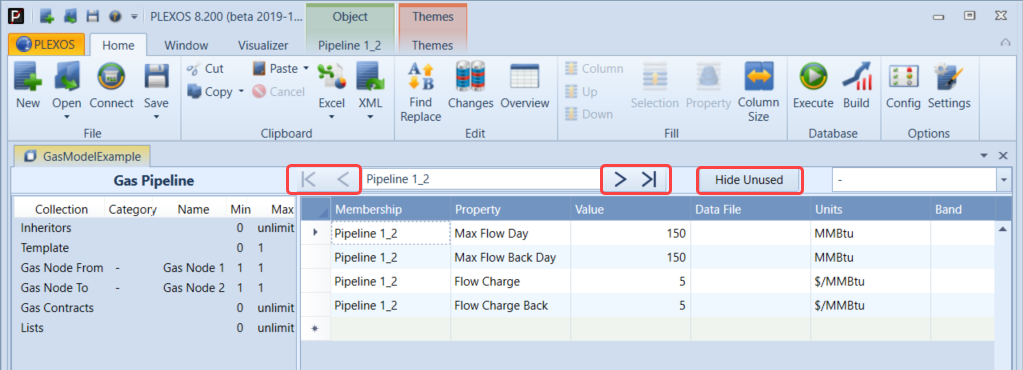
The common object properties window has two lists: Memberships and Properties.
Lists the collections available and all memberships defined on the object. You get one entry here per membership or one 'blank' line if the collection is empty. This allows you to quickly review the memberships for the object. Note that if a required membership is missing the text "missing" appears next to the collection name. You can double-click any collection/membership to add/remove memberships.
PropertiesLists all of the static and dynamic properties that have been activated for this class of object. If a property value has not been set for the object then the value cell is empty. You can edit the values directly in this grid.
The properties window has "Next" and "Previous" buttons to cycle through the objects in the class. You can also use Ctrl+Right, Ctrl+Left, Ctrl+Up and Ctrl+Down cursor keys to navigate through the objects right, left, first and last.
The "Hide Unused" button hides all unused properties (where the value is not set) and unused memberships (where there is no child for the membership collection) for the current object.
Import data from an external file
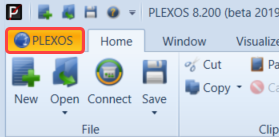
To import data from an external file, select the Import command from the Backstage (File tab):
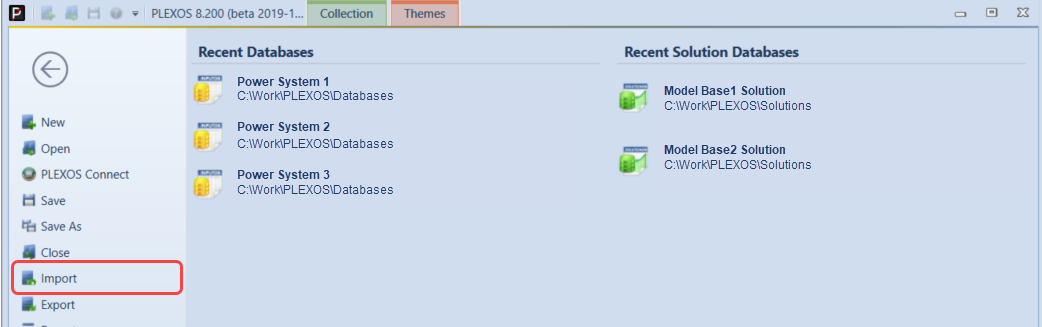
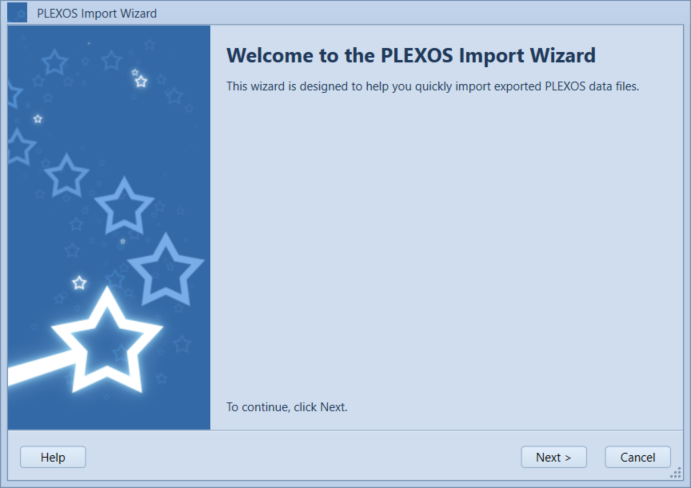
This will bring up the PLEXOS Import Wizard. Follow the instructions to quickly import data files in compatible formats. For more details refer to the Import and Export PLEXOS help article.
2. Categories
Grouping objects into categories improves ease of navigation in the tree view of objects in both input and solution databases. Note that categories are also used in the Solution Viewer when running aggregate queries on data. All classes of objects can be categorized.
Note: The categorization of objects does not affect the way the objects are formulated in the simulation; it is purely an organizational tool. However, it will result in the order of objects being read differently, and this can affect the generation of random seeds for modelling, such as the forced outages of Generators. If you want to be able to re-order, or add/ remove objects without affecting the random seeds, set the individual random seed properties of objects like Generator and Line. For example, Generator [Random Number Seed].
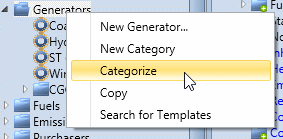
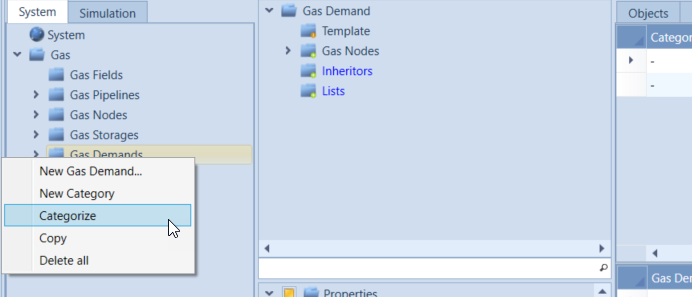
To create and edit categories, select the Categorize command from the pop-up menu of the collection of objects. For example, to categorize your generators right-click the [Generators] collection in the System tree.
This opens the Categorize Window. From this window you can:
- Add, delete, or rename categories
- Change the order that categories appear in the tree
- Change the assignment of objects to categories
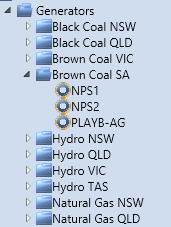
Once the categories are defined and objects have been assigned to those categories the System and Simulation trees will display your objects inside the categories, showing the categories as folders. The categories are used throughout the interface by PLEXOS to organize your objects, and they are passed through to the solution database. Objects inside the categories are always sorted in alphabetical order, whereas the categories display in the order you define in the Categorize Window.
Categorize Window
To open the categorize window, right-click anywhere within the objects tree and select Categorize.
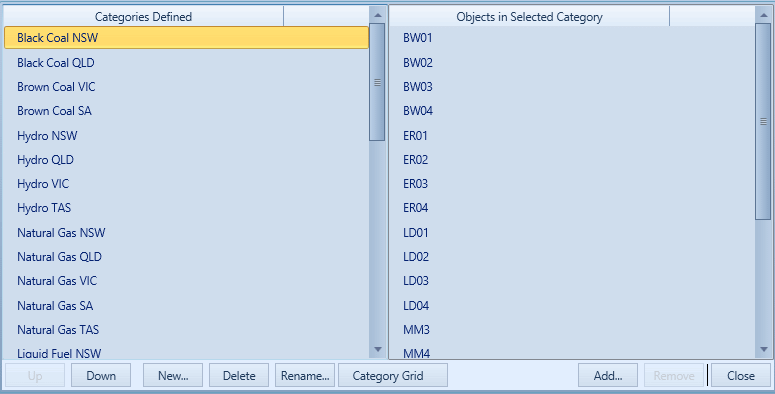
The categorize window consists of two lists. Categories Defined is on the left and Objects in Selected Category is on the right. Along the bottom of the window are various operations that can be performed on categories and objects within those categories. There is also a "Category Grid" button which opens a grid, allowing you to make bulk changes to the categories across the whole database.
 Basic Operations on the categories fora particular class.
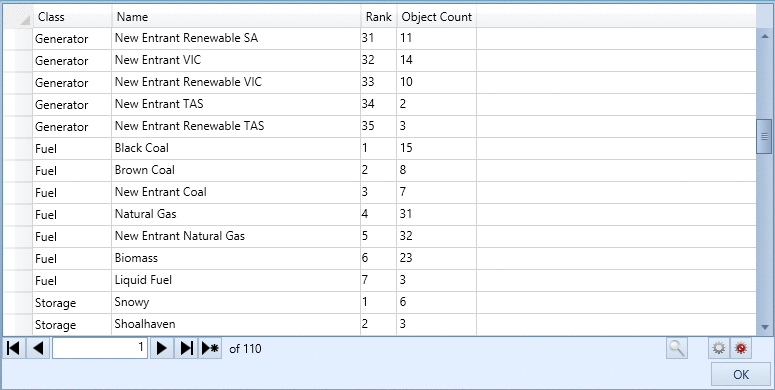 Bulk operations on the categories for the whole database
3. Memberships
Memberships are the method used to define functional and logical relationships between objects.
Memberships always involve two objects:
- A parent object
- A child object
For example, a generator can burn one or more fuels and each such relationship is stored as the membership of the Fuel in the Generator [Fuel] collection. However, this is not enough information to uniquely identify the relationship; hence we also require a collection name. For example Generators and Fuels can be related in two ways (Generator [Fuel] and Generator [Start Fuels]) so we must also specify the collection name when defining a membership.
Hence each membership (relationship) is uniquely defined by using three fields:
- Collection
- Parent Name
- Child Name
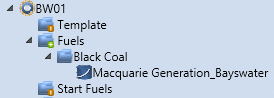
For example, the Generator "BW01" is defined as using the Fuel "Macquarie Generation_Bayswater" as follows:
- Collection = Generator.Fuels
- Parent Name = BW01
- Child Name = Macquarie Generation_Bayswater
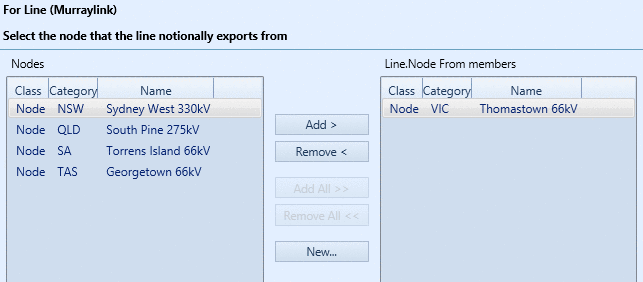
Most memberships have a natural complement. For example, as shown in the image below, "BW01" belonging to the [Generators] collection of the Fuel "Macquarie Generation_Bayswater" is the complement of the above membership. In the PLEXOS database, memberships are stored only once, but can be viewed/created/edited in either direction in the interface. Membership complements are shown in blue in the trees.
Colour Codes of the Membership Tree
The Membership Tree uses four colour codes to distinguish different qualities of the memberships displayed:
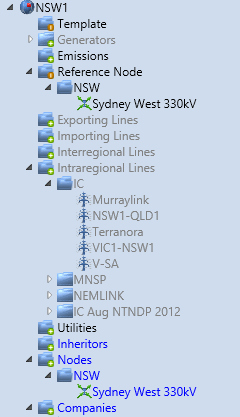
Black
This is the membership displayed the same way it is stored in the database. For example, Generator Fuels is the 'direction' this type of membership is stored in.
BlueA complement of a membership. For example, Fuel Generator meaning that the membership is actually stored in the other direction to that shown. You can add/remove etc. complements exactly as if they were normal memberships, so this distinction is only relevant for those automating the production of a PLEXOS input file external to the GUI.
RedThis type of membership, such as a Generator Node, is required to have at least one member.
GreyThis is not a membership defined directly by data, but one that PLEXOS has inferred from other memberships. for example, Region Generator is implied by the combination of Node Region and Generator Node. These inferred memberships are informational only and cannot be created/edited directly, but they are particularly useful in the solution view.
Creating New Memberships
There are multiple ways to create new memberships:
- Memberships can be defined directly in the Memberships grid either by adding rows using the dropdown lists or by pasting a list of memberships.
- Memberships can be created using drag-and-drop.
- Memberships can be created and amended using the Memberships Editor.
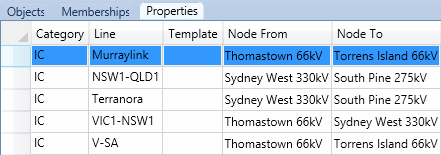
Certain one-to-one memberships, such as the Region that a Node belongs to or the Line [Node From] and [Node To] memberships, can be edited directly in the static grid of the Properties tab. This convenient input method is not available for all memberships such as Generator to Node, which is allowed to be one-to-many and thus cannot be displayed in the static grid.
Memberships that are one-to-many must be created using one of the other methods described below.
Creating Memberships in the Memberships Grid
To create a membership directly in the Memberships grid, select the Collection, the Parent Name and the Child Name from the respective drop-down box.
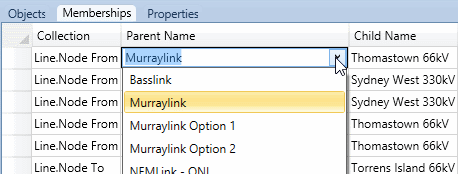
Note that you need only select the parent or child in the membership if you first select an object in the Main tree, and collection in the Memberships tree. You may also paste a list of memberships into this grid just as you can to create objects.
Creating Memberships by drag-and-dropTo create memberships just drag-and-drop objects from the Object tree into the collections of the Membership tree. For example, to add a Fuel to a Generator's [Fuels] collection, first make sure the Fuel object is visible, then select the Generator so the Membership tree shows its collections. Then drag the Fuel object from the System tree onto the Memberships tree and on to the [Fuels] collection of the Generator object.
Tip: You can drag-and-drop inside the System tree itself. Simply pick up the object you want to add and drag it onto the object you want to add it to. If the object is not visible then you can hover over the folder containing it for a few seconds until it opens automatically. Note that if there are multiple collections that contain the type of object you are dragging, PLEXOS will pick the first in the list, so you might need to check which collection the object was added to.
Membership EditorThe membership editor is the primary and most convenient/powerful way of editing memberships. You can use the Add/Remove buttons to create/delete memberships in the database. To access the Membership editor you can either double-click the collection you want to edit from the Memberships tree or choose the Memberships command from the right-click menu for the collection. You can also access the editor from the common object property form by double-clicking the membership you want to edit.
You can use the New command to create a new child object and add it to the collection all in one action.
There are also commands available on the right mouse button click, including Copy which will, in one action, copy the selected object to a new name and add it as a membership.
Membership collections in the Membership tree are identified as One to One or One to Many by their icon. One to One has an orange dot in the lower right corner of the folder, and One to Many has a green dot in the lower right corner, as shown in the image below.
Collections which may be switched between One to One and One to Many will have the option to do so in the Context Ribbon and Context Menu. Switching from One to Many to One to One may prompt you, warning that membership data will be trimmed back for the entire database.
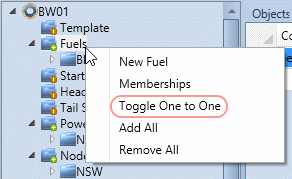 Membership Tree
The Config Window also has an option for switching a membership from One to Many to One to One.
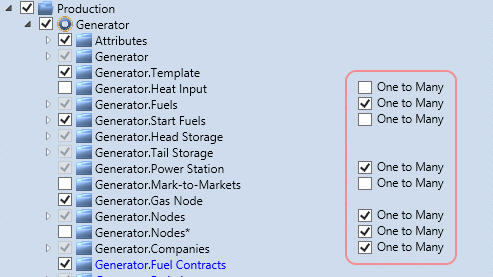 Config options
4. Lists
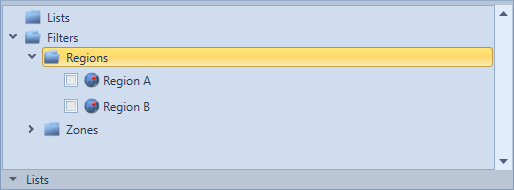
A List is a generic collection of objects. A list can store objects from different classes and categories. You can then filter by the objects in a List.
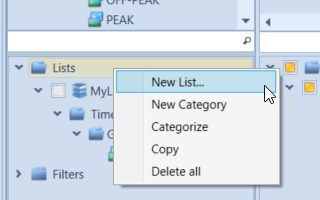
To create a list:
-
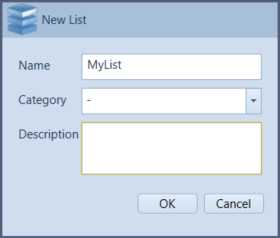
In the Lists pane, right-click on Lists and select New List.
-
In the New List window, enter a Name for the list.
-
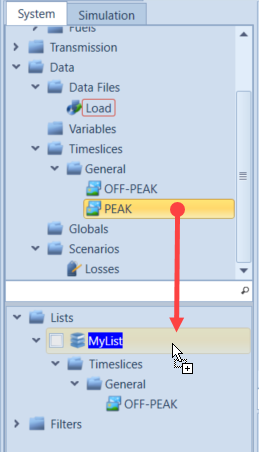
Click and drag objects from the Object Tree onto the new list in the List pane.
-
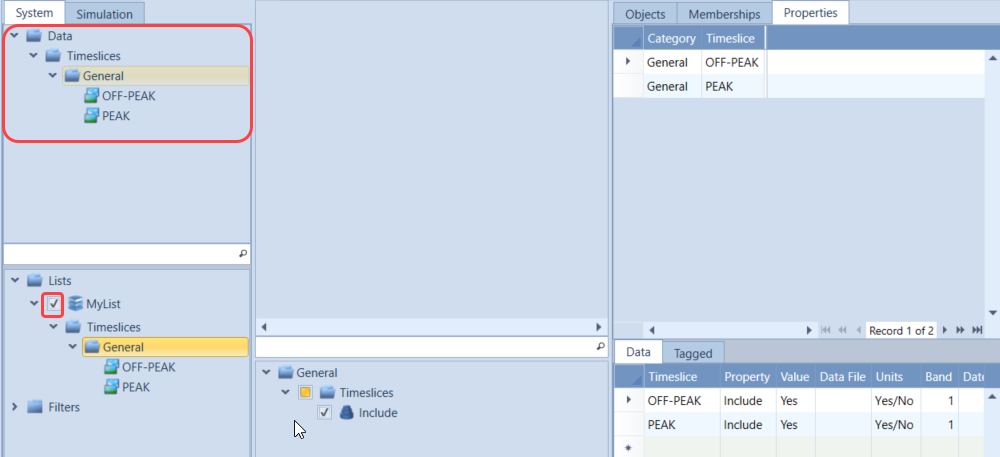
Tick the box next to the list to filter objects by the contents of the list. Objects which are filtered out will disappear from the object tree until you deselect the List in the Lists pane.
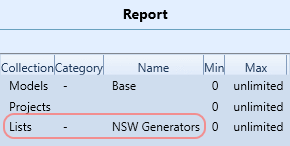
Lists are also used to limit the objects that are reported on during Model execution. Lists can be added as children in a Report [Lists] membership.
List objects also have a number of attributes in the static grid:
If the List is Transient then it won't be saved to disk. This can be useful for creating filters while using PLEXOS. Filters are automatically discarded when the database is closed.
If the List is Inclusive Empty then an empty collection in a List added to a Report object implies that all objects from that collection are included and will be reported on.
Selecting Report will pass the List through to a Solution Database.
5. Templates
A Template is a an instance of an object (of any class) which, through a membership association, other objects of the same class derive their data. By creating a Template membership between one object and another, the child object inherits the property values and memberships of the parent. When property values are set on the child object, those values override those that are inherited from the "template parent". In data grids, inherited values are shown in gray. These are values that the object will use for an execution, but exist for that object because they are defined on a template parent object.

6. Properties
Properties are basic elements used to store the data associated with a power system. For example: load, generation capability, transmission data, etc.
Property TreeThe property Tree allows you to:
- Browse by collection, such as system level or second-level properties (those involving two non-System objects)
- Browse by property group, such as "Unit Commitment" in the System [Generators] collection
- Browse to individual properties
The property tree shows only the properties that have been enabled in Configuration.
Properties can be either single-point (static) data or multi-value (dynamic) data:
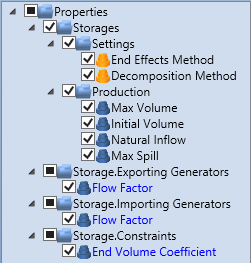
StaticStatic property values are set once and cannot change over time or in any other way. They appear as yellow icons in the Property tree.
DynamicDynamic properties are flexible and can change over time and according to other rules. They appear as blue icons in the Property tree.
Most properties can be set to either static or dynamic, but some properties are logically static-only. These are referred to as Attributes. The attributes are shown at the top of the Property tree using a yellow icon.
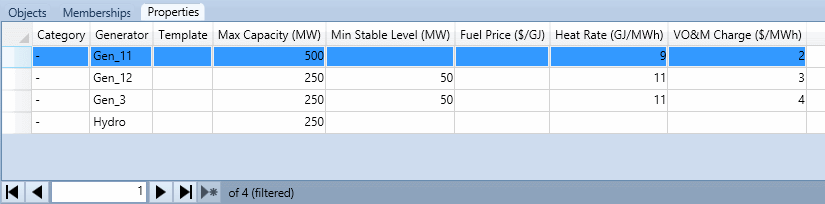
When entering static data, first select the class of objects to which the data apply, such as Generators in the System tree. Then select the Properties grid. The static grid (upper) will now show the objects of that type and the available properties in columns.
Note: By default some properties are configured static and some dynamic, depending on the most common usage of the property typically is; but most properties can be switched freely between static and dynamic entry using the Configuration Manager: see Configuration.
Note: The object names are provided for reference only and cannot be modified in this view. To change an object's name use the data grid on the Objects tab.
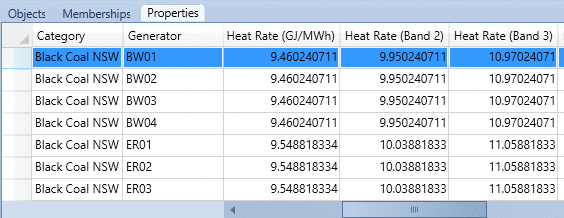
Multi-band dataSome properties can be configured for multiple bands. For example, Generator Offer Quantity and Offer Price are usually entered in pairs with multiple bands (or tranches). Another example is Heat Rate parameters, which are often described by a multi-point function. PLEXOS uses the concept of numbered bands for all such multi-point data. In the static grid, multi-band data are shown in a sequence of columns with the band number on the second, third, (etc.) column.
Dynamic data grid
Dynamic data are edited in a list format. These additional fields are available for dynamic data: Data File, Date From, Date To, Timeslice, Action, Expression, and scenario.
Note: For efficient input of lengthy data series, such as loads, generator bids etc., data points may refer to text files using the Data File field: Data Files.
Dynamic data grid columnsCollection
Not always visible, this helps to qualify the membership on which the data applies.
Parent ObjectNot always visible, this helps to qualify the membership on which the data applies.
Child ObjectThe name of the child object on which the data applies.
Note: When you select a particular object in the System or Simulation tree, PLEXOS hides the Child Object field since this is implied by your selection.
PropertyThe name of the property. To get help on a property, select the property either in the data grid, or in the Property tree and press F1.
ValueThe value that the property takes.
UnitsThis field shows what units PLEXOS expects for the data. This field is read-only and is shown purely for information. You can change the system of units used in the current database: see File Settings. Some properties indicate a unit using a ~. The ~ will be substituted by the unit specified in the Unit Attribute for the object.
BandUsed to mark the band number for multi-band data (see above).
Date FromSets the date from which the entered value applies. Note that, unless you provide a time part here, the Date To is inclusive. In other words, the value applies from midnight at the start of the day.
Dates are always displayed and entered according to the regional settings in Windows. For example "3/04/2010" is the 3rd of April 2010 in the UK, but is the 4th of March 2010 in the USA. Changing the regional settings does not change the date stored by PLEXOS, it will only change the display format and convention expected when entering dates.
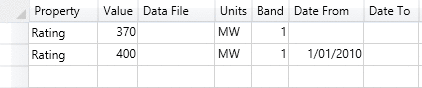 The value 400 will apply from 1/01/2010. Prior to this, the "base" value of 370 MW would be used.
Date to
Sets the end date for which the value applies. Note that, unless you provide a time part here, the Date To is inclusive. In other words, the value applies up to midnight at the end of the day. The simulator reads data in date order (Date From then Date To), so it is most often not required to use the Date To field since values are read in sequence with one overwriting the previous and so on. Date To is usually only used for defining outage using Units Out.
Date To can also be used without giving Date From in which case the value applies from the start of the planning horizon.
In this field you can name a defined Timeslice object or combine Timeslices and patterns.
The data in the field will then apply only to the specified time periods. Patterned data will repeat across the planning horizon. For example, if different values should apply to peak versus off-peak hours.
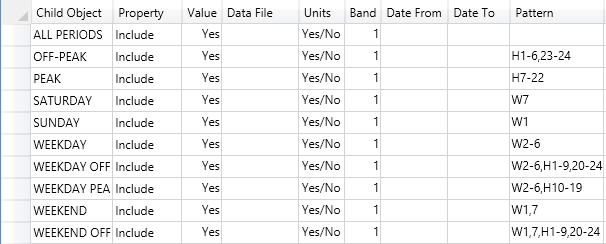
Timeslices are essentially shortcuts for defining a pattern using the syntax described below. To define a Timeslice, simply create a Timeslice object and set the Include property equal to "Yes" with the pattern that applies to it. When editing properties for a Timeslice object itself the Timeslice field in the data grid takes the name Pattern instead, indicating that a pattern is expected, not another Timeslice name. In fact you can use other Timeslice names inside the definition of a Timeslice.
Similarly to dates, if you provide a value only for certain periods, the default value will apply in other periods, thus it is best to define a "complete" set of Timeslices for a datum e.g. PEAK with OFF-PEAK.
Patterns use the following syntax:
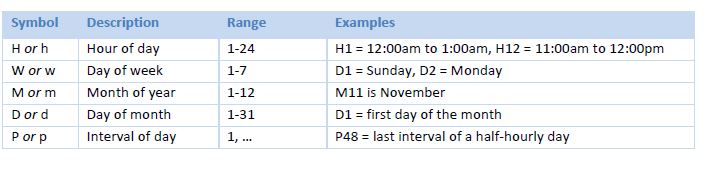
Other supported syntax:
- List of periods: H1, 2, 5
- Range of periods: H6-9
- List of Range: H1, 2, 5-10
- Use commas to "AND" patterns together e.g. H1-3,D2-6 means the pattern applies only the time 12:00am - 2:59am (AND) on weekdays Monday to Friday.
- Use semi-colon to "OR" patterns e.g. H1-3,W2-6; H12-18,W1-7 means the pattern applies the time 12:00am - 2:59am on weekdays Monday to Friday, OR 11:00am - 5:59pm on weekdays Sunday to Saturday.
- Use an exclamation mark to indicate "NOT" e.g. "!SUMMER" would include all periods that are not defined by the Timeslice "SUMMER".
You can prefix the numbers with "0" to help with sorting in the property display e.g. M01, M02: this is highly recommended especially for patterns using a single digit, such as months.
To assist in creating Timeslices which cover the entire Horizon, see Timeslice Editor.
The Data File field is allowed for all properties where the value may vary period-by-period and is more conveniently input as a list of values in a separate text file from the database itself. The value in this field is interpreted either as the name of a Data File object, or as the name of a text file that contains the data. See the section Data Files for more details.
Action/ExpressionIf the Expression is provided with a numeric value, the original value of the property will be changed according to the Action attribute (Note that in the current release, the expression and action do not work with direct input data yet. Expression needs to link to a variable).
- × (multiplied by Expression value)
- ÷ (divide by Expression value)
- + (plus Expression value)
- - (minus Expression value)
- ^ (raised to the power of Expression value)
If the Expression field is linked to a variable name then, the data will be provided by the sample values of a Variable object: see section 4.9 Applying Variable in Variable for more details.
ScenarioTags the data with a Scenario name: see Scenarios. Entering the name of a non-existing Scenario will create a new Scenario.
Validation RulesWhen you execute the database, PLEXOS performs a number of tests on your data to check for logical mistakes or the use of ambiguous combinations of dynamic property fields. Execution will not proceed if any of these validation rules fail, and you will be informed of the required corrections.
Examples of rules that are checked are:
- Values are within a range defined by the validation rules for the property.
- The band field is only used on properties that are allowed to be multi-band.
- Properties are not defined multiple times with different values, without being qualified by some extra information (data ranges, timeslices, etc).
7. System vs Second-level Properties
As well as static versus dynamic properties, there are the following important distinctions between properties:
- The majority of data are stored as System-level properties for objects. For example, the Generator property Max Capacity is stored on the membership of the Generator to the System [Generators] collection.
- Certain other properties exist on memberships to the collections inside other objects. For example, the property [Transport Charge] is specific to a Fuel when it is a member of a Generator Fuel collection.
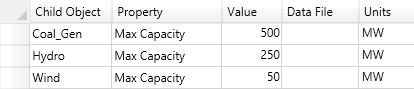 This grid shows a system-level property. Only the child object is specified for each datum. The parent object is not needed to be specified as it is always the System object for system-level properties.
Example
The Max Capacity of the "Coal_Gen" generator is a system-level property (belongs to the Generator object alone) and is stored as:
- Collection = "Generators"
- Parent Name = "System"
- Child Name = "Coal_Gen"
- Property = "Max Capacity"
- Value = 500
 This grid shows a second-level property, where the collection, and both a parent and a child object are specified for each datum.
The cost of transporting the fuel "Coal" to the "Goal_Gen" generator involves both the Fuel and the Generator and hence this property is stored as:
- Collection = Generator.Fuels
- Parent Name = "Goal_Gen"
- Child Name = "Coal"
- Property = "Transport Charge"
- Value = 0.54
Properties like this are called 'second-level' properties because they refer to collections inside objects, rather than the 'first-level' properties which are inside the System. In the Property tree, second-level properties are listed in separate folders underneath the class name.
8. Data Fill Tools
The Ribbon Fill commands can help you quickly fill new data or modify existing data:
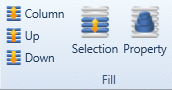
The following commands apply to any grid.
When you have one or a number of specific cells selected across columns:
- Column: Copies the selected cell's value into the entire column.
- Up: Copies the selected cell's value into all rows above the selected cell.
- Down: Copies the selected cell's values into all rows below the selected cell.
The following commands apply to the Dynamic Properties grid.
When you have one or more entire rows selected:
- Selection: Opens the Fill Dialog to set value for each columns in each selected row.
- Property: Opens the Fill Dialog to create new dynamic property rows for each object in the current selection.
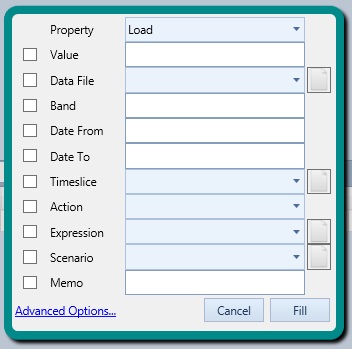 The Fill Dialog
The Fill Dialog allows you to set a fixed value for selected columns. This will populate each selected row in the Dynamic Property Grid with the desired values. Some fields, such as Data File, which accept an object reference, allow you to create a new object by clicking on the icon to the right of the drop-down list.
When creating new property rows using the Fill Dialog, the row configured in the dialog will be added as a new row for each object in the current tree selection.
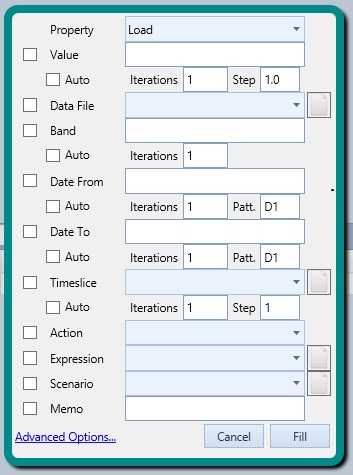 Fill Dialog with Advanced Options
The Advanced Options of the Fill Dialog allow various data to be incremented. For populating a grid selection, the increments occur in parallel for each selected row. For new rows the user specifies how many iterations to increment each value, and this is done for each incremental field selected.
- Value: Accepts iteration count and a step (or increment) value.
- Band: Accepts iteration count.
- Date From/Date to: Accepts iteration count and a pattern which describes how to increment the date.
- Date Increment Pattern:
Format - {unit} {increment}- {unit} can be one of Year, Month, Day, Hour, minute.
- {increment} is an integer.
- Examples:
- D1 will increment the day by 1 over each iteration.
- M4 will increment the month by 4 over each iteration
- D2H12 will increment the day by 2 and the hours by 12 for each iteration. (ie 2.5 days each iteration.)
- Timeslice: Accepts iteration count and a step (or increment) value.
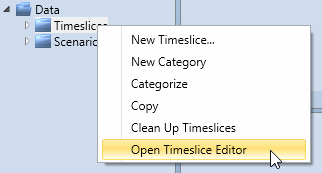
9. Timeslice Editor
The Timeslice viewer is available from the timeslice context menu.
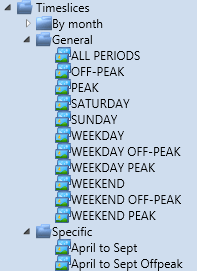
The Timeslice Editor Window displays the main tree of Timeslice objects on the left. From here the user can select particular timeslices to work with. Checking Timeslice objects will populate the properties grid in the bottom-right. Properties checked from the property grid are displayed on the timeline chart.
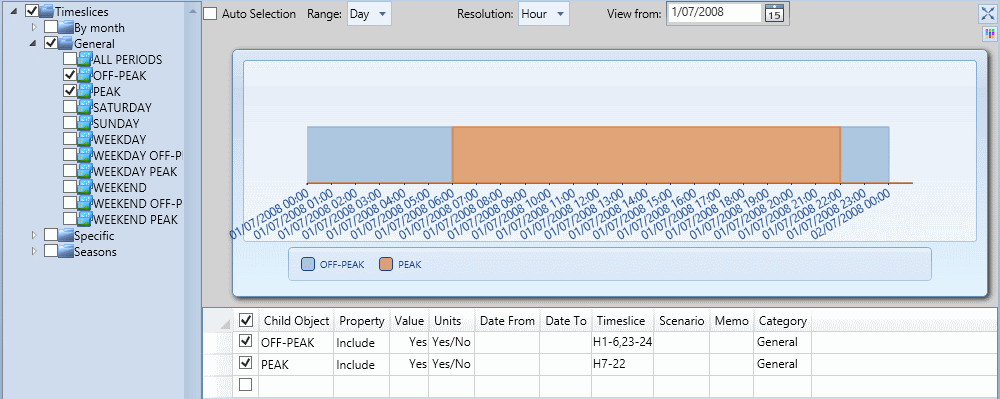
The user can adjust the visual representation of Timeslice using the controls from the top part of the Timeslice Editor window.
- Auto Selection Checkbox: Allows Range, Resolution and View From date to be selected automatically, based on the parameters of timeslices.
- Range combo: Selects the range of dates displayed on the timeline.
- Resolution combo: Selects the date frequency for the charted timeslice data.
- View From: Selects the initial date for the charted timeline.
Zoom into the chart by dragging the mouse over an area of interest. Clicking
 in the top-right corner restores the chart to the original view.
10. Data Files
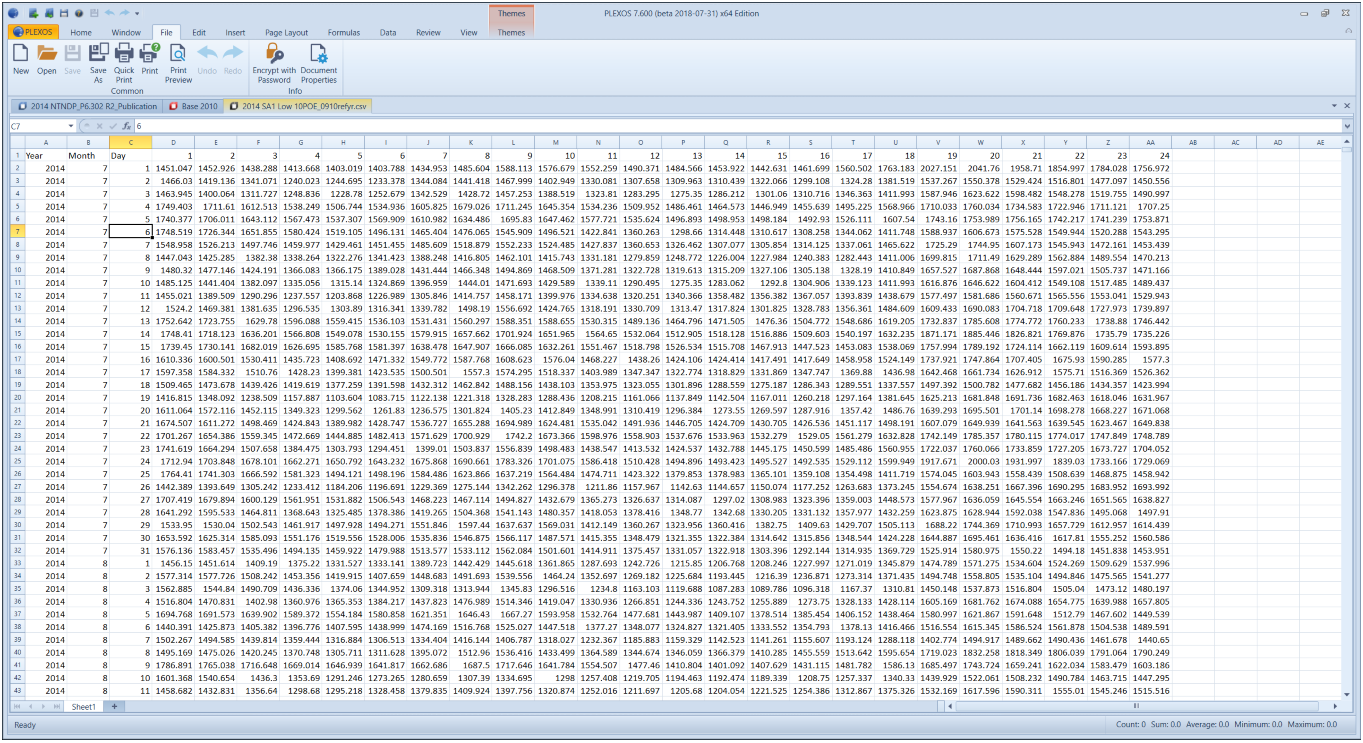
It is recommended that all bulky data are entered into PLEXOS indirectly by storing the data in external text files, rather than entering those data directly into the database. Use of external files is also a convenient way to update data that change frequently, (for example, the load forecast), without having to edit the database itself. In the extreme, one can place all data outside of the input database, using the database only as a shell defining the objects and their relationships. However in most usage scenarios there will be a mix of database and external text file data.
When referring to a file on disk use either a relative or full path. For example:
- LOAD1.csv
- LOADS\LOAD1.csv
- C:\DATA\LOADS\LOAD1.csv
See Flat File Delimited on selecting a delimiter to suit your local requirements.
File FormatsThe help document Text File Formats describes the available formats, but in general the files must begin with a header describing the columns in the file. The available columns are:
- Year, Month, Day, Period
- Name
- Pattern
- Band
- Value
Additional fields then define the data for either periods of day, bands, or for specific objects. The above fields can be used in many different combinations to suit the type of data you are defining. For example, monthly data can be defined with the Year and Month columns alone.
For text file formats other than those listing all period values in columns, the data may be 'compressed' by removing duplicate values.
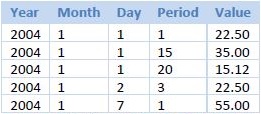 Text File input with missing values.
Multi-band file data
Multi-band data can be stored in text files with either:
- Each column being a band; or
- A specific Band column
You must set the Band field in the PLEXOS dynamic properties grid equal to the number of bands of data you want to read for that object. Alternatively you can read different bands from different files, by defining multiple entries each with a unique band number and Data File.
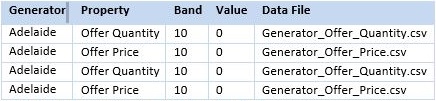 Band Property used with Data File field.
Data Files and Dates
A Data File can be qualified with Date From and Date To, so that you can read different periods of data from separate files.
 Data File used with a date range.
Visualizing and Editing Text Files
PLEXOS provides functions to view and edit existing text data files. To open an existing file:
- Choose Open from the Home tab of the ribbon.
- Change the file filter to Data Files (CSV, TXT)."
- Select the data file and click Open.
The file is opened as a new tab in the PLEXOS interface. From this view you can browse and edit the data. Use the Save command to save changes to the file.
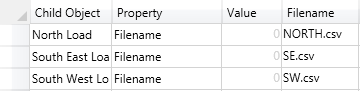
The Data File class of objects allows you to conveniently view data in a text file in a more sophisticated way. For example:
- Create Data File called "North Load".
- Set the Data File Filename property to point to the text file (type the filename in the Filename field).
- Then use the name "North Load" anywhere in the Data File fields as necessary.
- Having created a Data File object and the associated text file you can use the right-mouse button View command to display the data in the text file.
Options for viewing include:
- View as Time Series or Duration Curve/3D Surface
- Log scale or standard scale for curve
- Zoom In/Out (by dragging and selecting and mouse scrolling)
- Range selection
- Graphical statistics
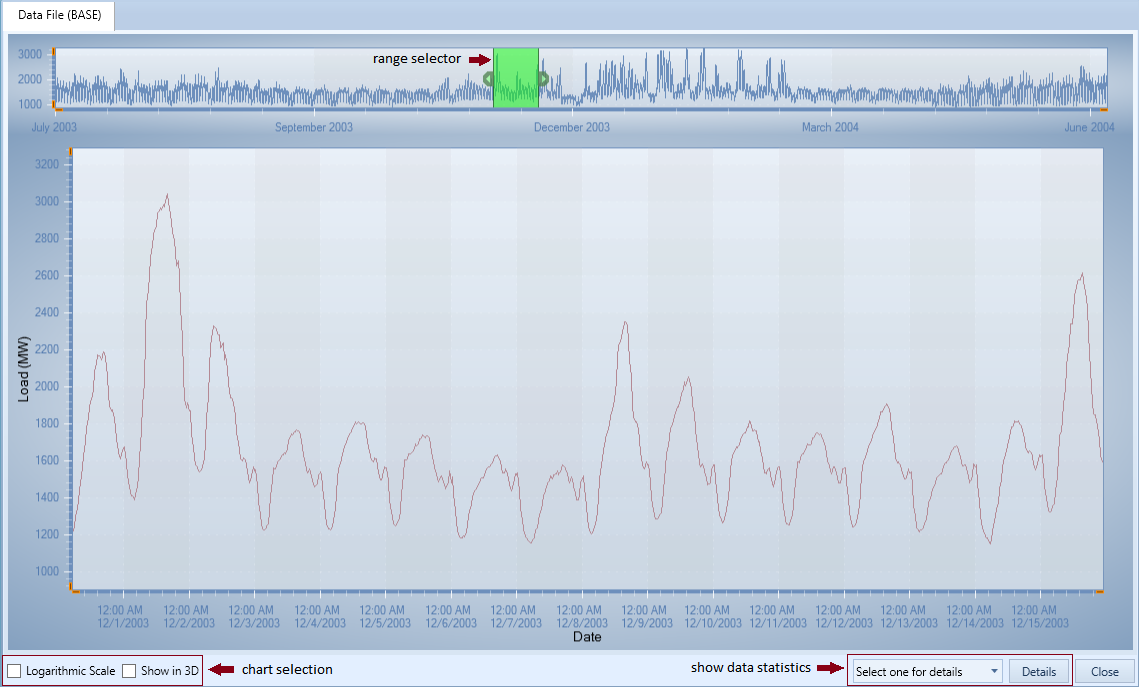
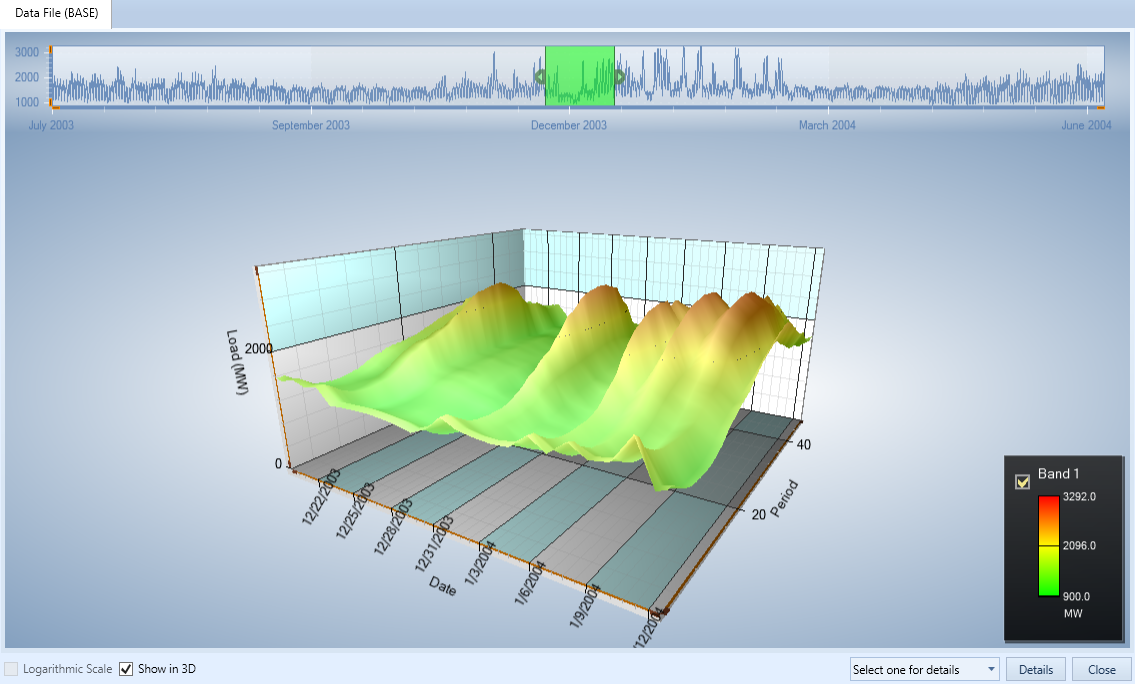
When "Show in 3D" is selected, a 3D surface is used instead of the 2D curve. Range selector can be used in both 2D and 3D charts.
Charts for details can be opened by selecting one series and then click the "Details" button at the bottom-right corner. Three types of chart are provided:
- Density Map - distribution throughout the whole period
- Hourly Distribution - average value in each hour of the day
- Monthly Distribution - statistic for each month
The tab to show details can be closed by clicking the "X" in the tab header.
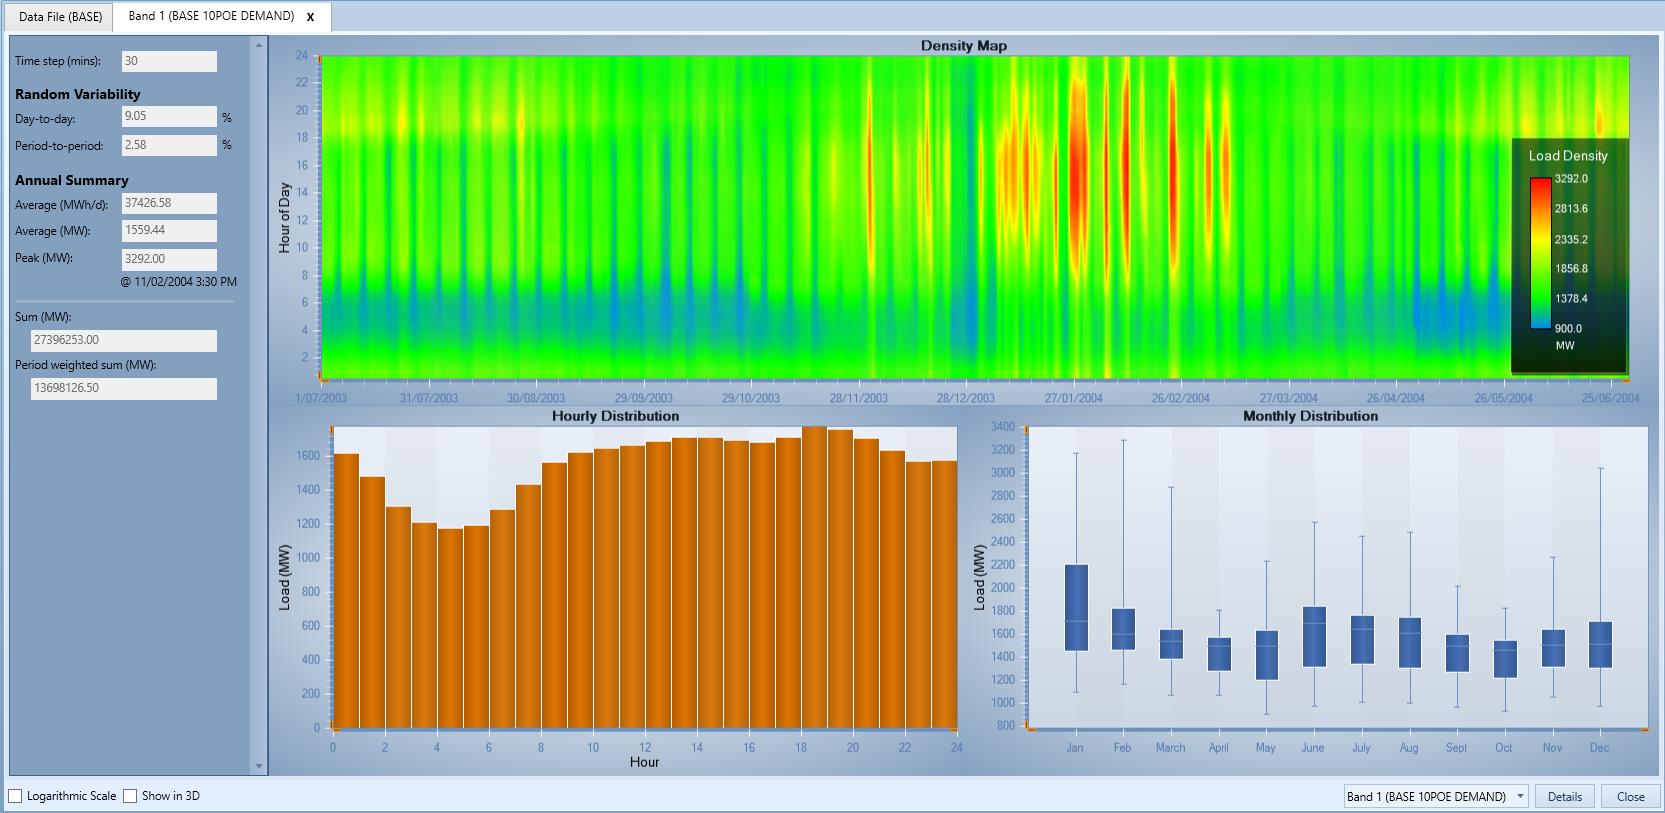
The left hand side panel, provides general statistics about the selected series. The statistics displayed are as follows:
- Time Step (mins) - The total number of minutes each time step represents
- The Period-to-period variability - This is calculated by using the following formula:
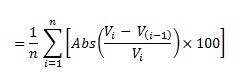
Where Vi is the daily sum of all values and n is the number of days.
- The Period-to-period variability - Similarly this calculation uses the same formula as above, except Vi is the period value and n is the total number of periods.
- Average (MWh/d) - This is the average MWh per day
- Average (MW) - This is simply the average MW value defined
- Peak (MW) - This is the peak MW value defined
- Sum (MW) - The total MW value
Period weighted sum (MW) - This is the period weighted sum of all values (MW).
11. Variables
Variable objects form the foundation of stochastic modelling in PLEXOS. They are not tied to any particular element of power system data and thus are completely generic. This means that any datum in the input file (except another Variable) can be made stochastic, meaning not just the 'usual' elements such as load, hydro and fuel price. And further, any number of variables (stochastic elements) may be included in any model: up to the limit of practicality of sampling across multiple variables.
There are two approaches allowed for randomizing a datum:
- Directly define a set of chronological sequences that can be randomly selected when sampling: These sequences can be correlated. For example, the load in two regions may be correlated, but each can be supplied with a set of load trances with various associated probabilities.
- Define the expected value and information on how errors are distributed and allow the PLEXOS engine to generate the required samples.
Once the Variable input is defined and any correlations entered, there are then options for:
- How many stochastic samples are generated
- How the simulation of LT Plan, MT Schedule, and ST Schedule handles stochastic data. You can choose to run a:
- Single 'expected value' sample, multiple independent samples.
- Stochastic optimization which finds the single optimal solution accounting for uncertainty.
Additionally, Variable can be used as Escalators and Conditions since Escalator and Condition are no longer present since PLEXOS-7.
The enhanced Variable class defines the following attributes and properties:
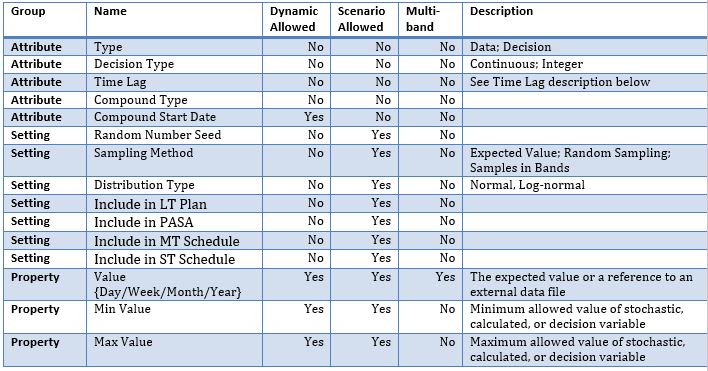
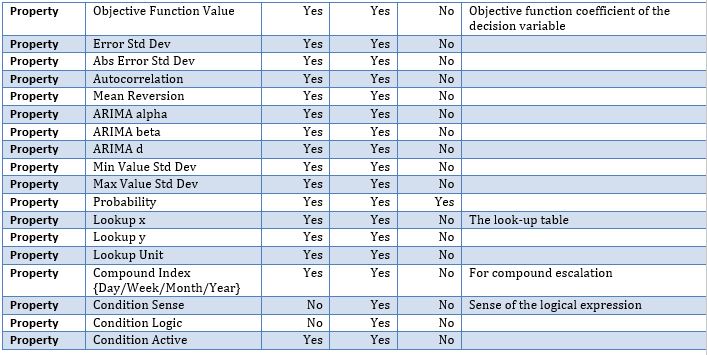
Functions of the Variables are as follows:
- Point a value to a defined list of constants that change each interval/day/week/month.
- Point a value to a stochastic series generated either endogenously or provided by the user.
- Multiply values by an index.
- Multiply values by a compounding index.
Make a value conditional on a logical expression defined by an equation involving user-defined objects
See the PLEXOS Help topic on the Variable class for more information and examples.
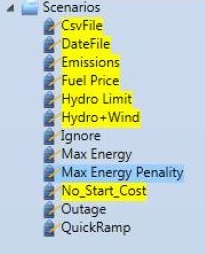
12. Scenarios
Scenario objects allow data to be labelled with a particular scenario name. Scenarios are created in the same ways as other objects. Once created:
- The scenario name appears in the list of Scenarios for dynamic properties.
- Any property can be tagged with that scenario name.
Model objects (the objects that are executed during a simulation) have a [Scenarios] collection. Adding a Scenario to this collection instructs PLEXOS to use all the properties tagged with that scenario name as well as all properties that have no tag, with scenario data taking priority.
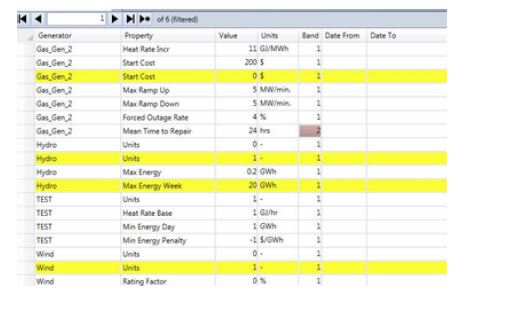
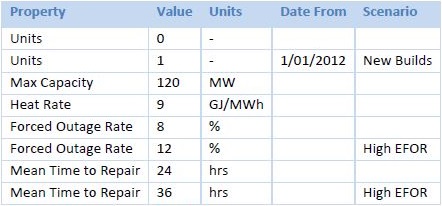 In this example the [Units] property is 1 only when the "New Builds" Scenario is included in the executing Model. Likewise the higher values of Forced Outage Rate and Mean Time to Repair are used only when the Scenario "High EFOR" is included.
Model Scenarios Collection
The following images illustrate how to make use of scenario objects.
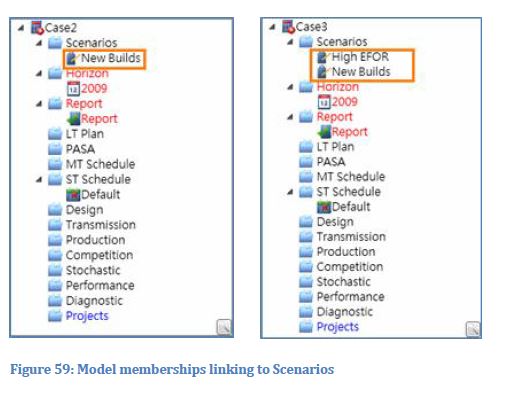 These are two Model membership trees. The Model "Case 2" includes only the "New Build" Scenario, while "Case 3" includes both "New Build" and "High EFOR".
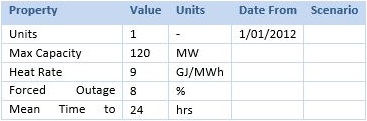 Data used in Model "Case 2"
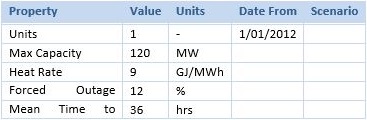 Data used in Model "Case 3"
Default Scenario
A Default Scenario drop-down can be selected to auto-tag new property data. Existing data is unaffected by this selection. The drop-down includes an entry to disable auto-tagging.
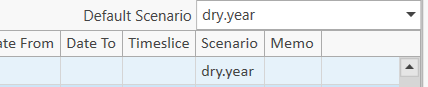 Default Scenario drop-down.
Apply a Scenario to Existing Data
If you have existing data that you wish to 'tag' with a scenario, use the Selection ribbon command in the Fill group:

Clicking the Selection command opens the following dialog box, from which you can select an existing Scenario or create a new Scenario and Fill the Scenario tag for all selected rows with the Fill button.

Scenario Priority
Where two scenarios specify values for the same datum in the same time period, the scenarios are read in alphabetical order. Although this behaviour can be overridden using the Scenario Priority attribute.
Viewing all Data Tagged With ScenariosSelect a Scenario object in the PLEXOS interface and the Properties grid will display all the properties in the database that are tagged with that Scenario name.
Highlight ScenarioHighlight Scenario allows user to highlight listed scenarios individually using right click menu option.
Highlighted Scenarios highlight the tagged data row in the Dynamic property grid, which helps us to search tagged data for the listed scenarios.
Cleared Highlighted Scenario
Highlighted Scenarios can be cleared using right click context menu option Clear Highlight on the highlighted scenario.
Deleting ScenariosWhen you delete a scenario object you are presented with two options:
- Delete all data associated with that scenario.
- Promote the data to 'base' level, i.e. keep the data but remove the Scenario tags.
13. The System Object
The System object (at the top of the System tree) is useful for displaying all data in the input file, and it can also be useful for bulk-entry of objects, memberships and properties.