Add Column 
This button adds a column to an Input table. Follow the steps below:
- Click the Add Column button on the toolbar. The following window will appear:
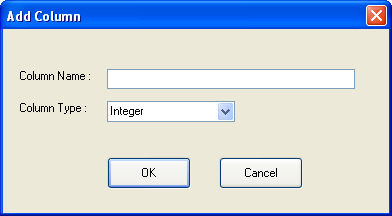
- Enter the Column Name. For optional columns, enter the name exactly as it is stated in the Help for the column selected.
![]() NOTE: NO SPECIAL CHARACTERS are currently supported for XML databases. When creating table or columns names, include only letters, numbers, spaces, and underscores. For the Time Series Hourly or Time Series SubHourly tables invalid column names also include Year, Hour, Month, and Day.
NOTE: NO SPECIAL CHARACTERS are currently supported for XML databases. When creating table or columns names, include only letters, numbers, spaces, and underscores. For the Time Series Hourly or Time Series SubHourly tables invalid column names also include Year, Hour, Month, and Day.
- Select the Column Type from the list. For optional columns, the column type is listed in the Help topic. Allowed column types are:
-
Text – alphanumeric characters, including alphabet, digits and blank spaces (Energy Exemplar recommends avoiding use of special characters). In most cases this is the recommended column type.
-
Integer – a whole numerical value from -2,147,483,648 through 2,147,483,64
-
Single – a single precision floating point that accepts -3.4028235E+38 through -1.401298E-45 † for negative values and 1.401298E-45 through 3.4028235E+38 † for positive values
-
Boolean – True/False or 0/1
- Click OK to add the column to the Input Table. The column will be added to the far right of the table.
After adding a column to the input database, check your results carefully to ensure that the column name and type are entered correctly and the data in the column is being applied to the study.
![]() NOTE: Additional columns are automatically saved to the input database. As such, no Undo is available. Use Delete Column to remove a column once it has been added.
NOTE: Additional columns are automatically saved to the input database. As such, no Undo is available. Use Delete Column to remove a column once it has been added.
Hot Key: Alt+C
![]() Add Column
Add Column