dbCompare 
The Aurora dbCompare tool application is used to compare and review the differences between Aurora databases. The application will support comparing either two Input databases, two Output databases, or two alfc files at a time. A full description of the tool follows below, including Project Dropdown, Compare Toolbar, Customize Toolbar, Results Toolbar and Comparison Report descriptions.
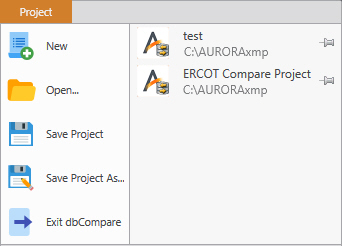
Project Dropdown
|
|
The Project dropdown is used to manage Aurora compare files (.adcproj). These files store the settings such as database path/name, filters, etc. for use in future compares. Note this project does not save the results of the compare, just the settings for the compare itself.
Note that Recent Projects are also available in the right-hand bar. |
Compare Toolbar

-
Compare Databases: Use the Start button to launch the compare. Very large databases with lots of records may take some time. Use the Customize toolbar to limit compare to only selected tables. The Cancel button will stop the compare.
-
Database Selection & Setup: This section is used to select which database files will be used by the tool, either two input databases, two output databases, or two nodal loadflow (.alfc) files.
-
Db Type: Use the dropdown to select the type of database. The application will list all databases supported by Aurora, both input and output formats.
-
Database: Click this button to browse and select the "base" and "compare" databases. Additional information may be required for SQLServer instances, or if the database requires a UserID/Password or other security for those database types which support integrated security (auto-login using domain account). The connection can be tested from the setup dialog.
-
Run_ID: Click this button to apply a filter to the selected database. Select a Run_ID so that records of the database are filtered and only records with this Run_ID value will be used in the compare. This can be useful if multiple runs or study cases have been written to the same database. Leave this blank to compare all rows.
-
Database Name: The selected database will display below the buttons.
-
Swap Databases: Reverses the selected databases to exchange which is the "base" and which is the "compare" file.
-
-
Numeric Display Format: These toggle switches determine how numeric values are displayed in the results.
-
Difference: When selected, the results for numeric compares will show the difference using the formula DB2value - DB1value.
-
Percent Difference: When selected, the results for numeric compares will show the percent change using the formula (DB2value - DB1value)/DB1value.
-
Both Values: When selected, the results for numeric compares will show the values from each database, e.g., DB1value | DB2value.
-
-
Help: This button launches the Help.
Customize Toolbar

-
Reset All Defaults: This button restores factory defaults for the customize toolbar. For example, if individual tables have been previously selected this option resets the form so that all tables are used in the compare.
-
Compare Tables/Columns: This section is used to select which tables and columns to compare from each database. Note that only tables (with the same name) that exist in both databases will be compared.
-
Default Tables/Columns: Compares the default (pre-defined) list of tables.
-
Chooses Tables/Columns: Use this option to select a custom sub-set of tables or columns to compare from each database. The compare will complete faster when limiting the compare to only the data of interest.
-
-
RowMatch Columns: This section is used to determine how rows are matched for the comparison.
-
Default RowMatch Columns: Uses the default columns for the comparison, typically Primary Key in input tables and a combination of columns for output tables, e.g., for Zone output the default compare uses Conditions, ID, LT_Iteration, Risk_Iteration, and Time_Period columns.
-
Choose RowMatch Columns: This advanced feature is used to customize how rows are matched for the comparison. Use the form to select a set of columns which produces a unique key for each row. Custom column sets must be validated before running the compare again.
-
-
Comparison Tolerance:
-
Percent Tolerance: Sets the percent change tolerance level for deciding if a value has changed or not. Percent change differences that are less than the tolerance will not be reported.
-
Absolute Tolerance: Sets the absolute value tolerance level for deciding if a value has changed or not. Absolute differences that are less than the tolerance will not be reported.
-
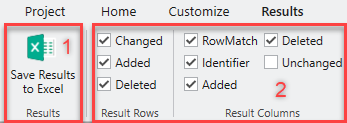
Results Toolbar
-
Save Results to Excel: Use this button to save the compare results in Excel (.xls or .xlsx) for future use. This feature will launch Excel upon save.
-
Result Rows & Columns: These check boxes are used to further filter the resulting data view. When checked, the option will be included in the view.
-
Result Rows: In the example toolbar above, rows will be included if the comparison has rows with altered/changed data, data added in the comp database or data has been deleted.
-
Result Columns: In the example toolbar above, columns will be included that are defined as RowMatch columns, a column Identifier, or if the compared data has changed, or been added or deleted. This view would not contain columns with unchanged data.
-
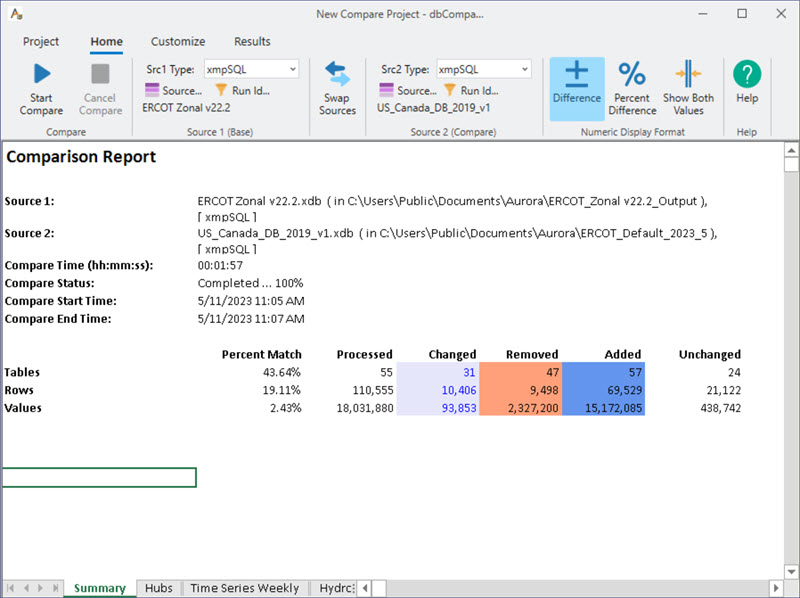
Comparison Report
The Database Comparison Report workbook contains the results of the database comparison. The first sheet, called Summary, is a summary of the changes including various statistics. Each subsequent sheet, named for the table it compared, contains the differences for one table. If there are no differences, no sheet will be produced for that table.
Summary Window
The summary window updates as the application is executing and contains a complete comparison report after the run has completed. The results report include:
- The database names/filenames being compared
- The elapsed time it took the process to complete
- The status of the process
- The date/time the comparison run was started and completed
- The total number of tables, rows and values processed
- Detailed information about the number and types of differences for each table, row, or value
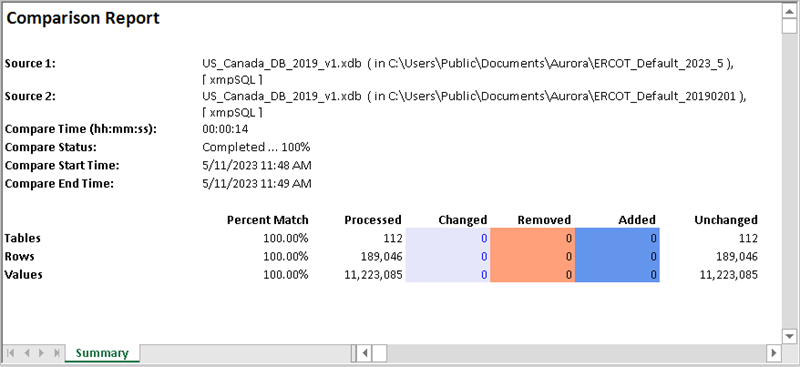
Table Reports
The individual table reports show changes as described below.
-
Text Changes - Base vs. comp changes in text fields will be displayed as "Before | After" values. Additionally, numerical values will use this convention if the Show Differences Only option from the Customize toolbar is not selected.
-
Numerical Difference - The resulting difference value will be displayed for numerical fields when the Show Differences Only option from the Customize toolbar is selected.
-
Blue Highlights - Columns or rows highlighted in blue display structural changes to the database that have been added.
-
Orange HIghlights - Columns or rows highlighted in orange display structural changes to the database that have been deleted.
Automating Information
The dbCompare tool can be used for automated projects by accessing via the Command Line Interface.
![]() Productivity Tools
Productivity Tools
![]() dbCompare
dbCompare