PLEXOS User Interface Guide Chapter 10
Contents
1. Introduction
The detail that PLEXOS to set up for a simulation run are:
- A planning horizon over which to run the simulation (defined by a Horizon object)
- A selection of fields to report in the solution file (defined by a Report object)
- A selection of algorithms to run: we will refer to these as simulation phases.
Beyond this there are a set of objects that control detailed simulation settings and these are described later.
A new PLEXOS input file is already set up to execute a simulation for a single day using the full chronological model (ST Schedule simulation phase).
2. Model
In PLEXOS the Model class acts as a container for all the settings required to define a simulation run. The complete functionality of the Model class is described later. For the time being we describe how to review/change the basic settings so that you can execute a simulation.
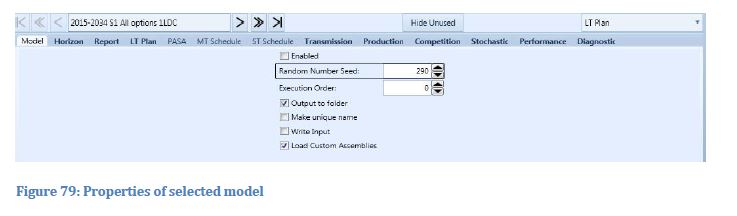
To begin, open the Model properties window. You do this by going to the Simulation tree, opening the Models collection and double-clicking the Model you want to execute. By default there is a just one Model in this collection. The Model properties window is shown below. The tabs in this window allow you to review all the simulation settings such as Horizon, Report etc.
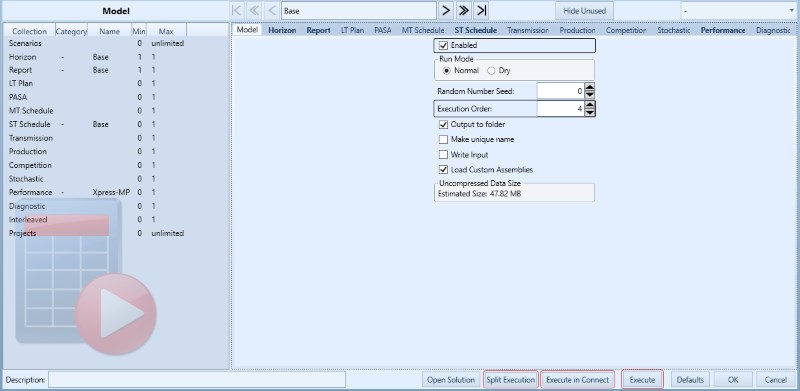 Model properties
Note that the Model can be executed immediately using the Execute command on this form. But in general you can launch multiple Models in a batch using the Execute command from the program ribbon.
Uncompressed Data Size Estimate
The data size estimate is not an estimate of the final '.zip' file size for a compressed XML solution but instead an estimate of the uncompressed data files (ie, '.bin') contained in a compressed XML solution. The estimate is calculated by but not limited to the number of objects, planning horizon, report properties enabled, selected phases, statistical modes, number of samples and reporting type selected for a particular model. The reported value is the summation of those models with this reporting feature and set to execute.
Note that the data size estimate is not accurate but is meant as an indication of the data file sizes. This estimate does not consider all possible outcomes that may be influenced by data such as multi bands, timeslices, scenarios or data files.
3. Horizon
The Horizon "Base" Properties are shown below. Note that you can also access the properties for the horizon directly form the horizon object in the simulation tree.
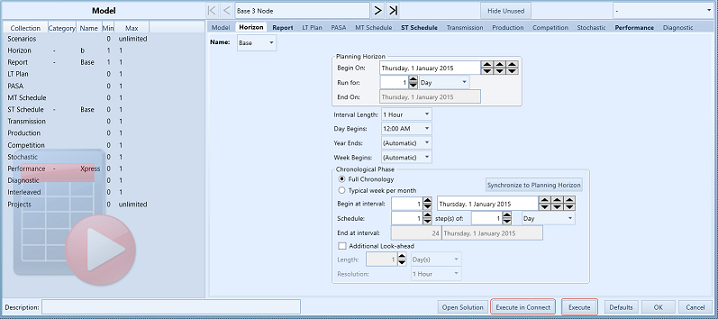 Model Horizon properties
The element on this form are:
Planning Horizon
The simulation will run across the entire planning horizon.
Begin on (Horizon [Planning From])Sets the start date of the planning horizon
Run of (Horizon [Step Count], [Step Type])Determines how many days/weeks/months/years the planning horizon is to run over
End onReports the end of the planning horizon based on the Begin on, and Run for settings
Interval Length (Horizon [Intervals per Day])Sets the duration of each interval (or "trading period") in the market: this is converted to the horizon property [Intervals per Day], for example hourly is converted to 24 intervals per day
Day Begins (Horizon [Day Beginning])Sets the time (hour of the day at which the day starts from the point of view of the market
Year Ends (Horizon [Fiscal Year Ending])Determines when the year will end: this can be set manually by choosing a month or set automatically.
Week Begins (Horizon [Week Beginning])Determines what day of the week a week starts on, this can also be chosen manually or set to automatic.
Chronological Horizon
The chronological horizon applies to the ST Schedule simulation phase, which is the default simulation method.
Begin at IntervalAllows the selection of the starting point for ST Schedule: this date and interval must be inside the planning horizon.
ScheduleIndicates how many intervals and what size to step forward from the starting date and interval. When these settings are updated the end date and interval are calculated automatically. ST Schedule uses a very detailed mathematical model of the system, thus it usually necessary from a computational point of view to solve the horizon in steps. Generally, steps of one week at a time are adequate for moderate sized systems. If only a few intervals/days are required then the ST Schedule can be set to solve in a single step.
End at IntervalThis is automatically calculated based on schedule selections (see above).
Synchronize to Planning HorizonSets the chronological horizon to match the planning horizon as closely as possible: there may be a mismatch if the planning horizon for example is in years and the chronological model is running in weeks, in which case you might need to add some additional time to the planning horizon to fit the chronological horizon, e.g. your planning horizon would need to be 53 weeks long to model a year with weekly chronological steps.
Additional Look-aheadExtends each step of ST Schedule by a number of intervals/days/weeks which improves decisions such as unit commitment or pumped storage dispatch. This is because the optimization has more 'look-ahead': The planning horizon must be long enough to cover the look-ahead of the last step.
4. Report
There are two aspects to the Report settings;
- The types of data reported: every simulation interval, daily summary, weekly etc.
- The list of properties reported: referred to as the Field List for the Report.
From the Model properties window you can select the Report tab to see the types of data reported on, as in the Figure below.
Report Attributes
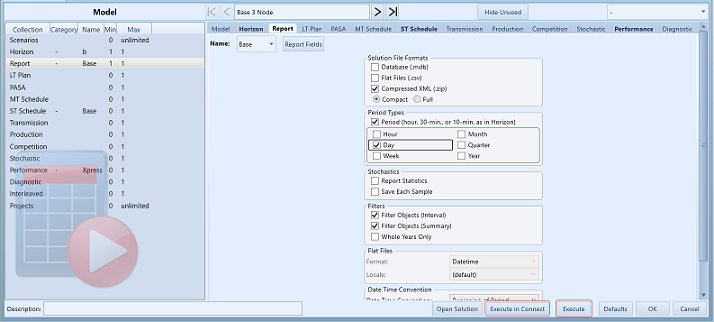 Model Report properties
The Report form has the following options:
Solution File Formats
Determines which output formats are used to write the solution data for each executed Model:
DatabaseIf Microsoft Access is installed on the computer PLEXOS can write MDB solution files (compatible with older PLEXOS versions), but it cannot open them in the user interface. Therefore it is recommended to upgrade to (zipped) XML solution file format.
Text FilesThe solution is written to a set of text files arranged in a folder structure. These text files are in a format that can be read back into PLEXOS as input. Thus this option is suitable when you want to run a sequence of simulations with one simulation reading some aspects of the solutions of previous simulations, for example running a day-ahead and then real time simulations.
XML
By default, PLEXOS uses zipped-XML format for solution files. Zipped-XML means that the solution files are written as a ZIP file which contains a combination of XML and binary data. Zipped-XML is approximately 10 times more efficient in terms of file size than MDB, and there is no limit on the size of the solution file (MDB is limited to 2GB). Zipped-XML is the format required for use with PLEXOS Connect client-server.
PLEXOS opens these ZIP files to view/ query the solution. The files have the same naming convention as previous PLEXOS versions, e.g. Model "Base" will have solution file "Model Base Solution.zip".
Period Types
PLEXOS can automatically summarize the period-by-period simulation results by hour/day/week/month/Quarter/year and this option allows you to choose which of these summaries are written to the solution file. You can also choose to turn off writing of interval-by-interval data.
Stochastic
When running a simulation with multiple Monte Carlo or other samples you can choose to write statistics for each output (Min, Max, and Standard Deviation of values) or even report every sample's results. By default only the mean value will be reported. Note that in the Field List for the Report you can choose exactly which properties have their sample results and/or statistics reported, thus you have complete control over the degree of output of every field.
Filters and Memberships List
The Memberships list on this form allows you to choose which objects are reported on. By default (empty Report collections) all objects will be reported, but for example you might want to report only a selection of Generator objects. To do this first you would add those Generator objects to the [Generators] collection of the Report (by double-clicking the [Generators] collection in the Memberships lists and using the Membership editor), then you can choose how this "filter" is applied, i.e. do you want to report only those objects' interval data, summary data, or both. These controls allow you to precisely control the amount of data reported.
Report Field Window
The list of properties that will be output is edited in the Report Field List. To access this screen you need to open the property window for the Report object. This can be accessed by clicking the Report Fields button the Model Report tab or by opening the property window for the Report object itself (double click the Report object in the Simulation tree or from any Membership window) or select "Report Fields" menu item from the Report object context menu.
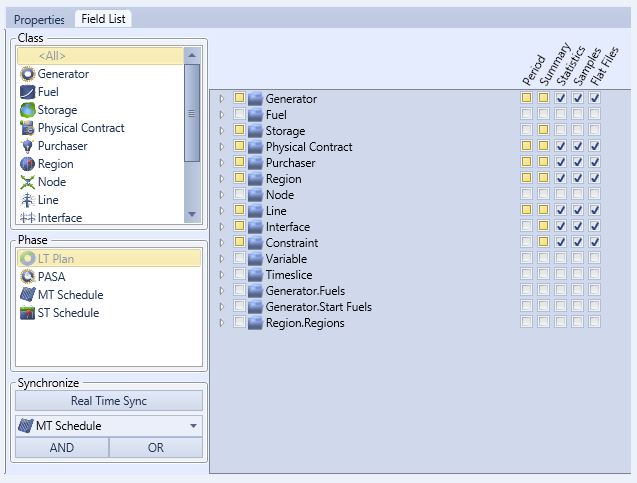
On the left-hand side is:
- The list of classes for which at least one object is defined in the database.
- The list simulation phases for which at least one simulation phase object (LT Plan, PASA, MT Schedule, or ST Schedule) is defined in the database.
- Additional controls to aid synchronising selection of properties between simulation phases.
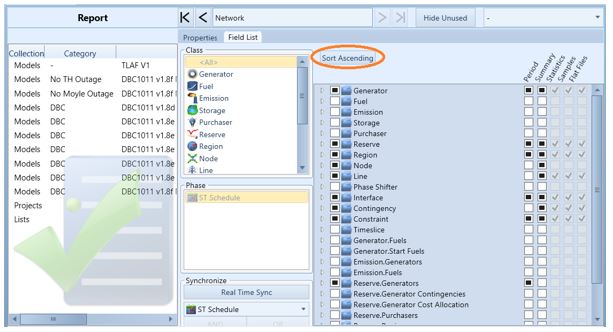
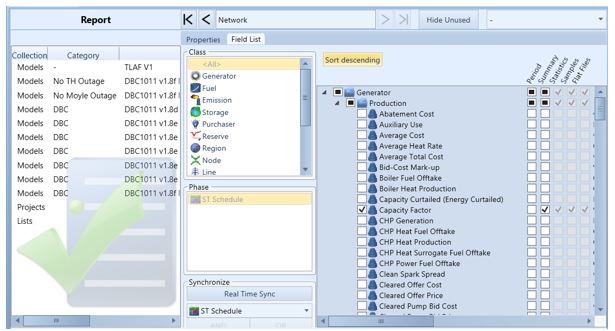
The right-hand side shows the properties available for reporting grouped by class using a tree view with those properties selected indicated with a tick. When you select a particular class in the left-hand side the tree expands automatically to show the selected properties as in below.
Pressing F1 (help) key with any property selected will open the help file with that property's description as the current page.
Reporting Field List Sorting
In order to sort the list of reported properties in the Report Fields page, toggle between "Sort Ascending", "Sort Descending" and "Default". The list opens sorted ascending, the button is labelled with the next sorting option.
You are able to set the following attributes for each enabled property:
Period
Check this box to report the property for every simulation interval (period).
Summary Data Fields
Check this box to report the property for all selected summary period types (according to the list of selected period types in the Report property window).
Statistics
Check this to report minimum, maximum and standard deviation of the property values when running a multiple-sample simulation.
Samples
Check this to report every sample value when running a multiple-sample simulation.
Note: For transmission modelling there are additional reporting switches that can be set in transmission attributes (e.g. the kV level at which transmission reporting begins).
Report field selections are set by simulation phase. The phases LT Plan, MT Schedule, and ST Schedule all share the same list of report properties. PASA uses a subset of those properties. Having the flexibility to select properties by phase allows for very precise control of the report selections and hence of the simulation run time and output file size.
There are a number of ways to make changes across phases. Real Time Sync will modify other phases as you apply changes the current phase. Or if you have made a series of property selections in one phase and wish to synchronize those selections with another phase, use the AND and OR buttons:
Real Time Sync
Toggling this button ON will automatically propagate your changes to the current phase through to all of the other phases, where possible.
If you have made a series of property selections in one phase e.g. in ST Schedule and wish to synchronise those selections with another phase e.g. MT Schedule, use the AND and OR buttons:
AND Command
The AND command will select all properties in the two phases where the property is selected in both field lists, and deselect all other properties for those phases.
OR Command
The OR command will select all properties in the two phases where the property is selected in either field list, and deselect all other properties for those phases.
5. Execution
When all data have been entered and the horizon and reports settings have been established PLEXOS has all the information it needs to execute a simulation.
Model objects are the execution control objects for the PLEXOS simulation engine. Any newly created database will contain one Model . The best way to think of a Model is that it is a collection of controlling parameters, settings, and options that in combination comprise a run of the simulator. An input file can contain any number of Model objects each representing a unique simulation 'run'. Model objects can vary in their:
- Horizon object
- Report object
- The Scenario objects they use and hence the data connected to those scenarios
- Market design, transmission, production, competition, stochastic, performance and diagnostic settings
To execute the currently enabled Model(s) do the following:
- Click Execute from the main toolbar
- The Execute window appears
- Click OK to begin execution
Note: Importantly because simulation settings are an integral part of the Object Model they are subject to the same referential integrity rules of all other PLEXOS objects, so your settings will not become orphaned from the System they control.
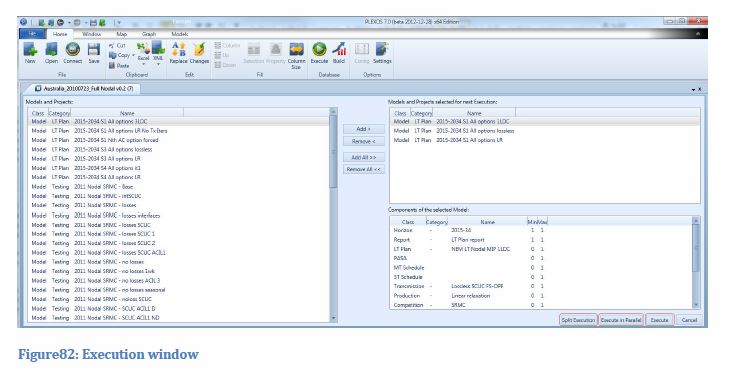
Elements on the Execute form are the following:
Models
Lists available model objects
Models to be executed
Lists model objects that are selected for execution.
Add
Adds the selected model object to the list of those to be executed.
Remove
Removes the selected model object to the list of those to be executed
Execute
Begins execution of the selected models
Execute in Parallel
Executes each selected model separately and runs each execution in parallel. The number of concurrent processes is limited by the number specified in the PLEXOS Settings dialog, under the Execution Tab and labelled "Number of concurrent processes." Simulations which must be run in excess of this number are queued to run as the initial processes complete so that no more than the specified number are concurrently executing. The PLEXOS GUI does not need to remain open once the parallel run has started.
Split Execution
Split Execution provides the option to split models by Planning Horizon, Chronological Horizon, Samples, and Outage Pattern. When the Horizon is split, the dialog prompts for the number of divisions and a units option. The duration of the Horizon will be converted to the specified unit and then divided by the number of divisions. Each division is executed separately, allowing for parallel processing, and the results are combined into a single Solution file when all of the processes are complete, as though it had been run as one process.
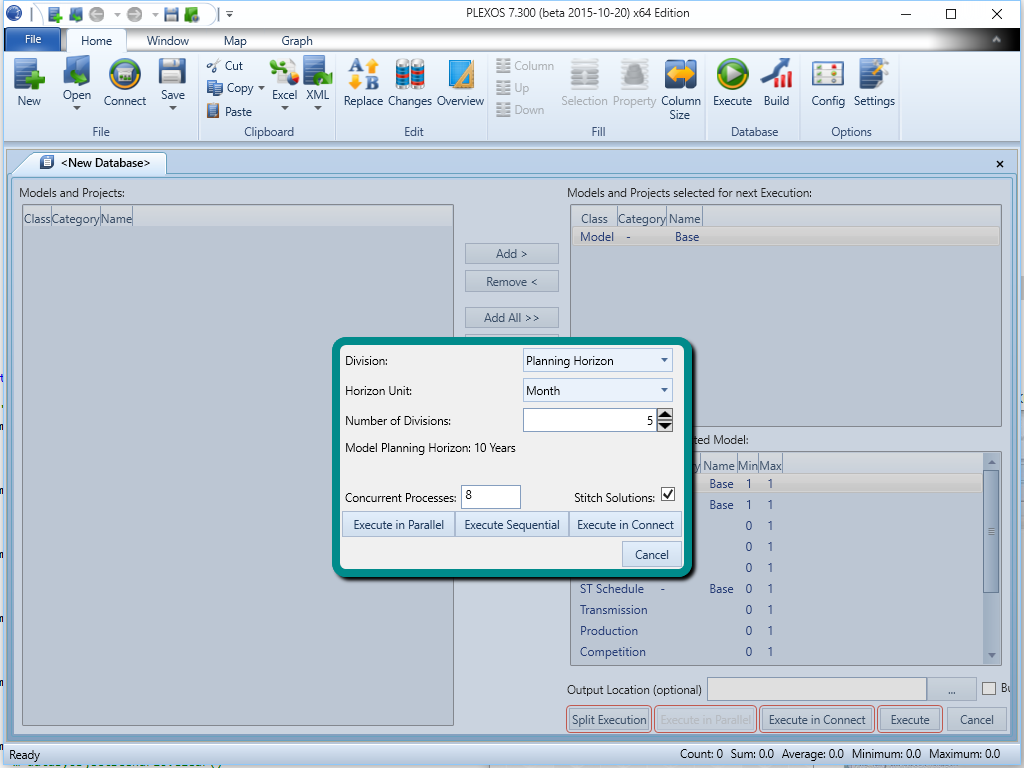 Split Run options from the Execution Window
Spilt Execution allows the user to execute models either in parallel or sequentially. A parallel run will behave as described above under "Execute in Parallel", but the dialog presents a "Concurrent Processes" field in which the user can override the application level setting for the particular run. A sequential execution executes one model at a time (identical to setting concurrent processes to 1). PLEXOS will only consume (check-out) a single license, regardless of the number of "split" simulations specified.
Please note that the "Split by planning horizon" option will not be available, if the horizon has the look-ahead option enabled.
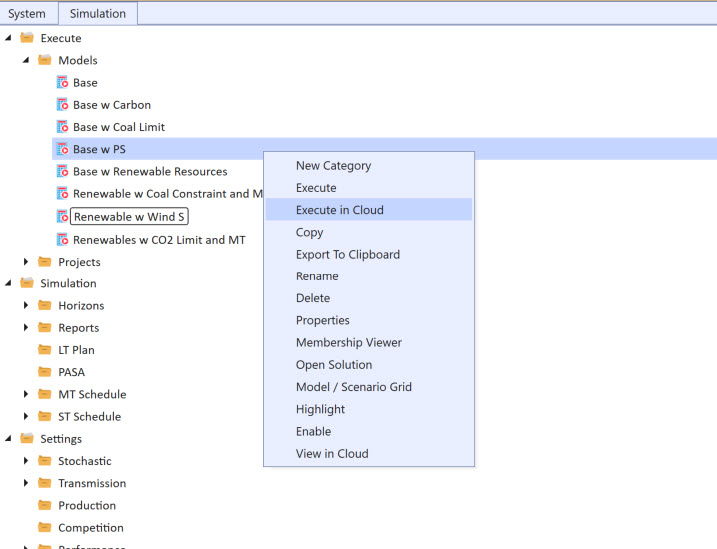
Execute in Cloud
Users now have the option to Execute their models in PLEXOS Cloud. After creating and saving the model, you can Sync Study, which uploads your model to Cloud, and View in Cloud. The options available in the PLEXOS GUI are shown below.

After the study is uploaded to Cloud, you can now Execute in Cloud as shown below.
To learn more about the PLEXOS Cloud Desktop Integration, refer to the PLEXOS Knowledge Base and the following article on the PLEXOS Cloud Desktop Integration.
Command Line Arguments
The arguments text box allows users to fully define the engine simulation argument line, user can type in some advance arguments which are not available in the graphic user interface like "\d" - delete input file after simulation completes. The current command line arguments will be shown when user opens up the execute window, corresponding settings will be updated once user has modified the arguments. Any setting changes from the interface will be updated to the arguments line too.
Arguments \m <model name> and \p <project name> are not supported in the argument textbox, it will be removed from the argument line automatically. Please be mindful that the next argument may be removed also if the \m or \p argument is not followed by a model name or project name. Also, it is always a good idea to enclose the file path in double quotation marks, especially when there are blank spaces inside the file name.
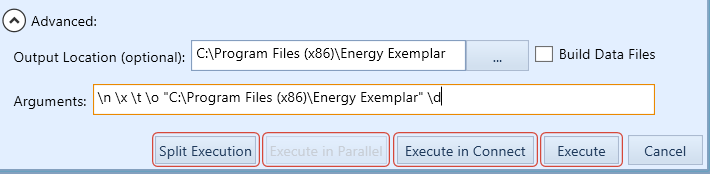 Advanced arguments from the Execute windows
Note: The output location folder option only applies to solution output files and not build data files.
Components of selected Model
In the Components list, each can be configured by right-clicking and selecting Properties.
A properties dialog will then be displayed:
- Horizon: Each Horizon holds a number of properties that determine both the length and resolution of the simulation horizon.
- Report: Report objects hold the selections of output properties to be reported on. Report objects are also used to filter the objects reported on. Placing objects in the collections of a report instructs the simulator to report only on those objects (an empty collection means "report on all"). You can control whether the report filtering applies to interval data or summary data with the options Filter Objects by Interval and Filter Objects in Summary.
- LT Plan: The settings that control the capacity expansion planning function in the simulator are defined on LT Plan objects. Also, see the article LT Plan Performance.
- PASA: PASA is a simulation that focuses on the balance of supply and demand in the medium term. It can be run alone, or as a phase in a more detailed simulation. Also, see the PASA in the Help system.
- MT Schedule: MT Schedule addresses a key challenge in power system modelling and that is to optimize medium to long term decisions in a computationally efficient manner. Primarily this means managing hydro storages, fuel supply and emission constraints, but there are many other constraints and commercial considerations that need to be addressed over time scales longer than a day or week. Also see the MT Schedule in the Help system.
- ST Schedule: ST Schedule is mixed-integer programming (MIP) based chronological optimization. It is distinct from LT Plan and MT Schedule in that it model days of the horizon at full resolution, as dictated by the Horizon Periods per Day setting. At the default setting this means every hour, but the resolution can be customized to any feasible length e.g. 5-minute intervals. Also see the ST Schedule in the Help system
For a description of the Transmission, Production, Competition, Stochastic, Performance, and Diagnostic items see the Help system for these classes.
Multiple models can be executed in parallel or sequentially. The Execute command will queue all selected Model objects for execution and run them in sequence in the order shown in the Execute window. When you Execute in Parallel PLEXOS defaults to two streams. For example if 10 Models are run and two streams of execution are set, then each stream will run five Model objects each. Execution within a stream is sequential. The Model objects are assigned to streams such that the Models run in approximately the same order as they would under sequential execution.
- You may need multiple licenses to run more than one stream in parallel.
- You should only use as many streams of execution as your computer is capable of handling. For example a computer with 8 cores and 8GB RAM might be able to run four streams of execution in parallel (depending on the size of the individual Models), but a computer with only 2 cores and 2GB might not be able to run more than a single Model at a time.
The solution data for each Model will be sent to separate output files/folders: see the Help on the Project class for a description of how to save multiple Model results into a single output database.
The Execution dialog box shows:
- Progress indicators for each of the solvers (Pre-schedule, MT Schedule, and ST Schedule) and associated sub-processes.
- Elapsed time.
- Conditions indicator: either "No Warnings", Warning(s), or "Error".
- A read-out of all log, warning, and error messages.
Note: Any error messages that cause execution to fail will appear in the log window. This log is a lso written to disk under the same name as the solution file, but with ".txt" extension.
By default, the solution file is written to the same directory as the file with the name "Model xxx Solution.zip", where xxx is the name of the Model object executed.
IMPORTANT: Existing solution files are overwritten without warning!
The time of the execution can vary widely and depends on:
- The number and complexity of the objects defining the problem.
- The resolution (hourly, 5-minute).
- The type of algorithm(s) being executed.
- The mathematical solver employed.
Execution time is very dependent on the size of the mathematical programming problem(s) that need to be formulated and solved.
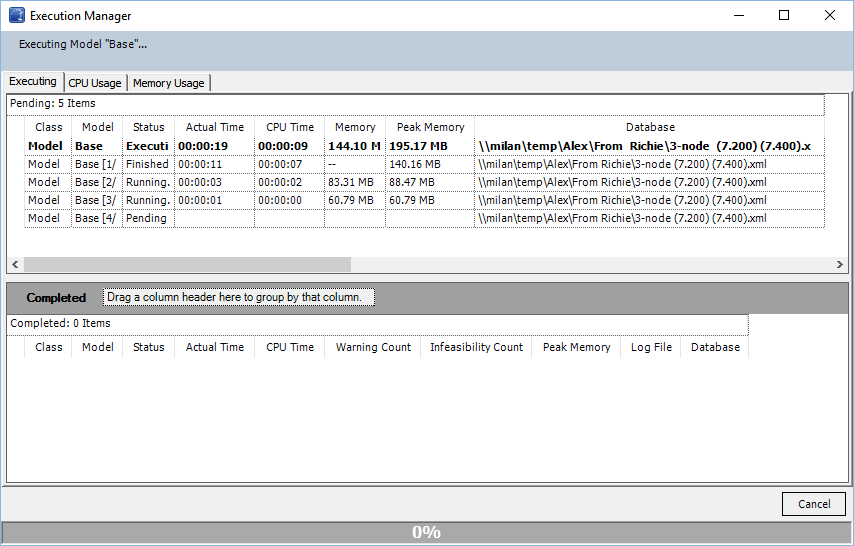
Run through Execution Manager
The Execution Manager in PLEXOS is a graphical execution window that monitor and report on the progress of your model runs. It uses a separate process for each Model or Project running in a batch, which can reduce memory fragmentation.
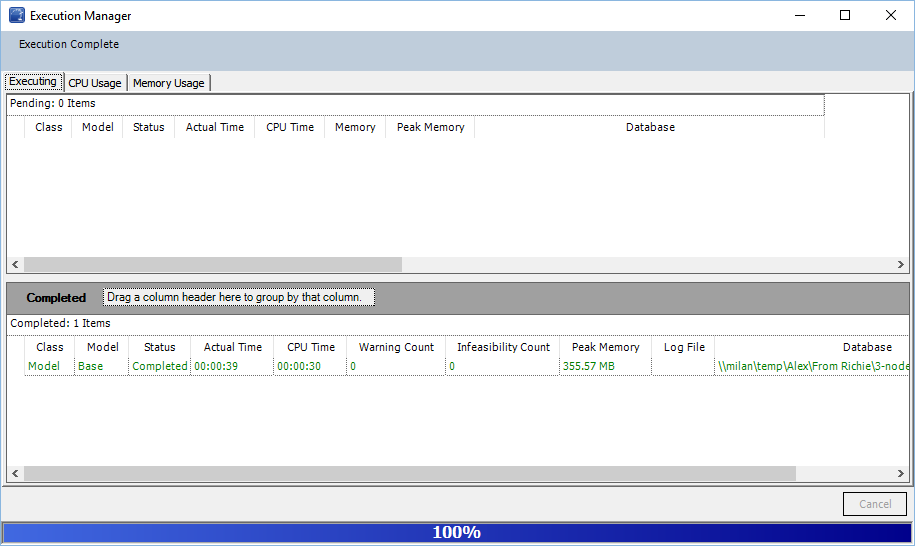
The Execution manager can be used with any one of the execution modes mentioned above (sequential, parallel and split run). Besides the general information about each running model or project, it also monitors the CPU and memory usage.

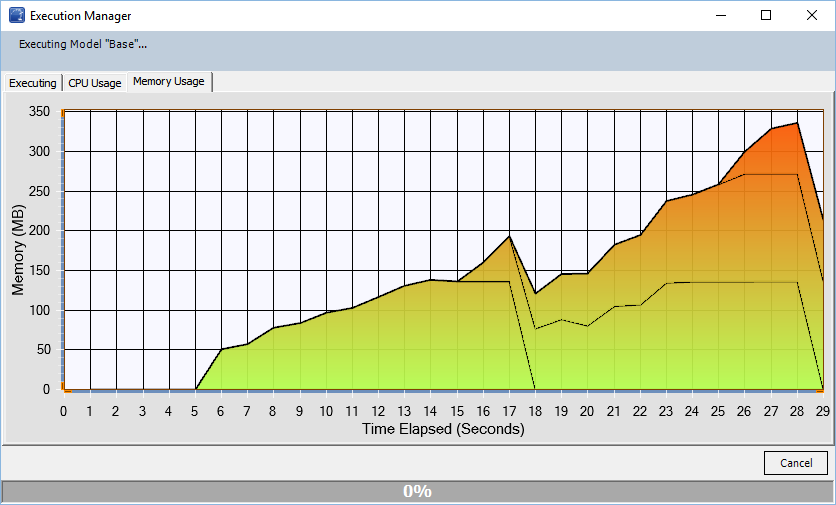
In case of split run, the execution grid and memory usage chart would be a little different as the Execution Manager will display separate information for each split. The following chart shows that at most four split run executing in parallel:
In such case, the memory usage chart will also split the total memory usage for corresponding split processes:
6. Detailed Simulation Settings
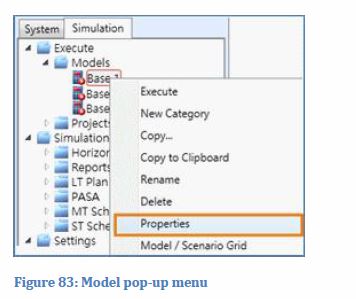
Simulation settings are contained in a number of separate components defined in objects of the Settings group. A Model then uses the settings by having memberships with those objects. The settings objects (called Model components) that will be used by a Model are displayed in the Model property dialog. This dialog is accessed via the right-mouse button pop-up menu for the Model in the Simulation tree.
In order to locate the Model object pop-up menu:
- Select the simulation tree
- Open up the Models collection
- Right click on the model object you wish to edit and select properties.
To change a simulation setting you need to access the properties of the components. For example, to change the settings related to the horizon (the timeframe over which the simulation is run), select the Horizon tab in the Model properties window. You can also access these properties directly on the Horizon object itself from the Simulation tree or anywhere you see the object in a Membership list.
Tip: Double-clicking the object in the Memberships list will also bring up the memberships editing form where you can change the associated components.
Note: The components list shown below is also available from the Execute dialog.
7. Models and Scenarios
For a problem of any complexity you may wish to change the values of certain data according to a number of possible scenarios. When PLEXOS executes your simulation it actually executes the system as defined by a Model object, not all the data in the file. As well as having separate settings such as Horizon and other options, Model objects have a collection called [Scenarios].
A Scenario is an object that is used to 'tag' (or label) some data: see the section Scenarios for more details.
The list of Scenarios used by a Model is defined by the memberships and can be viewed in the Memberships tree under the Model.
The dynamic property grid will show all the Scenario data for the selected model when you select the Scenarios collection under a Model.
For convenience you can also use the Model/Scenario Grid to review and change the memberships of Models and Scenarios. This grid is accessed from the right-mouse button menu of a Model or the Models collection. Use the check boxes to turn on/off a Scenario in a Model. This causes the appropriate membership to be created/deleted.
