Filter 
Aurora provides a Filter option very similar to Microsoft Excel. Filtering is a quick way to view only a subset of data within a table. A filtered list displays only the data that meets the specified criteria. Follow the steps below to apply a filter:
1. Select the Filter button on the ribbon and the following window appears:
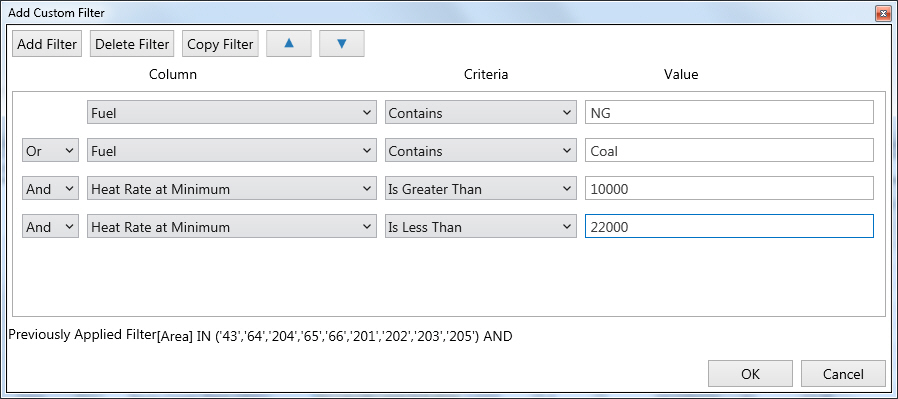
2. Click Add Filter to add additional criteria to the form.
3. Using the first dropdown, select the Column name you want to filter on (or type in the column name exactly as it appears). The form will default to whatever column was selected in the table when the form was launched.
4. Select the Criteria you wish to use (e.g., contains, equals, does not equal, etc.) using the second dropdown. To use numeric filters (e.g., is greater, is less than or equal to, etc.) mark the Check For Numeric Filter box.
5. Enter the Value you want to filter on, or select text using the third dropdown arrow.
![]() NOTE: When filtering, the filter dropdowns will only display approximately 100 unique items in the column and will only identify options in the first 5000 records. Therefore, if the desired item does not appear in the dropdown, type the item into the appropriate field.
NOTE: When filtering, the filter dropdowns will only display approximately 100 unique items in the column and will only identify options in the first 5000 records. Therefore, if the desired item does not appear in the dropdown, type the item into the appropriate field.
6. Repeat above step for additional columns, if desired.
7. When all the selections have been made, click OK and the data table will display using the filter selections. Click Apply to activate the filter, but leave the form open for further use.
Filtering Tips
-
Applying a filter does not change the contents of the underlying table. Use Save as Quick View to save the filtered view of the table as a Quick View. See Using Quick Views for more information.
-
To remove the filter, click Clear Filter/Sort on the toolbar or the Remove button in the Custom Filter window.
-
To apply a filter without closing the Custom Filter window, click Apply.
-
To filter on blank columns, select "equals" and leave the third criteria box blank.
-
To filter out the blank columns (i.e., view only non-blank columns), select "does not equal" and leave the third criteria box blank.
Use the Filter Dropdown on the Data Table Toolbar to apply quick changes to the filtered view.
![]() NOTE: It is best to avoid using special characters in fields referenced by filters.
NOTE: It is best to avoid using special characters in fields referenced by filters.
Hot Key: Ctrl+F
![]() Filter
Filter