Options
This window includes options for customizing Aurora in several categories. Option settings are saved for each computer user account.
General
User PreferencesUser Preferences
These options customize how Aurora stores files:
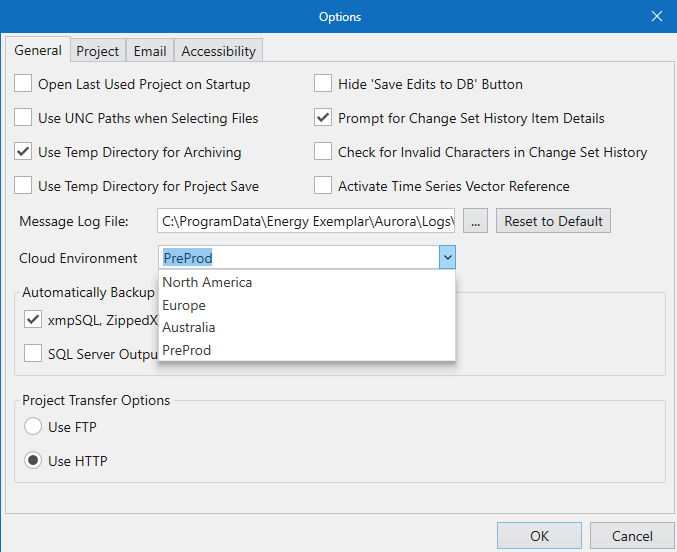
Open Last Used Project on Startup
The current default requires that you open the desired project file and database after opening Aurora. When this option is selected, Aurora will automatically open the last used project on startup.
Use UNC Paths When Selecting Files
Selecting this option sets all referenced paths as UNC paths. (UNC is short for Universal/Uniform Naming Convention.) This option is especially useful when using the Project Scheduler in a host environment where projects are located on network shares.
When this option is checked, if a project is already open, the project must be reopened for the UNC paths to appear. The UNC Paths will affect the project file and any referenced files, including the Input database, Output database, Change Set file, Quick View file, and CDS file.
Once this option is selected, the project is opened, and saved with the UNC paths, turning off this option will not get rid of the UNC paths. To change the file references back from UNC paths, this option must be turned off, and all referenced files manually changed back to their non-UNC paths and then the project must be saved. To change the Input database back, “Change DB” must be used and given a non-UNC path.
Use Temp Directory for Archiving
Select this option to archive files. First, files will be saved to the user's Temp directory and then the archive will be copied over to the specified location. This option is useful to help prevent errors when archiving projects to a shared network location.
Use Temp Directory for Project Save
If this option is turned on, when Project Save is used, the project and all of its relevant files will be saved to the user’s Temp directory, under the “AuroraProjectSave” folder. Those files will then be copied over to their intended save location. This will affect the project file, the Quick View file, and the Change Set and Change Set History files if they are being used.
This option will help prevent errors when saving an Aurora project on a shared network. This option should be turned off if Aurora projects are usually saved to a local computer.
Hide 'Save Edits to DB' Button
This option, when selected, disables the ability to use the Save Edits to DB button on the Change Set Ribbon. This option is especially useful to prevent accidental saves to the database.
Prompt for Change Set History Items Details
Check this box to prompt the user to enter Change Set History information. When turned off (unchecked), basic information about the date, user, and changes is still recorded in the history, but the user is not automatically prompted with the pop-up form to enter a description.
Check for Invalid Characters in Change Set History
If a Change Set History is being autogenerated for a Change Set and there are invalid XML characters in the Change Set, it will cause errors when trying to save the Change Set History. When this option is selected, when a Change Set History is being autogenerated, it checks each cell to make sure there are no invalid XML characters in the Change Set. However, this issue is rare and checking for invalid characters can be time consuming, so we default to turning off this option
Activate Time Series Vector Reference
This option activates the Time Series Vector Reference Tool.
Message Log File
This part of the form shows the location of the Messages.log file that stores all messages from the Status window. Custom locations can be set here, or returned to the default locaiton.
Cloud Environment
This option lets you select the region for the Cloud Environment where you will be running Cloud tools. When you open the Cloud tab, there is a Sign In option on the top-right of the screen (maximize screen if you cannot see it right away). This shows the Cloud environment that you will sign in to work with PLEXOS Cloud to run Cloud simulations. For more information, see Cloud Tools Tab.
Automatically Backup Output Database
This option is used to automatically backup existing output databases. If selected, when a run is launched that will write over an existing database, the model will first copy the database as a backup before creating the new database. The backup database is appended with "_bk" and stored in the same location as the original file. The Restore Backup button on the Output Database form can then be used to recover the original data.
![]() NOTE: There is a separate switch for SQL type databases. Use care in selecting this switch, as backups for SQL Server type databases can take some time.
NOTE: There is a separate switch for SQL type databases. Use care in selecting this switch, as backups for SQL Server type databases can take some time.
Project Transfer OptionsProject Transfer Options
These options determine the method of file transfer used for the Send Project to Support feature available from the Account menu.
Use FTP
When selected, data is transferred using File Transfer Protocol (FTP).
Use HTTP
When selected, data is transferred using Hyper Text Transfer Protocol (HTTP). For systems with file transfer restrictions beyond internal networks due to firewall security. This option provides improved file transfer success rates, to and from, Support.
![]() NOTE: FTP and HTTP are unsecured Internet protocols and Energy Exemplar cannot guarantee the security of these technologies. Therefore, Energy Exemplar cannot certify the security of information transferred via these protocols or the FTP and HTTP sites themselves. If this does not meet a client's needs, we recommend the procurement of another procedure for transferring data. Contact Support for more information.
NOTE: FTP and HTTP are unsecured Internet protocols and Energy Exemplar cannot guarantee the security of these technologies. Therefore, Energy Exemplar cannot certify the security of information transferred via these protocols or the FTP and HTTP sites themselves. If this does not meet a client's needs, we recommend the procurement of another procedure for transferring data. Contact Support for more information.
Project
These options are used to customize project file settings and are saved in the project file.
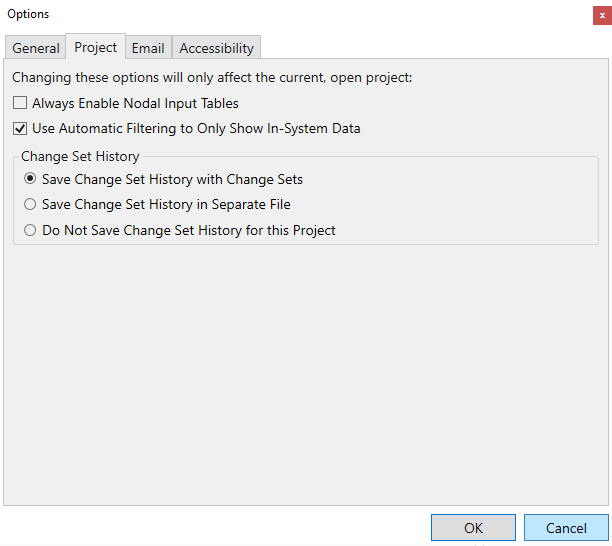
Always Enable Nodal Input TablesAlways Enable Nodal Input Tables
This option always includes the Nodal tables button on the Input Tables ribbon even when the project does not contain Nodal tables. By unchecking this box, the Nodal tables button will only be available when Nodal data is present.
This option enables automatic filtering on select tables which shows a filtered view based on the areas, zones, or pools which are running in the study system. Automatic filters are overridden by the User Default view.
Change Set HistoryChange Set History
These options save the Change Set History in a project.
Save Change Set History with Change Sets
This will save the Change Set History in the same file that the Change Sets are saved in. This can either be the project file or a separate Change Set file. This option is recommended for most projects and is the default setting.
Save Change Set History in Separate File
This will save the Change Set History in a separate file from where the Change Sets are saved. The Change Set History will be saved in a zip file next to the file where the Change Sets are saved. The Change Set History file name will automatically be generated with the name of the file where the change sets are stored, with “_ChangeSetHistory.zip” added to the end, i.e., “C:\AURORAxmp\Nodal_10Bus_Example_ChangeSetHistory.zip”.
This option will not affect exporting or importing Change Sets. The Change Sets and their histories will still be exported to the same file and will still be imported together.
Do Not Save Change Set History for this Project
This option will not save the Change Set History for the project. When this option is selected, Change Set Histories will still automatically be generated when the project is loaded, so viewing Change Set History and Partial Change Sets can still be used, however, those Change Set Histories will never actually be written to the file when the project is saved.
This option is generally only recommended if a project’s Change Sets are extremely large, which can cause longer project saving times or issues saving over a network, and the Change Set History is not being used.
This option will not affect exporting or importing Change Sets. The Change Sets and their histories will still be exported to the same file and will still be imported together.
Email Settings
These setup options are for sending an email at the end of a simulation run. Users must have default permission levels set to allow access to the specified SMTP email server. An internet connection is required. Check with your IT department if you do not know the settings for your email server.
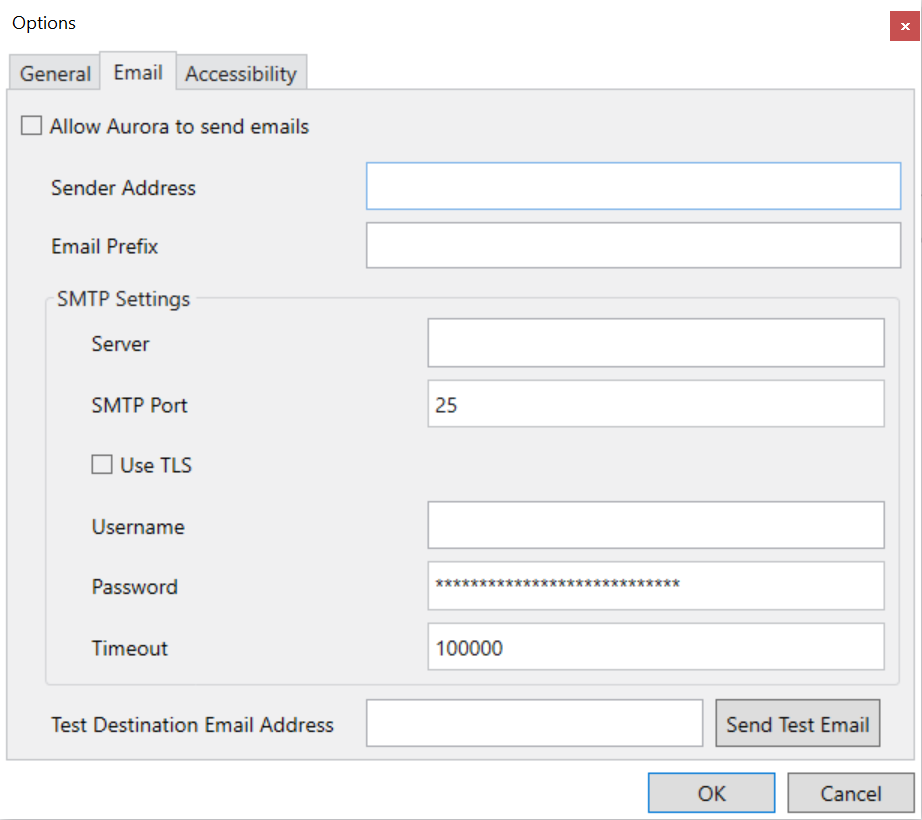
Allow Aurora to Send EmailsAllow Aurora to Send Emails
Check this box to turn on the email option.
Enter the default email address of the sender. This email will appear in the From field of the email.
Use this optional field to enter a prefix applied to all outgoing email subjects.
SMTP Settings
Enter the host name of your SMTP server used for email (i.e., smpt.office365.com).
-
-
Use this optional field to enter the port used to connect to the SMTP server. If this field is blank it will default to 25. Office 365 SMPT Port Number is 587.
-
This optional checkbox will enable TLS (Transport Layer Security) option for connecting to the SMTP server.
-
Use this optional field to enter the account used to connect to the SMTP server.
-
Use this optional field to enter the password for the account used to connect to the SMTP server.
-
Use this optional field to enter the timeout value for the SMTP server in MS. If blank, the timeout will default to 100,000.
-
Test Email AddressTest Email Address
Sends a test email to the specified address to verify functionality.
![]() NOTE: Emails that include image file attachments may be filtered as spam by some email software programs. Please check with your email administrator if you experience issues sending/receiving certain file types.
NOTE: Emails that include image file attachments may be filtered as spam by some email software programs. Please check with your email administrator if you experience issues sending/receiving certain file types.
Accessibility
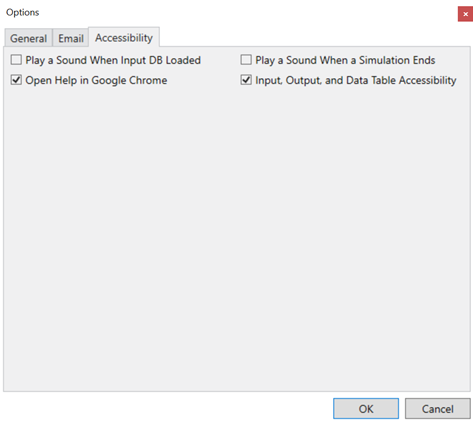
Play a Sound When Input DB LoadedPlay a Sound When Input DB Loaded
This option will sound an alert when the input database has finished loading.
Play a Sound When a Simulation EndsPlay a Sound When a Simulation Ends
This option will sound an alert at the completion of a simulation.
Open Help in Google ChromeOpen Help in Google Chrome
This option will open the Help in Google Chrome instead of a separate Aurora window.
Input, Output, and Data Table AccessibilityInput, Output, and Data Table Accessibility
This option will allow the Input, Output, and Data Table windows to be read by a screen reader.