Change Sets 
Change Sets give you the ability to create and save multiple sets of input database changes layered within a single Aurora project. They are a convenient and efficient way to set up and run sensitivity studies or scenario analysis beyond a base-case set of assumptions. Change Sets enable you to manage the variation in assumptions generally associated with sensitivity or scenario analysis.
Alternatively, you can also manage changes to a base case set of assumptions by making copies of the relevant input tables, editing those tables for the appropriate changes, and then using separate projects or scripting to select different tables for inclusion in the studies.
While Working with Change Sets, you have both the Change Set Ribbon menu and all the Right-Click Menus available.
This next section describes, in detail, how to work with Change Sets including the following topics:
- Understanding the Change Set Tree
- Change Set Status Colors
- Creating a Change Set
- Saving Change Sets
- Active and Inactive Change Sets
- Modifying Existing Change Sets
- Displaying the Contents of a Change Set
- Merging Change Sets
- How Change Sets are Applied
- Managing Runs Using Multiple Change Sets
- Stop Loading Change Sets
Understanding the Change Set Tree
Change Sets are managed through the Input Tables Window in the Change Sets window on the left side. This part of the window gives visual feedback on the status of all Change Sets in the project or change set file (.csf).
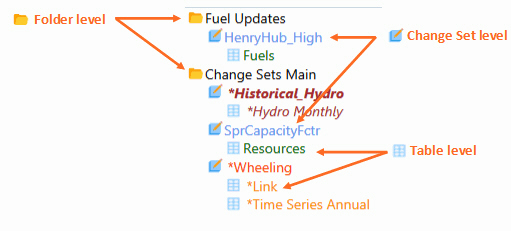
The Change Set Structure has three levels:
FoldersFolders
Folders are used to organize Change Sets. The Change Sets Main folder is created by default and can never be deleted. However, user-defined folders can be created from the New Folder button in the Change Set ribbon and can be deleted. When Change Sets are created, they are placed in the Change Sets Main folder by default. Folders are denoted by the yellow folder icon, and can expand or collapse by clicking on the icon or double clicking the folder name. In the image above, Fuel Updates is a user-defined folder.
Change Sets are automatically created whenever an input table is edited. If no Change Set is active, a new one will be created with the default name New Change Set #. Changes to multiple tables can reside in a single Change Set. They are denoted by the Change Set icon; click on the Change Set icon or double-click on the name to expand or collapse the change tables contained in the Change Set.
Change Tables show the input tables the Change Set has modified. They are denoted by the table icon.
Change Set Status Colors
| Status | Change Set Format | Change Table Format | Example |
| Saved (saved to file) | Blue | Green |  |
| Applied (saved to memory) | Dark Orange w/ Asterisk | Light Orange w/ Asterisk |  |
| Unsaved | Red Bold Italics | Red Italics |  |
| *Active* | Bold | n/a |
Creating a Change Set
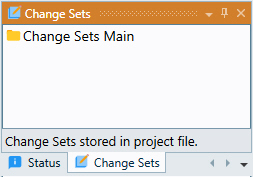
When a Change Set is opened, if the project contains no current Change Sets, the Change Set window will look like the image below. There are no Change Sets present, and there are no active data edits.
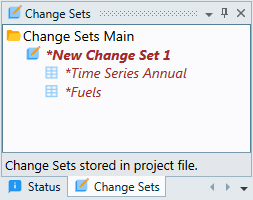
After edits are made to tables, a new Change Set is created. The window shows the names of tables affected. For example, if edits are made to the Time Series Annual Table and Fuel Table, the Change Set window looks like the one below, reflecting that there are current but unsaved edits made to those two tables. As additional tables are modified, the list will grow to reflect those changes as well.
More information on creating Change Sets are provided in the tutorial article Working with Change Sets.
Saving Change Sets

There are four ways to save changes:
 |
Apply Unsaved Changes |
This button is found on the Change Set ribbon, this option does not write changes to the file but they are temporarily saved to memory only. This is useful for quick tests where edits may need to be reverted. |
| Save Change Sets | This button is found on the Change Set ribbon, this option is used to permanently save changes as a Change Set on disk. | |
 |
Save Edits to DB | This button is found found on the Change Set ribbon, this option is used to permanently save the changes to the input database. |
 |
Project Save | This button is found in the Quick Access Toolbar, this option permanently saves the changes to disk. |
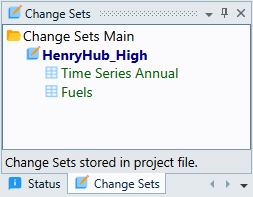
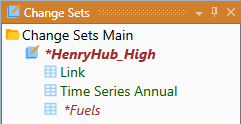
Right-click > Rename to give the Change set a more descriptive name. Once a Change Set has been saved to disk, it will turn blue as shown below. (Bold means it is active.)
Alternately, edits can be committed to the input database by using the Save Edits to DB button which removes them from the Change Set window.
![]() NOTE: Default settings save a Change Set to the project file. Change Sets can also be saved independently of the project file in a separate Change Set file (.csf). See Change Set Ribbon menu for more information. If a Change Set is saved to the project file it will be overwritten when the Open Change Set File method is used to select a new Change Set. Use Import From File to ensure previous work is not lost.
NOTE: Default settings save a Change Set to the project file. Change Sets can also be saved independently of the project file in a separate Change Set file (.csf). See Change Set Ribbon menu for more information. If a Change Set is saved to the project file it will be overwritten when the Open Change Set File method is used to select a new Change Set. Use Import From File to ensure previous work is not lost.
Active and Inactive Change Sets
Active - Change Sets have bold text when active. Typically they will be blue, unless there are changes saved only to memory, in which case they will be orange. When active, all data associated with this Change Set is reflected automatically in the input tables as they are opened and edited. Furthermore, a run performed while the Change Set is active will apply the data to the study. The status bar panel at the lower right of the Input Tables Window will also indicate the current active Change Set. In the illustration above “HenryHub_High” is shown in a bright blue and indicates that the Change Set is active.
Inactive - Change Sets have regular text when deactivated. To deactivate a Change Set, select the Change Set name, and select Deactivate from the ribbon menu. This will remove the effect of this Change Set from all of the tables in the input dataset, and the Change Set will now be shown in a light blue color (or light orange if only saved to memory).
Modifying Existing Change Sets
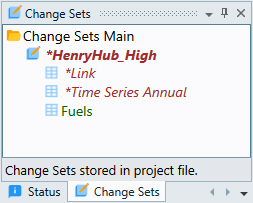
If a Change Set is active and further edits are made to Input Tables, it is reflected by the color coding in the Change Set window. For example, with “HenryHub_High” active, making additional edits to the Time Series Annual and Link tables result in a view like the window below. This indicates that there are new, unsaved changes to these tables.
The Apply Unsaved Changes button can be used to save these additional changes to the active Change Set. If, at any point, you want to reject all these additional edits, use the Revert All Changes button to reject the unsaved changes and reset the data to the last file save of the Change Set. Alternately, all edits to an entire table can be also be deleted using the right-click menu on a selected table.
Displaying the Contents of a Change Set
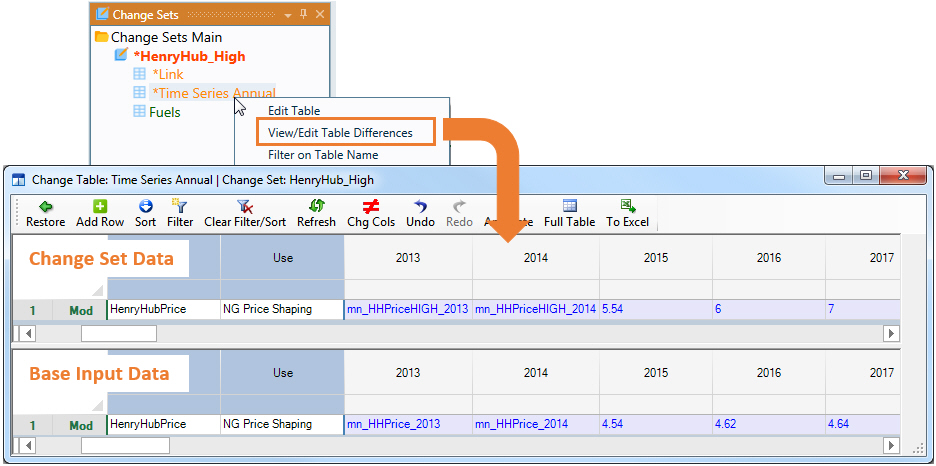
To examine the edits that are held in a Change Set, select a table within a Change Set, right-click, and select View/Edit Table Differences. A new window will open showing the differences between the Change Set values and those in the current input database.
Merging Change Sets
If a project contains more than one Change Set, tables from within them can be merged. See Merging Change Sets for more information.
How Change Sets are Applied
For background, there are two ways to define the data used in a study (or set of studies). These consist of (A) using currently active data, and (B) defining and running study cases made up of combinations of an optional base case with or without any number of saved Change Sets as setup in Study Cases. Option A will produce only one run and set of output, while option B can produce any number of runs and sets of output.
Option A: Using Currently Active Data
If Run Using Active Edits is checked, then Aurora will run with the current input dataset. This will reflect the currently active Change Set and/or any unsaved data edits that have been made (as reflected in the Input Tables window). This method can be used to make quick changes, run and repeat as much as desired without saving data edits either to a Change Set or to the input database. The Run ID used for the study will reflect the status of the data being used. Run IDs are defined as:
-
Input Database - No changes have been made to the input database
-
Current Data - Current unsaved data changes are applied
-
Name of the active Change Set - There is an active Change Set and there are no unsaved data changes
-
Name of the active Change Set (with edits) - There is an active Change Set with unsaved data changes
These four (4) possibilities for the configuration of currently active input data are further described below.
-
Input Database - If there are no Change Sets activated, and no current unsaved edits, Aurora will run the input database. The Run ID column in all the output reports will be labeled “Input Database” for the run.
-
Name of the active Change Set - If a Change Set is active, with no current unsaved edits, Aurora will run the activated Change Set. The Run ID column in all the output reports will be labeled with the name of the Change Set, e.g., "HenryHub_High". This configuration can be confirmed by the Active Change Set region in the upper, right-hand corner of any data table.

-
Name of the active Change Set (with edits) - If there are currently unsaved edits and a Change Set is active, Aurora will run with the activated Change Set and the additional edits. The Run ID column in all the output reports will be labeled with the name of the Change Set and an indicator of unsaved edits, in this case "HenryHub_High (with edits)". This configuration can be confirmed by an active Change Set with an input table highlighted in red. The message "Active Change Set = NameOfActiveChangeSet; also appears in the bottom-right corner of the Input Tables window, as shown in the following image:

Option B: Using the Study Case List
See Study Cases for a complete description of Option B to manage runs using multiple change sets for scenario runs. Study Cases can be used to combine or layer Change Sets without merging them.
Stop Loading Change Sets
In some instances, Change Set files (.csf) may get very large in size and slow the loading of a project file. To break out of loading a large Change Set file (.csf) use the Stop button on the Home Tab ribbon and continue to use the project file.
![]() NOTE: Also, Energy Exemplar cannot guarantee that Change Sets will work with linked tables (Excel worksheets). Change Sets can only work with a linked table if the worksheet contains a Primary Key column, all values within this column are unique, and the Primary Key values remain consistent with those referenced within the Change Set (the primary key values when the Change Set was created). Primary Key values within an Excel worksheet cannot be automatically controlled from the Aurora interface; therefore, management and maintaining validity of the Primary Key values within liked tables is the responsibility of the user.
NOTE: Also, Energy Exemplar cannot guarantee that Change Sets will work with linked tables (Excel worksheets). Change Sets can only work with a linked table if the worksheet contains a Primary Key column, all values within this column are unique, and the Primary Key values remain consistent with those referenced within the Change Set (the primary key values when the Change Set was created). Primary Key values within an Excel worksheet cannot be automatically controlled from the Aurora interface; therefore, management and maintaining validity of the Primary Key values within liked tables is the responsibility of the user.
![]() Data Management
Data Management