Input Tables Toolbar
The ribbon at the top of the Input Tables Windows contains the following buttons:

Change Sets
|
|
Change SetsThis button opens the Change Sets window, which is used to create and manage change sets which represent an incremental set of data changes to the underlying database. |

Database Operations
|
|
New DBThis button creates and loads a new input database with all required tables. The user can then add rows/columns to the tables to populate the data. Be sure to select whether or not to include nodal tables when the database is created. |
||
|
|
Change DBThis button is used to change the input database used by the project. Step-by-step instructions for changing a databaseStep-by-step instructions for changing a database To change the database:
The project file will automatically connect to the new database, as displayed in the status bar on the bottom of the Input Data Assumptions window.
|
||
Reload DBWhen a project file is opened in Aurora the input database is automatically read into memory; with this option the database is loaded again and read into memory any time after a project has already opened. This command is generally only needed if there is a problem with the database loading at project open or the load was interrupted by pressing Stop. The Status column in the Input Tables Window will display the status ("Read" or "Not Read") for each table as the input database is loaded.
|
|||
Save DB AsThis button is used to save a copy of the input database with a different file type. The newly created database will be loaded into the project as part of the file conversion. To convert a database file type:
The project file will automatically connect to the new database, as displayed in the status bar on the bottom of the Input Data Assumptions window.
xmpSQL The xmpSQL type is an SQL database “server” that is embedded in Aurora. This option provides SQL capabilities, especally in output, without using a separate server program and eliminates the need for any other external servers. The size limit on xmpSQL databases is as much as 2 TBs, although performance may decrease after 10’s of GBs. The xmpSQL database type supports much of the functionality of SQL Server and the speed of is also equivalent to SQL Server.
As such, Change Sets created on other database types will automatically convert when applied to an xmpSQL database. This process can take 2-3 minutes, especially if there are large tables affected by the Change Set. You should save Change Sets to a separate Change Set file (.csf) prior to applying them to another database format.
SQL Server The SQL Server type can be used with Microsoft SQL Server or SQL Server Express. One benefit of using SQL Server rather than SQL Server Express, which is free, is that SQL Server does not have any database size restrictions like the Express version. More information about the SQL database size restrictions can be found on Microsoft’s website. To use the SQL Server option in Aurora you must have access to a SQL Server on your network or an installed copy of SQL Server Express. For a more detailed discussion see Recommendations for using SQL Server with Aurora. Detailed SQL Server Setup InformationDetailed SQL Server Setup Information
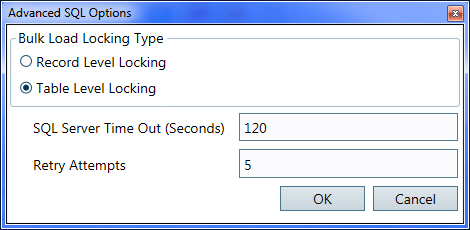
Advanced SQL OptionsAdvanced SQL Options
These advanced settings are used to refine how Microsoft SQL Server is used with Aurora. To access this form, SQLServer must be selected as the input or output database type. Bulk Load Locking Type Use this option if Microsoft SQL Server 2005 or later is installed. A SQL Bulk Load capability can be used when writing to the output database. If available, this option will result in significantly improved performance for database writes over standard SQL Server. In Energy Exemplar testing, the speed proved to be comparable or superior to that of any other output format.
With this option selected, Aurora will only lock a single record (row) of a table while writing the output. All other records and tables will be available for read/write from other applications, including other instances of Aurora.
With this option selected, Aurora will lock an entire table while writing output. All other tables will be available for read/write from other applications, including other instances of Aurora. SQL Server Timeout (Secs) This setting determines how long a query will run against the SQL (SQL Server or MySQL) database before timing out. See Output Queries for more information. The timeout is the amount of time SQL Server will wait before closing the connection with Aurora. This number should be long enough to allow needed queries adequate time to return results, but as short as possible to free up database resources (like connections and memory) to other database users. The default setting is 120 seconds. For the majority of situations, this length of time should be adequate without unduly restricting database resources to other users. However, if the connection to the database is running slow (e.g. due to network traffic) and/or there are extremely large output database tables with complex queries or joins, then the timeout may need to be increased. Conversely, if all needed queries are fast and multiple database users need frequent access, then decreasing this number could improve overall database performance without prematurely closing the connection with Aurora.
This switch governs the number of times the model will retry a SQL Server table write when it fails. Increasing this number can help in cases where brief network outages might cause the initial write attempt to fail. Zipped XML The Zipped XML type is a collection of XML files stored in a zipped folder. XML uses standard tags to define the structure and the content of a file. Having the same XML tags in all files enables you to efficiently index, search, combine, and reuse text-based information. Since XML is text-based and not limited to proprietary computer languages, it enables the exchange of information between normally incompatible systems. Zipped XML has an output file size limit of 4 GB. When creating an XML database, use the 'Browse For Folder' dialogue box to create/specify the XML folder where the collection of XML files will be stored. The following link provide more information on XML: Understanding XML
|
|||
|
|
Export DatabaseThis button is used to create a copy of the input database and save it with a different name and location.
|
||
|
|
Compact DatabaseThis option will reduce the file size of an xmpSQL (.xdb) type input database when performed after tables have been deleted. Effectively it is a "vacuum" function. |


Input Table Operations
![]() NOTE: For all of these options, NO SPECIAL CHARACTERS are currently supported for database formatting. When creating table or columns names, include only alpha or numeric characters and/or underscores.
NOTE: For all of these options, NO SPECIAL CHARACTERS are currently supported for database formatting. When creating table or columns names, include only alpha or numeric characters and/or underscores.
|
|
Add TablesThis button is used to add multiple tables to the input database. Select the desired table type from the list and it will be added to the database with the table type name. To select a new table for use in the study, see In Study in the data grid. Alternatively, use the right-click menu to add only a selected table type.
|
|
|
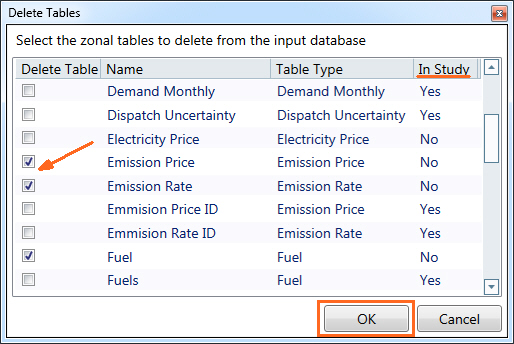
Delete Tables (Del)This feature can delete multiple tables from the input database, and is useful in reducing file size and getting rid of unnecessary or antiquated tables.
Step-by-step instructions to delete tablesStep-by-step instructions to delete tables To delete tables:
|
Import Tables (Ctrl+I)This button is used to import/copy a table from another database or Excel workbook. When Import Tables is selected, navigate to the desired data file then click OK. The tables available for import will appear. Select the desired table(s) to import, using the check boxes, and click OK. If a table of the same name already exists, the new table is given the same name appended with a number (e.g., "TableName_1 ").
When using an xmpSQL, SQL Server, or Zipped XML input database:
|
|
Link Tables (Ctrl+L)This option is used to create links to Excel worksheets, so they can be used directly for input into Aurora. When this button is selected, an Open Database control window will appear. Select the Excel file to be linked, use the check boxes to select the desired table(s) or worksheet(s) to be linked, and click OK. The linked table and path will appear in the LinkPath column of the Data Grid.
|
|
|
|
View Merged Resource Table (Ctrl+M)This option is used to view the entire list of resource options at any time during or after a run. During a run Aurora combines the Resources, the New Resources (if LT study), and the Resource Modifier (RMT) tables to create a "Merged Resource" table. It is the Merged Resource table that is actually resolved for resource information. During the iterations of a LT study, the merged table will have all records from Resources and New Resources tables. Once the LT enters the final, optimized run the merged table will include all resources from the Resources table and newly created RMT.
|
|
|
Convert DemandWhen you press the Convert Demand button, you will be prompted by a dialog for the names of the new Demand and Time Series tables that will be created by the conversion process. Convert Demand will convert the Demand Escalation, Demand Monthly, Demand Hourly, and Demand Monthly Peak data into a single Demand type table. For more details about the Demand Converter and the conversion process, see Convert Demand.
|


Grid Controls
|
|
Hide Unused TablesThis button is a toggle which causes the grid to alternate between showing all tables in the input database and showing only those currently selected for use in the project file (as indicated by a check in the In Study column). |
|
|
Hide Optional TablesThis button is a toggle which causes the grid to alternate between showing all tables in the input database and showing only those that are required by Aurora to run a simulation. |
|
|
Reload GridThis feature will reload and validate the Input Table types used by the project file. This command is generally only needed if there is a problem with the project file loading or the load was interrupted by pressing Stop (on the Home Tab ribbon). Unlike Reload DB, this command does not load the actual tables in the input database, just the viewed grid. |


Nodal Actions
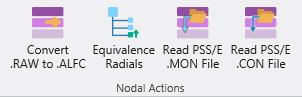
The Nodal Actions buttons are only available in the Nodal Input window and handle data for nodal studies.
|
|
Convert .RAW to .ALFCUse this button to convert a loadflow case that is in the PTI v29, v30, v32, v33, or v34 raw format to the Aurora Nodal loadflow format. (*.raw to *.alfc) The converted loadflow tables are found in the Network Case Input Files.
|
|
|
Equivalence RadialsThis button reduces nodal problem size and speed of solution by eliminating radial lines within a loadflow case. See Nodal Radial Equivalence for more detail |
|
|
Read PSS/E .MON FileTbis button converts a monitor (.mon) file to Aurora Nodal Input table format. Note that the table will not automatically be selected in study. Depending on the data in the original file, these may convert to Corridor Def, Corridor Limit, Contingency, Filter Sets, or Supplemental Branch tables. |
|
|
Read PSS/E .CON FileThis button converts a contingency (.con) file to Aurora Nodal Input table format. Note that the table will not automatically be selected in study. Depending on the data in the original file, these may convert to Corridor Def, Corridor Limit, Contingency, Filter Sets, or Supplemental Branch tables. Unsupported contingency types will be imported, but will be disabled in the model. |


![]() Input Tables Toolbar
Input Tables Toolbar